Receive an inbound SMS
When someone sends a text message to your Twilio number, Twilio can invoke a webhook that you've created to determine what reply to send back using TwiML. This page provides examples of Functions that can serve as the webhook for your Twilio number.
A Function that responds to webhook requests will receive details about the incoming message as properties on the event parameter. These include the incoming number (event.From), the recipient number (event.To), and the text body of the message (event.Body). Other relevant data include the number of media sent and geographic metadata about the phone numbers involved. You can view a full list of potential values at Twilio Request to your Webhook URL.
After a Function is invoked by an inbound SMS, you can take any number of actions. The following examples can serve as a starting point for your implementation.
Before you run any of the examples on this page, create a Function and paste the example code into it. You can create a Function in the Twilio Console or by using the Serverless Toolkit.
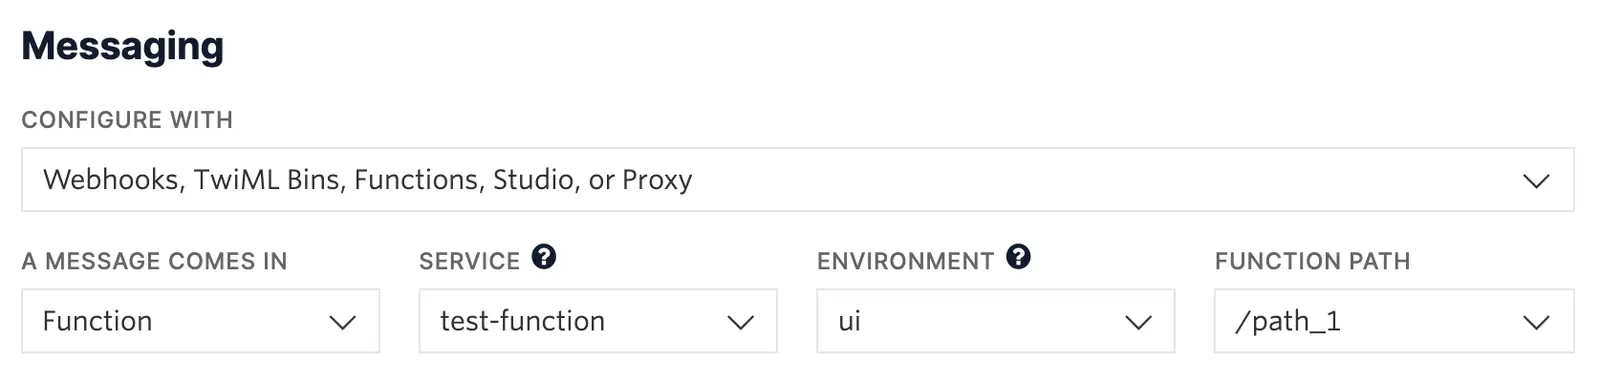
If you prefer a UI-driven approach, complete these steps in the Twilio Console:
- Log in to the Twilio Console and navigate to Develop > Functions & Assets. If you're using the legacy Console, open the Functions tab.
- Functions are contained within Services. Click Create Service to create a new Service.
- Click Add + and select Add Function from the dropdown.
- The Console creates a new protected Function that you can rename. The filename becomes the URL path of the Function.
- Copy one of the example code snippets from this page and paste the code into your newly created Function. You can switch examples by using the dropdown menu in the code rail.
- Click Save.
- Click Deploy All to build and deploy the Function. After deployment, you can access your Function at
https://<service-name>-<random-characters>-<optional-domain-suffix>.twil.io/<function-path>
For example:test-function-3548.twil.io/hello-world.
You can now invoke your Function with HTTP requests, configure it as the webhook for a Twilio phone number, call it from a Twilio Studio Run Function Widget, and more.
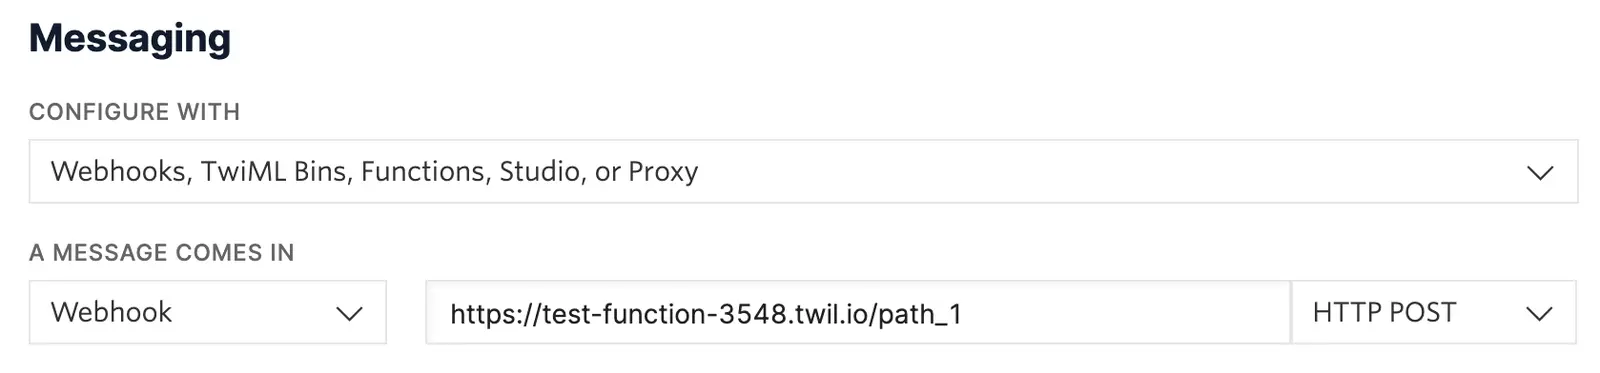
For your Function to react to incoming SMS or voice calls, it must be set as a webhook for your Twilio number. There are a variety of methods to set a Function as a webhook:
Use the Twilio Console UI to connect your Function as a webhook:
- Go to Products & Services > Numbers & Senders > Phone Numbers.
- Select the phone number you'd like to connect to your Function.
- Go to the Configuration Details tab.
- To configure Messaging, choose Edit details in the Messaging section.
- To configure Voice calls, choose Edit details in the Voice and emergency calling section.
- Select the webhook method and provide your webhook URL. Select an HTTP method to handle responses.
- Optional: Configure a secondary webhook in case the primary webhook fails.
- Click the Save button.
For the simplest example, you can reply to the incoming SMS with a hard-coded message. To do so, you can create a new MessagingResponse and declare the intended message contents. Once your message content has been set, you can return the generated TwiML by passing it to the callback function as shown and signaling a successful end to the Function.
1exports.handler = (context, event, callback) => {2// Create a new messaging response object3const twiml = new Twilio.twiml.MessagingResponse();4// Use any of the Node.js SDK methods, such as `message`, to compose a response5twiml.message('Hello, World!');6// Return the TwiML as the second argument to `callback`7// This will render the response as XML in reply to the webhook request8return callback(null, twiml);9};
Because you can access the incoming message text from event.Body, you can tailor the response based on that text. For example, you could respond with "Hello, there!" to an incoming message that includes the text "hello". You could say "Goodbye" to any message including "bye". You can have a fallback response if neither of those conditions is met.
1exports.handler = (context, event, callback) => {2// Create a new messaging response object3const twiml = new Twilio.twiml.MessagingResponse();45// Access the incoming text content from `event.Body`6const incomingMessage = event.Body.toLowerCase();78// Use any of the Node.js SDK methods, such as `message`, to compose a response9if (incomingMessage.includes('hello')) {10twiml.message('Hello, there!');11} else if (incomingMessage.includes('bye')) {12twiml.message('Goodbye!');13} else {14twiml.message('Not sure what you meant! Please say hello or bye!');15}1617// Return the TwiML as the second argument to `callback`18// This will render the response as XML in reply to the webhook request19return callback(null, twiml);20};
Another example uses additional event properties to forward SMS messages from your Twilio phone number to your personal phone. Use this approach when you don't want to share your personal number, such as when selling an item online or interacting with unknown contacts.
This Function will accept an incoming SMS and generate a TwiML response that contains the number that sent the message followed by the contents of the SMS. Because the to property of the TwiML is set to your personal phone number, this message will be forwarded to you instead of creating a response directly to the sender.
For a detailed example, see SMS Forwarding and Responding Using Twilio and JavaScript.
1const MY_NUMBER = "+15095550100";23exports.handler = (context, event, callback) => {4// Create a new messaging response object5const twiml = new Twilio.twiml.MessagingResponse();6// Use any of the Node.js SDK methods, such as `message`, to compose a response7// Access incoming text information like the from number and contents off of `event`8// Note: providing a `to` parameter like so will forward this text instead of responding to the sender9twiml.message({ to: MY_NUMBER }, `${event.From}: ${event.Body}`);10// Return the TwiML as the second argument to `callback`11// This will render the response as XML in reply to the webhook request12return callback(null, twiml);13};
Info
This example hard-codes your personal number in the Function for convenience. For a more secure approach, consider setting MY_NUMBER as an Environment Variable in the Functions UI instead. It could then be referenced in your code as context.MY_NUMBER, as shown in the following example.
Using an environment variable to store sensitive data
1exports.handler = (context, event, callback) => {2// Create a new messaging response object3const twiml = new Twilio.twiml.MessagingResponse();4// Use any of the Node.js SDK methods, such as `message`, to compose a response5// Access incoming text information like the from number and contents off of `event`6// Access environment variables and other runtime data from `context`7twiml.message({ to: context.MY_NUMBER }, `${event.From}: ${event.Body}`);8// Return the TwiML as the second argument to `callback`9// This will render the response as XML in reply to the webhook request10return callback(null, twiml);11};
All the Function examples so far are fully synchronous and only rely on data from the inbound message. Functions can also request data from other services by using modern async/await syntax.
For example, a Function can fetch an online resource (such as an image of a Shiba Inu) and reply with an MMS that includes the image.
1const axios = require('axios');23// Note that the function must be `async` to enable the use of the `await` keyword4exports.handler = async (context, event, callback) => {5// Create a new messaging response object6const twiml = new Twilio.twiml.MessagingResponse();78// You can do anything in a Function, including making async requests for data9const response = await axios10.get('https://dog.ceo/api/breed/shiba/images/random')11.catch((error) => {12// Be sure to handle any async errors, and return them in a callback to end13// Function execution if it makes sense for your application logic14console.error(error);15return callback(error);16});1718const imageUrl = response.data.message;1920// Use any of the Node.js SDK methods, such as `message`, to compose a response21// In this case we're also including the doge image as a media attachment22// Note: access incoming text details such as the from number on `event`23twiml24.message(`Hello, ${event.From}! Enjoy this doge!`)25.media(imageUrl);2627// Return the TwiML as the second argument to `callback`28// This will render the response as XML in reply to the webhook request29return callback(null, twiml);30};
Warning
To use an npm module such as axios to create HTTP requests, you will need to add it as a Dependency.