Manage application state with cookies
Due to the ephemeral nature of Functions, application state for purely serverless apps has previously been difficult to manage, or required storing such information in a remote database. Luckily, with access to cookies with Runtime Handler version 1.2.1 and later, you can now maintain limited state in your apps through cookies!
Let's create a Function named state that leverages per-phone number cookies to store some application state, just like you would with a more traditional, server-based solution! Use the following directions to create a Service and your state Function:
Before you run any of the examples on this page, create a Function and paste the example code into it. You can create a Function in the Twilio Console or by using the Serverless Toolkit.
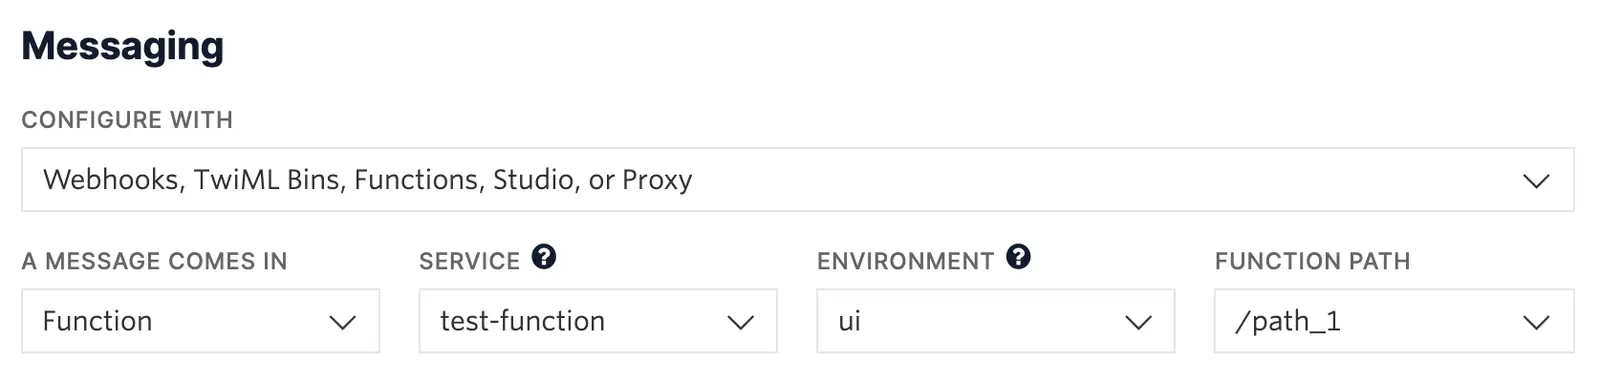
If you prefer a UI-driven approach, complete these steps in the Twilio Console:
- Log in to the Twilio Console and navigate to Develop > Functions & Assets. If you're using the legacy Console, open the Functions tab.
- Functions are contained within Services. Click Create Service to create a new Service.
- Click Add + and select Add Function from the dropdown.
- The Console creates a new protected Function that you can rename. The filename becomes the URL path of the Function.
- Copy one of the example code snippets from this page and paste the code into your newly created Function. You can switch examples by using the dropdown menu in the code rail.
- Click Save.
- Click Deploy All to build and deploy the Function. After deployment, you can access your Function at
https://<service-name>-<random-characters>-<optional-domain-suffix>.twil.io/<function-path>
For example:test-function-3548.twil.io/hello-world.
You can now invoke your Function with HTTP requests, configure it as the webhook for a Twilio phone number, call it from a Twilio Studio Run Function Widget, and more.
1exports.handler = (context, event, callback) => {2// Initialize a new Response and some TwiML3const response = new Twilio.Response();4const twiml = new Twilio.twiml.MessagingResponse();56// Cookies are accessed by name from the event.request.cookies object7// If the user doesn't have a count yet, initialize it to zero. Cookies are8// always strings, so you'll need to convert the count to a number9const count = Number(event.request.cookies.count) || 0;1011// Return a dynamic message based on if this is the first message or not12const message =13count > 014? `Your current count is ${count}`15: 'Hello, thanks for the new message!';1617twiml.message(message);1819response20// Add the stringified TwiML to the response body21.setBody(twiml.toString())22// Since we're returning TwiML, the content type must be XML23.appendHeader('Content-Type', 'text/xml')24// You can increment the count state for the next message, or any other25// operation that makes sense for your application's needs. Remember26// that cookies are always stored as strings27.setCookie('count', (count + 1).toString());2829return callback(null, response);30};
For Twilio SMS, cookies are scoped to the "conversation" between two parties — you can have a unique cookie for each To/From phone number pair. For example, you can store a unique cookie for any messages sent between 415-555-2222 (your number, for example) and 415-555-1111 (the phone number your Function is a webhook for), which will be different from the cookie used between 415-555-3333 and 415-555-1111.
The code here is accepting an incoming Message webhook request, and checking for an incoming cookie named count. If that cookie is not present, count is initialized to 0, the user message is formatted to indicate the start of a conversation, and the count is incremented then set as a cookie along with the response to the sender. If count is already present, its value is included in the message, incremented, and set so that subsequent messages can continue to store the ever-increasing value of count.
To test this and observe your stateless Function managing to track state with cookies, you'll need to set your deployed state Function as the webhook for your Twilio phone number, as shown next.
Warning
Cookies created in this specific scenario (Twilio forwarding SMS messages to your Function or server) are limited to a maximum lifetime of four hours, so if a conversation remains idle for more than four hours, it will be automatically cleared. If you require longer-lasting state, you will need to store it in an external source such as a database.
In any other scenario, cookies set by your Function are only subject to the usual limitations.
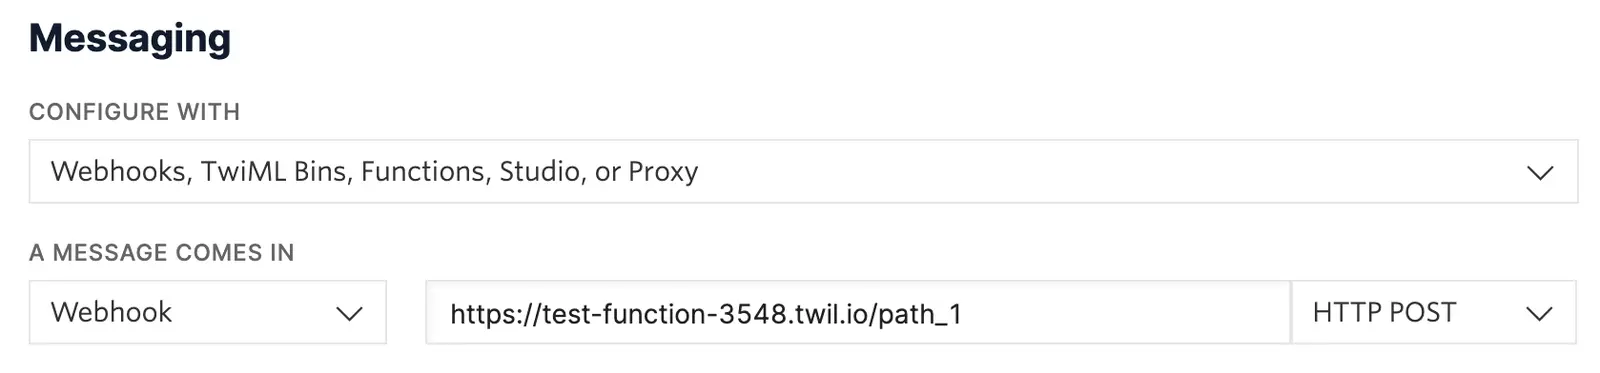
For your Function to react to incoming SMS or voice calls, it must be set as a webhook for your Twilio number. There are a variety of methods to set a Function as a webhook:
Use the Twilio Console UI to connect your Function as a webhook:
- Go to Products & Services > Numbers & Senders > Phone Numbers.
- Select the phone number you'd like to connect to your Function.
- Go to the Configuration Details tab.
- To configure Messaging, choose Edit details in the Messaging section.
- To configure Voice calls, choose Edit details in the Voice and emergency calling section.
- Select the webhook method and provide your webhook URL. Select an HTTP method to handle responses.
- Optional: Configure a secondary webhook in case the primary webhook fails.
- Click the Save button.
Now that your Twilio phone number is directing incoming SMS messages to your Function, try sending a short message to your Twilio phone number.
You will receive an initial response of Hello, thanks for the new message!, and any subsequent messages you send will then receive a response of Your current count is 1, Your current count is 2, and so on.
Cookies support several attributes, which allow you to define aspects such as duration, security, and more. You can set these using the third parameter to setCookie. For example, given the existing call:
response.setCookie('count', (count + 1).toString());
You could modify the count cookie to last for a maximum of 30 minutes (1800 seconds) by setting the Max-Age attribute like so:
response.setCookie('count', (count + 1).toString(), ['Max-Age=1800']);
By default, session cookies persisted by Twilio SMS only last for four hours at most, and you cannot exceed this limit. However, it's perfectly valid to remove a cookie at any time to fit your application's needs.
For example, you could clear the count from the previous example once a condition is met, as shown in this sample:
1exports.handler = (context, event, callback) => {2// Initialize a new Response and some TwiML3const response = new Twilio.Response();4const twiml = new Twilio.twiml.MessagingResponse();56// Since we're returning TwiML, the content type must be XML7response.appendHeader('Content-Type', 'text/xml');89// Cookies are accessed by name from the event.request.cookies object10// If the user doesn't have a count yet, initialize it to zero. Cookies are11// always strings, so you'll need to convert the count to a number12const count = Number(event.request.cookies.count) || 0;1314if (count > 5) {15twiml.message("You've reached the end of the count!");16// In this case we want to remove the count and let the user begin17// a new conversation18response.setBody(twiml.toString()).removeCookie('count');19// Use an early return to respond to the user and avoid other logic paths20return callback(null, response);21}2223// Return a dynamic message based on if this is the first message or not24const message =25count > 026? `Your current count is ${count}`27: 'Hello, thanks for the new message! Message again to see your count update.';2829twiml.message(message);3031response.setBody(twiml.toString()).setCookie('count', (count + 1).toString());3233return callback(null, response);34};
If you save and deploy this new code instead, you should have a very similar interaction with your Twilio phone number. After sending a message, you will receive an initial response, and any subsequent messages you send will then receive a response of Your current count is 1, Your current count is 2, and so on.
The difference is that after reaching a count of five and sending another message, you'll receive You've reached the end of the count!. If you try to message again, you'll find yourself in a completely new conversation. This is a handy way to end interactions, such as if your application has successfully helped a customer, or if your application is a game that the user has won or lost.
Warning
These examples demonstrate adding a single state value as a cookie, but you are free to add more to support your application needs!
Keep in mind, there are limitations on how many cookies can be set, how large they can be, and how long they can persist until expiring.
Info
Curious about what else you can build by using cookies to add statefulness to your Functions? Check out this blog article to see how you can build your own Wordle clone purely with Functions and Assets!