Run Function widget
Studio widgets represent various parts of Twilio's functionality that you can combine in your Studio Flow to build out robust applications that don't require you to do any coding.
Info
New to Twilio Studio? Check out our Getting Started guide.
The Run Function widget allows you to execute Twilio Functions within your Studio Flow.

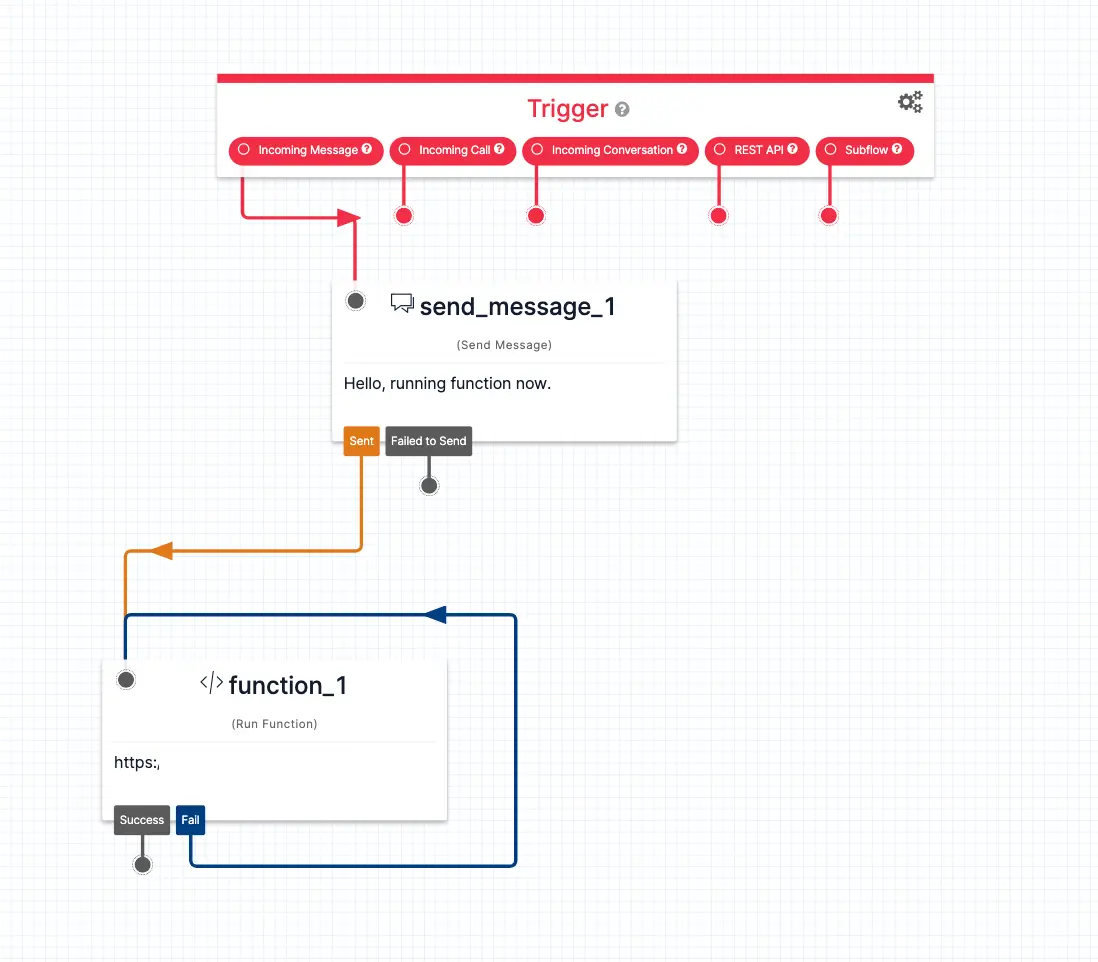
Functions are a Twilio Serverless product. They are lightweight, serverless pieces of code that run in the Twilio cloud. By using the Run Function widget, you can write code for additional business logic that works alongside your other Studio widgets. See below for an example of a Studio Flow that uses a Function to generate a random number.
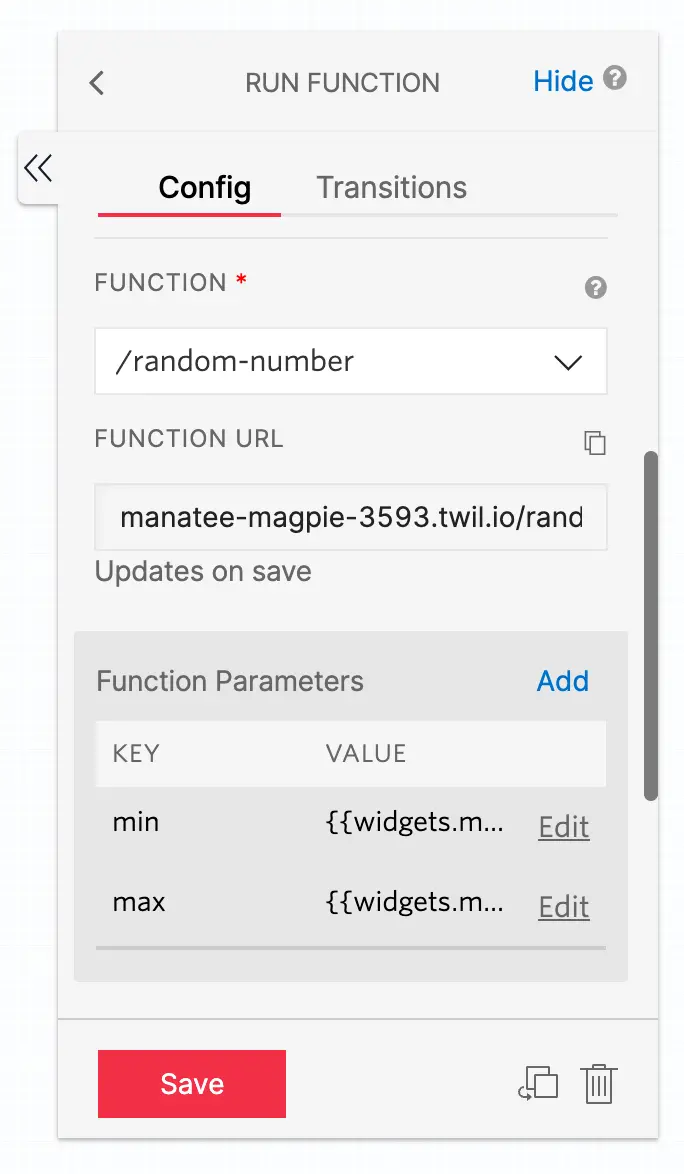
The Run Function widget only requires one piece of information to run properly: the URL of the Function you want to call.
You may select an existing Function from the Function URL dropdown in the widget's configuration panel, or create a new Function by clicking on the Create link above the Function URL dropdown menu.
Services are containers for your Functions, Assets, and Environments within Twilio Serverless. If you don't select a Service or choose the Default Service option, you'll see all the Functions within your account's Default Service.
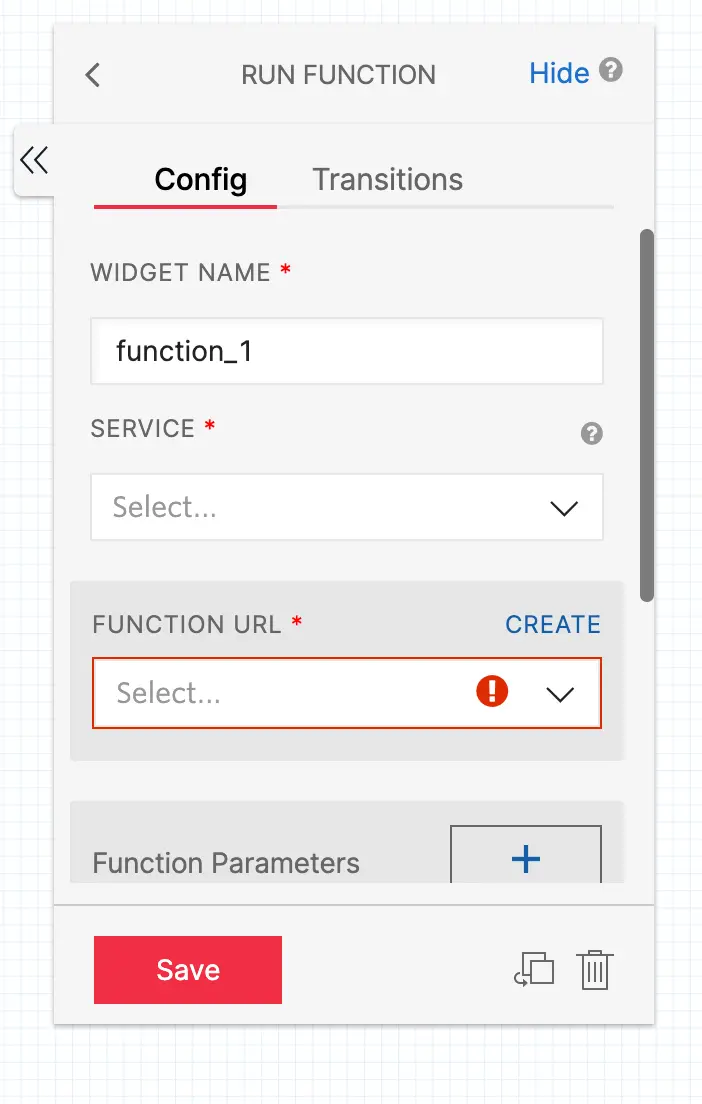
If you have an existing Service that contains the Function you want to run, select that Service, select the Environment the Function is in, and then select the Function. Note that if you select a Service that is not Default, you won't see the Create link above the Function URL dropdown menu. To create a new Function within a specific Service, go to the Services section of the Twilio Console.
Warning
Run Function can only invoke Public or Protected Functions. Learn more about Function visibility.
When configuring the Run Function widget, you may choose to add any number of Function parameters. These are extra parameters that Studio will pass to your Function, expressed as key/value pairs. The Run Function widget supports string literals as well as variables. The parameters you pass to the Function from Studio are stored on the Function's event object.
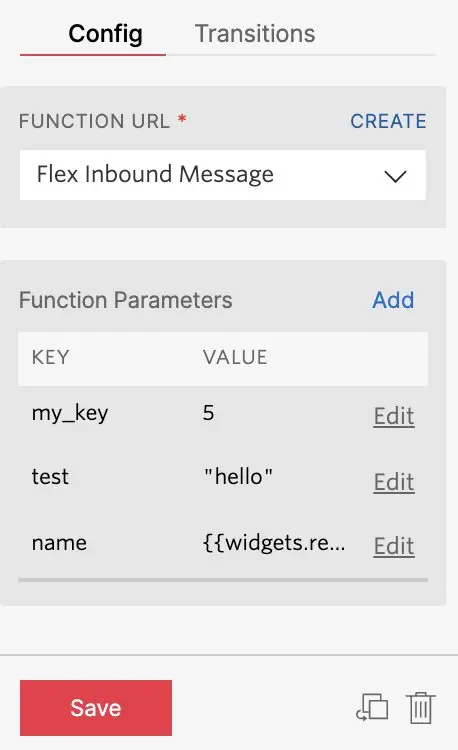
You can use Liquid Templating Language to add variables as parameters to your Function. Learn more about variables in Studio in the Getting Started guide.
These events trigger transitions from this widget to another widget in your Flow. For more information on working with Studio transitions, see this guide.
| Name | Description | Example |
|---|---|---|
| Success | A successful return of your Function. | 200 OK |
| Fail | The Function does not return or has an error. | 500 Error |
Define transitions for both success and failure states so that your Studio Flow knows what to do if it gets a response back or if the request fails in some way. For example, if the request succeeds, you typically want the Flow to move on to the next widget. If the request fails, you can choose to re-try the request or fail out of the Flow.
Danger
Using the Run Function widget to run custom TwiML in your Flow will cause Studio to give up control of the live voice call when the TwiML is returned. If your use case requires returning control of the call back to your Studio Flow after running your custom TwiML, use the TwiML Redirect widget to invoke a custom TwiML URL instead of using Run Function.
You may want to reattempt a request to an external service or Twilio Function if a failure occurs.
Looping a widget's failure transition back to itself is not an ideal way to implement a retry. This approach eliminates your ability to control the number of repeated requests a user can perform on your services. Additionally, a Flow's Execution will terminate after the same Widget is run 10 times — abruptly ending a user's Execution rather than providing functionality that handles the error.
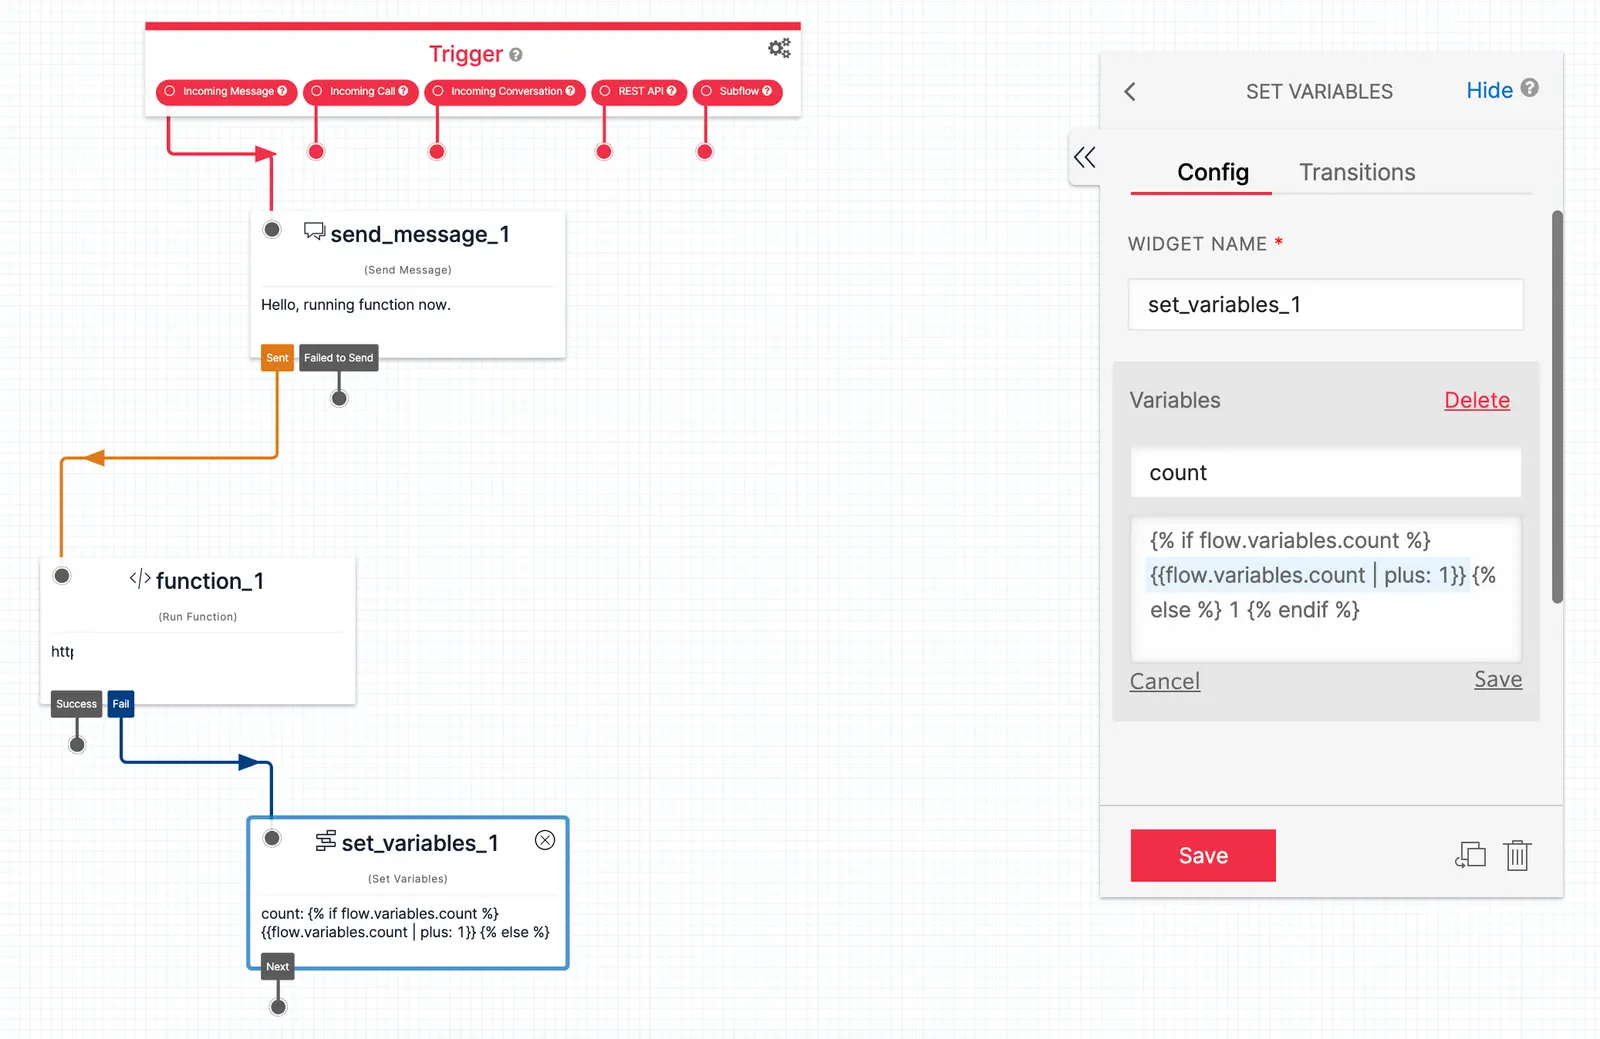
To properly control retry attempts, you can create a counter within your Flow to keep track of how many requests have been attempted for a particular service and add Widgets to respond based on the result of each retry.
To create a counter:
- Add a Set Variables Widget to create and increment a
countvariable. - Using Liquid tags, first check if the
countvariable exists. If it does, set thecountvalue to its current value plus one using the Liquid filterplus: 1. If thecountvariable does not exist, set the value to one. Copy and paste the below code into the Value field of yourcountvariable.
1{% if flow.variables.count %}2{{flow.variables.count | plus: 1}} {% else %} 1 {% endif %}
The count variable can be accessed anywhere in the Flow using {{flow.variables.count}}.
You can now check the count and continue incrementing or move the Flow forward using a Split Based On… Widget.
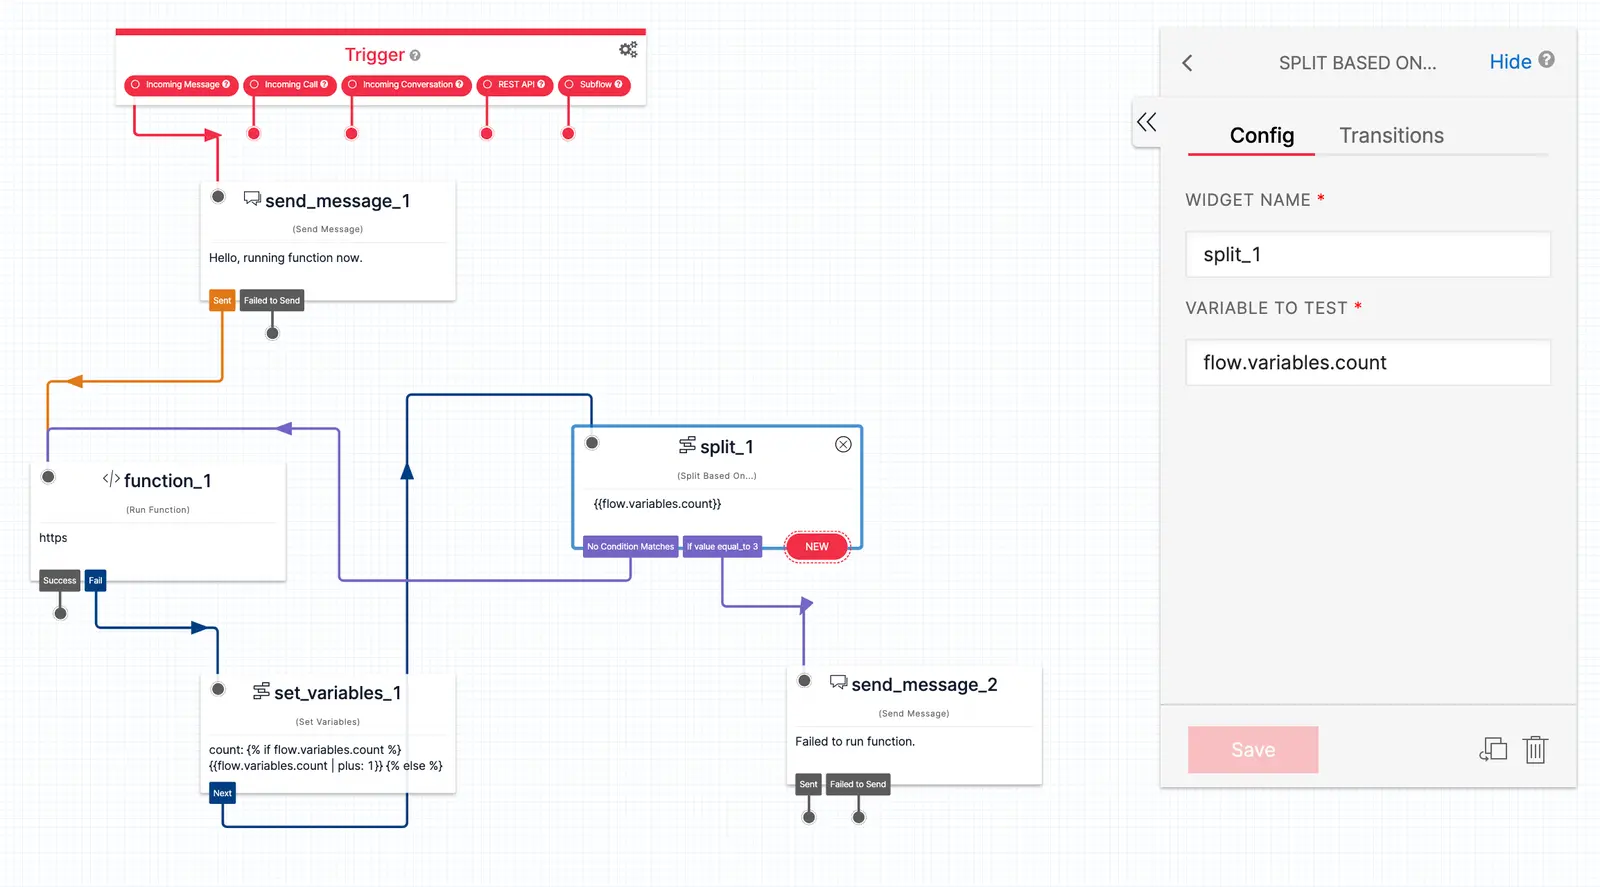
- Add a Split Based On… Widget to analyze the
{{flow.variables.count}}variable and determine if the number of requests has exceeded the limit you set. - You will now add a condition to the Widget — checking if the variable is equal to the maximum number of requests you specify. In this example, the maximum number has been set to 3.
- If the variable being tested is not equal to 3, loop the No Condition Matches transition back to the Run Function Widget that failed. This will result in a retry.
- If the variable is equal to 3, use another Widget to handle the failure as you wish. For example, you can use a Send Message Widget to communicate the failure to the customer.
The HTTP response from the Function you call with the Run Function widget must return a 2xx or 3xx status code within 10 seconds to succeed, and the response body must not exceed 64kB. We recommend configuring your HTTP response according to the following guidelines:
| Response | Recommendation | Notes |
|---|---|---|
| Status Code | 200 or 204 | 3xx redirection is supported. 4xx or 5xx status code will transition to failed in the widget |
| Content Type | application/json | Content-Type header is not required if Status Code is 204 No Content. Other content types are supported, such as plain text or XML. However, only application/json objects (for example, {"foo":"bar"}) are automatically parsed into Studio variables. |
| Body | Valid JSON | Body content must match the Content-Type header |
| Response Time | 10 seconds or less | Since Twilio Functions support up to a 10 second execution limit, Studio will timeout the request at 10 seconds and transition to failed in the widget. |
| Response Size | Maximum 64kb | Studio can only process responses up to 64kb. |
See the Function Execution documentation to learn more about how to edit the return value from the Function to return errors, success responses, and different content types.
You may want to do some work on the data you pass to your endpoint and return more data or variables to work with further along in your Flow.
If your request returns an object in valid JSON, you can access it via widgets.MY_WIDGET_NAME.parsed.
For example, consider a Function that returns the following JSON object:
{"message":"Hi", "person":{"name":"Alex", "age": 40}}
You could access the values within the JSON object using the following variables:
| Variable Name | Value |
|---|---|
widgets.MY_WIDGET_NAME.parsed.message | "Hi" |
widgets.MY_WIDGET_NAME.parsed.person.name | "Alex" |
widgets.MY_WIDGET_NAME.parsed.person.age | 40 |
Danger
For Studio to parse the response correctly, you must return a JSON object with key/value pairs. If your request returns an array of objects, Studio won't parse those objects. You must wrap the array within an object to access the array objects.
No matter what kind of response your URL returns to Studio, the following variables will be available to your Flow. To learn more, see Use variables in your Studio Flow in the Getting Started documentation.
{{widgets.MY_WIDGET_NAME.body}}
The full response body returned from the Function.
{{widgets.MY_WIDGET_NAME.content_type}}
The content type of the Function's response.
{{widgets.MY_WIDGET_NAME.status_code}}
The status code returned from the Function.
{{widgets.MY_WIDGET_NAME.headers["x-twilio-function-concurrency"]}}
The number of Twilio Functions running concurrently when the Function sends the response. To learn more about monitoring concurrency and Function invocation limits, see the Functions and Assets FAQ documentation.
The following Studio Flow represents an example of working with the Run Function widget. The Flow is a random number generator. It asks the user for a minimum value and a maximum value, and then passes those two inputs to a Serverless Function that generates a number between those two values. It then returns the random number back to the user.
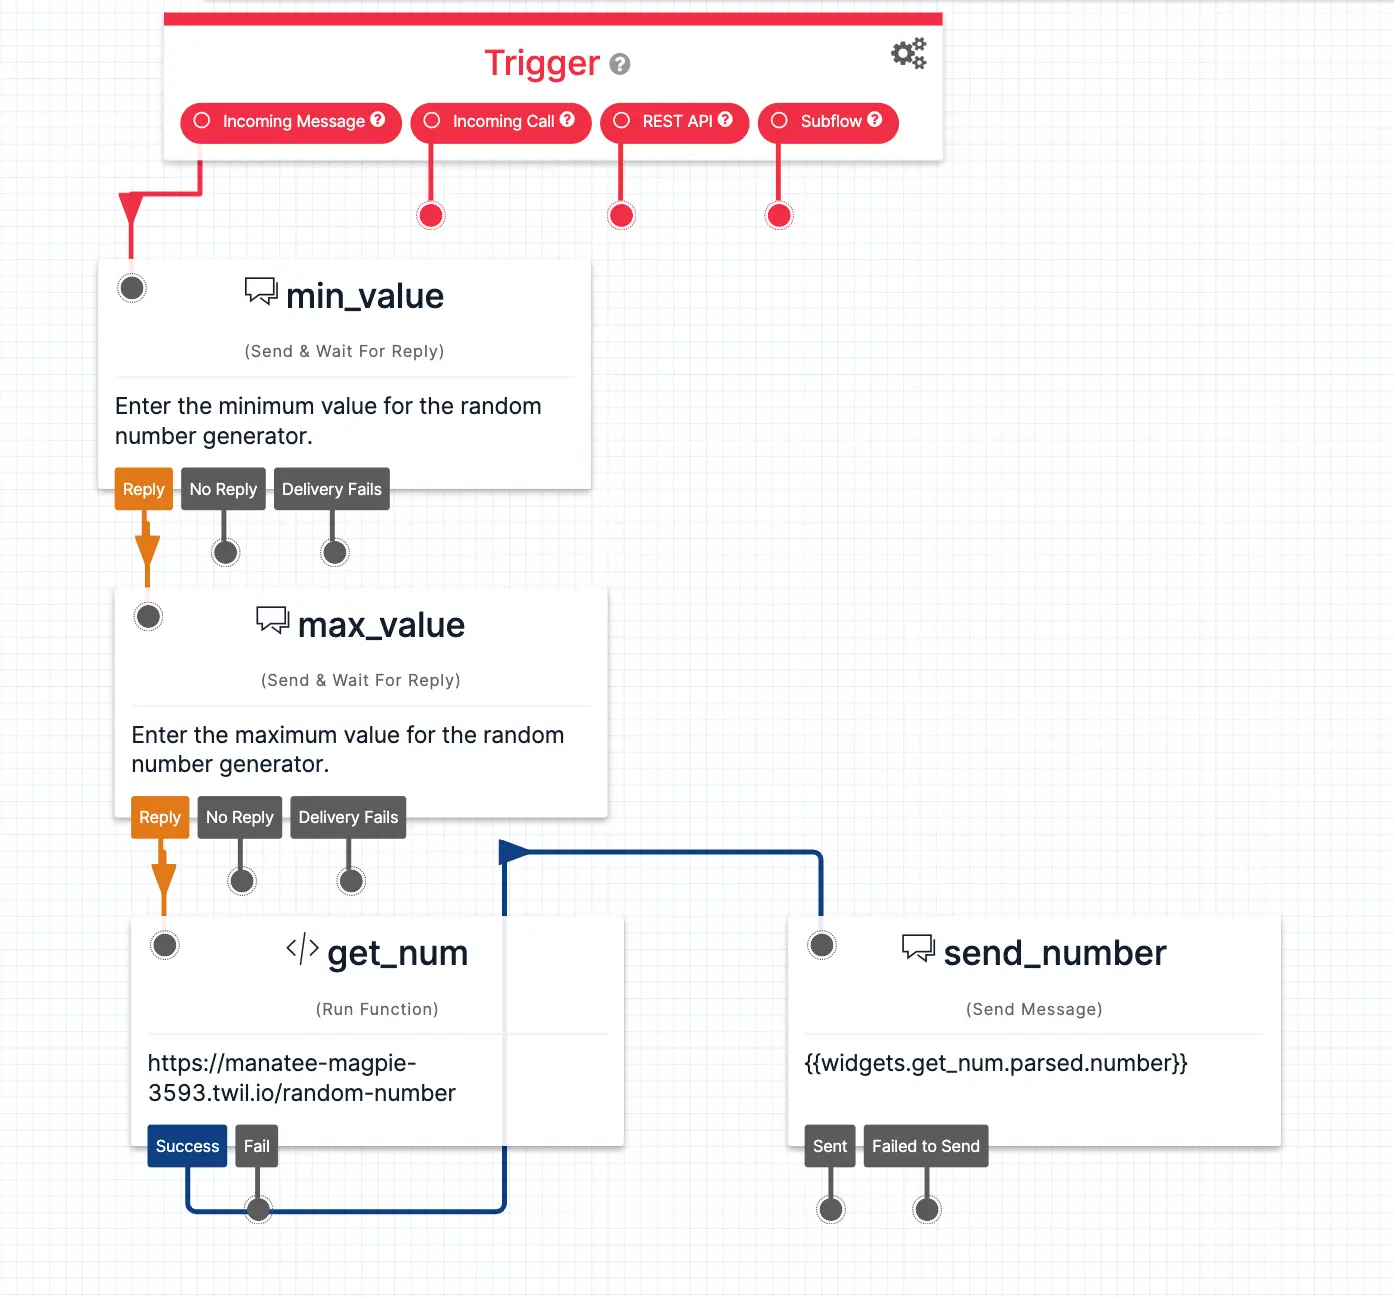
The Flow uses two Send & Wait for Reply widgets to collect the minimum and maximum values for generating the random number. Then, the Run Function widget runs a Function called Generate Random Number. It passes the two numbers that the user entered into the Function as parameters. The two variables are:
{{widgets.min_value.inbound.Body}}{{widgets.max_value.inbound.Body}}
Below is the code for the Generate Random Number Twilio Function. The min and max Function Parameter values that Studio passes to the Function are stored in the Function's event object. The Function returns a JSON response containing the key number with the randomly generated number as the value.
1exports.handler = function(context, event, callback) {2const min = Math.ceil(event.min);3const max = Math.floor(event.max);4const randomNum = Math.floor(Math.random() * (max - min + 1)) + min;56return callback(null, { number: randomNum });7};
Finally, the Send Message widget sends back the randomly generated number. Keys from the JSON object that the Function sends back are parsed into variables. The Send Message widget accesses the random number through the variable {{widgets.get_num.parsed.number}}.
When your Studio Flow executes the same Run Function widget more than once (for example, inside a loop), the stored outputs in the widget context may display merged or cached results. This is expected behavior.
- Each time the widget runs,
widgets.<WidgetName>.body,widgets.<WidgetName>.content_type, andwidgets.<WidgetName>.status_codeare updated with the returned result. - If a Function execution returns JSON,
widgets.<WidgetName>.parsedis also updated with the returned result. The new parsed object merges with the existing parsed object, if any, instead of completely overwriting it. - If the next execution returns plain text (not JSON), only the
body,content_type, andstatus_codefields update. The parsed object keeps its previous value.
As a result, you may see parsed keys persist or appear to be "cached" if your Function results change type between executions.
The following shows three executions of the same Function widget. Note how the context changes:
| Execution | Function response | Widget context (body) | Widget context (status_code) | Widget context (content_type) | Widget context (parsed) | Notes |
|---|---|---|---|---|---|---|
| 1st execution | Status: 200, Body: { "foo": "bar" }, Content-Type: application/json | { \"foo\": \"bar\" } | 200 | application/json | { "foo": "bar" } | Parsed from JSON body. |
| 2nd execution | Status: 404, Body: not found, Content-Type: text/plain | not found | 404 | text/plain | { "foo": "bar" } | parsed value unchanged (response is not JSON). |
| 3rd execution | Status: 201, Body: { "created": true }, Content-Type: application/json | { \"created\": true } | 201 | application/json | { "foo": "bar", "created": true } | New JSON keys are merged into existing parsed object. |
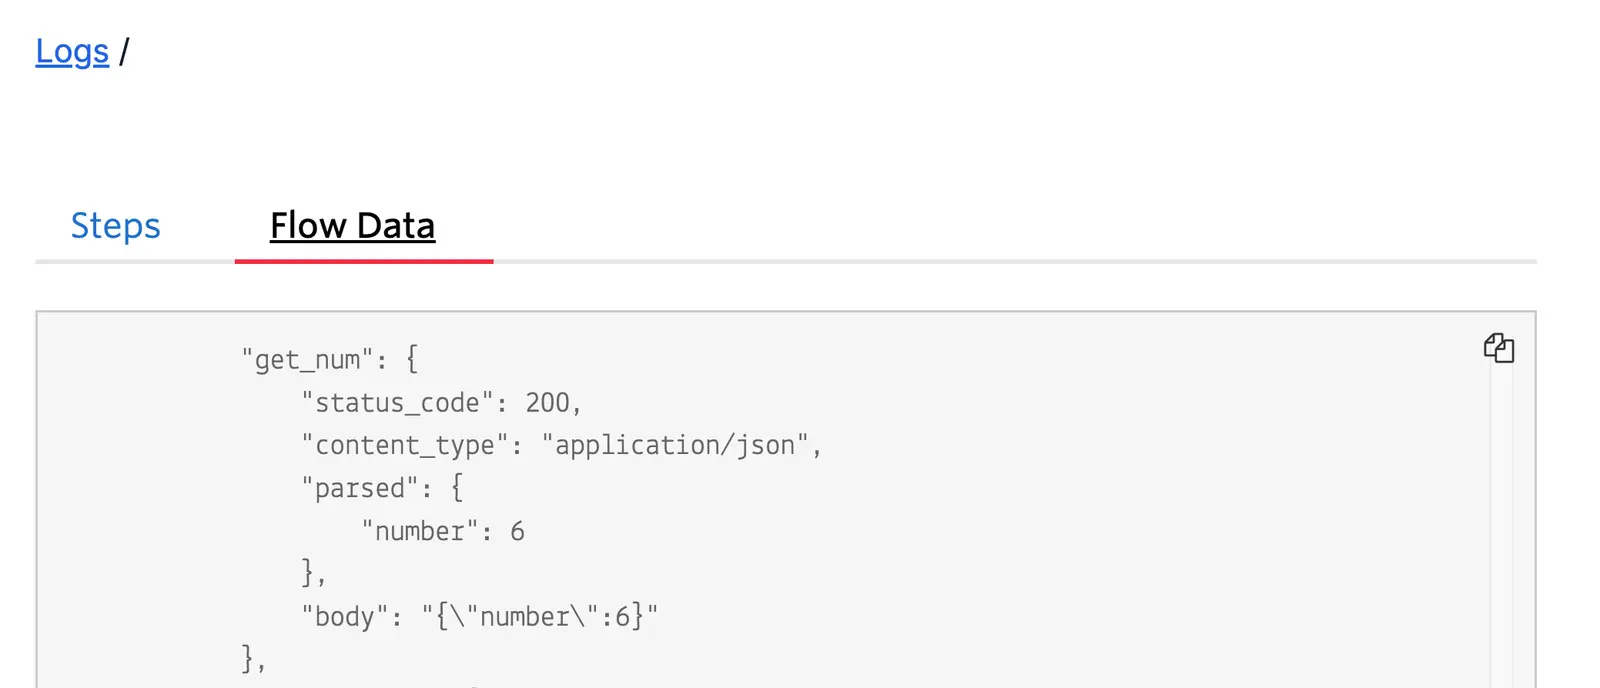
You can see the return value, return type, and status code that your Function returns to your Studio Flow in the Studio Flow Logs. Access the Logs for a Studio Flow by clicking on Logs next to the Flow in the Console. You will see a list of Executions. Click into an Execution to see the logs for that particular Execution of the Studio Flow.
Click on Flow Data to see the data returned from the Run Function widget. The Flow Data is a JSON object containing data for every widget that ran during the Execution. Scroll down until you see the name of your Run Function widget. You should then see all the data returned to Twilio Studio from the Function.
Learn more about debugging Twilio Functions in the Functions documentation.
Want to learn how to use the Run Function widget in real-world examples? You can follow along with these this step-by-step tutorials to see this widget in action:
Let's build something amazing.