Configure Skill-Based Routing
Now that you've navigated the Flex UI and handled your first voice and SMS Tasks, you can start customizing your Flex instance.
By default, when a call or SMS comes in, it goes into a single Queue that all Agents are part of. As you develop your call center, you'll want to create multiple Queues for different purposes and assign Agents to these Queues based on their roles and skills. For example, you might want to have a Sales Queue for sales inquiries and a Support Queue where your Support team can help existing customers. You might also create Skills and Queues based on the languages that your Agents speak.
In Flex, you can accomplish this Skill-based routing by creating Skills (which are general categories that you use for grouping your Agents and assigning Tasks), assigning Agents to those Skills, and then creating new Queues to match these Skills.
The steps involved in setting up Skill-based routing are:
- Create a new Skill (such as Sales or Support) in the Flex Admin UI
- Assign workers to that Skill (for example, you would assign workers who are part of the Sales team to the Sales Skill)
- Create a new Queue for the Skill, so that incoming Tasks requiring that Skill can be queued for the correct workers
- Create a new Workflow, which looks at incoming Tasks and assign them to the appropriate Queue based on their properties
- Create an Interactive Voice Response (IVR) system to assign Tasks with properties for routing (for example, the IVR would ask a caller which department they want to reach, and then assign the call as requiring the Skill that the call needs)
This section of the onboarding guide covers steps 1-4. You create an IVR system in the next step of the Onboarding Guide.
To get started with Skill-based routing, you first want to create a new Skill in the Flex Admin UI. Typically, you create one Queue for each Skill you create. For example, you might create the Skill "Sales" and then create one Queue called "Sales" to route all sales traffic to Agents with the Sales skill.
In the Flex UI Admin View, navigate to the Skills section. Here, you can see a list of existing Skills and create new Skills.
You can create Skills with or without levels. If you create a Skill with levels, you can then assign Agents the Skill and give them a specific level - for example, you can create a Support skill with levels 1 through 5, and then categorize Agents with this Skill based on their expertise or seniority. This allows you to route tasks based on an Agent's level within a given Skill. If you create Skills without levels, everyone with that Skill will be at the same level.
Warning
Skill names should not have spaces in them, to ensure compatibility with TaskRouter (which you will be using later to route Tasks to the correct Queues).
Warning
Adding levels to Skills may route more than the ideal amount of Tasks to the Agents in the more advanced levels. Tasks are routed to Agents with higher levels before Agents with lower levels. It's important to keep this in mind if you choose to use Skills with levels.
To get started, create a new Skill called "Sales":
- Under Name of skill, type "Sales"
- Do not check the box Does this skill require levels?
- Click Add new skill
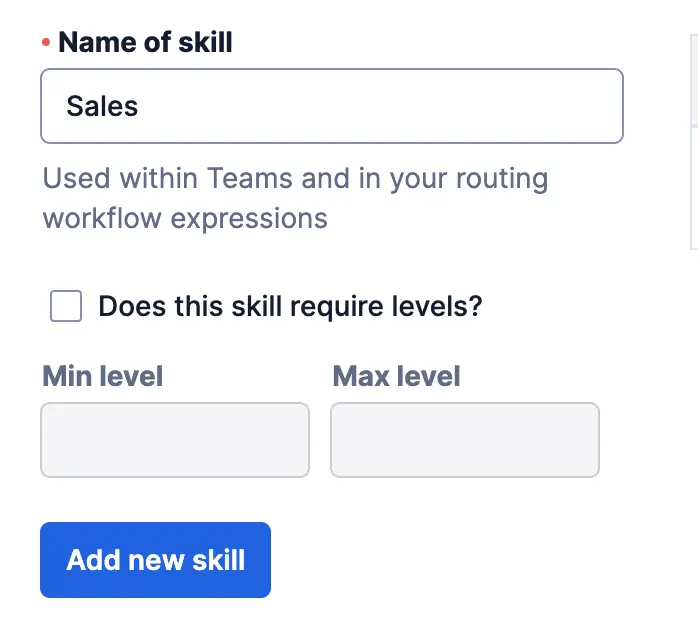
You will now see this Skill added to the list on the right side of the page.
Info
When you create a new Skill, it includes the Skill's Queue expressions and Workflow expressions. These expressions are written in TaskRouter Expression Syntax and will be important later when you create new Queues and Workflows based on these Skills. You do not need to use these now, but you will be prompted later in this guide to refer back to these values.
Next, create another Skill called "Support":
- Under Name of skill, type "Support"
- Do not check the box Does this skill require levels?
- Click Add new skill
You should also see this new Skill added to the list on the right side of the page.
Now that you've created two new Skills, you can assign an Agent to these Skills.
Navigate to the Teams View in the Flex UI. You should refresh the page after creating new Skills for them to populate in the Teams view.
Click on your Agent to bring up their details. Under Skills in the Agent Detail View, choose the Sales skill to assign to this Agent from the dropdown list of available Skills. Click the blue + button to assign this Skill. Then click Save at the bottom of the Agent Details panel.
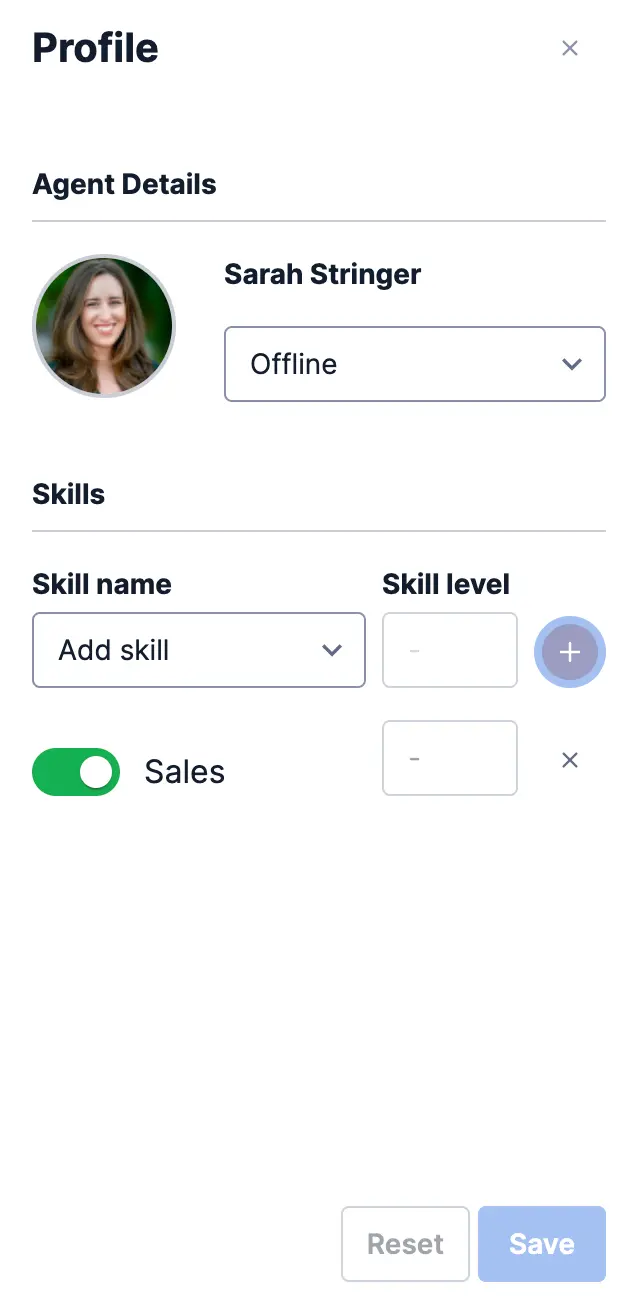
Once a Skill is added to an Agent, you can toggle it on and off in the future from the Agent Details View, or remove it from their profile entirely.
Next, you will create a Queue for each Skill you have created. Creating a new Queue allows tasks to be routed to specific Agents based on their Skills.
You perform this section in the Twilio Console rather than in the Flex UI.
TaskRouter is a core component of Flex that routes Tasks to Workers based on various criteria.
Below is a glossary of TaskRouter terms used in this Overview:
- Activities: Activities describe the current status of your Workers, such as "Offline" or "Available", which determines whether they are eligible to receive task assignments. Activities are also considered the Worker's "status". Workers are always set to a single Activity.
- Task: A Task represents a single item of work waiting to be processed, such as an inbound call or SMS message. TaskRouter's primary role is to match a Task with a Worker.
- Task Queue: Task Queues allow you to categorize Tasks and describe which Workers are eligible to handle those Tasks. Typically, you want to create one Task Queue for each Skill in your Flex instance.
- Worker: Workers represent an entity that is able to perform Tasks, such as an Agent working in a call center, or a salesperson handling leads.
- Workflow: A Workflow defines the rules for distributing Tasks to Workers. A Workflow's configuration matches Tasks into Task Queues, assigns each Task's priority, and configures time-based rules for escalating the Task.
- Workspace: This is the high-level container for all of your TaskRouter resources (Tasks, Workers, TaskQueues, Workflows, and Activities). A single Flex instance can only have one Workspace.
In a new browser tab, navigate to the TaskRouter section of the Twilio Console. Then, click on Workspaces in the left navigation bar under TaskRouter. One Flex instance can only have one Workspace, so you will only see one item in this Workspaces list.
Click on that Workspace to enter it.
Next, you see a list of all Task Queues. Currently, you only have one, called Everyone. Right now, when a Task comes in, it is automatically routed to this Queue. This Queue captures anything that doesn't match another Task Queue's routing logic.
You now want to create two new Task Queues for the two Skills you set up earlier. Click View all Task Queues, above the list of existing Queues, and then click on + Create new Task Queue.
When creating a new Queue, you need to define several pieces of information. This next block walks through what each piece means, and afterward you will see how to complete this section for each new Queue.
- The name for the Queue
- The workspace (this is not editable, because you can only use your current Workspace)
- Task Order: You can choose between First in, first out (the first person who entered the Queue is the first person who reaches an Agent when one is available), or Last in, first out (the last person who called into the Queue is the first person to reach an Agent when one is available). In most call centers, you want to use First in, first out.
- Reservation Activity and Assignment Activity: These fields are not relevant for new Flex instances and you can choose any available option here. In the examples below, you'll choose "Offline", but this does not matter. (Historically, these fields represented the status that a Worker would be given when they were reserved for a new Task and when they were assigned a Task, but these are no longer used in Flex instances.)
- Maximum Reserved Workers: The number of Workers/Agents to try to route a Task from this Queue to. The default value is one, meaning that TaskRouter reserves one Worker to try to route the task to. If that Worker isn't available within the default timeout window, it then reserves another Worker to try to route the Task to. If you set this number higher, then TaskRouter reserves that number of Workers to try to route the Task to, and the first one of those reserved workers to accept the Task is the one who is assigned to it.
- For more information about how the Maximum Reserved Workers property works, check out this blog post.
- Target Worker Expression: This is an expression in TaskRouter syntax that explains how Agents are being matched with Tasks in this Queue. Learn more about TaskRouter Syntax here.
First you'll create the Sales Queue. Here are the values you should provide for each item in the Create new Task Queue page:
- Task Queue name: Sales
- Task Order: First in, first out
- Reservation Activity: Offline
- Assignment Activity: Offline
- Maximum Reserved Workers: 1
- Target Worker Expression: Copy the "Queue Expression" from the Sales skill you created in the Flex Admin UI, and paste it here. (It should look like routing.skills HAS "Sales")
Once you have filled these fields out, click Save. You have now created a new Sales Queue.
Complete this again for the Support Queue:
- Task Queue name: Support
- Task Order: First in, first out
- Reservation Activity: Offline
- Assignment Activity: Offline
- Maximum Reserved Workers: 1
- Target Worker Expression: Copy the "Queue Expression" from the Support skill you created in the Flex Admin UI, and paste it here. (It should look like routing.skills HAS "Support")
You should now have two Queues: Sales and Support. From the Task Queues main menu, where you see a list of all your existing Queues, click on the new Sales Queue you created. Then, scroll down to the bottom of the page to see a list of Matching Workers who meet the criteria for this Queue. You should see your one Agent that you assigned the Sales Skill earlier.
If you go into the Support Queue and scroll down to the list of Matching Workers, you shouldn't see anyone, since you did not assign anyone the Support Skill.
A Workflow defines the rules for distributing Tasks to Workers. Your Workflow receives incoming tasks from the IVR system you build in the next section of the guide, and it routes those tasks the appropriate Queue.
You can get to the Workflows section in the Twilio Console by going to TaskRouter > Workspaces > Click on your only Workspace > Workflows.
You should see one existing workflow, called "Assign to Anyone", which is the Workflow that routes any new Tasks to the Everyone Queue.
Click on Create new Workflow at the top of the page.
Under Properties, complete the following details:
-
Workflow Name: Sales and Support Workflow
-
Task Reservation Timeout: 20
- The Task Reservation Timeout is the amount of time in seconds that TaskRouter waits for the reserved Worker to accept the Task before moving on to another eligible Worker
You can leave Assignment Callback blank. You would use this field if you were building custom logic with a separate application for how to handle accepted Tasks.
Then add two filters, which tell the workflow how to direct incoming traffic. Under Edit with UI, click +Add a Filter.
First, add the Sales filter. This looks for any incoming Tasks that indicate they require the Sales Skill and route them to the Sales Task Queue you created. Complete the following pieces of information:
- Click on Unnamed Filter to edit the name of the filter. Call it "Send to Sales".
- For Matching Tasks, copy and paste the value under Workflow expressions from the Sales Skill you created in the Flex Admin UI. It should look like
"Sales" IN task.skillsNeeded. - Under Matching Workers, click on the value for Task Queue to edit it. Select the Sales Queue from the dropdown.
- Leave everything else with their default values.
Next, create a new filter for Support. Click on +Add a Filter again and fill out the following information:
- Click on Unnamed Filter to edit the name of the filter. Call it "Send to Support".
- For Matching Tasks, copy and paste the value under Workflow expressions from the Support Skill you created in the Flex Admin UI. It should look like
"Support" IN task.skillsNeeded. - Under Matching Workers, click on the value for Task Queue to edit it. Select the Support Queue from the dropdown.
- Leave everything else with their default values.
Finally, click Save at the bottom of the page to save this Workflow.
You have now created a TaskRouter Workflow. When you send an incoming call to this workflow (which you will set up in the next step), it evaluates the incoming Task, looks to see whether it requires the Sales or Support skills, and routes the Task to the appropriate Queue if so. You set the default timeout value to 20 seconds, meaning that TaskRouter waits for the first reserved Agent to accept the task for 20 seconds before moving on to the next available Agent.
You can add additional filters to Workflows beyond Skills filters and can add a number of attributes to Tasks to route them appropriately. Learn more about what's possible with the TaskRouter Expression Syntax here.