Use the Run Function widget in Studio
With their lightweight nature and ability to execute JavaScript, Functions are an excellent companion to Studio Flows. Whether you need to gather some data from an API or run any other custom code to fit your business logic, Functions help to fill in the gaps in your application that existing Studio widgets may not cover.
In order to ease the integration of Functions into your Studio Flows, Studio provides the Run Function widget. This widget, as the name implies, allows you to run a Twilio Function; you may pass in any desired parameters, and leverage any generated values later on in your Studio Flow.
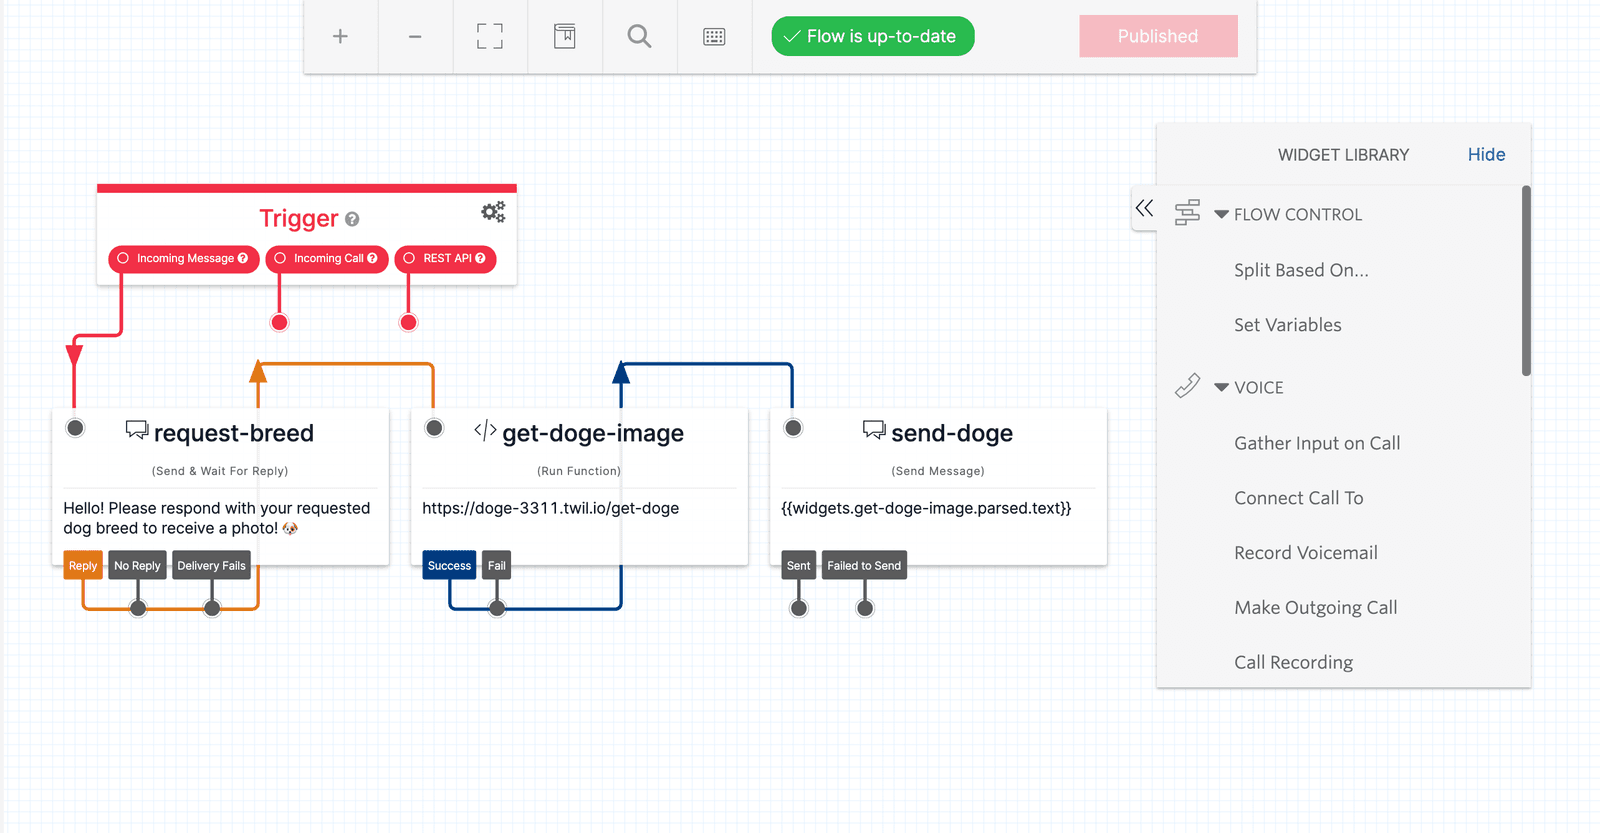
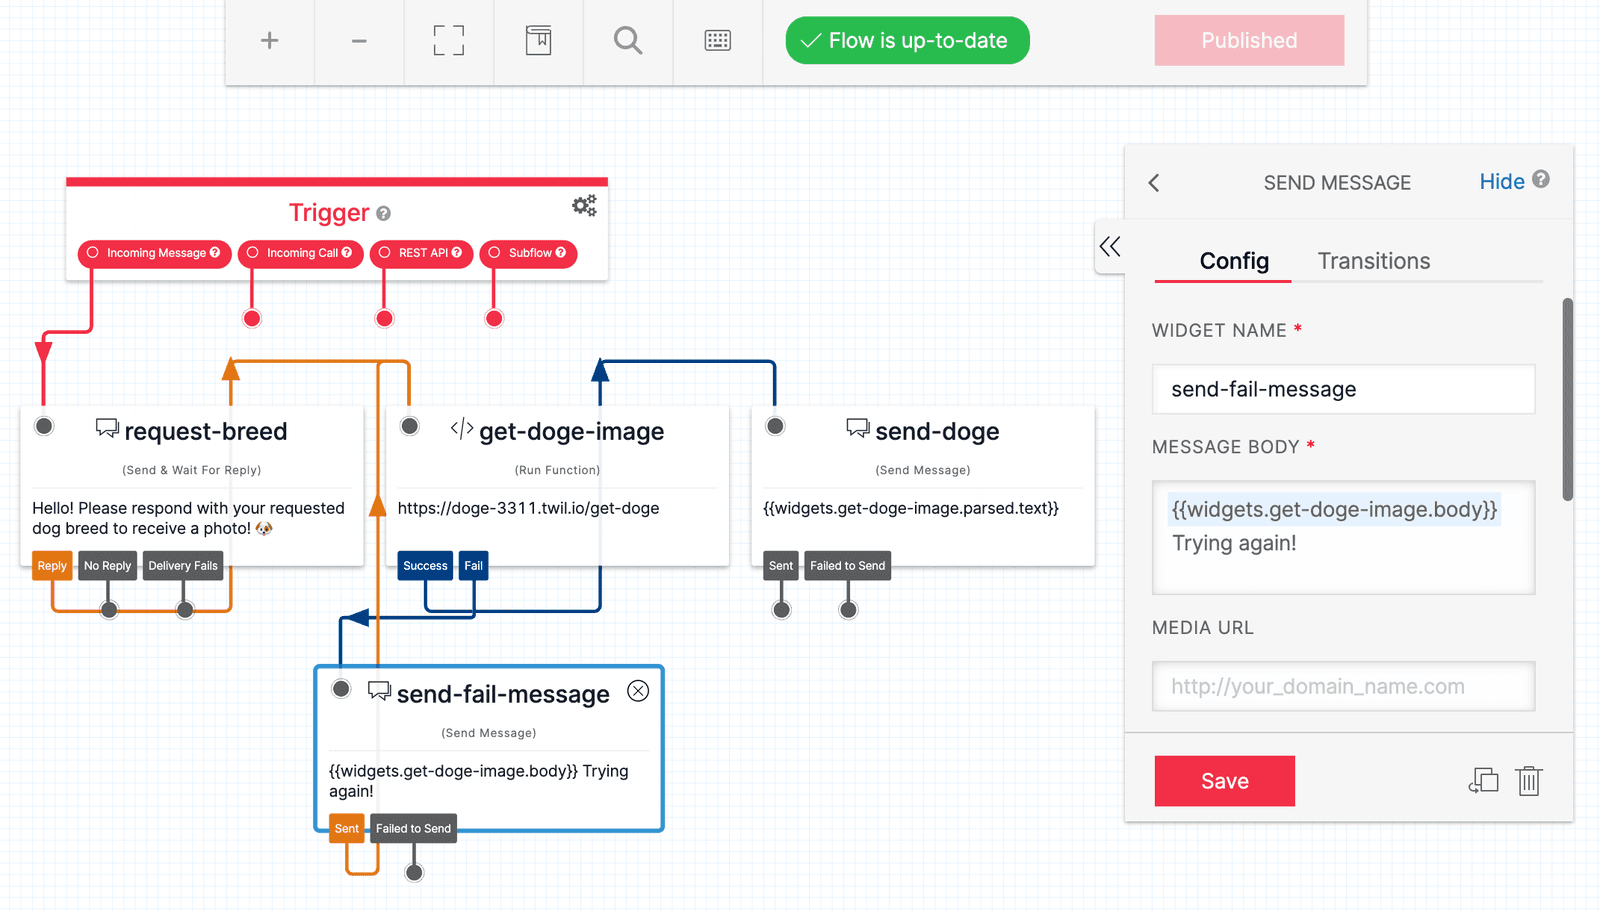
To test this out we'll create a Studio Flow that accepts incoming text messages, prompts the user for their desired dog breed, and returns an MMS containing some text and an image of their requested breed (assuming they provided a valid breed). The finished flow would look like this:
If you haven't created a Flow before, we suggest following the Create Your Flow steps in the chatbot tutorial to get one established.
Once you are inside of your newly created Studio Flow, create the prompt for dog breed by dragging a Send & Wait For Reply widget onto the Studio canvas. Name it and provide some text to prompt the user; the text can be anything you'd like for this example, something along the general lines of "which dog breed would you like to see?"
Here, we'll name the widget request-breed, and provide the following prompt:
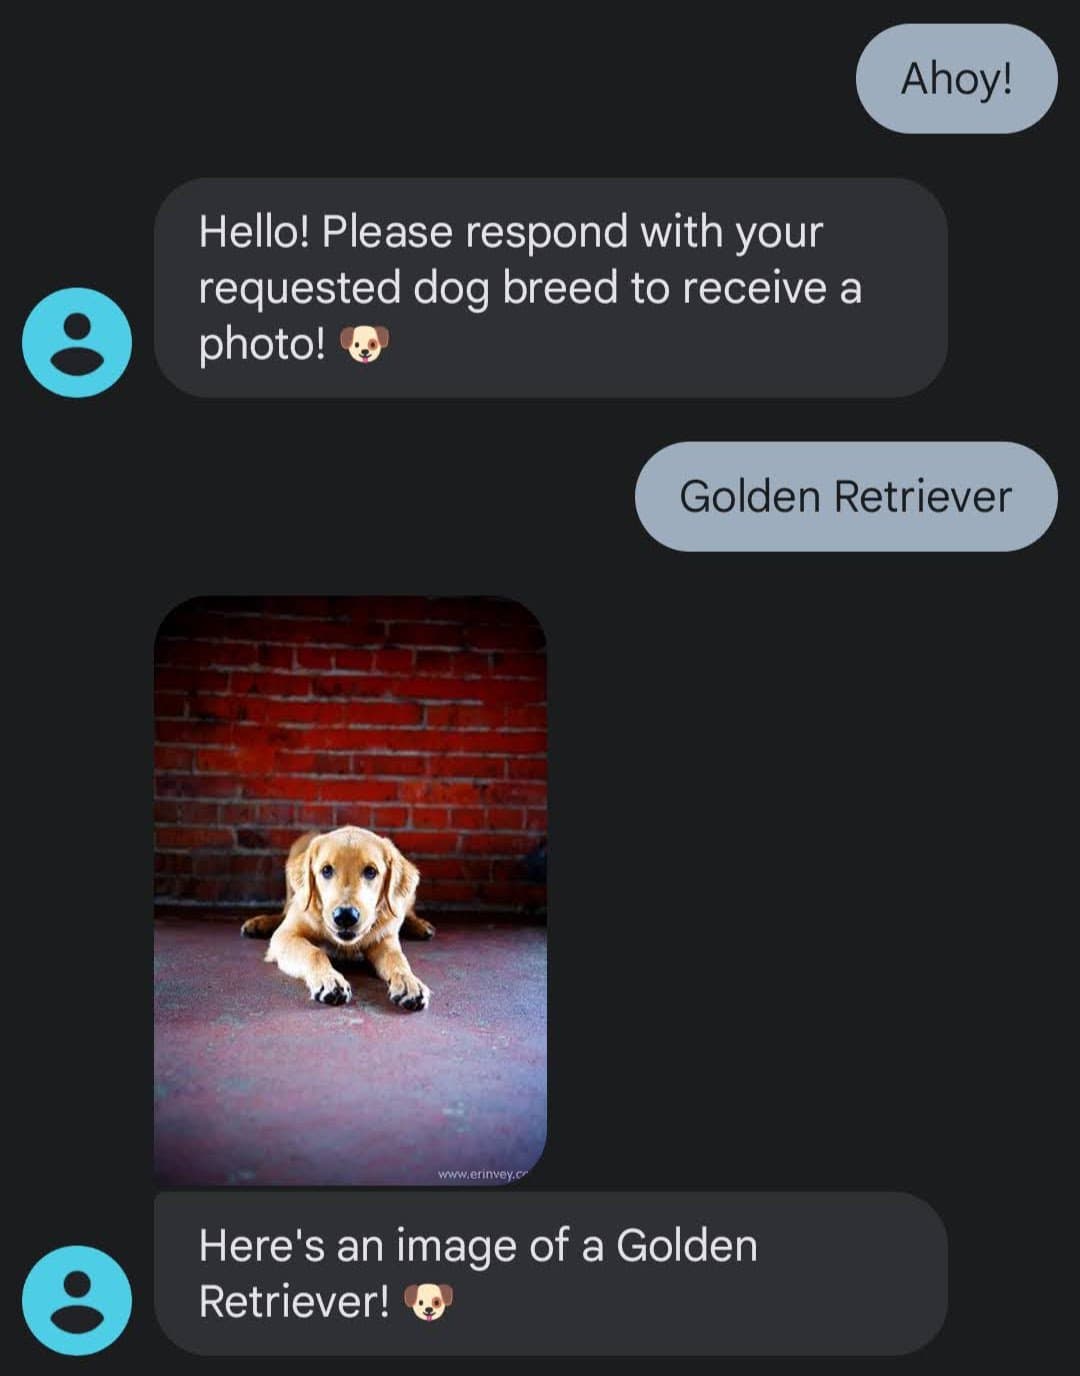
Hello! Please respond with your requested dog breed to receive a photo! 🐶
Before we can proceed any further, we must first create the Function that we'll be calling in the next step of the Flow.
Before you run any of the examples on this page, create a Function and paste the example code into it. You can create a Function in the Twilio Console or by using the Serverless Toolkit.
If you prefer a UI-driven approach, complete these steps in the Twilio Console:
- Log in to the Twilio Console and navigate to Develop > Functions & Assets. If you're using the legacy Console, open the Functions tab.
- Functions are contained within Services. Click Create Service to create a new Service.
- Click Add + and select Add Function from the dropdown.
- The Console creates a new protected Function that you can rename. The filename becomes the URL path of the Function.
- Copy one of the example code snippets from this page and paste the code into your newly created Function. You can switch examples by using the dropdown menu in the code rail.
- Click Save.
- Click Deploy All to build and deploy the Function. After deployment, you can access your Function at
https://<service-name>-<random-characters>-<optional-domain-suffix>.twil.io/<function-path>
For example:test-function-3548.twil.io/hello-world.
You can now invoke your Function with HTTP requests, configure it as the webhook for a Twilio phone number, call it from a Twilio Studio Run Function Widget, and more.
Studio Widgets can handle the elements of gathering user input and sending back a response text. However, custom logic like handling breed names that contain spaces lives best inside of a Function.
Let's add some code to this Function. Install axios as a Dependency, copy the following code example into your Function, save, and deploy your Service so that we can look more closely at how to integrate the Run Widget into a Studio Flow.
Note that this Function expects an input of breed, and returns JSON that includes some text and an image url.
Info
If you're curious about why we're using axios and keywords such as async and await, be sure to read up on how to make API requests in Functions.
1const axios = require('axios');23exports.handler = async (context, event, callback) => {4// Any parameters provided to the Function will be accessible from `event`.5// In Function Parameters, we defined `breed` as the inbound Body from6// our Send & Wait For Reply Widget. We can access that via `event.breed`.7// To minimize the potential for errors, lowercase and trim the user input.8let dogBreed = event.breed.toLowerCase().trim();910// The Dog API also supports sub-breeds, so we need to handle that case.11// For example, if the user requests "Golden Retriever", we need to format12// the breed as "retriever/golden".13if (dogBreed.includes(' ')) {14const [subBreed, breed] = dogBreed.split(' ');15dogBreed = `${breed}/${subBreed}`;16}1718const dogApiUrl = `https://dog.ceo/api/breed/${dogBreed}/images/random`;1920try {21// Make the request to the Dog API. Remember to use `await` since this22// is an asynchronous request!23const response = await axios.get(dogApiUrl);24// Return the response to the Send & Wait For Reply Widget.25return callback(null, {26text: `Here's an image of a ${event.breed}! 🐶`,27// The `message` property of the response is the URL of the dog image.28url: response.data.message,29});30} catch (error) {31// Remember to handle any errors that may occur!32// In the case of a 404, the breed was not found.33if (error.response && error.response.status === 404) {34return callback(null, {35text: `Sorry, we couldn't find any ${event.breed}s 🥲`,36});37}38// Otherwise, there may have been a network or server error.39return callback(error);40}41};
Once your prompt is complete, drag a Run Function widget onto the canvas, and connect it to the Reply condition of the request-breed widget.
You'll be able to provide a name for the widget (get-doge-image), a configuration that will point this widget at your intended Function, and any parameters or arguments that you'd like to pass from the Flow to the Function when it's executed.
For this example, we'll point the Run Function widget at our Function, which was deployed to the doge Service in a production environment, and the path to the Function is /get-doge. Replace the Service, Environment, and Function configuration options with the values specific to the Function you created earlier.
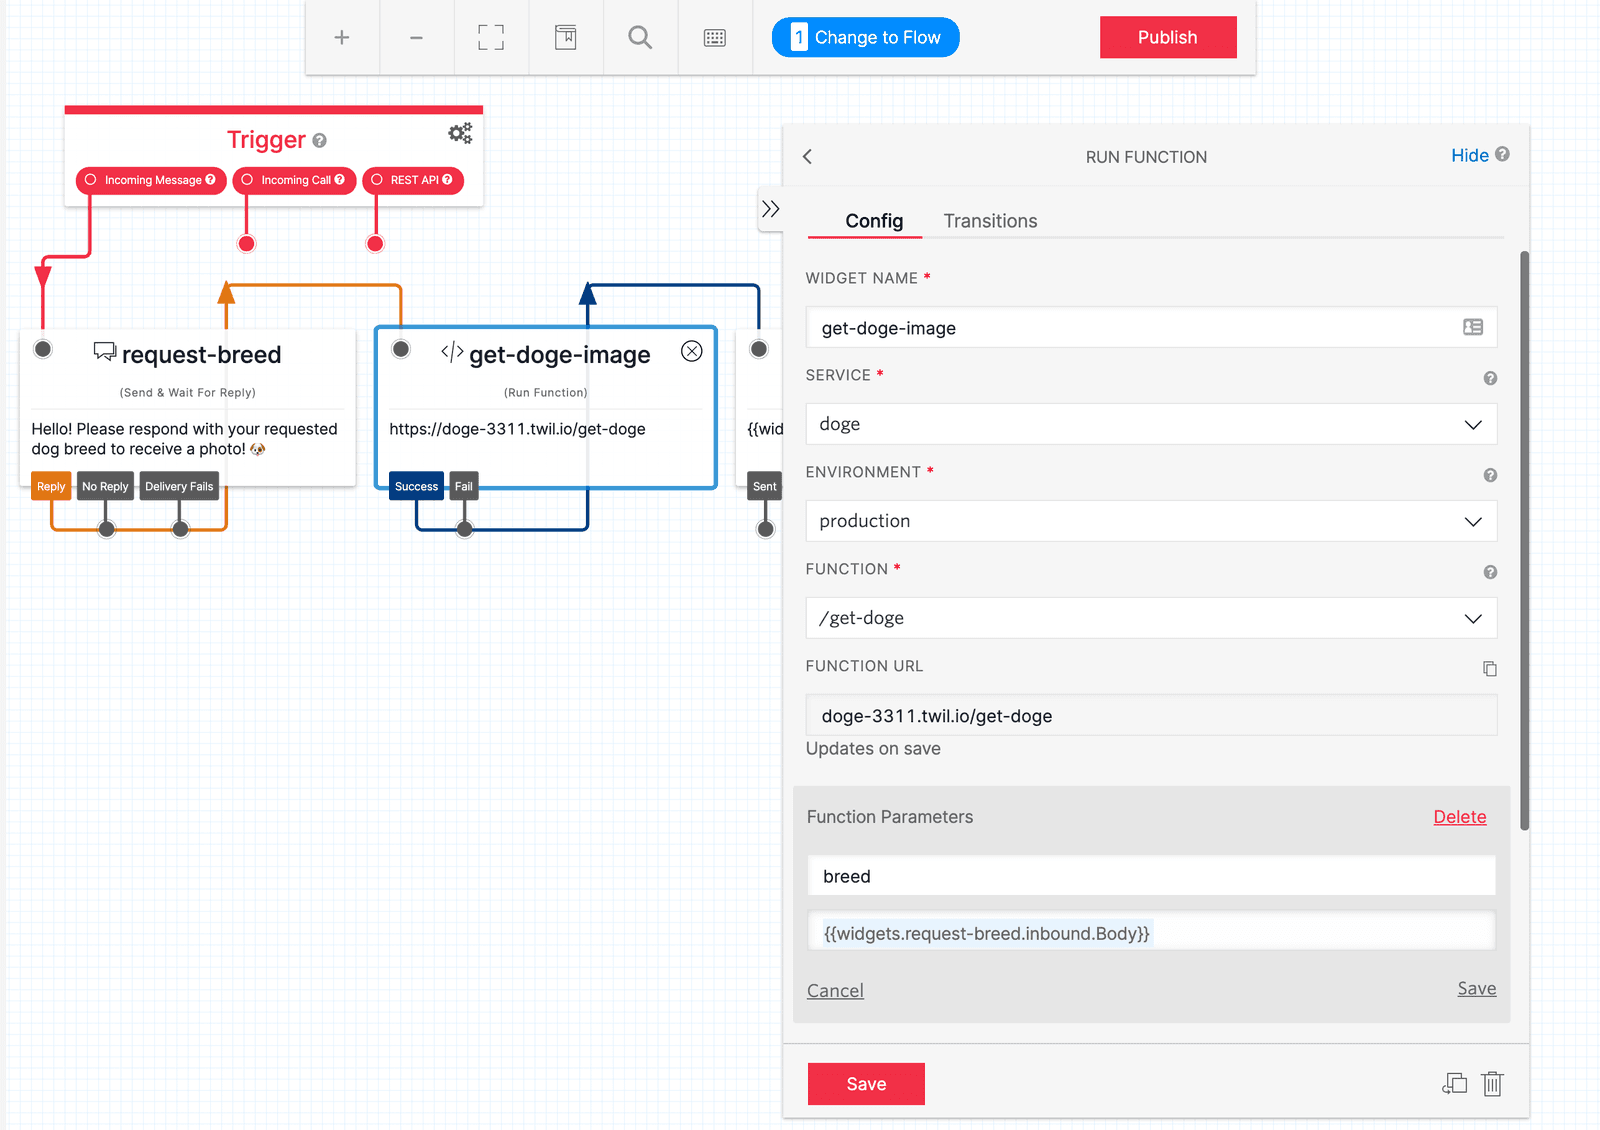
The final important configuration to note is the section labeled Function Parameters. Here, we define the parameters that we will pass to the Function's event object.
Here, we want to provide a variable called breed which is equal to the user's response to the prompt. We can do this by creating a new parameter, naming it breed, and setting the value to the user's response to the request-breed widget.
Info
We are using the Liquid template language to set a variable to the value gathered by the request-breed widget. Read the Studio guide on Liquid to learn more about this syntax and what else you can do with these expressions!
With our prompt and Run Function widgets in place, the last step is to generate a response to the user which incorporates the Function's result.
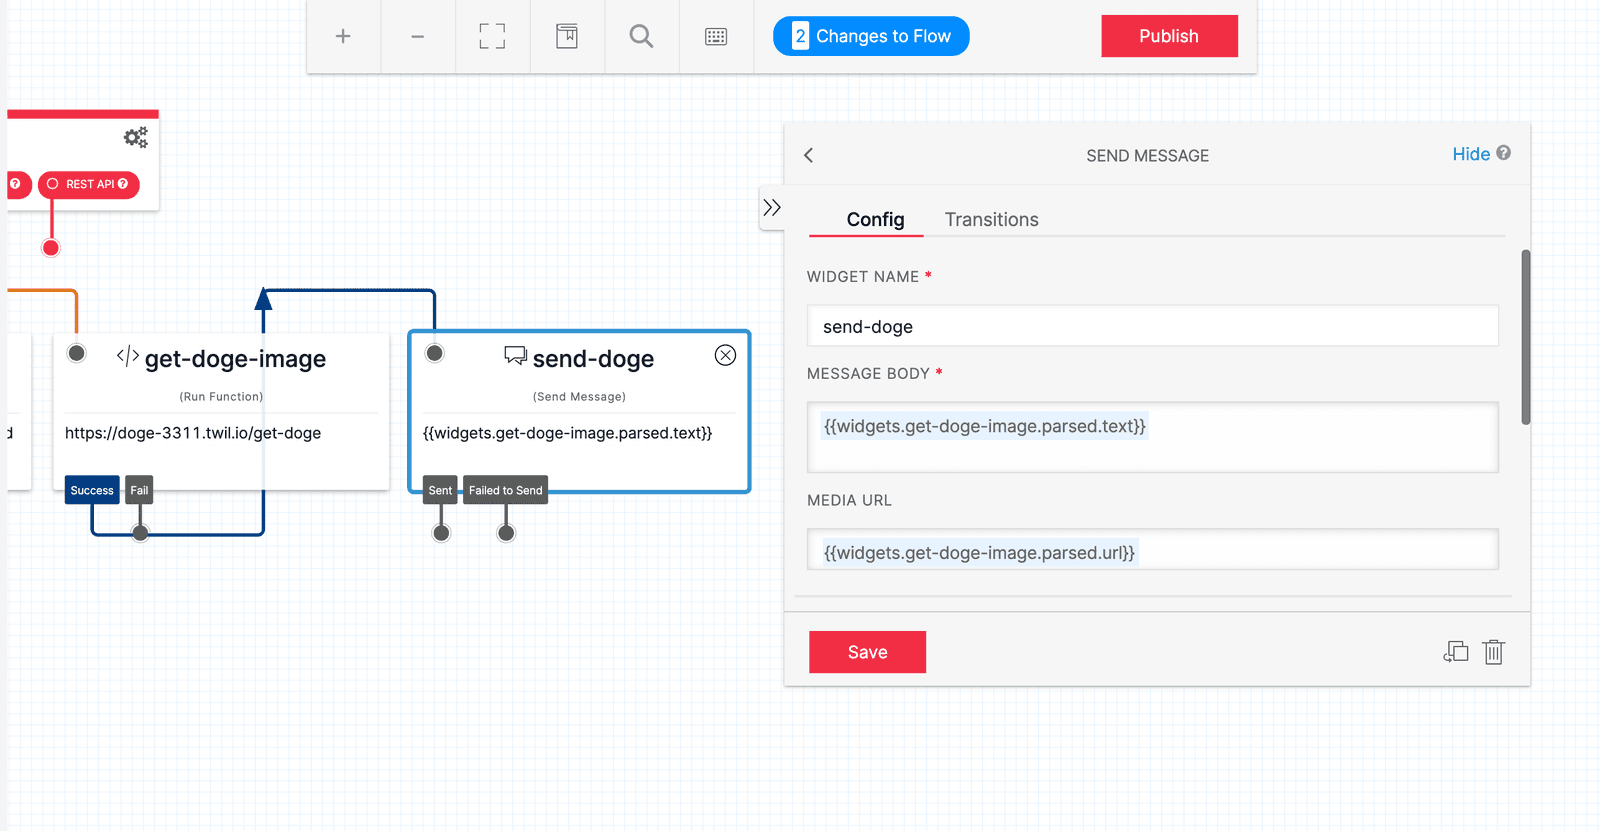
Drag a Send Message widget onto the canvas, and connect it to the Success condition of the get-doge-image widget.
The configuration for this widget is much shorter, and consists only of a name for the widget, the text body, and any media URL (s) you may want to attach. Luckily, the /get-doge Function returns text and uri values for us, so we can template these values into the config using Liquid.
In order to access the return value of a Run Function widget, you will need to access a special property called parsed. This object will contain any and all contents returned by the targeted Function.
Info
The general syntax to access a property from the result of a Run Function widget is {{widgets.<widget-name>.parsed.<property>}}.
For example, to access the text and url returned from the get-doge-image widget, the respective Liquid template strings would be the following:
1{{widgets.get-doge-image.parsed.text}}2{{widgets.get-doge-image.parsed.url}}
Once you have set Message Body to {{widgets.get-doge-image.parsed.text}} and Media URL to {{widgets.get-doge-image.parsed.url}} on the Send Message widget, your configuration should look like this:
With the Function deployed and all the widgets in the Studio Flow connected and configured, all that's left is to see this little application in action. To save all your progress on the Flow and ensure that its code is live, click Publish on the Studio canvas.
Next, connect one of your Twilio phone numbers to this Flow.
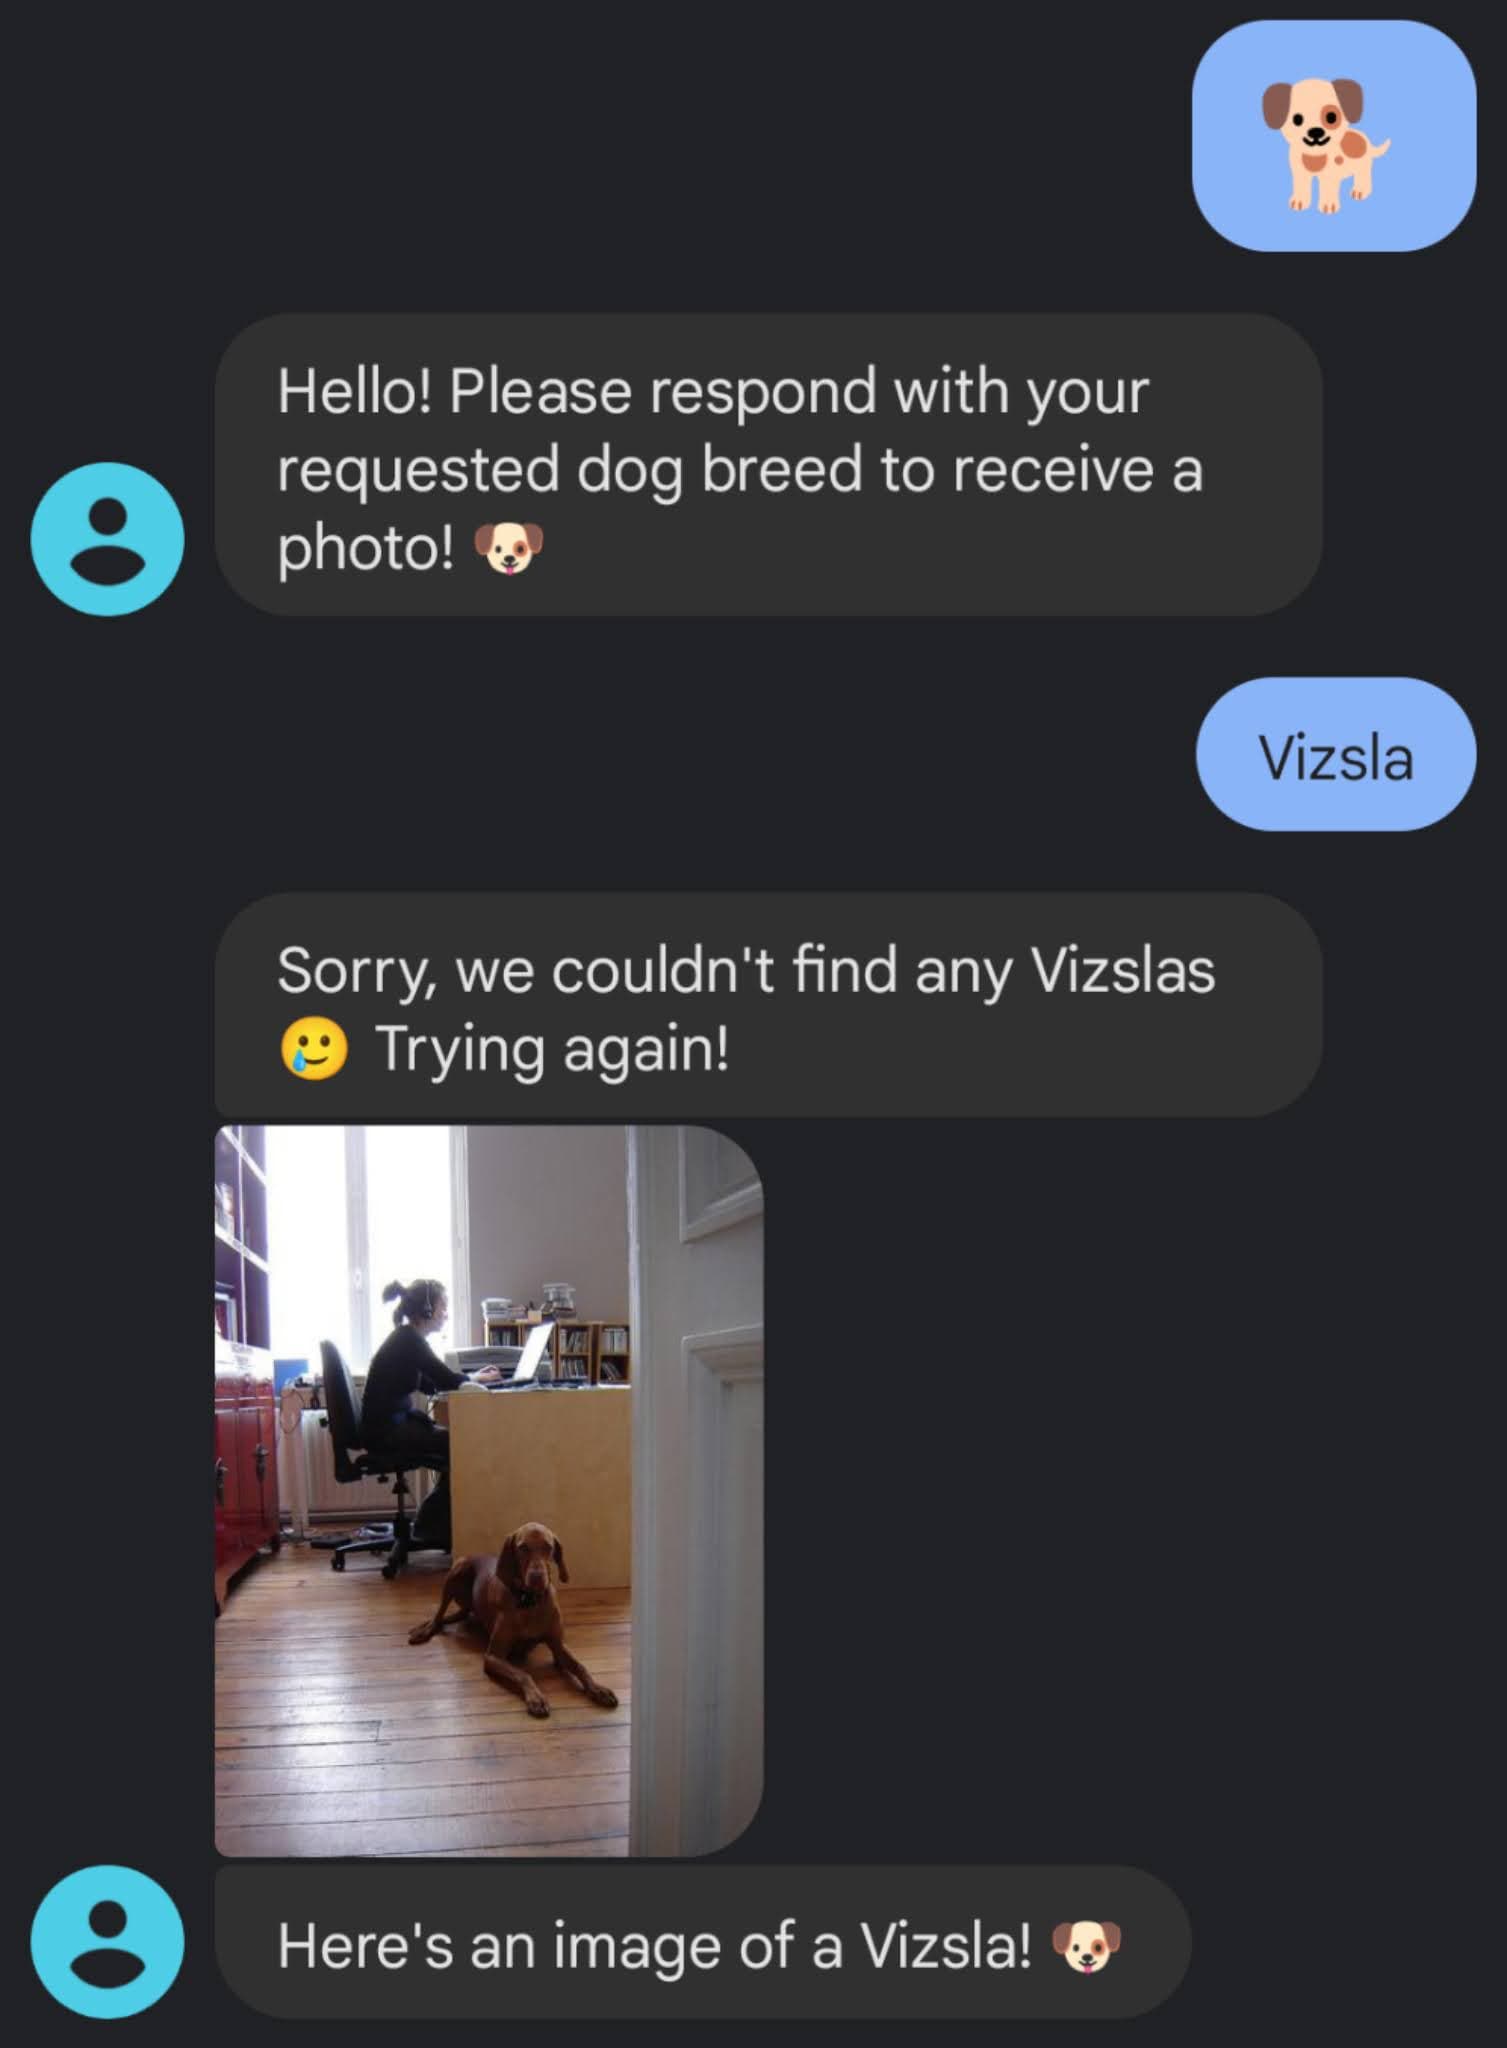
Once you have published your Flow and connected it to your Twilio phone number, send it a brief message to start the conversation. A simple "Ahoy!" will do. Respond to the incoming prompt with a breed of dog, and you will see an MMS of that breed after a momentary delay.
So far, while the Function code does contain some catch logic, it otherwise doesn't really have any resilience to missing breed types or even network errors, and it definitely doesn't show that to the user. To improve the experience, let's see what happens if we expand our flow to handle the fail condition of get-doge-image.
To get started, drag a new Send Message widget onto the canvas, give it a name such as send-fail-message, and connect it to the Fail transition from get-doge-image. By doing this, we're introducing an alternative flow of logic for our application in case the Function runs into an error.
To take this a step further, connect the Sent condition of the newly made send-fail-message to get-doge-image. In doing so, you've just created a loop! If the Function fails to get a dog image, the flow will send the user a message then try to re-run the Function, and will do so until it succeeds.
Set the message body to {{widgets.get-doge-image.body}} Trying again!, click Save, and finally click Publish to publish this update to the flow.
These connections and the configuration for send-fail-message should appear as shown below:
With the flow updated to handle failures from our Function, let's quickly edit our code to make it artificially error-prone; only for the sake of testing, of course!
1const axios = require('axios');23exports.handler = async (context, event, callback) => {4// In Function Parameters, we defined `breed` as the inbound Body from5// our Send & Wait For Reply Widget. We can access that via `event.breed`.6// To minimize the potential for errors, lowercase and trim the user input.7let breed = event.breed.toLowerCase().trim();89// The Dog API also supports sub-breeds, so we need to handle that case.10// For example, if the user requests "Golden Retriever", we need to format11// the breed as "retriever/golden".12if (breed.includes(' ')) {13const [first, second] = breed.split(' ');14breed = `${second}/${first}`;15}1617const dogApiUrl = `https://dog.ceo/api/breed/${breed}/images/random`;1819try {20// Let's introduce some inconsistency by randomly throwing an error21if (Math.random() > 0.3) throw new Error('No doge~');22// Make the request to the Dog API. Remember to use `await` since this23// is an asynchronous request!24const response = await axios.get(dogApiUrl);25// Return the response to the Send & Wait For Reply Widget.26return callback(null, {27text: `Here's an image of a ${event.breed}! 🐶`,28// The `message` property of the response is the URL of the dog image.29url: response.data.message,30});31} catch (error) {32// Remember to handle any errors that may occur!33// This error message will be accessible as `widgets.get-doge-image.body`34return callback(`Sorry, we couldn't find any ${event.breed}s 🥲`);35}36};
Info
To get access to a returned error message, you will need to access the body property returned by the Run Function Widget. This will look like {{widgets.<widget-name>.body}} if used in a liquid template.
Deploy your Function with this updated code, and once completed, send a new message to your Twilio phone number. Between this code change and the new widget in the Studio flow, you will (most likely, this is random, of course) see one or more error messages, ultimately followed by an image of your requested dog breed!
This is a very brief introduction to what is possible! Instead of a retry loop with a message, you could create an entirely new, logical flow of widgets where you ask the user for other information; your imagination is the only true limit here.