App Installation and Setup
Start your free trial of Twilio for Salesforce. The trial package includes 30 free seats for 30 days.
- Need a volume discount? Contact sales for more information.
- Not sure how many users you need for your project? See "How many licenses do I need?" in the FAQ.
- A Twilio account —sign up here if you don't have one yet. If you're installing Twilio for Salesforce in multiple environments, we recommend creating separate Twilio projects for each organization.
- Administrative access to a Salesforce with a supported edition: Enterprise, Unlimited, Force.com, Developer, or Performance.
- MyDomain configured for your Salesforce instance.
Twilio for Salesforce installation takes 10-20 minutes. Let's get started.
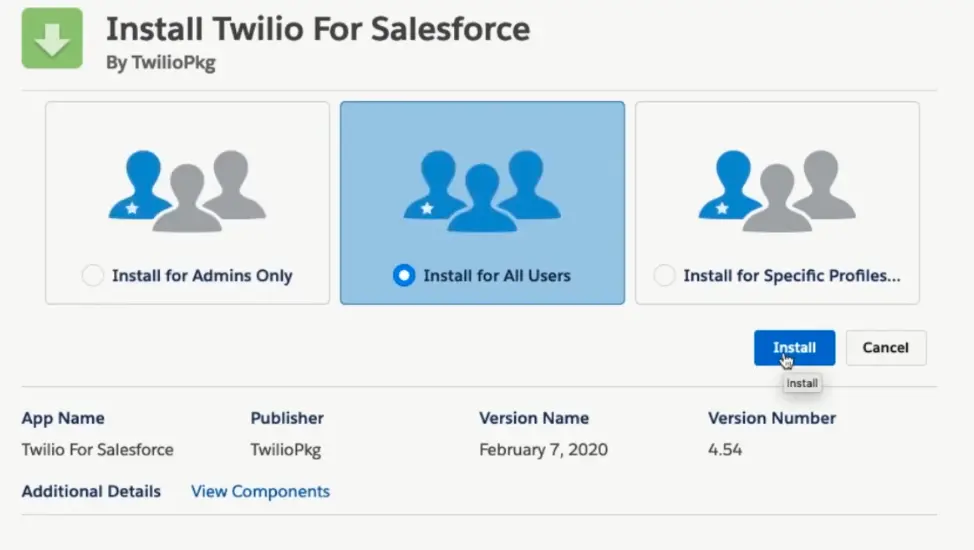
Install Twilio for Salesforce using the links available on this page. When prompted, select Install for All Users :
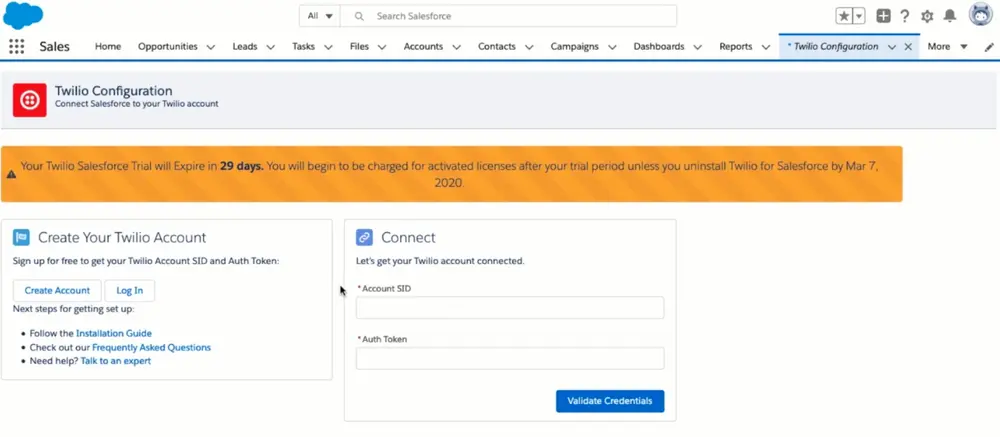
Once the package has finished installing, search for Twilio Configuration from the Salesforce App Launcher. You should then see this page:
Warning
Twilio is only able to provide support for the latest version of the application. Because this product is in Beta, support is limited to the latest version of the product. To view the current app version, please visit Twilio for Salesforce Changelog.
-
From the Twilio Configuration page in Salesforce, click on the Create Account or Log In buttons to go to the Twilio Console.
-
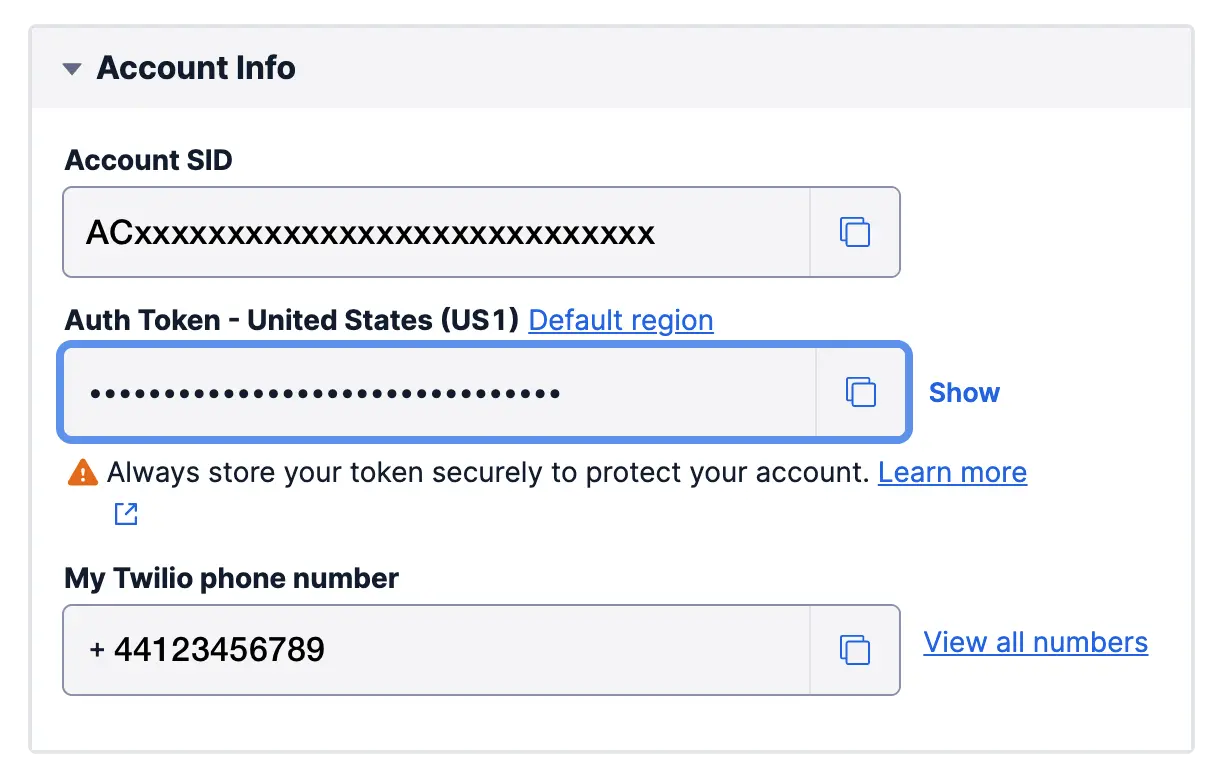
You'll be asked to log in — this will take you to your Account dashboard. Scroll down to the Account Info section.
-
Copy the Account SID and Auth Token values from the front page of the Console:
-
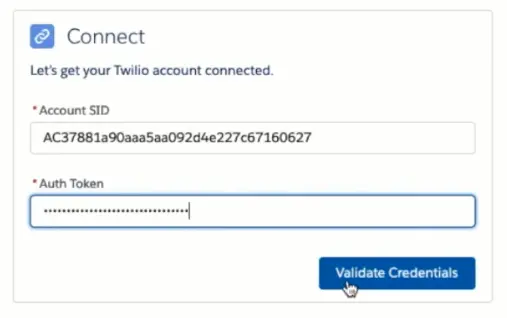
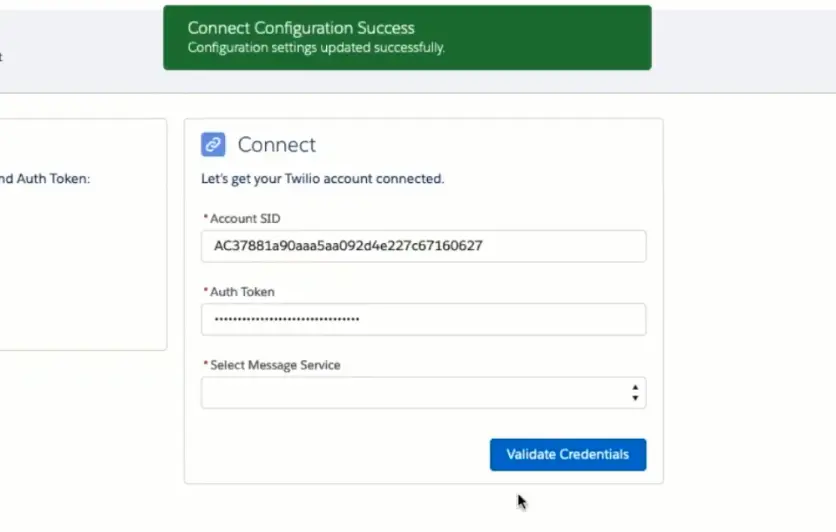
Back in Salesforce, paste your Account SID and Auth Token into Salesforce, then click on Validate Credentials :
-
You'll see a confirmation message like this:
Info
If you need to configure Twilio with multiple Salesforce instances or environments, we recommend creating a separate Twilio Account for each instance. Each instance will have its own Account SID and Auth Token.
A messaging service is a pool of Twilio phone numbers that contain software to prevent text encoding issues, provide international phone numbers, and scale messaging capacity. Twilio for Salesforce uses a messaging service to provide phone numbers for three types of SMS:
- SMS sent from Salesforce users that don't have a personal phone number assigned.
- Campaign SMS sent from the Campaigns Lightning Component.
- Notifications sent from the Send SMS Process Builder action.
To create a messaging service:
- Go to Products & services > Messaing > Services.
- Click Create a Messaging Service.
- Enter a name for your messaging service and select a use case.
- Click Create.
If you already have phone numbers ready and a TwiML Bin that will manage the webhook that you'll use to relay messages to Salesforce, you can proceed through the messaging service setup wizard. For this guide, we assume that you don't, so just click the Skip Setup button for now. We'll work through each of these setup stages separately.
To add a phone number to your messaging service:
- Sign in to the Console, navigate to Products & Services > Numbers & Senders and click the Phone Numbers tab.
- Click Set up a new phone number.
- Complete the fields on the Basic information page.
- Click Next.
- Select and buy a phone number on the Select number page.
- (Optional) Apply filters to limit results and click Search.
- Click Select next to the number, then click Next.
- On the Review and buy number page, review your selection and click Purchase.
- Return to Products & services > Messaing > Services and select your new messaging service.
- On the Senders tab, click Add Senders.
- Select Phone number from the list of sender types, then select the phone number you just purchased.
- Click Add senders.
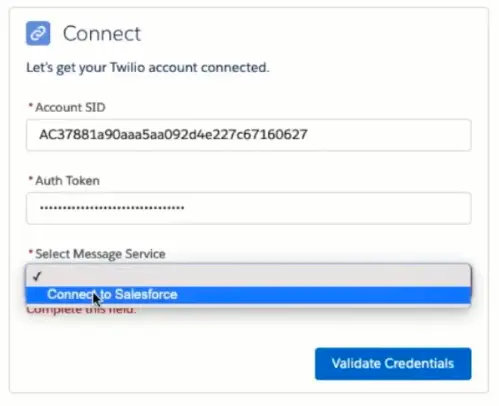
Return to the Twilio Configuration page in Salesforce and refresh the page. You can now be able to select your messaging service from the Select Message Service popup menu. Do so then click Validate Credentials :
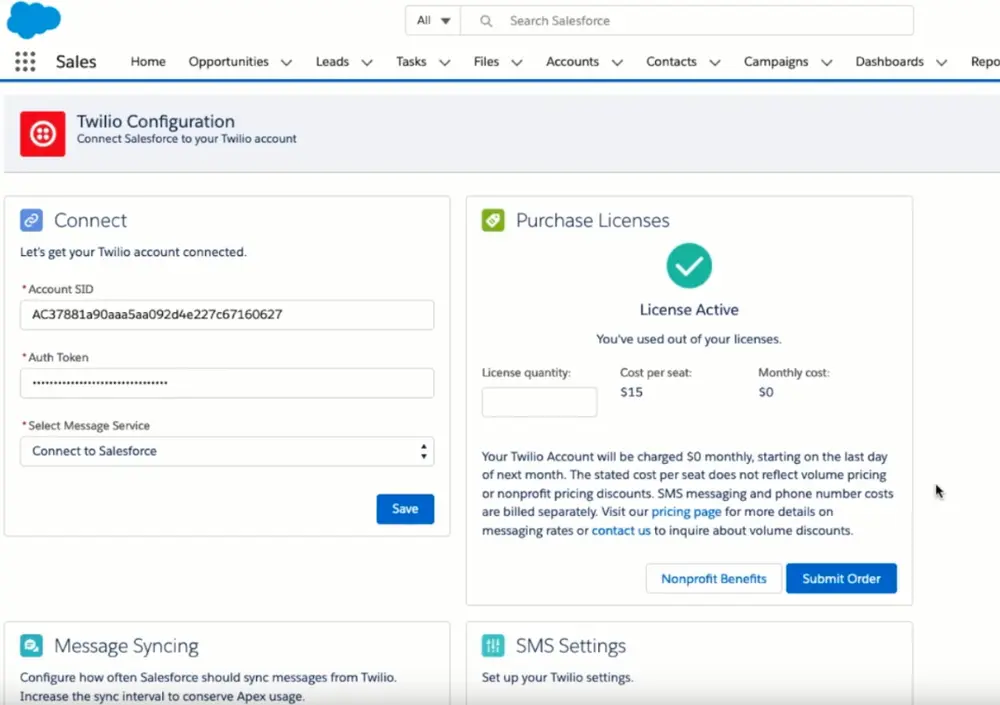
Once your Twilio Account SID, Auth Token, and messaging service have been validated, you'll see the full list of configuration options appear on the Twilio Configuration page:
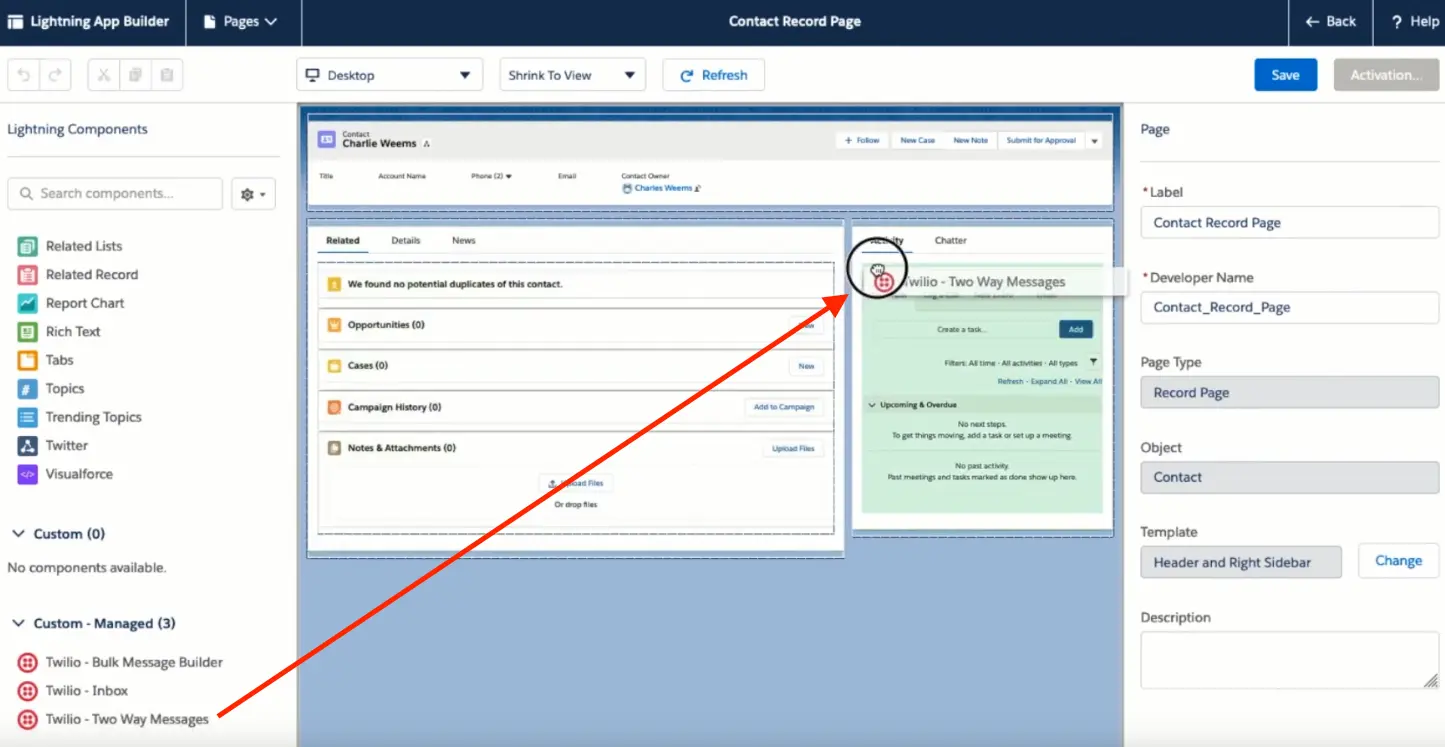
You can add Twilio for Salesforce's Lightning components to your layout using Salesforce's Lightning App Builder. Open the Lightning App Builder by opening a record (Leads, Contacts, Person Accounts, Cases, or Campaigns), clicking on the configuration gear icon, and then selecting Edit Page .
You can then use the Lightning App Builder to add components, such as Twilio's Two-Way Messages, to the page:
Click Save in the top-right corner of the Lightning App Builder and then follow the instructions to deploy your layout to users.
Info
When you've completed this guide, you might like to check out our guides to these Lightning components:
The last step before using the Twilio features in your Salesforce install is to add users.
Anyone who should have access to Twilio functionality should be divided between the two new permission sets that were added to your organization during installation: Twilio User and Twilio Administrator .
- A User can send and view messages, and generally access all the features of the package.
- An Administrator will be able to view and configure Twilio API credentials.
To add these permission sets in Salesforce:
-
Go to Setup then search for
Permission Setsin the find field, then click on the permission set you'd like to provision: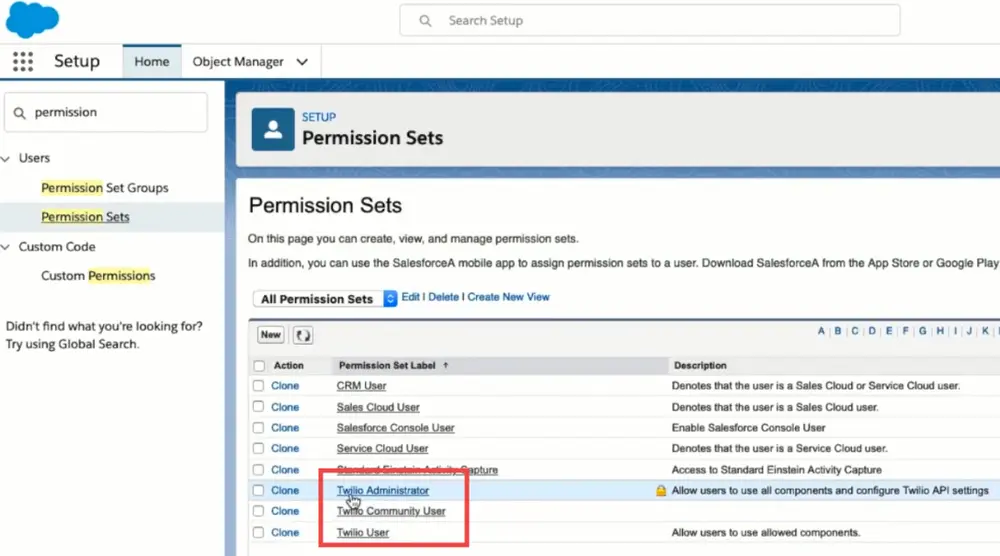
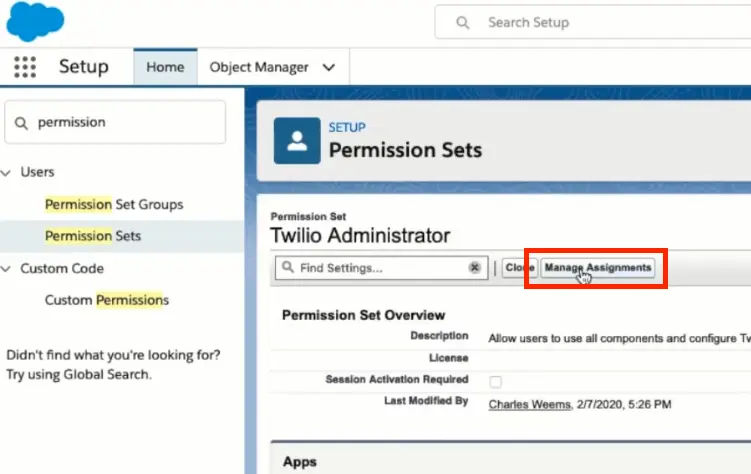
-
On the Permission Set page, click on Manage Assignments :
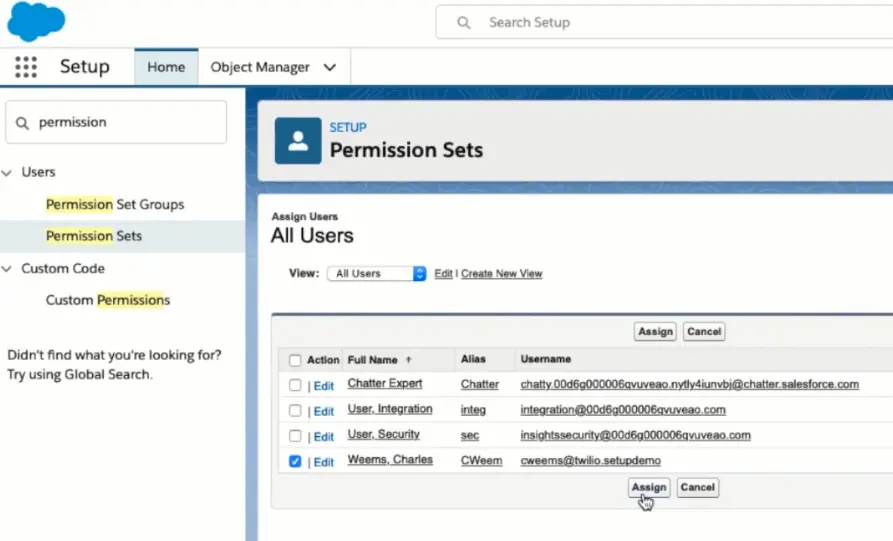
-
Click on the user you would like to assign to the permission set:
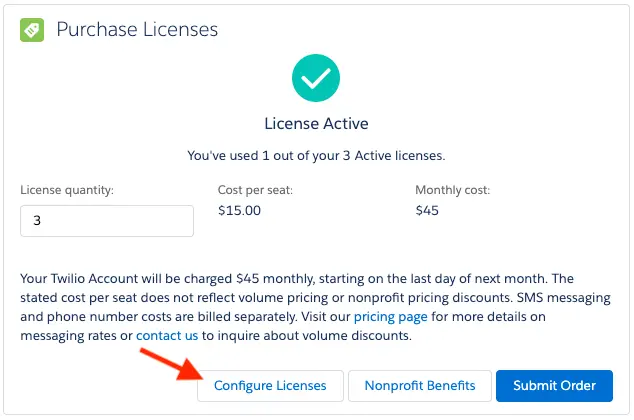
If you're in a sandbox environment, you don't need to do anything further — you can jump ahead past the next step. If you're in a production organization, however, you'll need to configure Salesforce licenses for the users who'll need access. We'll show you how to do that now, but if you are a sandbox user, jump to the next step.
In production instances of Salesforce, you'll need to provision your users with licenses. The trial package includes 30 free seats for 30 days. For more pricing options, contact sales.
-
You can do this by going to Twilio App in Salesforce > Twilio Configuration > Purchase Licenses and then clicking on Configure Licenses :
-
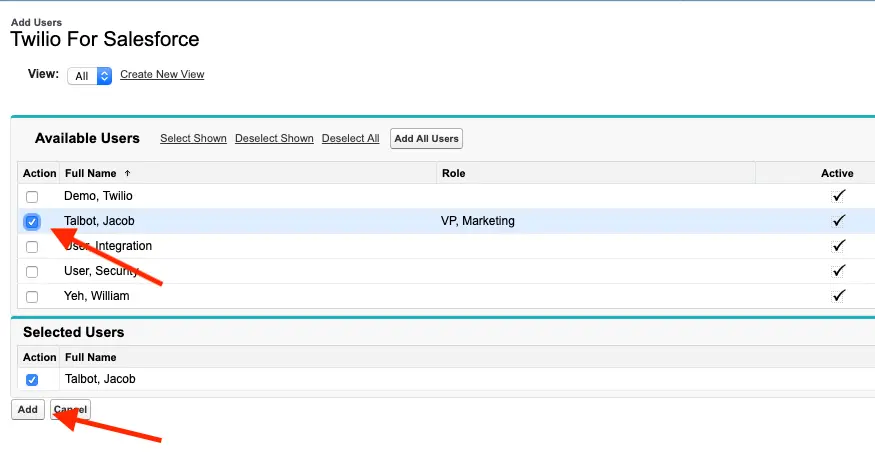
Click on Add Users , and then select the users who you would like to have access to the package:

-
You do not need to provision every user in your organization, only those who will be using Twilio functionality:
That's it — you're done!
Now that your Twilio for Salesforce install is all set, it's time to start sending some messages.
Here are some more Twilio for Salesforce tutorials to help you make the most of your installation: