Receive an incoming phone call
When someone calls your Twilio number, Twilio can invoke a webhook that you've created to determine how to respond using TwiML. On this page, we will be providing some examples of Functions that can serve as the webhook of your Twilio number.
A Function that responds to webhook requests will receive details about the incoming phone call as properties on the event parameter. These include the phone number of the caller (event.From), the phone number of the recipient (event.To), and other relevant data such as geographic metadata about the phone numbers involved. You can view a full list of potential values at Twilio's request to your application.
Once a Function has been invoked on an incoming phone call, any number of actions can be taken. Below are some examples to inspire what you will build.
In order to run any of the following examples, you will first need to create a Function into which you can paste the example code. You can create a Function using the Twilio Console or the Serverless Toolkit as explained below:
If you prefer a UI-driven approach, creating and deploying a Function can be done entirely using the Twilio Console and the following steps:
- Log in to the Twilio Console and navigate to the Functions tab. If you need an account, you can sign up for a free Twilio account here!
- Functions are contained within Services. Create a Service by clicking the Create Service button and providing a name such as test-function.
- Once you've been redirected to the new Service, click the Add + button and select Add Function from the dropdown.
- This will create a new Protected Function for you with the option to rename it. The name of the file will be path it is accessed from.
- Copy any one of the example code snippets from this page that you want to experiment with, and paste the code into your newly created Function. You can quickly switch examples by using the dropdown menu of the code rail.
- Click Save to save your Function's contents.
- Click Deploy All to build and deploy the Function. After a short delay, your Function will be accessible from:
https://<service-name>-<random-characters>-<optional-domain-suffix>.twil.io/<function-path>
For example:test-function-3548.twil.io/hello-world.
Your Function is now ready to be invoked by HTTP requests, set as the webhook of a Twilio phone number, invoked by a Twilio Studio Run Function Widget, and more!
In order for your Function to react to incoming SMS and/or voice calls, it must be set as a webhook for your Twilio number. There are a variety of methods to set a Function as a webhook, as detailed below:
You can use the Twilio Console UI as a straightforward way of connecting your Function as a webhook:
- Log in to the Twilio Console's Phone Numbers page.
- Click on the phone number you'd like to have connected to your Function.
- If you want the Function to respond to incoming SMS, find the A Message Comes In option under Messaging. If you want the Function to respond to Voice, find the A Call Comes In option under Voice & Fax.
- Select Function from the A Message Comes In or A Call Comes In dropdown.
-
Select the
Service
that you are using, then the
Environment
(this will default to
uiunless you have created custom domains ), and finally Function Path of your Function from the respective dropdown menus.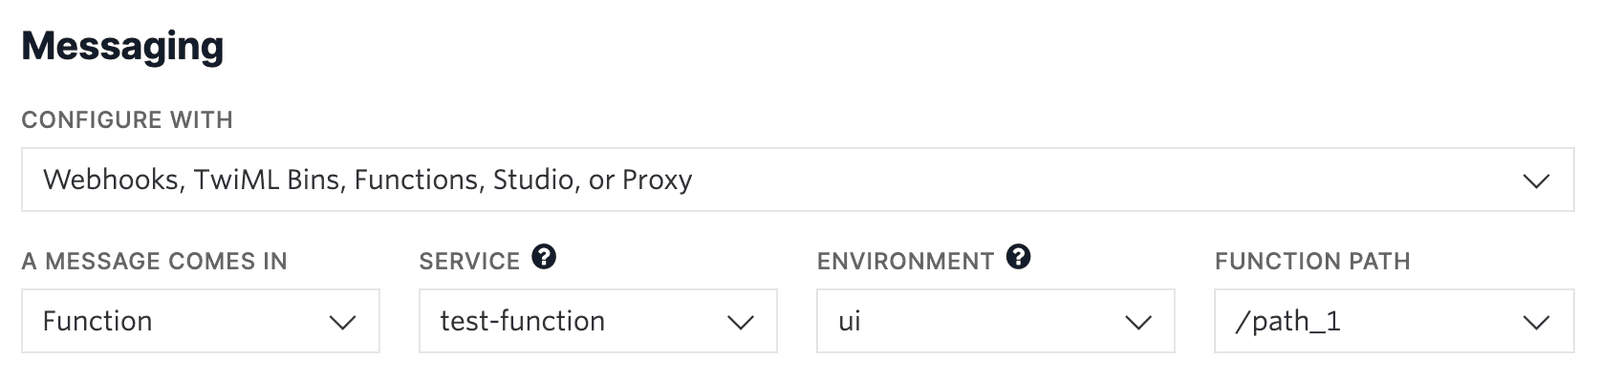
-
Alternatively, you could select
Webhook
instead of Function, and directly paste in the full URL of the Function.
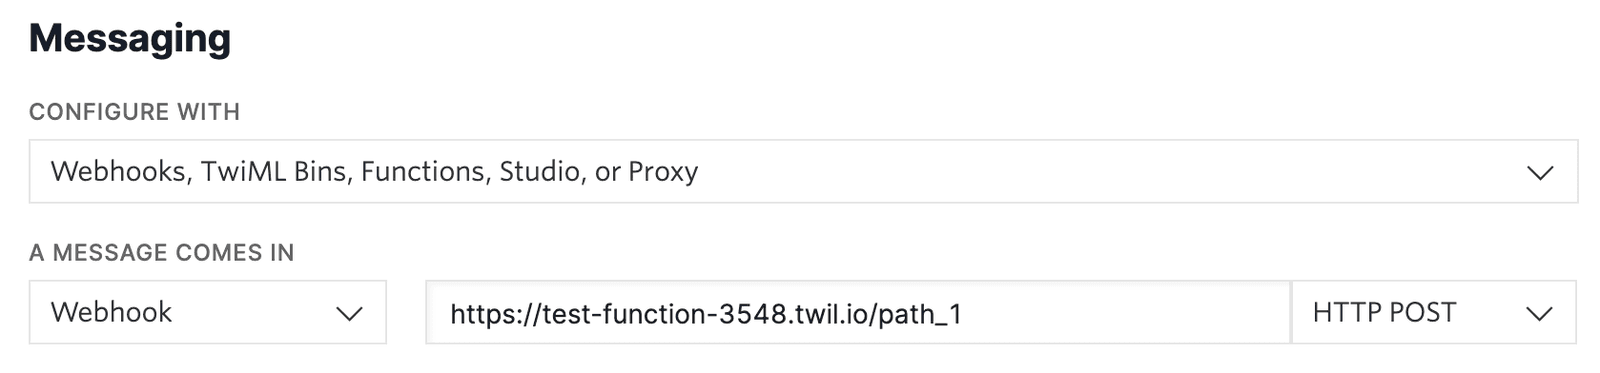
- Click the Save button.
For the most basic possible example, one can reply to the incoming phone call with a hardcoded message. To do so, you can create a new VoiceResponse and declare the intended message contents using the say method. Once your voice content has been set, you can return the generated TwiML by passing it to the callback function as shown and signaling a successful end to the function.
1exports.handler = (context, event, callback) => {2// Create a new voice response object3const twiml = new Twilio.twiml.VoiceResponse();4// Use any of the Node.js SDK methods, such as `say`, to compose a response5twiml.say('Ahoy, World!');6// Return the TwiML as the second argument to `callback`7// This will render the response as XML in reply to the webhook request8return callback(null, twiml);9};
Because information about the incoming phone call is accessible from event object, it's also possible to tailor the response to the call based on that data. For example, you could respond with the city of the caller's phone number, or the number itself. The voice used to respond can also be modified, and pre-recorded audio can be used and/or added as well.
Read the in-depth <Say> documentation for more details about how to configure your response.
1exports.handler = (context, event, callback) => {2// Create a new voice response object3const twiml = new Twilio.twiml.VoiceResponse();4// Webhook information is accessible as properties of the `event` object5const city = event.FromCity;6const number = event.From;78// You can optionally edit the voice used, template variables into your9// response, play recorded audio, and more10twiml.say({ voice: 'alice' }, `Never gonna give you up, ${city || number}`);11twiml.play('https://demo.twilio.com/docs/classic.mp3');12// Return the TwiML as the second argument to `callback`13// This will render the response as XML in reply to the webhook request14return callback(null, twiml);15};
Another common use case is call forwarding. This could be handy in a situation where perhaps you don't want to share your real number while selling an item online, or as part of an IVR tree.
In this example, the Function will accept an incoming phone call and generate a new TwiML response that both notifies the user of the call forwarding and initiates a transfer of the call to the new number.
Read the in-depth <Dial>documentation for more details about connecting calls to other parties.
1const NEW_NUMBER = "+15095550100";23exports.handler = (context, event, callback) => {4// Create a new voice response object5const twiml = new Twilio.twiml.VoiceResponse();67twiml.say('Hello! Forwarding you to our new phone number now!');8// The `dial` method will forward the call to the provided E.164 phone number9twiml.dial(NEW_NUMBER);10// Return the TwiML as the second argument to `callback`11// This will render the response as XML in reply to the webhook request12return callback(null, twiml);13};
Info
In this example, the number for call forwarding is hardcoded as a string in the Function for convenience. For a more secure approach, consider setting NEW_NUMBER as an Environment Variable in the Functions UI instead. It could then be referenced in your code as context.NEW_NUMBER, as shown in the following example.
Use environment variables to store sensitive values
1exports.handler = (context, event, callback) => {2// Create a new voice response object3const twiml = new Twilio.twiml.VoiceResponse();4// Environment variables that you define can be accessed from `context`5const forwardTo = context.NEW_NUMBER;67twiml.say('Hello! Forwarding you to our new phone number now!');8// The `dial` method will forward the call to the provided E.164 phone number9twiml.dial(forwardTo);10// Return the TwiML as the second argument to `callback`11// This will render the response as XML in reply to the webhook request12return callback(null, twiml);13};
Another common use case would be recording the caller's voice as an audio recording which can be retrieved later. Optionally, you can generate text transcriptions of recorded calls by setting the transcribe attribute of <Record> to true.
Read the in-depth <Record> documentation for more details about recording and/or transcribing calls.
1exports.handler = (context, event, callback) => {2// Create a new voice response object3const twiml = new Twilio.twiml.VoiceResponse();45twiml.say('Hello! Please leave a message after the beep.');6// Use <Record> to record the caller's message7twiml.record();8// End the call with <Hangup>9twiml.hangup();10// Return the TwiML as the second argument to `callback`11// This will render the response as XML in reply to the webhook request12return callback(null, twiml);13};
Use extra options to configure your recording
1exports.handler = (context, event, callback) => {2// Create a new voice response object3const twiml = new Twilio.twiml.VoiceResponse();45twiml.say('Hello! Please leave a message after the beep.');6// Use <Record> to record the caller's message.7// Provide options such as `transcribe` to enable message transcription.8twiml.record({ transcribe: true });9// End the call with <Hangup>10twiml.hangup();11// Return the TwiML as the second argument to `callback`12// This will render the response as XML in reply to the webhook request13return callback(null, twiml);14};
For something more exciting, Functions can also power conference calls. In this example, a "moderator" phone number of your choice will have control of the call in a couple of ways:
- startConferenceOnEnter will keep all other callers on hold until the moderator joins
- endConferenceOnExit will cause Twilio to end the call for everyone as soon as the moderator leaves
Incoming calls will be checked based on the incoming event.From value. If it matches the moderator's phone number, the call will begin and then end once the moderator leaves. Any other phone number will join normally and have no effect on the call's beginning or end.
Read the in-depth <Conference> documentation to learn more details.
1exports.handler = (context, event, callback) => {2// Create a new voice response object3const twiml = new Twilio.twiml.VoiceResponse();45// Start with a <Dial> verb6const dial = twiml.dial();7// If the caller is our MODERATOR, then start the conference when they8// join and end the conference when they leave9// The MODERATOR phone number MUST be in E.164 format such as "+15095550100"10if (event.From === context.MODERATOR) {11dial.conference('My conference', {12startConferenceOnEnter: true,13endConferenceOnExit: true,14});15} else {16// Otherwise have the caller join as a regular participant17dial.conference('My conference', {18startConferenceOnEnter: false,19});20}21// Return the TwiML as the second argument to `callback`22// This will render the response as XML in reply to the webhook request23return callback(null, twiml);24};