IVR: Phone Tree with Node.js and Express
Learn to create an interactive voice response (IVR) system with Twilio Programmable Voice and your Node.js web application by using the <Gather>, <Say>, and <Dial> TwiML elements to handle phone tree logic inside an application. You can use this guide to send notifications, create self-service automation, build inbound call centers, build outbound call centers, or implement AI or ML transcription.
See Related reference documentation to learn more about the TwiML voice elements used in this guide.

This Node.js Express sample application is modeled after a typical call center experience.
Stranded aliens can call a phone number and receive instructions on how to get out of earth safely, or call their home planet directly. In this tutorial, we'll show you the key bits of code to make this work.
To run this sample app yourself, download the code and follow the instructions on GitHub.
Read how Livestream and other companies built phone trees on IVR with Twilio. Find guides for many web languages on our IVR example page.
To initiate the phone tree, we need to configure one of our Twilio numbers to send our web application an HTTP request when we get an incoming call.
Click on one of your numbers and configure the Voice URL to point to our app. In our code the route will be /ivr/welcome.
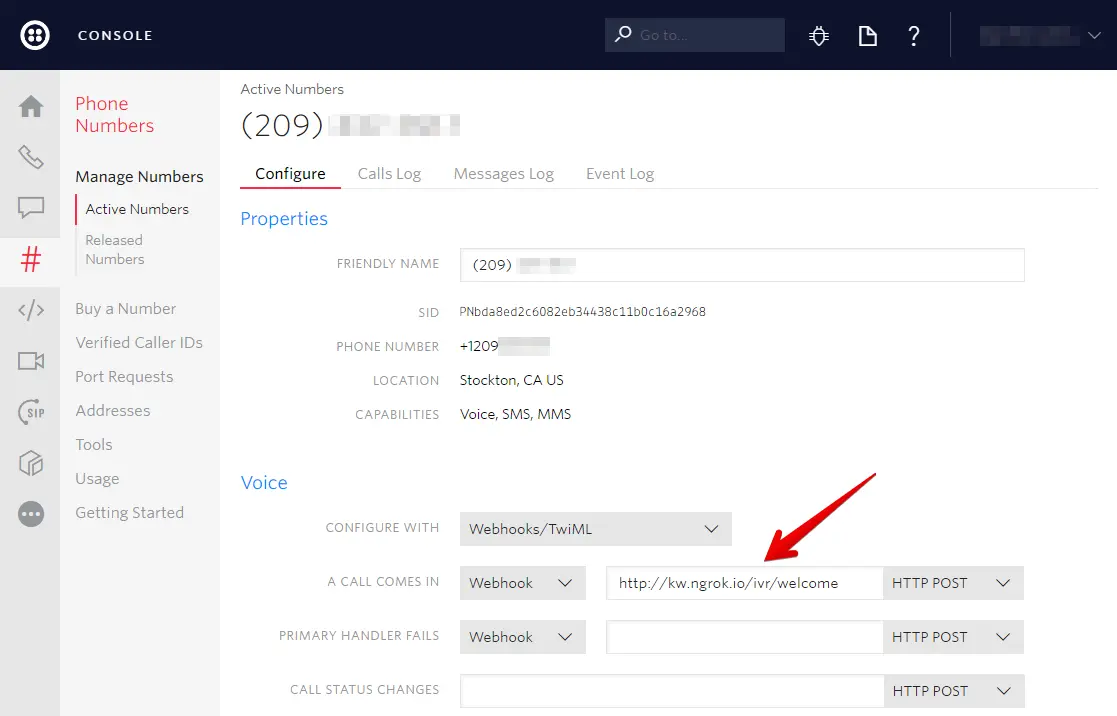
If you don't already have a server configured to use as your webhook, ngrok is a great tool for testing webhooks locally.
With our Twilio number configured, we are prepared to respond to the Twilio request.
Our Twilio number is now configured to send HTTP requests to this route method on any incoming voice calls. Our app responds with TwiML to tell Twilio what to do in response to the message.
In this case we tell Twilio to Gather the input from the caller and we Say a welcome message.
1const VoiceResponse = require('twilio').twiml.VoiceResponse;23exports.welcome = function welcome() {4const voiceResponse = new VoiceResponse();56const gather = voiceResponse.gather({7action: '/ivr/menu',8numDigits: '1',9method: 'POST',10});1112gather.say(13'Thanks for calling the E T Phone Home Service. ' +14'Please press 1 for directions. ' +15'Press 2 for a list of planets to call.',16{loop: 3}17);1819return voiceResponse.toString();20};2122exports.menu = function menu(digit) {23const optionActions = {24'1': giveExtractionPointInstructions,25'2': listPlanets,26};2728return (optionActions[digit])29? optionActions[digit]()30: redirectWelcome();31};3233exports.planets = function planets(digit) {34const optionActions = {35'2': '+19295566487',36'3': '+17262043675',37'4': '+16513582243',38};3940if (optionActions[digit]) {41const twiml = new VoiceResponse();42twiml.dial(optionActions[digit]);43return twiml.toString();44}4546return redirectWelcome();47};4849/**50* Returns Twiml51* @return {String}52*/53function giveExtractionPointInstructions() {54const twiml = new VoiceResponse();5556twiml.say(57'To get to your extraction point, get on your bike and go down ' +58'the street. Then Left down an alley. Avoid the police cars. Turn left ' +59'into an unfinished housing development. Fly over the roadblock. Go ' +60'passed the moon. Soon after you will see your mother ship.',61{voice: 'Polly.Amy', language: 'en-GB'}62);6364twiml.say(65'Thank you for calling the ET Phone Home Service - the ' +66'adventurous alien\'s first choice in intergalactic travel'67);6869twiml.hangup();7071return twiml.toString();72}7374/**75* Returns a TwiML to interact with the client76* @return {String}77*/78function listPlanets() {79const twiml = new VoiceResponse();8081const gather = twiml.gather({82action: '/ivr/planets',83numDigits: '1',84method: 'POST',85});8687gather.say(88'To call the planet Broh doe As O G, press 2. To call the planet DuhGo ' +89'bah, press 3. To call an oober asteroid to your location, press 4. To ' +90'go back to the main menu, press the star key ',91{voice: 'Polly.Amy', language: 'en-GB', loop: 3}92);9394return twiml.toString();95}9697/**98* Returns an xml with the redirect99* @return {String}100*/101function redirectWelcome() {102const twiml = new VoiceResponse();103104twiml.say('Returning to the main menu', {105voice: 'Polly.Amy',106language: 'en-GB',107});108109twiml.redirect('/ivr/welcome');110111return twiml.toString();112}
After saying the text to the caller and retrieving their input, Twilio will send this input to our application.
The gather's action parameter takes an absolute or relative URL as a value - in our case, the /ivr/menu route.
When the caller has finished entering digits, Twilio will make a GET or POST request to this URL including a Digits parameter with the number our caller chose.
After making this request, Twilio will continue the current call using the TwiML received in your response. Any TwiML verbs occurring after a <Gather> are unreachable, unless the caller enters no digits.
1const VoiceResponse = require('twilio').twiml.VoiceResponse;23exports.welcome = function welcome() {4const voiceResponse = new VoiceResponse();56const gather = voiceResponse.gather({7action: '/ivr/menu',8numDigits: '1',9method: 'POST',10});1112gather.say(13'Thanks for calling the E T Phone Home Service. ' +14'Please press 1 for directions. ' +15'Press 2 for a list of planets to call.',16{loop: 3}17);1819return voiceResponse.toString();20};2122exports.menu = function menu(digit) {23const optionActions = {24'1': giveExtractionPointInstructions,25'2': listPlanets,26};2728return (optionActions[digit])29? optionActions[digit]()30: redirectWelcome();31};3233exports.planets = function planets(digit) {34const optionActions = {35'2': '+19295566487',36'3': '+17262043675',37'4': '+16513582243',38};3940if (optionActions[digit]) {41const twiml = new VoiceResponse();42twiml.dial(optionActions[digit]);43return twiml.toString();44}4546return redirectWelcome();47};4849/**50* Returns Twiml51* @return {String}52*/53function giveExtractionPointInstructions() {54const twiml = new VoiceResponse();5556twiml.say(57'To get to your extraction point, get on your bike and go down ' +58'the street. Then Left down an alley. Avoid the police cars. Turn left ' +59'into an unfinished housing development. Fly over the roadblock. Go ' +60'passed the moon. Soon after you will see your mother ship.',61{voice: 'Polly.Amy', language: 'en-GB'}62);6364twiml.say(65'Thank you for calling the ET Phone Home Service - the ' +66'adventurous alien\'s first choice in intergalactic travel'67);6869twiml.hangup();7071return twiml.toString();72}7374/**75* Returns a TwiML to interact with the client76* @return {String}77*/78function listPlanets() {79const twiml = new VoiceResponse();8081const gather = twiml.gather({82action: '/ivr/planets',83numDigits: '1',84method: 'POST',85});8687gather.say(88'To call the planet Broh doe As O G, press 2. To call the planet DuhGo ' +89'bah, press 3. To call an oober asteroid to your location, press 4. To ' +90'go back to the main menu, press the star key ',91{voice: 'Polly.Amy', language: 'en-GB', loop: 3}92);9394return twiml.toString();95}9697/**98* Returns an xml with the redirect99* @return {String}100*/101function redirectWelcome() {102const twiml = new VoiceResponse();103104twiml.say('Returning to the main menu', {105voice: 'Polly.Amy',106language: 'en-GB',107});108109twiml.redirect('/ivr/welcome');110111return twiml.toString();112}
Now that we have told Twilio where to send the caller's input, we can look at how to process that input.
If our callers choose to call their home planet we will read them the planet directory. This is akin to a typical "company directory" feature of most IVRs.
In this route, we grab the caller's selection from the request and store it in a variable called selectedOption. We then use a Dial verb with the appropriate phone number to connect our caller to their home planet.
The current numbers are hardcoded, but they could also be read from a database or from a file.
1const VoiceResponse = require('twilio').twiml.VoiceResponse;23exports.welcome = function welcome() {4const voiceResponse = new VoiceResponse();56const gather = voiceResponse.gather({7action: '/ivr/menu',8numDigits: '1',9method: 'POST',10});1112gather.say(13'Thanks for calling the E T Phone Home Service. ' +14'Please press 1 for directions. ' +15'Press 2 for a list of planets to call.',16{loop: 3}17);1819return voiceResponse.toString();20};2122exports.menu = function menu(digit) {23const optionActions = {24'1': giveExtractionPointInstructions,25'2': listPlanets,26};2728return (optionActions[digit])29? optionActions[digit]()30: redirectWelcome();31};3233exports.planets = function planets(digit) {34const optionActions = {35'2': '+19295566487',36'3': '+17262043675',37'4': '+16513582243',38};3940if (optionActions[digit]) {41const twiml = new VoiceResponse();42twiml.dial(optionActions[digit]);43return twiml.toString();44}4546return redirectWelcome();47};4849/**50* Returns Twiml51* @return {String}52*/53function giveExtractionPointInstructions() {54const twiml = new VoiceResponse();5556twiml.say(57'To get to your extraction point, get on your bike and go down ' +58'the street. Then Left down an alley. Avoid the police cars. Turn left ' +59'into an unfinished housing development. Fly over the roadblock. Go ' +60'passed the moon. Soon after you will see your mother ship.',61{voice: 'Polly.Amy', language: 'en-GB'}62);6364twiml.say(65'Thank you for calling the ET Phone Home Service - the ' +66'adventurous alien\'s first choice in intergalactic travel'67);6869twiml.hangup();7071return twiml.toString();72}7374/**75* Returns a TwiML to interact with the client76* @return {String}77*/78function listPlanets() {79const twiml = new VoiceResponse();8081const gather = twiml.gather({82action: '/ivr/planets',83numDigits: '1',84method: 'POST',85});8687gather.say(88'To call the planet Broh doe As O G, press 2. To call the planet DuhGo ' +89'bah, press 3. To call an oober asteroid to your location, press 4. To ' +90'go back to the main menu, press the star key ',91{voice: 'Polly.Amy', language: 'en-GB', loop: 3}92);9394return twiml.toString();95}9697/**98* Returns an xml with the redirect99* @return {String}100*/101function redirectWelcome() {102const twiml = new VoiceResponse();103104twiml.say('Returning to the main menu', {105voice: 'Polly.Amy',106language: 'en-GB',107});108109twiml.redirect('/ivr/welcome');110111return twiml.toString();112}
See use cases for IVRs with Twilio Programmable Voice to learn about the different applications you can build with IVR phone trees.
After following this guide, you can successfully process incoming voice calls and present an interactive menu using Twilio Programmable Voice in your application. You will have a live IVR system capable of listening to dual-tone multi-frequency (DTMF) keypad inputs, executing logic conditionally based on user choice, and dynamically forwarding or terminating calls based on your response payload.
Explore the following guides to build on what you've learned in this guide:
- Respond to incoming phone calls: Learn how to handle incoming webhooks from Twilio to dynamically direct callers.
- Collect payments during calls: Use the
<Pay>TwiML verb to securely collect payment information from callers. - Make outbound phone calls: Initiate phone calls programmatically from your Node.js application.