Authy Push Authentications
Warning
As of November 2022, Twilio no longer provides support for Authy SMS/Voice-only customers. Customers who were also using Authy TOTP or Push prior to March 1, 2023 are still supported. The Authy API is now closed to new customers and will be fully deprecated in the future.
For new development, we encourage you to use the Verify v2 API.
Existing customers will not be impacted at this time until Authy API has reached End of Life. For more information about migration, see Migrating from Authy to Verify for SMS.
Before sending a One-Time Password:
- Create an Authy Application (see Applications documentation)
- Create a User (see Users documentation)
Push authentication offers seamless user experience for second-factor and passwordless authentication and offers the highest level of cryptographic security. All requests are fully encrypted, end to end and allow for non-repudiated transactions.
For users with the ability to install an app on their mobile device or computer, these ApprovalRequests can be sent and verified through our REST API. For information on other channels such as SMS or soft tokens, see the Authy API One-time Passwords documentation.
This will create a new approval request for the given Authy ID and send it to the end user along with a push notification to the Authy Mobile app(s), Desktop app(s), and any SDK-driven apps. Only the subject of the transaction is sent through Google or Apple push channels. If push notifications fail or delay, the user can still retrieve pending transactions by opening the Authy app or an SDK app manually.
POST https://api.authy.com/onetouch/{FORMAT}/users/{AUTHY_ID}/approval_requests
| Name | Type | Description |
|---|---|---|
| FORMAT | String | The format to expect back from the REST API call. json, or xml. |
| AUTHY_ID | Integer | The Authy ID of the user to send a Push Authentication. Create an Authy ID by registering a user. |
| Name | Description |
|---|---|
message String | Shown to the user when the push notification arrives. (📇 PII ) |
details Hash (optional) (Max 20 characters for the Key in the key value pair) | Dictionary containing any ApprovalRequest details you'd like to present to the user to assist their decision to approve or deny a transaction. We automatically add a timestamp to transactions. See below for an example on how to use details. (📇 PII ) |
hidden_details Hash (optional) (Max 20 characters for the Key in the key value pair) | Dictionary containing the approval request details hidden to user. This information will be preserved in transaction records but not presented to the user, so it may be useful for your business logic and routing. (📇 PII ) |
logos Hash (optional) | A dictionary containing override logos that will be shown to user in the push authentication transaction details. By default, we send the logos uploaded through the console. (🏢 not PII ) |
seconds_to_expire Integer (optional) | The number of seconds a transaction is valid without user response (pending) before expiring. Defaults to 86400 (one day); 0 will never expire. This should not be set too low as users need time to evaluate a request. (🏢 not PII ) |
| Name | Description |
|---|---|
approval_request Hash | Hash containing the keys & values for the ApprovalRequest. (📇 PII ) |
uuid String | Unique transaction ID of the ApprovalRequest. You'll need the uuid to query the request status or tie future callbacks to this ApprovalRequest. (🏢 not PII ) |
created_at Datetime | The date and time that we created the ApprovalRequest. (🏢 not PII ) |
status String | Tracks the current state of the ApprovalRequest between pending a user response, approved, denied, or expired. (🏢 not PII ) |
1# Download the helper library from https://github.com/twilio/authy-python2from authy.api import AuthyApiClient34# Your API key from twilio.com/console/authy/applications5# DANGER! This is insecure. See https://twil.io/secure6authy_api = AuthyApiClient('api_key')78details = {9'username': 'Bill Smith',10'location': 'California, USA',11'Account Number': '981266321'12}1314hidden_details = {15'transaction_num': 'TR139872562346'16}1718logos = [19dict(res='default', url='https://example.com/logos/default.png'),20dict(res='low', url='https://example.com/logos/low.png')21]2223response = authy_api.one_touch.send_request(24authy_id,25"Login requested for a CapTrade Bank account.",26seconds_to_expire=120,27details=details,28hidden_details=hidden_details,29logos=logos)3031if response.ok():32print(response.get_uuid())33else:34print(response.errors())
Output
1{2"approval_request": {3"uuid": "c31f7620-9726-0135-6e6f-0ad8af7cead6"4},5"success": true6}
This request generates a push notification that looks like this:
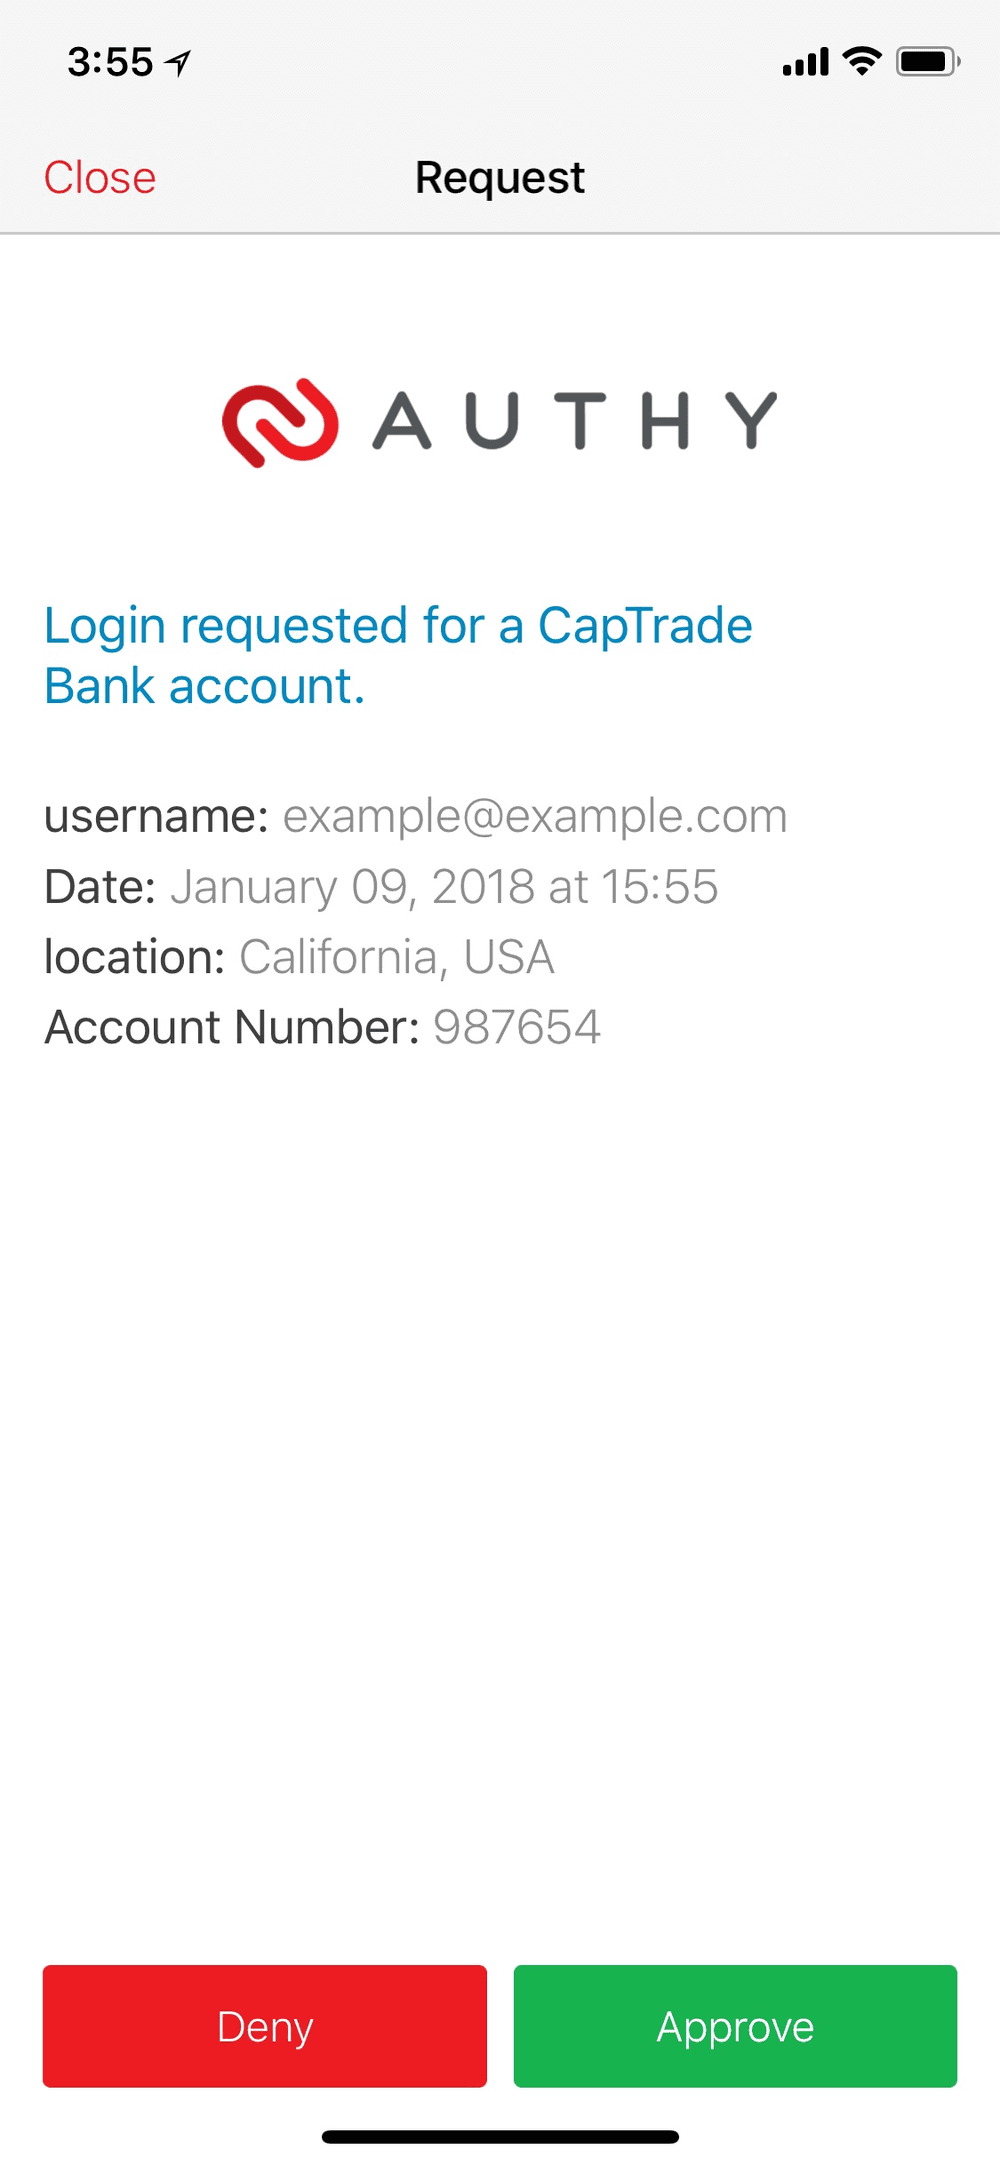
By default, all the ApprovalRequests created will be shown to the user using the logo defined in your application in the console. However, you can provide a custom image at the time of the request.
The logos parameter is expected to be an array of objects, each object with two fields: res (for resolution) and url (the location where you host your logo). If you include the logos parameter, we expect it to include a res with value default.
Options for the res field are:
default | fallback logo if logo for device resolution is not provided |
|---|---|
low | for devices with low resolution |
med | for devices with medium resolution |
high | for devices with high resolution |
Info
All image URLs must be served over HTTPS and not HTTP. Due to mobile platform restrictions, image requests must be over a secure channel.
There are two ways for you to check on ApprovalRequest status. You can poll the endpoint below for the status of an ApprovalRequest or you can use a webhook callback. Polling is the quickest way to get started using and testing the endpoint.
In order to implement polling, you can hit the following endpoint repeatedly until the status changes. We suggest polling once per second for the best user experience.
GET https://api.authy.com/onetouch/{FORMAT}/approval_requests/{PUSH_UUID}
| Name | Description |
|---|---|
FORMAT String | The format to expect back from the REST API call. json or xml. |
PUSH_UUID UUID | The approval request ID. (Obtained from the response to an ApprovalRequest) (🏢 not PII ) |
| Name | Description |
|---|---|
approval_request Hash | Hash containing the status of the approval request and other attributes as you can see in the example below. Possible values of nested status key are pending, expired, approved, or denied. "device" key only included in response when status is approved or denied. (📇 PII ) |
1# Download the helper library from https://github.com/twilio/authy-python2from authy.api import AuthyApiClient34# Your API key from twilio.com/console/authy/applications5# DANGER! This is insecure. See https://twil.io/secure6authy_api = AuthyApiClient('api_key')78status = authy_api.one_touch.get_approval_status('c31f7620-9726-0135-6e6f-0ad8af7cead6')910print(status.content)
Output
1{2"success": true,3"approval_request": {4"status": "approved",5"_user_email": "user@example.com",6"uuid": "c31f7620-9726-0135-6e6f-0ad8af7cead6",7"notified": false,8"hidden_details": {9"transaction_num": "TR139872562346"10},11"created_at": "2019-09-03T23:34:53Z",12"app_id": "5c1234c1234cfd6e8b1234",13"_app_serial_id": 123456,14"updated_at": "2019-09-03T23:37:01Z",15"seconds_to_expire": 120,16"_app_name": "Example Authy Application",17"processed_at": "2019-09-03T23:37:01Z",18"user_id": "59f27bc1234ef64e34a61234",19"_id": "5d6e12344d79f51234b6",20"_authy_id": 123,21"device": {22"city":"San Francisco",23"country":"United States",24"ip":"192.168.92.226",25"region":"California",26"registration_city":"New York",27"registration_country":"United States",28"registration_ip":"127.0.0.4",29"registration_method":"push",30"registration_region":"New York",31"os_type":"ios",32"last_account_recovery_at":null,33"id":2456245,34"registration_date":1506380735,35"last_sync_date":1508436616,36"enabled_unlock_methods": "pin, fingerprint",37"last_unlock_method_used": "pin",38"last_unlock_date": 154060175239}40}41}
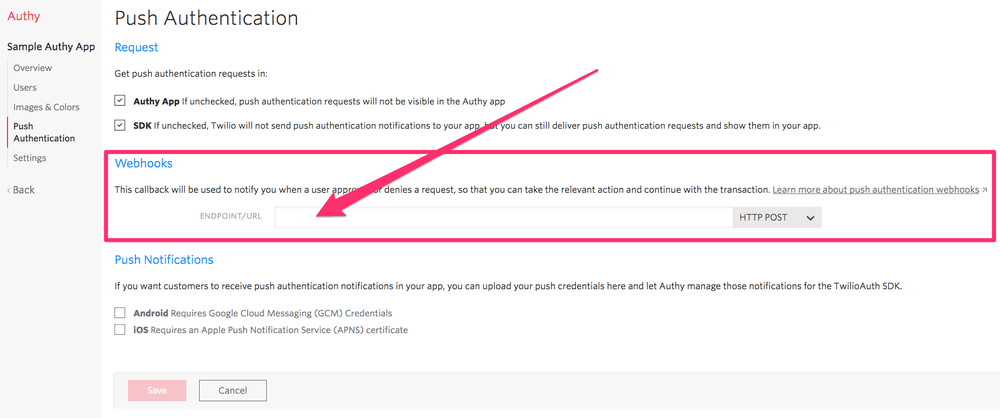
In your final application, we recommend exposing a URL to Twilio and using webhooks. With a webhook, we will call your URL immediately when a user reacts to an ApprovalRequest. Webhooks are a more scalable solution than polling. For redundancy you can implement both webhook callbacks and long-polling.
Learn more about how to validate incoming Twilio Authy API requests and how to implement Authy Webhooks. You can set a callback URL in the Push Authentication tab of your Authy Application in the console.