Two-Factor Authentication with Authy, Java and Servlets
Warning
As of November 2022, Twilio no longer provides support for Authy SMS/Voice-only customers. Customers who were also using Authy TOTP or Push prior to March 1, 2023 are still supported. The Authy API is now closed to new customers and will be fully deprecated in the future.
For new development, we encourage you to use the Verify v2 API.
Existing customers will not be impacted at this time until Authy API has reached End of Life. For more information about migration, see Migrating from Authy to Verify for SMS.
This Java Servlets sample application demonstrates two-factor authentication (2FA) using Authy. To run this sample app yourself, download the code and follow the instructions on GitHub.
Adding two-factor authentication (2FA) to your web application increases the security of your user's data. Multi-factor authentication determines the identity of a user by validating first by logging into the app, and then through their mobile devices using Authy.
For the second factor, we will validate that the user has their mobile phone by either:
- Sending them a OneTouch push notification to their mobile Authy app or
- Sending them a one-time token in a text message sent with Authy via Twilio.
1package com.twilio.authy2fa;23import org.eclipse.jetty.server.Request;4import org.eclipse.jetty.server.Server;5import org.eclipse.jetty.server.handler.AbstractHandler;67import javax.servlet.ServletException;8import javax.servlet.http.HttpServletRequest;9import javax.servlet.http.HttpServletResponse;10import java.io.IOException;1112public class App extends AbstractHandler {1314public static void main(String[] args) throws Exception {15Server server = new Server(8080);16server.setHandler(new App());1718server.start();19server.join();20}2122public void handle(String target,23Request baseRequest,24HttpServletRequest request,25HttpServletResponse response)26throws IOException, ServletException {27response.setContentType("text/html;charset=utf-8");28response.setStatus(HttpServletResponse.SC_OK);29baseRequest.setHandled(true);30}31}32
See how VMware uses Authy 2FA to secure their enterprise mobility management solution.
If you haven't already, now is the time to sign up for Authy. Create your first application, naming it as you wish. After you create your application, your production API key will be visible on your dashboard:
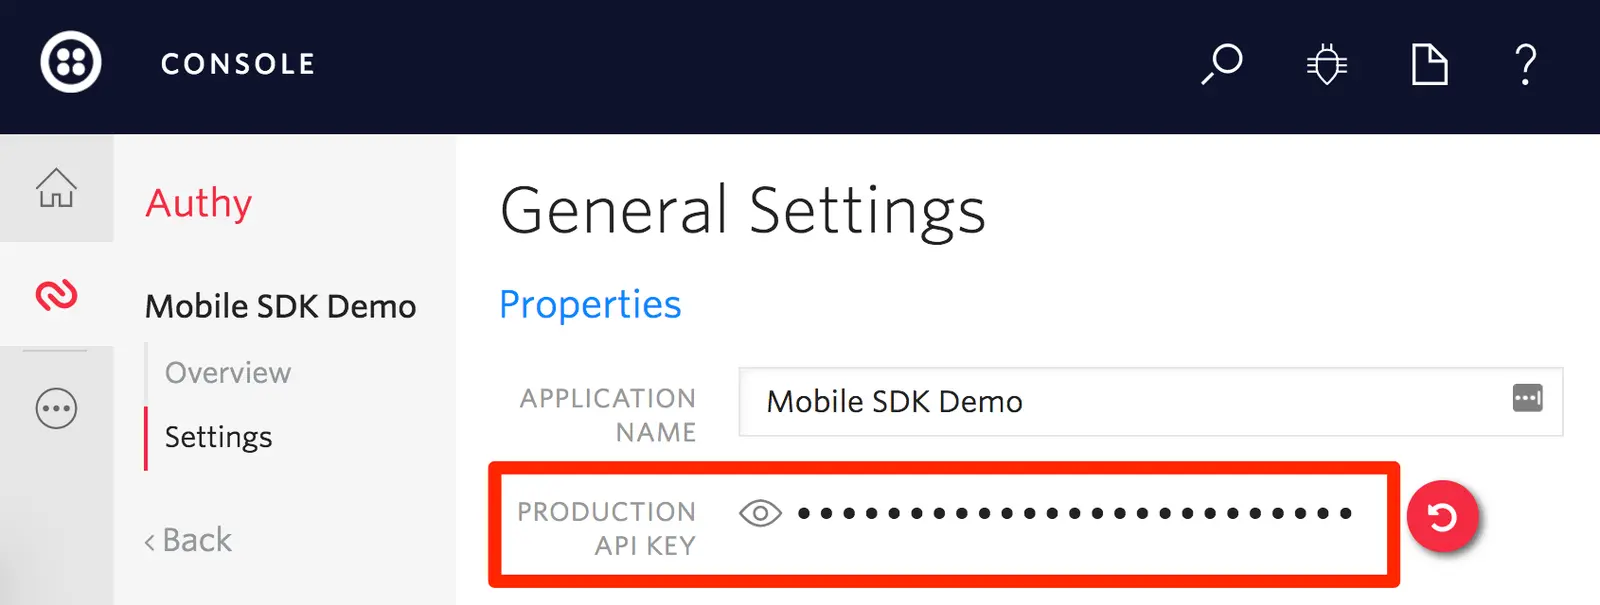
Once we have an Authy API key, we store it on this .env file, which helps us set the environment variables for our app.
You'll also want to set a callback URL for your application in the OneTouch section of the Authy dashboard. See the project's README for more details.
src/main/java/com/twilio/authy2fa/servlet/RegistrationServlet.java
1package com.twilio.authy2fa.servlet;23import com.authy.AuthyApiClient;4import com.twilio.authy2fa.exception.AuthyRequestException;5import com.twilio.authy2fa.lib.RequestParametersValidator;6import com.twilio.authy2fa.models.User;7import com.twilio.authy2fa.models.UserService;8import com.twilio.authy2fa.lib.SessionManager;9import com.twilio.authy2fa.service.AuthyRequestService;10import org.slf4j.Logger;11import org.slf4j.LoggerFactory;1213import javax.servlet.ServletException;14import javax.servlet.annotation.WebServlet;15import javax.servlet.http.HttpServlet;16import javax.servlet.http.HttpServletRequest;17import javax.servlet.http.HttpServletResponse;18import java.io.IOException;1920@WebServlet(urlPatterns = "/registration")21public class RegistrationServlet extends HttpServlet{2223private final SessionManager sessionManager;24private final UserService userService;25private final AuthyRequestService authyRequestService;2627private static final Logger LOGGER = LoggerFactory.getLogger(RegistrationServlet.class);282930@SuppressWarnings("unused")31public RegistrationServlet() {32this(33new SessionManager(),34new UserService(),35new AuthyRequestService()36);37}3839public RegistrationServlet(SessionManager sessionManager, UserService userService,40AuthyRequestService authyRequestService) {41this.sessionManager = sessionManager;42this.userService = userService;43this.authyRequestService = authyRequestService;44}4546protected void doGet(HttpServletRequest request, HttpServletResponse response)47throws ServletException, IOException {4849request.getRequestDispatcher("/registration.jsp").forward(request, response);50}5152protected void doPost(HttpServletRequest request, HttpServletResponse response)53throws ServletException, IOException {5455String name = request.getParameter("name");56String email = request.getParameter("email");57String password = request.getParameter("password");58String countryCode = request.getParameter("countryCode");59String phoneNumber = request.getParameter("phoneNumber");6061if (validateRequest(request)) {6263try {64int authyId = authyRequestService.sendRegistrationRequest(email, phoneNumber, countryCode);6566userService.create(new User(name, email, password, countryCode, phoneNumber, authyId));6768response.sendRedirect("/login.jsp");69} catch (AuthyRequestException e) {7071LOGGER.error(e.getMessage());7273request.setAttribute("data", "Registration failed");74preserveStatusRequest(request, name, email, countryCode, phoneNumber);75request.getRequestDispatcher("/registration.jsp").forward(request, response);76}77} else {78preserveStatusRequest(request, name, email, countryCode, phoneNumber);79request.getRequestDispatcher("/registration.jsp").forward(request, response);80}81}8283private boolean validateRequest(HttpServletRequest request) {84RequestParametersValidator validator = new RequestParametersValidator(request);8586return validator.validatePresence("name", "email", "password", "countryCode", "phoneNumber")87&& validator.validateEmail("email");88}8990private void preserveStatusRequest(91HttpServletRequest request,92String name,93String email,94String countryCode,95String phoneNumber) {96request.setAttribute("name", name);97request.setAttribute("email", email);98request.setAttribute("countryCode", countryCode);99request.setAttribute("phoneNumber", phoneNumber);100}101}102
Let's take a look at how we register a user with Authy.
When a new user signs up for our website, we call this controller, which handles saving our new user to the database as well as registering the user with Authy.
All Authy needs to get a user set up for your application is the email, phone number and country code. In order to do two-factor authentication, we need to make sure we ask for these things at the point of sign up.
Once we register the user with Authy we can get the user's authy_id back. This is very important since it's how we will verify the identity of our User with Authy.
src/main/java/com/twilio/authy2fa/servlet/RegistrationServlet.java
1package com.twilio.authy2fa.servlet;23import com.authy.AuthyApiClient;4import com.twilio.authy2fa.exception.AuthyRequestException;5import com.twilio.authy2fa.lib.RequestParametersValidator;6import com.twilio.authy2fa.models.User;7import com.twilio.authy2fa.models.UserService;8import com.twilio.authy2fa.lib.SessionManager;9import com.twilio.authy2fa.service.AuthyRequestService;10import org.slf4j.Logger;11import org.slf4j.LoggerFactory;1213import javax.servlet.ServletException;14import javax.servlet.annotation.WebServlet;15import javax.servlet.http.HttpServlet;16import javax.servlet.http.HttpServletRequest;17import javax.servlet.http.HttpServletResponse;18import java.io.IOException;1920@WebServlet(urlPatterns = "/registration")21public class RegistrationServlet extends HttpServlet{2223private final SessionManager sessionManager;24private final UserService userService;25private final AuthyRequestService authyRequestService;2627private static final Logger LOGGER = LoggerFactory.getLogger(RegistrationServlet.class);282930@SuppressWarnings("unused")31public RegistrationServlet() {32this(33new SessionManager(),34new UserService(),35new AuthyRequestService()36);37}3839public RegistrationServlet(SessionManager sessionManager, UserService userService,40AuthyRequestService authyRequestService) {41this.sessionManager = sessionManager;42this.userService = userService;43this.authyRequestService = authyRequestService;44}4546protected void doGet(HttpServletRequest request, HttpServletResponse response)47throws ServletException, IOException {4849request.getRequestDispatcher("/registration.jsp").forward(request, response);50}5152protected void doPost(HttpServletRequest request, HttpServletResponse response)53throws ServletException, IOException {5455String name = request.getParameter("name");56String email = request.getParameter("email");57String password = request.getParameter("password");58String countryCode = request.getParameter("countryCode");59String phoneNumber = request.getParameter("phoneNumber");6061if (validateRequest(request)) {6263try {64int authyId = authyRequestService.sendRegistrationRequest(email, phoneNumber, countryCode);6566userService.create(new User(name, email, password, countryCode, phoneNumber, authyId));6768response.sendRedirect("/login.jsp");69} catch (AuthyRequestException e) {7071LOGGER.error(e.getMessage());7273request.setAttribute("data", "Registration failed");74preserveStatusRequest(request, name, email, countryCode, phoneNumber);75request.getRequestDispatcher("/registration.jsp").forward(request, response);76}77} else {78preserveStatusRequest(request, name, email, countryCode, phoneNumber);79request.getRequestDispatcher("/registration.jsp").forward(request, response);80}81}8283private boolean validateRequest(HttpServletRequest request) {84RequestParametersValidator validator = new RequestParametersValidator(request);8586return validator.validatePresence("name", "email", "password", "countryCode", "phoneNumber")87&& validator.validateEmail("email");88}8990private void preserveStatusRequest(91HttpServletRequest request,92String name,93String email,94String countryCode,95String phoneNumber) {96request.setAttribute("name", name);97request.setAttribute("email", email);98request.setAttribute("countryCode", countryCode);99request.setAttribute("phoneNumber", phoneNumber);100}101}102
Having registered our user with Authy, we then can use Authy's OneTouch feature to log them in.
When a User attempts to log in to our website, we will ask them for a second form of identification. Let's take a look at OneTouch verification first.
OneTouch works as follows:
- We check that the user has the Authy app installed.
- In case they do, they will receive a push notification on their device.
- The user hits Approve in their Authy app.
- Authy makes a
POSTrequest to our app with anapprovedstatus. - We log the user in.
TwilioDevEd/authy2fa-servlets/src/main/java/com/twilio/authy2fa/service/ApprovalRequestService.java
1package com.twilio.authy2fa.service;23import com.authy.AuthyApiClient;4import com.authy.OneTouchException;5import com.authy.api.ApprovalRequestParams;6import com.authy.api.Hash;7import com.authy.api.OneTouchResponse;8import com.fasterxml.jackson.core.type.TypeReference;9import com.fasterxml.jackson.databind.ObjectMapper;10import com.twilio.authy2fa.exception.ApprovalRequestException;11import com.twilio.authy2fa.models.User;12import org.apache.http.client.fluent.Request;1314import java.io.IOException;15import java.util.HashMap;16import java.util.Map;1718public class ApprovalRequestService {1920private static final String AUTHY_USERS_URI_TEMPLATE = "%s/protected/json/users/%s/status?api_key=%s";21private final String authyBaseURL;2223private final ConfigurationService configuration;24private final AuthyApiClient client;2526public ApprovalRequestService() {27this.authyBaseURL = "https://api.authy.com";28this.configuration = new ConfigurationService();29this.client = new AuthyApiClient(configuration.authyApiKey());30}3132public ApprovalRequestService(String authyBaseURL, ConfigurationService configuration, AuthyApiClient client) {33this.authyBaseURL = authyBaseURL;34this.configuration = configuration;35this.client = client;36}3738public String sendApprovalRequest(User user) {39if(hasAuthyApp(user)){40try {41OneTouchResponse result = sendOneTouchApprovalRequest(user);42if(!result.isSuccess()) {43throw new ApprovalRequestException(result.getMessage());44}45return "onetouch";46} catch (IOException | OneTouchException e) {47throw new ApprovalRequestException(e.getMessage());48}49} else {50Hash result = sendSMSToken(user);51if(!result.isSuccess()) {52throw new ApprovalRequestException(result.getMessage());53}54return "sms";55}56}5758private boolean hasAuthyApp(User user) {59ObjectMapper objectMapper = new ObjectMapper();60String url = String.format(AUTHY_USERS_URI_TEMPLATE,61authyBaseURL,62user.getAuthyId(),63configuration.authyApiKey()64);65try {66String responseBody = Request.Get(url)67.connectTimeout(10000)68.socketTimeout(10000)69.execute().returnContent().asString();70TypeReference<HashMap<String,Object>> typeRef71= new TypeReference<HashMap<String,Object>>() {};72HashMap<String,HashMap> o = objectMapper.readValue(responseBody, typeRef);7374return (Boolean) ((Map<String, Object>)o.get("status")).get("registered");75} catch (IOException e) {76throw new ApprovalRequestException(e.getMessage());77}78}7980private OneTouchResponse sendOneTouchApprovalRequest(User user)81throws IOException, OneTouchException {82ApprovalRequestParams parameters = new ApprovalRequestParams.Builder(83Integer.valueOf(user.getAuthyId()),84"Request login to Twilio demo app")85.addDetail("email", user.getEmail())86.build();8788return client.getOneTouch().sendApprovalRequest(parameters);89}9091private Hash sendSMSToken(User user){92return client.getUsers().requestSms(Integer.valueOf(user.getAuthyId()));93}94}
Now let's look at how to send a OneTouch request.
When our user logs in, our app decides which two-factor authentication provider will be used. It can be Authy OneTouch or an SMS token.
Authy OneTouch will be used when the user has a registered OneTouch device.
We use the sendApprovalRequest method to create an approval request. It takes an ApprovalRequestParamater object with at least the following properties configured:
- The Authy user ID.
- The message that will be displayed in the device.
Here is an example about how to build the parameters object.
1ApprovalRequestParams parameters = new ApprovalRequestParams.Builder(2Integer.valueOf(user.getAuthyId()),3"Request login to Twilio demo app")4.addDetail("email", "alice@example.com")5.addDetail("name", "Alice")6.addHiddenDetail("phoneNumber", "555-5555")7.build();
TwilioDevEd/authy2fa-servlets/src/main/java/com/twilio/authy2fa/service/ApprovalRequestService.java
1package com.twilio.authy2fa.service;23import com.authy.AuthyApiClient;4import com.authy.OneTouchException;5import com.authy.api.ApprovalRequestParams;6import com.authy.api.Hash;7import com.authy.api.OneTouchResponse;8import com.fasterxml.jackson.core.type.TypeReference;9import com.fasterxml.jackson.databind.ObjectMapper;10import com.twilio.authy2fa.exception.ApprovalRequestException;11import com.twilio.authy2fa.models.User;12import org.apache.http.client.fluent.Request;1314import java.io.IOException;15import java.util.HashMap;16import java.util.Map;1718public class ApprovalRequestService {1920private static final String AUTHY_USERS_URI_TEMPLATE = "%s/protected/json/users/%s/status?api_key=%s";21private final String authyBaseURL;2223private final ConfigurationService configuration;24private final AuthyApiClient client;2526public ApprovalRequestService() {27this.authyBaseURL = "https://api.authy.com";28this.configuration = new ConfigurationService();29this.client = new AuthyApiClient(configuration.authyApiKey());30}3132public ApprovalRequestService(String authyBaseURL, ConfigurationService configuration, AuthyApiClient client) {33this.authyBaseURL = authyBaseURL;34this.configuration = configuration;35this.client = client;36}3738public String sendApprovalRequest(User user) {39if(hasAuthyApp(user)){40try {41OneTouchResponse result = sendOneTouchApprovalRequest(user);42if(!result.isSuccess()) {43throw new ApprovalRequestException(result.getMessage());44}45return "onetouch";46} catch (IOException | OneTouchException e) {47throw new ApprovalRequestException(e.getMessage());48}49} else {50Hash result = sendSMSToken(user);51if(!result.isSuccess()) {52throw new ApprovalRequestException(result.getMessage());53}54return "sms";55}56}5758private boolean hasAuthyApp(User user) {59ObjectMapper objectMapper = new ObjectMapper();60String url = String.format(AUTHY_USERS_URI_TEMPLATE,61authyBaseURL,62user.getAuthyId(),63configuration.authyApiKey()64);65try {66String responseBody = Request.Get(url)67.connectTimeout(10000)68.socketTimeout(10000)69.execute().returnContent().asString();70TypeReference<HashMap<String,Object>> typeRef71= new TypeReference<HashMap<String,Object>>() {};72HashMap<String,HashMap> o = objectMapper.readValue(responseBody, typeRef);7374return (Boolean) ((Map<String, Object>)o.get("status")).get("registered");75} catch (IOException e) {76throw new ApprovalRequestException(e.getMessage());77}78}7980private OneTouchResponse sendOneTouchApprovalRequest(User user)81throws IOException, OneTouchException {82ApprovalRequestParams parameters = new ApprovalRequestParams.Builder(83Integer.valueOf(user.getAuthyId()),84"Request login to Twilio demo app")85.addDetail("email", user.getEmail())86.build();8788return client.getOneTouch().sendApprovalRequest(parameters);89}9091private Hash sendSMSToken(User user){92return client.getUsers().requestSms(Integer.valueOf(user.getAuthyId()));93}94}
Once we send the request we need to update our user's AuthyStatus based on the response. But first we have to register a OneTouch callback endpoint.
In order for our app to know what the user did after we sent the OneTouch request, we need to register a callback endpoint with Authy.
Note: In order to verify that the request is coming from Authy, we've written the helper method validate that will halt the request if it appears that it isn't coming from Authy.
Here in our callback, we look up the user using the Authy ID sent with the Authy POST request. Ideally at this point we would probably use a websocket to let our client know that we received a response from Authy. However for this version we're going to just update the AuthyStatus on the User. What our client-side code needs to do is to check for user.AuthyStatus == "approved" before logging them in.
src/main/java/com/twilio/authy2fa/servlet/authy/CallbackServlet.java
1package com.twilio.authy2fa.servlet.authy;23import com.twilio.authy2fa.models.User;4import com.twilio.authy2fa.models.UserService;5import com.twilio.authy2fa.servlet.requestvalidation.AuthyRequestValidator;6import com.twilio.authy2fa.servlet.requestvalidation.RequestValidationResult;7import org.slf4j.Logger;8import org.slf4j.LoggerFactory;910import javax.servlet.ServletException;11import javax.servlet.annotation.WebServlet;12import javax.servlet.http.HttpServlet;13import javax.servlet.http.HttpServletRequest;14import javax.servlet.http.HttpServletResponse;15import java.io.IOException;1617@WebServlet(urlPatterns = {"/authy/callback"})18public class CallbackServlet extends HttpServlet {1920private static final Logger LOGGER = LoggerFactory.getLogger(CallbackServlet.class);2122private final UserService userService;232425@SuppressWarnings("unused")26public CallbackServlet() {27this(new UserService());28}2930public CallbackServlet(UserService userService) {31this.userService = userService;32}3334protected void doPost(HttpServletRequest request, HttpServletResponse response)35throws ServletException, IOException {3637AuthyRequestValidator validator = new AuthyRequestValidator(38System.getenv("AUTHY_API_KEY"), request);39RequestValidationResult validationResult = validator.validate();4041if (validationResult.isValidSignature()) {42// Handle approved, denied, unauthorized43User user = userService.findByAuthyId(validationResult.getAuthyId());44if(user != null) {45user.setAuthyStatus(validationResult.getStatus());46userService.update(user);47}48} else {4950LOGGER.error("Received Authy callback but couldn't verify the signature");5152response.sendError(403, "Invalid signature");53}54}55}56
Our application is now capable of using Authy for two-factor authentication. However, we are still missing an important part: the client-side code that will handle it.
Scenario: The OneTouch callback URL provided by you is no longer active.
Action: We will disable the OneTouch callback after 3 consecutive HTTP error responses. We will also
- Set the OneTouch callback URL to blank.
- Send an email notifying you that the OneTouch callback is disabled with details on how to enable the OneTouch callback.
How to enable OneTouch callback? You need to update the OneTouch callback endpoint, which will allow the OneTouch callback.
Visit the Twilio Console: Console > Authy > Applications > {ApplicationName} > Push Authentication > Webhooks > Endpoint/URL to update the Endpoint/URL with a valid OneTouch callback URL.
We've already taken a look at what's happening on the server side, so let's step in front of the cameras and see how our JavaScript is interacting with those server endpoints.
When we expect a OneTouch response, we will begin polling /authy/status until we see Authy status is not empty.
src/main/webapp/javascript/application.js
1$(document).ready(function() {2$("#login-form").submit(function(event) {3event.preventDefault();45var data = $(event.currentTarget).serialize();6authyVerification(data);7});89var authyVerification = function (data) {10$.post("/login", data, function (result) {11resultActions[result]();12});13};1415var resultActions = {16onetouch: function() {17$("#authy-modal").modal({ backdrop: "static" }, "show");18$(".auth-token").hide();19$(".auth-onetouch").fadeIn();20monitorOneTouchStatus();21},2223sms: function () {24$("#authy-modal").modal({ backdrop: "static" }, "show");25$(".auth-onetouch").hide();26$(".auth-token").fadeIn();27requestAuthyToken();28},2930unauthorized: function () {31$("#error-message").text("Invalid credentials");32},3334unexpectedError: function () {35$("#error-message").text("Unexpected error. Check the logs");36}37};3839var monitorOneTouchStatus = function () {40$.post("/authy/status")41.done(function (data) {42if (data === "") {43setTimeout(monitorOneTouchStatus, 2000);44} else {45$("#confirm-login").submit();46}47});48}4950var requestAuthyToken = function () {51$.post("/authy/request-token")52.done(function (data) {53$("#authy-token-label").text(data);54});55}5657$("#logout").click(function() {58$("#logout-form").submit();59});60});
Let's take a closer look at how we check the login status on the server.
This is the endpoint that our JavaScript is polling. It is waiting for the user Authy status.
src/main/java/com/twilio/authy2fa/servlet/authy/OneTouchStatusServlet.java
1package com.twilio.authy2fa.servlet.authy;23import com.twilio.authy2fa.lib.SessionManager;4import com.twilio.authy2fa.models.User;5import com.twilio.authy2fa.models.UserService;67import javax.servlet.ServletException;8import javax.servlet.annotation.WebServlet;9import javax.servlet.http.HttpServlet;10import javax.servlet.http.HttpServletRequest;11import javax.servlet.http.HttpServletResponse;12import java.io.IOException;1314@WebServlet(urlPatterns = {"/authy/status"})15public class OneTouchStatusServlet extends HttpServlet {1617private final SessionManager sessionManager;18private final UserService userService;1920@SuppressWarnings("unused")21public OneTouchStatusServlet() {22this(new SessionManager(), new UserService());23}2425public OneTouchStatusServlet(SessionManager sessionManager, UserService userService) {26this.sessionManager = sessionManager;27this.userService = userService;28}2930protected void doPost(HttpServletRequest request, HttpServletResponse response)31throws ServletException, IOException {3233long userId = sessionManager.getLoggedUserId(request);34User user = userService.find(userId);3536response.getOutputStream().write(user.getAuthyStatus().getBytes());37}38}39
Finally, we can confirm the login.
If the AuthyStatus is approved , the user will be redirected to the account page, otherwise we'll show the login form with a message that indicates if the request was denied or unauthorized.
src/main/java/com/twilio/authy2fa/servlet/authentication/ConfirmLogInServlet.java
1package com.twilio.authy2fa.servlet.authentication;23import com.twilio.authy2fa.lib.SessionManager;4import com.twilio.authy2fa.models.User;5import com.twilio.authy2fa.models.UserService;67import javax.servlet.ServletException;8import javax.servlet.annotation.WebServlet;9import javax.servlet.http.HttpServlet;10import javax.servlet.http.HttpServletRequest;11import javax.servlet.http.HttpServletResponse;12import java.io.IOException;1314@WebServlet(urlPatterns = {"/confirm-login"})15public class ConfirmLogInServlet extends HttpServlet {1617private final SessionManager sessionManager;18private final UserService userService;1920@SuppressWarnings("unused")21public ConfirmLogInServlet() {22this(new SessionManager(), new UserService());23}2425public ConfirmLogInServlet(SessionManager sessionManager, UserService userService) {26this.sessionManager = sessionManager;27this.userService = userService;28}2930protected void doPost(HttpServletRequest request, HttpServletResponse response)31throws ServletException, IOException {3233long userId = sessionManager.getLoggedUserId(request);34User user = userService.find(userId);3536String authyStatus = user.getAuthyStatus();3738// Reset the Authy status39user.setAuthyStatus("");40userService.update(user);4142switch (authyStatus) {43case "approved":44sessionManager.logIn(request, user.getId());45response.sendRedirect("/account");46break;47case "denied":48sessionManager.logOut(request);49request.setAttribute("data", "You have declined the request");50request.getRequestDispatcher("/login.jsp").forward(request, response);51break;52default:53sessionManager.logOut(request);54request.setAttribute("data", "Unauthorized access");55request.getRequestDispatcher("/login.jsp").forward(request, response);56break;57}58}59}60
That's it! We've just implemented two-factor auth using three different methods and the latest in Authy technology.
If you're a Java developer working with Twilio, you might enjoy these other tutorials:
Click-to-call enables your company to convert web traffic into phone calls with the click of a button.