App Verification with Twilio SMS
Using the Android SMS Retriever API from Google Play Services and Twilio Verify, you can verify users' phone numbers with a one-time password (OTP) without requiring a code to be typed in. Your application also won't have to ask for permission to read SMS messages.
Automating this stage in the onboarding funnel for your application can lead to happier end users, fewer customer support inquiries, and higher conversion rates.
Twilio Verify provides a complete solution for verifying end user phone numbers by sending a numeric code in a text message to the Android app. Your server application sits in the middle, between your Android app and Verify, so that you can verify a user's phone number after they sign up with your mobile application.
The app sends a copy of that text message to an API endpoint that you provide, and Verify tells your code whether the code matches the one that was sent. Your server application can then mark the end user as verified.
To build SMS verification into your application, set up the following components.
For development and testing, you will need:
- Android Studio (Download Android Studio from Google)
- Twilio Account - create a Twilio account here.
- An Android phone with an active phone number that can receive SMS messages. It will also need to have Google Play Services 10.2 or above. You can check the version of Google Play Services on your phone under the Apps menu item in the Settings app. You won't be able to test with a tablet or device that does not have a phone number - this includes the Android Emulator.
To run your solution, you'll need a server. Twilio provides quickstart server applications that provide a back end for your application. Follow the directions in the README for each of these projects. When you build SMS verification into your own application, you can use the code in these repos as a starting point. If you're building a solution in Java, C#, PHP, or Python - Twilio supports these languages, but we don't have an example application for those yet. We suggest reading through the Node.js application to get a sense for how things work.
- Node.js - GitHub repo
- Ruby - GitHub repo
Google created a sample application for you to use as a reference to get started. You'll need to follow the README for the sample app to get it properly configured:
One note - you'll need URLs for your web application to go into the sensitive.xml string values file in your Android app. You won't have those available until you get the web application up and running and either deploy it to the cloud, or use a localhost tunnel like ngrok to make a publicly accessible URL. The next steps cover that setup.
For the Node.js server, you will need to have Node installed locally or on the server you plan to deploy to. To set up Node, download an installer from the Node.js website, or use your operating system's package manager.
The Node install comes with npm, the node package manager. After you download the server and unzip it, install the required Node modules from the command line with this command:
npm install
If you're curious about what modules the server is using (including the Twilio SDK for Node), take a look at the package.json file.
You will need to have Ruby installed on your computer, either as a standalone installation, or with a Ruby version manager like rbenv.
Download the Ruby server code, and then run:
bundle install
This command installs the Ruby gems the server needs to run.
Once you have your server downloaded, you will need several configuration values. Copy the .env.example file to .env, and then fill in these values. You will need all of them for a successful installation.
| Config Value | Description |
|---|---|
| TWILIO_ACCOUNT_SID | The account SID is your primary Twilio account identifier. You will be able to find this value in the Twilio Console. |
| TWILIO_API_KEY | The Twilio SDK uses API Key and Secret pairs to make REST calls to the Twilio API. You can create a new API Key and Secret pair on the API Keys page in the Console. |
| TWILIO_API_SECRET | The API Secret will only be shown once when you generate an API Key and Secret pair, so be sure to download it. |
| VERIFICATION_SERVICE_SID | This project uses Twilio Verify to send verification codes and to check their status. You will need to create a verification service in the console, and then put the service id into your .env file. |
| APP_HASH | The Android app hash is very important, as the existence of this hash in the SMS Message is what the SMS Retriever API will look for. See Google's documentation on how to Compute your app's hash string. You can also find it under the Settings menu item in the sample application. |
| CLIENT_SECRET | Matches the Android application to the server - you can set this in the sensitive.xml file in the sample Android application. It must match the server's config value. |
| COUNTRY_CODE | Twilio Verify requires E.164 formatted phone numbers. This project uses Twilio Lookup to convert phone numbers into the expected format, based on the country for the phone number (Example: US). Find your ISO country codes here |
Run the application using the npm start command.
npm start
Your application should be running at http://localhost:3000
Run the server with the following command:
bundle exec rackup
Your application should be running at http://localhost:3000
Your phone won't be able to access localhost directly. You'll need to create a publicly accessible URL using a tool like ngrok to send HTTP/HTTPS traffic to a server running on your localhost. Use HTTPS to make web connections that retrieve a Twilio access token.
ngrok http 3000
Another alternative is to deploy this server to the cloud (such as Google App Engine) - you will need to configure the environment variables used above for your cloud provider.
You'll also probably need to integrate the SMS Retriever API into your existing Android application, either by replacing your existing verification process, or adding it as a new step. Check out Google's guide for how to Request SMS Verification in an Android App.
The sample Android application also needs to be configured to communicate with your server. Make sure you have an externally accessible URL for your application first (not localhost). If you need to create an external URL for your server application running on your local computer, download and install ngrok.
Go ahead and open up the application in Android Studio, and then create a sensitive.xml file in the res/values folder.
In the sensitive.xml file, add these values - you will need to replace your-server.com in the below code snippet with your server's domain name or IP address.
1<?xml version="1.0" encoding="utf-8"?>2<resources>3<string name="server_client_secret">0000000000</string>4<string name="server_client_secret_v8">0000000000</string>5<string name="url_verify">https://your-server.com/api/verify</string>6<string name="url_request">https://your-server.com/api/request</string>7<string name="url_reset">https://your-server.com/api/reset</string>8</resources>
You will also need to find and edit the server client secret lines in the sensitive.xml file. Make the secret the same string that you configured on the server.
Although you configure a reset URL for the sample Android application, Twilio Verify does not have a reset feature. The endpoint is there in our sample Node.js or Ruby application, but it does not do anything. After a successful verification with Verify, you can ask for another verification for the same phone number, so you do not need to reset for testing.
Once everything is set up, build the app in Android Studio and run it on your phone.
Double check that the App Hash (In the menu, under Settings) matches the value you have in the .env file for your server - if it's different, go ahead and change it in .env and restart the server.
Press the Sign Up button at the bottom of the app to get started with the verification process. On the next screen, when you tap the edit text input for the phone number, the Android app will use the hint picker to detect your phone's number, and then offer to fill that in for you.
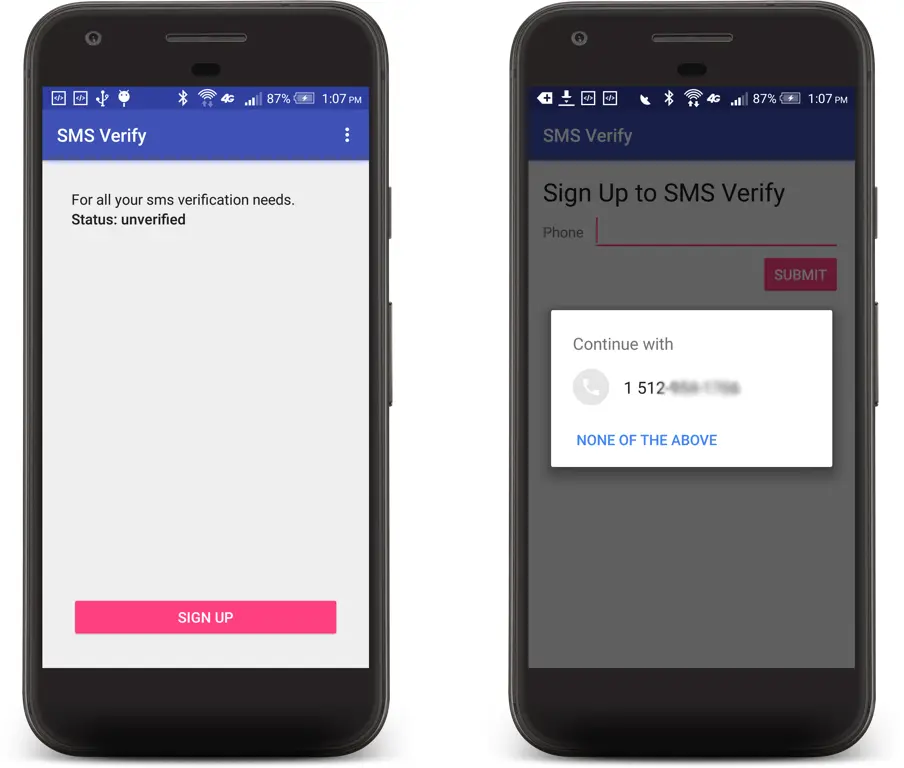
After pressing the Submit button, the app will make an HTTP POST request to the server, and you will see a progress indicator and several toasts indicating the status of your application. If the app fails to connect, double check that the URLs in the strings.xml file in your Android app are correct.
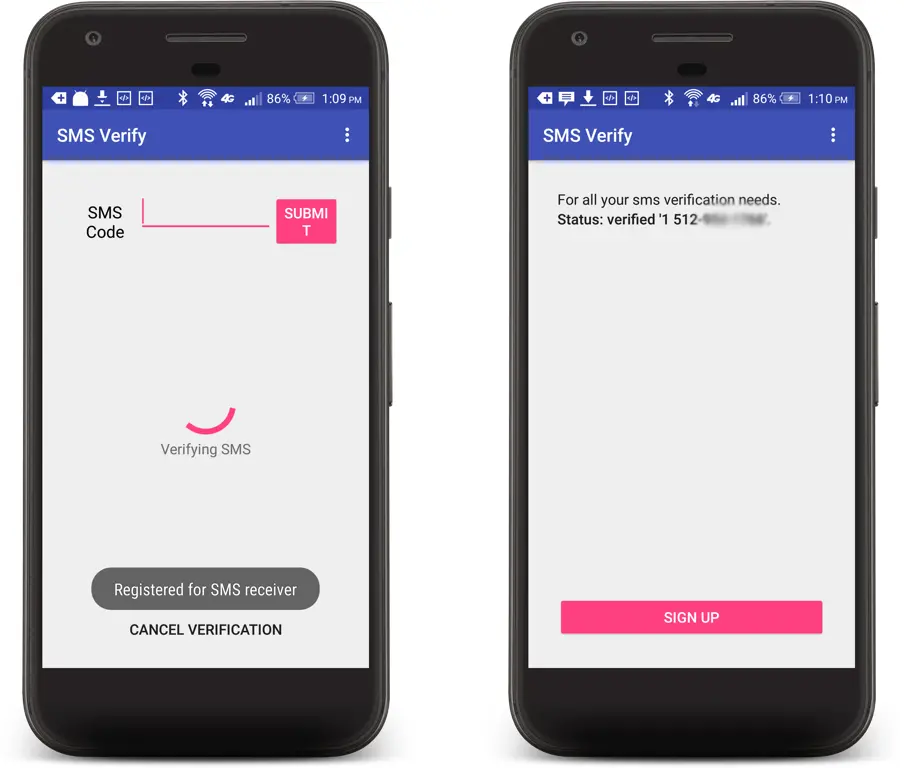
The Android application sends an HTTP POST to the server with an application secret (that the app and the server both share) and a phone number to verify.
The server then sends the phone number to Twilio Lookup, to return an E.164 formatted phone number - for instance, turning 555-555-1212 to +15555551212.
After getting a formatted phone number, the server uses the Twilio REST API to tell Twilio Verify to send a verification request to that number, with the Android app hash you provided in the .env file.
The app hash is required so that the Android SMS Retriever API can look up SMS messages specifically for that application. If you specify the app hash, Twilio Verify includes the SMS Retriever API-specific header at the beginning of the SMS:
<#>
Twilio Verify also takes care of appending the app hash to the end of the SMS message.
1<#>Your Android Verification Service verification code is: 8859192K4J3FRDUbDB
One of the most common errors you might run into is that the hash of your Android application's package signature doesn't match the app hash that you send in your SMS message. If these two don't match, the Android application will not be able to read the incoming SMS from your inbox, and the verification process will never complete.
Double check that App signature has for the Android app matches the hash you set in the configuration variable for the server.
Another common type of error would be that the SMS message does not come through - it never gets sent to your phone. This usually indicates that some of the configuration values in the .env file for your server are not set up correctly. Be sure to check the console logs for your server application to see if there are any runtime errors. You can also check the Twilio Debugger to see if there are any errors.
With your Android app verifying phone numbers via Twilio Verify, you can extend the integration further.
Integrate this Twilio verification code into your existing application with one of the Twilio SDKs.
To work more with Twilio Verify, try one of the Twilio Verify Quickstarts. You can use these with users that register through your website, instead of the Android app.