Authy Two-factor Authentication Node.js Quickstart
Warning
As of November 2022, Twilio no longer provides support for Authy SMS/Voice-only customers. Customers who were also using Authy TOTP or Push prior to March 1, 2023 are still supported. The Authy API is now closed to new customers and will be fully deprecated in the future.
For new development, we encourage you to use the Verify v2 API.
Existing customers will not be impacted at this time until Authy API has reached End of Life. For more information about migration, see Migrating from Authy to Verify for SMS.
Adding two-factor authentication to your application is the easiest way to increase security and trust in your product without unnecessarily burdening your users. This quickstart guides you through building a Node.js, AngularJS, and MongoDB application that restricts access to a URL. Four Authy API channels are demoed: SMS, Voice, Soft Tokens and Push Notifications.
Ready to protect your toy app's users from nefarious balaclava wearing hackers? Dive in!
Create a new Twilio account (you can sign up for a free Twilio trial), or sign into an existing Twilio account.
Once logged in, visit the Authy Console. Click on the red 'Create New Application' (or big red plus ('+') if you already created one) to create a new Authy application then name it something memorable.

You'll automatically be transported to the Settings page next. Click the eyeball icon to reveal your Production API Key.
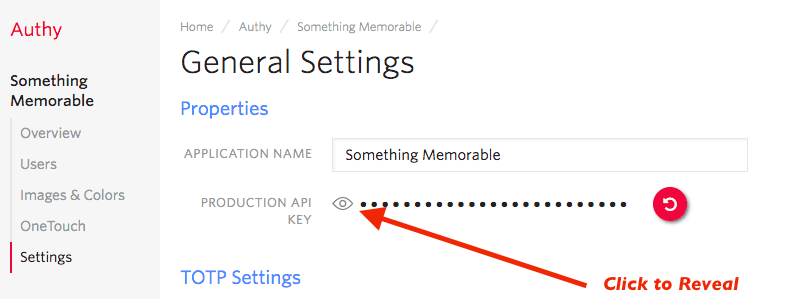
Copy your Production API Key to a safe place, you will use it during application setup.
When a user registers with your application, a request is made to Twilio to add that user to your App, and a user_id is returned. In this demo, we'll store the returned user_id in a MongoDB database.
Instructions for installing MongoDB vary by platform. Follow the instructions you need to install locally.
After installing, launch MongoDB. For *NIX and OSX, you can run:
mongod
This two-factor authentication demos two channels which require an installed Authy app to test: Soft tokens and push authentications. While SMS and voice channels will work without the client, to try out all four authentication channels download and install the Authy app for Desktop or Mobile:
Clone our Node.js repository locally, then enter the directory. Install all of the necessary node modules:
npm install
Next, open the file .env.example. There, edit the ACCOUNT_SECURITY_API_KEY, pasting in the API Key from the above step (in the console), and save the file as .env.
Depending on your system, you need to set the environmental variables before you continue. On *NIX, you can run:
source .env
On Windows, depending on your shell, you will have to use SET.
Alternatively, you could use a package such as autoenv to load it at startup.
Enter the API Key from the Account Security console and optionally change the port.
1export ACCOUNT_SECURITY_API_KEY='ENTER_SECRET_HERE'2export PORT=1337
Once you have added your API Key, you are ready to run! Launch Node with:
node .
If MongoDB is running and your API Key is correct, you should get a message your new app is running!
With your phone (optionally with the Authy client installed) nearby, open a new browser tab and go to http://localhost:1337/register
Enter your information and invent a password, then hit 'Register'. Your information is passed to Twilio (you will be able to see your user immediately in the console), and the application is returned a user_id.
Go to http://localhost:1337/login and login. You'll be presented with a happy screen:
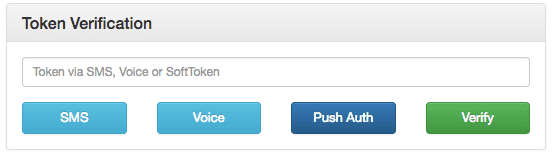
If your phone has the Authy app installed, you can immediately enter a soft token from the client to Verify. Additionally, you can try a push authentication by pushing the labeled button.
If you do not have the Authy app installed, the SMS and voice channels will also work in providing a token. To try different channels, you can logout to start the process again.
Demonstrating SMS, Voice, and Push Notification Two-Factor channels. (Soft Tokens can be entered directly.)
1var crypto = require('crypto');2var mongoose = require('mongoose');3var User = mongoose.model('User');4var config = require('../config.js');5var qs = require('qs');6var request = require('request');7var phoneReg = require('../lib/phone_verification')(config.API_KEY);89// https://github.com/seegno/authy-client10const Client = require('authy-client').Client;11const authy = new Client({key: config.API_KEY});121314function hashPW(pwd) {15return crypto.createHash('sha256').update(pwd).digest('base64').toString();16}1718/**19* Login a user20* @param req21* @param res22*/23exports.login = function (req, res) {24User.findOne({username: req.body.username})25.exec(function (err, user) {26if (!user) {27err = 'Username Not Found';28} else if (('password' in req.body) && (user.hashed_password !==29hashPW(req.body.password.toString()))) {30err = 'Wrong Password';31} else {32createSession(req, res, user);33}3435if (err) {36res.status(500).json(err);37}38});39};4041/**42* Logout a user43*44* @param req45* @param res46*/47exports.logout = function (req, res) {48req.session.destroy(function (err) {49if (err) {50console.log("Error Logging Out: ", err);51return next(err);52}53res.status(200).send();54});55};5657/**58* Checks to see if the user is logged in and redirects appropriately59*60* @param req61* @param res62*/63exports.loggedIn = function (req, res) {64if (req.session.loggedIn && req.session.authy) {65res.status(200).json({url: "/protected"});66} else if (req.session.loggedIn && !req.session.authy) {67res.status(200).json({url: "/2fa"});68} else {69res.status(409).send();70}71};7273/**74* Sign up a new user.75*76* @param req77* @param res78*/79exports.register = function (req, res) {8081var username = req.body.username;82User.findOne({username: username}).exec(function (err, user) {83if (err) {84console.log('Rregistration Error', err);85res.status(500).json(err);86return;87}88if (user) {89res.status(409).json({err: "Username Already Registered"});90return;91}9293user = new User({username: req.body.username});9495user.set('hashed_password', hashPW(req.body.password));96user.set('email', req.body.email);97user.set('authyId', null);98user.save(function (err) {99if (err) {100console.log('Error Creating User', err);101res.status(500).json(err);102} else {103104authy.registerUser({105countryCode: req.body.country_code,106email: req.body.email,107phone: req.body.phone_number108}, function (err, regRes) {109if (err) {110console.log('Error Registering User with Authy');111res.status(500).json(err);112return;113}114115user.set('authyId', regRes.user.id);116117// Save the AuthyID into the database then request an SMS118user.save(function (err) {119if (err) {120console.log('error saving user in authyId registration ', err);121res.session.error = err;122res.status(500).json(err);123} else {124createSession(req, res, user);125}126});127});128}129});130});131};132133134/**135* Check user login status. Redirect appropriately.136*137* @param req138* @param res139*/140exports.loggedIn = function (req, res) {141142if (req.session.loggedIn && req.session.authy) {143res.status(200).json({url: "/protected"});144} else if (req.session.loggedIn && !req.session.authy) {145res.status(200).json({url: "/2fa"});146} else {147res.status(200).json({url: "/login"});148}149};150151/**152* Request a OneCode via SMS153*154* @param req155* @param res156*/157exports.sms = function (req, res) {158var username = req.session.username;159User.findOne({username: username}).exec(function (err, user) {160console.log("Send SMS");161if (err) {162console.log('SendSMS', err);163res.status(500).json(err);164return;165}166167/**168* If the user has the Authy app installed, it'll send a text169* to open the Authy app to the TOTP token for this particular app.170*171* Passing force: true forces an SMS send.172*/173authy.requestSms({authyId: user.authyId}, {force: true}, function (err, smsRes) {174if (err) {175console.log('ERROR requestSms', err);176res.status(500).json(err);177return;178}179console.log("requestSMS response: ", smsRes);180res.status(200).json(smsRes);181});182183});184};185186/**187* Request a OneCode via a voice call188*189* @param req190* @param res191*/192exports.voice = function (req, res) {193var username = req.session.username;194User.findOne({username: username}).exec(function (err, user) {195console.log("Send SMS");196if (err) {197console.log('ERROR SendSMS', err);198res.status(500).json(err);199return;200}201202/**203* If the user has the Authy app installed, it'll send a text204* to open the Authy app to the TOTP token for this particular app.205*206* Passing force: true forces a voice call to be made207*/208authy.requestCall({authyId: user.authyId}, {force: true}, function (err, callRes) {209if (err) {210console.error('ERROR requestcall', err);211res.status(500).json(err);212return;213}214console.log("requestCall response: ", callRes);215res.status(200).json(callRes);216});217});218};219220/**221* Verify an Authy Token222*223* @param req224* @param res225*/226exports.verify = function (req, res) {227var username = req.session.username;228User.findOne({username: username}).exec(function (err, user) {229console.log("Verify Token");230if (err) {231console.error('Verify Token User Error: ', err);232res.status(500).json(err);233}234authy.verifyToken({authyId: user.authyId, token: req.body.token}, function (err, tokenRes) {235if (err) {236console.log("Verify Token Error: ", err);237res.status(500).json(err);238return;239}240console.log("Verify Token Response: ", tokenRes);241if (tokenRes.success) {242req.session.authy = true;243}244res.status(200).json(tokenRes);245});246});247};248249/**250* Create a OneTouch request.251* The front-end client will poll 12 times at a frequency of 5 seconds before terminating.252* If the status is changed to approved, it quit polling and process the user.253*254* @param req255* @param res256*/257exports.createonetouch = function (req, res) {258259var username = req.session.username;260console.log("username: ", username);261User.findOne({username: username}).exec(function (err, user) {262if (err) {263console.error("Create OneTouch User Error: ", err);264res.status(500).json(err);265}266267var request = {268authyId: user.authyId,269details: {270hidden: {271"test": "This is a"272},273visible: {274"Authy ID": user.authyId,275"Username": user.username,276"Location": 'San Francisco, CA',277"Reason": 'Demo by Authy'278}279},280message: 'Login requested for an Authy Demo account.'281};282283authy.createApprovalRequest(request, {ttl: 120}, function (oneTouchErr, oneTouchRes) {284if (oneTouchErr) {285console.error("Create OneTouch Error: ", oneTouchErr);286res.status(500).json(oneTouchErr);287return;288}289console.log("OneTouch Response: ", oneTouchRes);290req.session.uuid = oneTouchRes.approval_request.uuid;291res.status(200).json(oneTouchRes)292});293294});295};296297/**298* Verify the OneTouch request callback via HMAC inspection.299*300* @url https://en.wikipedia.org/wiki/Hash-based_message_authentication_code301* @url https://gist.github.com/josh-authy/72952c62521480f3dd710dcbad0d8c42302*303* @param req304* @return {Boolean}305*/306function verifyCallback(req) {307308var apiKey = config.API_KEY;309310var url = req.headers['x-forwarded-proto'] + "://" + req.hostname + req.url;311var method = req.method;312var params = req.body;313314// Sort the params.315var sorted_params = qs.stringify(params).split("&").sort().join("&").replace(/%20/g, '+');316317var nonce = req.headers["x-authy-signature-nonce"];318var data = nonce + "|" + method + "|" + url + "|" + sorted_params;319320var computed_sig = crypto.createHmac('sha256', apiKey).update(data).digest('base64');321var sig = req.headers["x-authy-signature"];322323return sig == computed_sig;324}325326/**327* Poll for the OneTouch status. Return the response to the client.328* Set the user session 'authy' variable to true if authenticated.329*330* @param req331* @param res332*/333exports.checkonetouchstatus = function (req, res) {334335var options = {336url: "https://api.authy.com/onetouch/json/approval_requests/" + req.session.uuid,337form: {338"api_key": config.API_KEY339},340headers: {},341qs: {342"api_key": config.API_KEY343},344json: true,345jar: false,346strictSSL: true347};348349request.get(options, function (err, response) {350if (err) {351console.log("OneTouch Status Request Error: ", err);352res.status(500).json(err);353}354console.log("OneTouch Status Response: ", response);355if (response.body.approval_request.status === "approved") {356req.session.authy = true;357}358res.status(200).json(response);359});360};361362/**363* Register a phone364*365* @param req366* @param res367*/368exports.requestPhoneVerification = function (req, res) {369var phone_number = req.body.phone_number;370var country_code = req.body.country_code;371var via = req.body.via;372373console.log("body: ", req.body);374375if (phone_number && country_code && via) {376phoneReg.requestPhoneVerification(phone_number, country_code, via, function (err, response) {377if (err) {378console.log('error creating phone reg request', err);379res.status(500).json(err);380} else {381console.log('Success register phone API call: ', response);382res.status(200).json(response);383}384});385} else {386console.log('Failed in Register Phone API Call', req.body);387res.status(500).json({error: "Missing fields"});388}389390};391392/**393* Confirm a phone registration token394*395* @param req396* @param res397*/398exports.verifyPhoneToken = function (req, res) {399var country_code = req.body.country_code;400var phone_number = req.body.phone_number;401var token = req.body.token;402403if (phone_number && country_code && token) {404phoneReg.verifyPhoneToken(phone_number, country_code, token, function (err, response) {405if (err) {406console.log('error creating phone reg request', err);407res.status(500).json(err);408} else {409console.log('Confirm phone success confirming code: ', response);410if (response.success) {411req.session.ph_verified = true;412}413res.status(200).json(err);414}415416});417} else {418console.log('Failed in Confirm Phone request body: ', req.body);419res.status(500).json({error: "Missing fields"});420}421};422423/**424* Create the initial user session.425*426* @param req427* @param res428* @param user429*/430function createSession(req, res, user) {431req.session.regenerate(function () {432req.session.loggedIn = true;433req.session.user = user.id;434req.session.username = user.username;435req.session.msg = 'Authenticated as: ' + user.username;436req.session.authy = false;437req.session.ph_verified = false;438res.status(200).json();439});440}
And there you go, two-factor authentication is on and your Node.js app is protected!
Now that you are keeping the hackers out of this demo app using two-factor authentication, you can find all of the detailed descriptions for options and API calls in our Authy API Reference. If you're also building a registration flow, also check out our Twilio Verify product and the Verification Quickstart which uses this codebase.
For additional guides and tutorials on account security and other products, in Node.js and in our other languages, take a look at the Docs.