.NET Core C# Two-factor Authentication Quickstart
Warning
As of November 2022, Twilio no longer provides support for Authy SMS/Voice-only customers. Customers who were also using Authy TOTP or Push prior to March 1, 2023 are still supported. The Authy API is now closed to new customers and will be fully deprecated in the future.
For new development, we encourage you to use the Verify v2 API.
Existing customers will not be impacted at this time until Authy API has reached End of Life. For more information about migration, see Migrating from Authy to Verify for SMS.
Adding two-factor authentication to your application is the easiest way to increase security and trust in your product without unnecessarily burdening your users. This quickstart guides you through building an ASP.NET Core, AngularJS, and SQL Server application that restricts access to a URL. Four Authy API channels are demoed: SMS, Voice, Soft Tokens and Push Notifications.
Ready to protect your toy app's users from nefarious balaclava wearing hackers? Dive in!
Create a new Twilio account (you can sign up for a free Twilio trial), or sign into an existing Twilio account.
Once logged in, visit the Authy Console. Click on the red 'Create New Application' (or big red plus ('+') if you already created one) to create a new Authy application then name it something memorable.

You'll automatically be transported to the Settings page next. Click the eyeball icon to reveal your Production API Key.
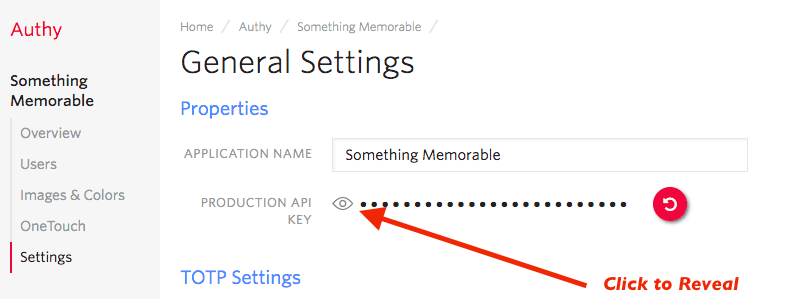
Copy your Production API Key to a safe place, you will use it during application setup.
This two-factor authentication demos two channels which require an installed Authy app to test: Soft tokens and push authentications. While SMS and voice channels will work without the client, to try out all four authentication channels download and install the Authy app for Desktop or Mobile:
Start by cloning our repository. Then, enter the directory and install dependencies:
1git clone https://github.com/TwilioDevEd/account-security-csharp.git2cd account-security-csharp/src/AccountSecurity3dotnet restore
Next, open the file appsettings.json. There, edit the AuthyApiKey, pasting in the API Key from the above step (in the console), and save .
Enter the API Key from the Account Security console.
1{2"Logging": {3"LogLevel": {4"Default": "Warning"5}6},7"AllowedHosts": "*",8"ConnectionStrings": {9"DefaultConnection": "Server=127.0.0.1;Database=account_security;Trusted_Connection=True;MultipleActiveResultSets=true;Integrated Security=False;User ID=sa;Password=yourStrong(!)Password"10},11"AuthyApiKey": "Your-Authy-Api-Key"12}
When a user registers with your application, a request is made to Twilio to add that user to your App, and a user_id is returned. In this demo, we'll store the returned user_id in an MSSQL database.
On Windows, you can install the free SQL Server Express:
On Linux or Mac, run it as a docker container:
1docker run -e 'ACCEPT_EULA=Y' -e 'SA_PASSWORD=yourStrong(!)Password' \23-p 1433:1433 --name mssql -d microsoft/mssql-server-linux:latest
Warning
Make sure your DefaultConnection connection string in appsettings.json is correct for your SQL Server installation. You may need to change the Server to localhost\\SQLEXPRESS if running MSSQL Server Express on Windows. Or, you may need to change the password if you selected a different one when starting your Docker container.
Run the database migrations:
dotnet ef database update -v
Once you have added your API Key, you are ready to run! Run the app with:
dotnet run --environment development
With your phone (optionally with the Authy client installed) nearby, open a new browser tab and navigate to https://localhost:5001/register/
Enter your information and invent a password, then hit 'Register'. Your information is passed to Twilio (you will be able to see your user immediately in the console), and the application is returned a user_id.
Now visit https://localhost:5001/login/ and login. You'll be presented with a happy screen:
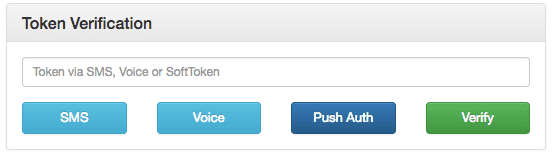
If your phone has the Authy app installed, you can immediately enter a soft token from the client to Verify. Additionally, you can try a push authentication by pushing the labeled button.
If you do not have the Authy app installed, the SMS and voice channels will also work in providing a token. To try different channels, you can logout to start the process again.
1using System;2using System.Collections.Generic;3using System.Net;4using System.Net.Http;5using System.Threading.Tasks;6using AccountSecurity.Models;7using Microsoft.Extensions.Configuration;8using Microsoft.Extensions.Logging;9using Newtonsoft.Json;10using Newtonsoft.Json.Linq;111213namespace AccountSecurity.Services14{15public interface IAuthy16{17Task<string> registerUserAsync(RegisterViewModel user);18Task<TokenVerificationResult> verifyTokenAsync(string authyId, string token);19Task<TokenVerificationResult> verifyPhoneTokenAsync(string phoneNumber, string countryCode, string token);20Task<string> sendSmsAsync(string authyId);21Task<string> phoneVerificationCallRequestAsync(string countryCode, string phoneNumber);22Task<string> phoneVerificationRequestAsync(string countryCode, string phoneNumber);23Task<string> createApprovalRequestAsync(string authyId);24Task<object> checkRequestStatusAsync(string onetouch_uuid);25}2627public class Authy : IAuthy28{29private readonly IConfiguration Configuration;30private readonly IHttpClientFactory ClientFactory;31private readonly ILogger<Authy> logger;32private readonly HttpClient client;3334public string message { get; private set; }3536public Authy(IConfiguration config, IHttpClientFactory clientFactory, ILoggerFactory loggerFactory)37{38Configuration = config;39logger = loggerFactory.CreateLogger<Authy>();4041ClientFactory = clientFactory;42client = ClientFactory.CreateClient();43client.BaseAddress = new Uri("https://api.authy.com");44client.DefaultRequestHeaders.Add("Accept", "application/json");45client.DefaultRequestHeaders.Add("user-agent", "Twilio Account Security C# Sample");4647// Get Authy API Key from Configuration48client.DefaultRequestHeaders.Add("X-Authy-API-Key", Configuration["AuthyApiKey"]);49}5051public async Task<string> registerUserAsync(RegisterViewModel user)52{53var userRegData = new Dictionary<string, string>() {54{ "email", user.Email },55{ "country_code", user.CountryCode },56{ "cellphone", user.PhoneNumber }57};58var userRegRequestData = new Dictionary<string, object>() { };59userRegRequestData.Add("user", userRegData);60var encodedContent = new FormUrlEncodedContent(userRegData);6162var result = await client.PostAsJsonAsync("/protected/json/users/new", userRegRequestData);6364logger.LogDebug(result.Content.ReadAsStringAsync().Result);6566result.EnsureSuccessStatusCode();6768var response = await result.Content.ReadAsAsync<Dictionary<string, object>>();6970return JObject.FromObject(response["user"])["id"].ToString();71}7273public async Task<TokenVerificationResult> verifyTokenAsync(string authyId, string token)74{75var result = await client.GetAsync($"/protected/json/verify/{token}/{authyId}");7677logger.LogDebug(result.ToString());78logger.LogDebug(result.Content.ReadAsStringAsync().Result);7980var message = await result.Content.ReadAsStringAsync();8182if (result.StatusCode == HttpStatusCode.OK)83{84return new TokenVerificationResult(message);85}8687return new TokenVerificationResult(message, false);88}8990public async Task<TokenVerificationResult> verifyPhoneTokenAsync(string phoneNumber, string countryCode, string token)91{92var result = await client.GetAsync(93$"/protected/json/phones/verification/check?phone_number={phoneNumber}&country_code={countryCode}&verification_code={token}"94);9596logger.LogDebug(result.ToString());97logger.LogDebug(result.Content.ReadAsStringAsync().Result);9899var message = await result.Content.ReadAsStringAsync();100101if (result.StatusCode == HttpStatusCode.OK)102{103return new TokenVerificationResult(message);104}105106return new TokenVerificationResult(message, false);107}108109public async Task<string> sendSmsAsync(string authyId)110{111var result = await client.GetAsync($"/protected/json/sms/{authyId}?force=true");112113logger.LogDebug(result.ToString());114115result.EnsureSuccessStatusCode();116117return await result.Content.ReadAsStringAsync();118}119120public async Task<string> phoneVerificationCallRequestAsync(string countryCode, string phoneNumber)121{122var result = await client.PostAsync(123$"/protected/json/phones/verification/start?via=call&country_code={countryCode}&phone_number={phoneNumber}",124null125);126127var content = await result.Content.ReadAsStringAsync();128129logger.LogDebug(result.ToString());130logger.LogDebug(content);131132result.EnsureSuccessStatusCode();133134return await result.Content.ReadAsStringAsync();135}136137public async Task<string> phoneVerificationRequestAsync(string countryCode, string phoneNumber)138{139var result = await client.PostAsync(140$"/protected/json/phones/verification/start?via=sms&country_code={countryCode}&phone_number={phoneNumber}",141null142);143144var content = await result.Content.ReadAsStringAsync();145146logger.LogDebug(result.ToString());147logger.LogDebug(content);148149result.EnsureSuccessStatusCode();150151return await result.Content.ReadAsStringAsync();152}153154public async Task<string> createApprovalRequestAsync(string authyId)155{156var requestData = new Dictionary<string, string>() {157{ "message", "OneTouch Approval Request" },158{ "details", "My Message Details" },159{ "seconds_to_expire", "300" }160};161162var result = await client.PostAsJsonAsync(163$"/onetouch/json/users/{authyId}/approval_requests",164requestData165);166167logger.LogDebug(result.ToString());168var str_content = await result.Content.ReadAsStringAsync();169logger.LogDebug(str_content);170171result.EnsureSuccessStatusCode();172173var content = await result.Content.ReadAsAsync<Dictionary<string, object>>();174var approval_request_data = (JObject)content["approval_request"];175176return (string)approval_request_data["uuid"];177}178179public async Task<object> checkRequestStatusAsync(string onetouch_uuid)180{181var result = await client.GetAsync($"/onetouch/json/approval_requests/{onetouch_uuid}");182logger.LogDebug(result.ToString());183var str_content = await result.Content.ReadAsStringAsync();184logger.LogDebug(str_content);185186result.EnsureSuccessStatusCode();187188return await result.Content.ReadAsAsync<object>();189}190}191192public class TokenVerificationResult193{194public TokenVerificationResult(string message, bool succeeded = true)195{196this.Message = message;197this.Succeeded = succeeded;198}199200public bool Succeeded { get; set; }201public string Message { get; set; }202}203}
And there you go, two-factor authentication is on and your .NET Core C# App is protected!
Now that you are keeping the hackers out of this demo app using two-factor authentication, you can find all of the detailed descriptions for options and API calls in our Authy API Reference. If you're also building a registration flow, also check out our Twilio Verify product and the Verification Quickstart which uses this codebase.
For additional guides and tutorials on account security and other products, in C# and in other languages, take a look at the Docs.