Account Verification with Authy, Ruby and Rails
Warning
As of November 2022, Twilio no longer provides support for Authy SMS/Voice-only customers. Customers who were also using Authy TOTP or Push prior to March 1, 2023 are still supported. The Authy API is now closed to new customers and will be fully deprecated in the future.
For new development, we encourage you to use the Verify v2 API.
Existing customers will not be impacted at this time until Authy API has reached End of Life. For more information about migration, see Migrating from Authy to Verify for SMS.
Ready to implement user account verification in your application? Here's how it works at a high level:
- The user begins the registration process by entering their data, including a phone number, into a signup form.
- The authentication system sends a one-time password to the user's mobile phone to verify their possession of that phone number.
- The user enters the one-time password into a form before completing registration.
- The user sees a success page and receives an SMS indicating that their account has been created.
To get this done, you'll be working with the following Twilio-powered APIs:
Authy REST API
- Users Resource: You will need to create Authy users to send and verify one-time passwords with them.
- SMS Resource: We will ask Authy to send one-time passwords to our user via SMS.
- Verify Resource: Used to verify tokens entered by the user in our web form during registration.
Twilio REST API
- Messages Resource: We will use Twilio directly to send our user a confirmation message after they create an account.
Let's get started!
In this tutorial, we will be working through a series of user stories that describe how to fully implement account verification in a web application. Our team implemented this example application in about 12 story points (roughly equivalent to 12 working hours).
Let's get started with our first user story around creating a new user account.
As a user, I want to register for a new user account with my email, full name, mobile phone number, and a password.
To do account verification, you need to start with an account. This requires that we create a bit of UI and a model object to create and save a new User in our system. At a high level, here's what we will need to add:
- A form to enter details about the new user
- A route and controller function on the server to render the form
- A route and controller function on the server to handle the form
POSTrequest - A persistent
Usermodel object to store information about the user
Let's start by looking at the model, where we decide what information we want to store about our user.
Let's start by defining our model and validating it.
First we need to create the ActiveRecord object, which creates the model in the related Postgres table and tells our app how to validate the model's data.
Validations are important since we want to make sure only accurate data is being saved into our database. In this case we only want to validate that all of our required fields are present. We can do this by creating a validates statement with presence: true.
Calling has_secure_password in Rails creates a hash that protects our user's passwords in the database.
One note: in order to run this demo you would need to run rake db:migrate which would run the migrations in our db/migrate folder. For this tutorial we're going to focus on the verification steps, but if you want to learn more about migrations you can read the Rails guide on the subject.
app/models/user.rb
1class User < ActiveRecord::Base2has_secure_password34validates :email, presence: true, format: { with: /\A.+@.+$\Z/ }, uniqueness: true5validates :name, presence: true6validates :country_code, presence: true7validates :phone_number, presence: true8end9
Now we're ready to move up to the controller level of the application, starting with the HTTP request routes we'll need.
In a Rails application, there is something called Resource Routing which automatically maps a resource's CRUD capabilities to its controller. Since our User is an ActiveRecord resource, we can tell Rails that we want to use some of these routes, which will save us some lines of code.
This means that in this one line of code we automatically have a 'user/new' route which will render our 'user/new.html.erb' file.
config/routes.rb
1Rails.application.routes.draw do23get "users/verify", to: 'users#show_verify', as: 'verify'4post "users/verify"5post "users/resend"67# Create users8resources :users, only: [:new, :create, :show]910# Home page11root 'main#index'1213end
Let's take a look at the new user form up close.
When we create a new user, we ask for a name, email address, and a password. In order to validate their account with Authy, we also ask them for a mobile number with a country code, which we can use to send them one-time passwords via SMS.
By using the rails form_for tag we can bind the form to the model object. This will generate the necessary html markup that will create a new User on submit.
app/views/users/new.html.erb
1<h1>We're going to be *BEST* friends</h1>2<p> Thanks for your interest in signing up! Can you tell us a bit about yourself?</p>34<% if @user.errors.any? %>5<h2>Oops, something went wrong!</h2>67<ul>8<% @user.errors.full_messages.each do |error| %>9<li><%= error %></li>10<% end -%>11</ul>12<% end -%>1314<%= form_for @user do |f| %>15<div class="form-group">16<%= f.label :name, "Tell us your name:" %>17<%= f.text_field :name, class: "form-control", placeholder: "Zingelbert Bembledack" %>18</div>19<div class="form-group">20<%= f.label :email, "Enter Your email Address:" %>21<%= f.email_field :email, class: "form-control", placeholder: "me@mydomain.com" %>22</div>23<div class="form-group">24<%= f.label :password, "Enter a password:" %>25<%= f.password_field :password, class: "form-control" %>26</div>27<div class="form-group">28<%= f.label :country_code %>29<%= f.text_field :country_code, class: "form-control", id: "authy-countries" %>30</div>31<div class="form-group">32<%= f.label :phone_number %>33<%= f.text_field :phone_number, class: "form-control", id: "authy-cellphone" %>34</div>35<button class="btn btn-primary">Sign up</button>36<% end -%>37
Let's jump back over to the controller to see what happens when we create a user.
One of the other handy controllers created by our User resource route is 'user/create' which handles the POST from our form.
In our controller we take the input from our form and create a new User model. If the user is saved to the database successfully, we use the Authy gem to create a corresponding Authy User and save the ID for that user in our database.
app/controllers/users_controller.rb
1class UsersController < ApplicationController2def new3@user = User.new4end56def show7@user = current_user8end910def create11@user = User.new(user_params)12if @user.save13# Save the user_id to the session object14session[:user_id] = @user.id1516# Create user on Authy, will return an id on the object17authy = Authy::API.register_user(18email: @user.email,19cellphone: @user.phone_number,20country_code: @user.country_code21)22@user.update(authy_id: authy.id)2324# Send an SMS to your user25Authy::API.request_sms(id: @user.authy_id)2627redirect_to verify_path28else29render :new30end31end3233def show_verify34return redirect_to new_user_path unless session[:user_id]35end3637def verify38@user = current_user3940# Use Authy to send the verification token41token = Authy::API.verify(id: @user.authy_id, token: params[:token])4243if token.ok?44# Mark the user as verified for get /user/:id45@user.update(verified: true)4647# Send an SMS to the user 'success'48send_message("You did it! Signup complete :)")4950# Show the user profile51redirect_to user_path(@user.id)52else53flash.now[:danger] = "Incorrect code, please try again"54render :show_verify55end56end5758def resend59@user = current_user60Authy::API.request_sms(id: @user.authy_id)61flash[:notice] = 'Verification code re-sent'62redirect_to verify_path63end6465private6667def send_message(message)68@user = current_user69twilio_number = ENV['TWILIO_NUMBER']70account_sid = ENV['TWILIO_ACCOUNT_SID']71@client = Twilio::REST::Client.new account_sid, ENV['TWILIO_AUTH_TOKEN']72message = @client.api.accounts(account_sid).messages.create(73:from => twilio_number,74:to => @user.country_code+@user.phone_number,75:body => message76)77end7879def user_params80params.require(:user).permit(81:email, :password, :name, :country_code, :phone_number82)83end84end85
Now we have a user that has registered, but is not yet verified. In order to view anything else on the site they need to verify that they own the phone number they submitted by entering a token we send to that phone. Time to take a look at how we would send this token.
As an authentication system, I want to send a one-time password to a user's mobile phone to verify their possession of that phone number.
This story covers a process that is invisible to the end user but necessary to power our account verification functionality. After a new user is created, the application needs to send a one-time password to that user's phone to validate the number (and the account). Here's what needs to get done:
- Create and configure an Authy API client.
- Modify the controller to send a one-time password after the user is created.
Let's begin by modifying the app's configuration to contain our Authy API key.
In secrets.yml, we list configuration parameters for the application. Most are pulled in from system environment variables, which is a helpful way to access sensitive values (like API keys). This prevents us from accidentally checking them in to source control.
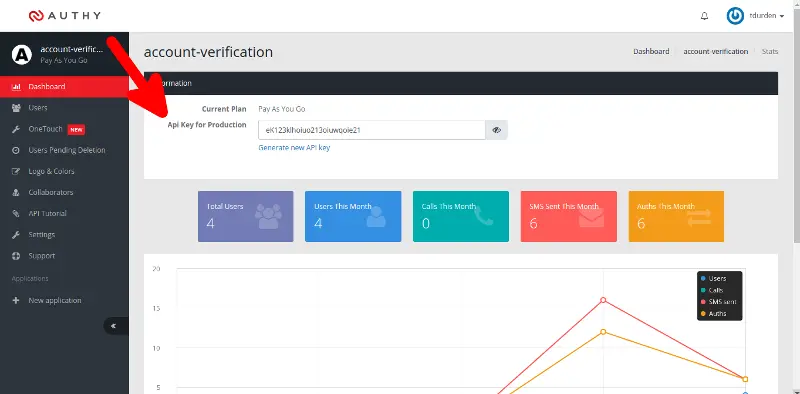
Now, we need our Authy production key (sign up for Authy here). When you create an Authy application, the production key is found on the dashboard:
config/secrets.yml
1# Be sure to restart your server when you modify this file.23# Your secret key is used for verifying the integrity of signed cookies.4# If you change this key, all old signed cookies will become invalid!56# Make sure the secret is at least 30 characters and all random,7# no regular words or you'll be exposed to dictionary attacks.8# You can use `rake secret` to generate a secure secret key.910# Make sure the secrets in this file are kept private11# if you're sharing your code publicly.1213development:14secret_key_base: 2995cd200a475082070d5ad7b11c69407a6219b0b9bf1f747f62234709506c097da19f731ecf125a3fb53694ee103798d6962c199603b92be8f08b00bf6dbb1815authy_key: <%= ENV["AUTHY_API_KEY"] %>1617test:18secret_key_base: deff24bab059bbcceeee98afac8df04814c44dd87d30841f8db532a815b64387d69cfd3d09a78417869c4846f133ba7978068882ca0a96626136ebd084b7073219authy_key: <%= ENV["AUTHY_API_KEY"] %>2021# Do not keep production secrets in the repository,22# instead read values from the environment.23production:24secret_key_base: <%= ENV["SECRET_KEY_BASE"] %>25authy_key: <%= ENV["AUTHY_API_KEY"] %>26
Next, we need to jump over to the UserController to configure the Authy client and create an instance method to send a one-time password.
Once the user has an authyId, we can actually send a verification code to that user's mobile phone.
When our user is created successfully via the form we implemented for the last story, we send a token to the user's mobile phone to verify their account in our controller.
app/controllers/users_controller.rb
1class UsersController < ApplicationController2def new3@user = User.new4end56def show7@user = current_user8end910def create11@user = User.new(user_params)12if @user.save13# Save the user_id to the session object14session[:user_id] = @user.id1516# Create user on Authy, will return an id on the object17authy = Authy::API.register_user(18email: @user.email,19cellphone: @user.phone_number,20country_code: @user.country_code21)22@user.update(authy_id: authy.id)2324# Send an SMS to your user25Authy::API.request_sms(id: @user.authy_id)2627redirect_to verify_path28else29render :new30end31end3233def show_verify34return redirect_to new_user_path unless session[:user_id]35end3637def verify38@user = current_user3940# Use Authy to send the verification token41token = Authy::API.verify(id: @user.authy_id, token: params[:token])4243if token.ok?44# Mark the user as verified for get /user/:id45@user.update(verified: true)4647# Send an SMS to the user 'success'48send_message("You did it! Signup complete :)")4950# Show the user profile51redirect_to user_path(@user.id)52else53flash.now[:danger] = "Incorrect code, please try again"54render :show_verify55end56end5758def resend59@user = current_user60Authy::API.request_sms(id: @user.authy_id)61flash[:notice] = 'Verification code re-sent'62redirect_to verify_path63end6465private6667def send_message(message)68@user = current_user69twilio_number = ENV['TWILIO_NUMBER']70account_sid = ENV['TWILIO_ACCOUNT_SID']71@client = Twilio::REST::Client.new account_sid, ENV['TWILIO_AUTH_TOKEN']72message = @client.api.accounts(account_sid).messages.create(73:from => twilio_number,74:to => @user.country_code+@user.phone_number,75:body => message76)77end7879def user_params80params.require(:user).permit(81:email, :password, :name, :country_code, :phone_number82)83end84end85
When the code is sent, we redirect to another page where the user can enter the token they were sent, completing the verification process.
As a user, I want to enter the one-time password sent to my mobile phone from the authentication system before I complete the signup process.
This story covers the next user-facing step of the verification process, where they enter the code we sent them to verify their possession of the phone number they gave us. Here's what needs to get done to complete this story:
- Create a form to allow the user to enter the one-time password they were sent.
- Create routes and controllers to both display the form and handle the submission of the one-time password.
app/views/users/show_verify.html.erb
1<h1>Just To Be Safe...</h1>2<p>3Your account has been created, but we need to make sure you're a human4in control of the phone number you gave us. Can you please enter the5verification code we just sent to your phone?6</p>7<%= form_tag users_verify_path do %>8<div class="form-group">9<%= label_tag :code, "Verification Code:" %>10<%= text_field_tag :token, '', class: "form-control" %>11</div>12<button type="submit" class="btn btn-primary">Verify Token</button>13<% end -%>1415<hr>16<%= form_tag users_resend_path do %>17<button type="submit" class="btn">Resend code</button>18<% end -%>19
The route definition in config/routes.rb is pretty straight-forward, so we'll skip that bit here. Let's begin instead with the verification form, which is created with the Embedded Ruby Template code you see here.
This page actually has two forms, but we'll focus on the form for verifying a user's code first. It has only a single field for the verification code, which we'll submit to the server for validation.
app/views/users/show_verify.html.erb
1<h1>Just To Be Safe...</h1>2<p>3Your account has been created, but we need to make sure you're a human4in control of the phone number you gave us. Can you please enter the5verification code we just sent to your phone?6</p>7<%= form_tag users_verify_path do %>8<div class="form-group">9<%= label_tag :code, "Verification Code:" %>10<%= text_field_tag :token, '', class: "form-control" %>11</div>12<button type="submit" class="btn btn-primary">Verify Token</button>13<% end -%>1415<hr>16<%= form_tag users_resend_path do %>17<button type="submit" class="btn">Resend code</button>18<% end -%>19
Now let's take a look at the controller code handling this form.
This controller function handles the form submission. It needs to:
- Get the current user.
- Verify the code that was entered by the user.
- If the code entered was valid, flip a Boolean flag on the user model to indicate the account was verified.
Authy provides us with a verify method that allows us to pass a user id, a token and a callback function if we'd like. In this case we just need to check that the API request was successful and, if so, set user.verified to true.
app/controllers/users_controller.rb
1class UsersController < ApplicationController2def new3@user = User.new4end56def show7@user = current_user8end910def create11@user = User.new(user_params)12if @user.save13# Save the user_id to the session object14session[:user_id] = @user.id1516# Create user on Authy, will return an id on the object17authy = Authy::API.register_user(18email: @user.email,19cellphone: @user.phone_number,20country_code: @user.country_code21)22@user.update(authy_id: authy.id)2324# Send an SMS to your user25Authy::API.request_sms(id: @user.authy_id)2627redirect_to verify_path28else29render :new30end31end3233def show_verify34return redirect_to new_user_path unless session[:user_id]35end3637def verify38@user = current_user3940# Use Authy to send the verification token41token = Authy::API.verify(id: @user.authy_id, token: params[:token])4243if token.ok?44# Mark the user as verified for get /user/:id45@user.update(verified: true)4647# Send an SMS to the user 'success'48send_message("You did it! Signup complete :)")4950# Show the user profile51redirect_to user_path(@user.id)52else53flash.now[:danger] = "Incorrect code, please try again"54render :show_verify55end56end5758def resend59@user = current_user60Authy::API.request_sms(id: @user.authy_id)61flash[:notice] = 'Verification code re-sent'62redirect_to verify_path63end6465private6667def send_message(message)68@user = current_user69twilio_number = ENV['TWILIO_NUMBER']70account_sid = ENV['TWILIO_ACCOUNT_SID']71@client = Twilio::REST::Client.new account_sid, ENV['TWILIO_AUTH_TOKEN']72message = @client.api.accounts(account_sid).messages.create(73:from => twilio_number,74:to => @user.country_code+@user.phone_number,75:body => message76)77end7879def user_params80params.require(:user).permit(81:email, :password, :name, :country_code, :phone_number82)83end84end85
That's all for this story! However, our verification form wouldn't be very usable if there wasn't a way to resend a verification code if the message didn't arrive at the end user's handset for whatever reason. Let's look at that next.
Since the form for re-sending the code is one line (see show_verify.html.erb) we're going to skip that for this tutorial. Let's just look at the controller function.
This controller loads the User model associated with the request and then uses the same Authy API method we used earlier to resend the code. Pretty straightforward!
app/controllers/users_controller.rb
1class UsersController < ApplicationController2def new3@user = User.new4end56def show7@user = current_user8end910def create11@user = User.new(user_params)12if @user.save13# Save the user_id to the session object14session[:user_id] = @user.id1516# Create user on Authy, will return an id on the object17authy = Authy::API.register_user(18email: @user.email,19cellphone: @user.phone_number,20country_code: @user.country_code21)22@user.update(authy_id: authy.id)2324# Send an SMS to your user25Authy::API.request_sms(id: @user.authy_id)2627redirect_to verify_path28else29render :new30end31end3233def show_verify34return redirect_to new_user_path unless session[:user_id]35end3637def verify38@user = current_user3940# Use Authy to send the verification token41token = Authy::API.verify(id: @user.authy_id, token: params[:token])4243if token.ok?44# Mark the user as verified for get /user/:id45@user.update(verified: true)4647# Send an SMS to the user 'success'48send_message("You did it! Signup complete :)")4950# Show the user profile51redirect_to user_path(@user.id)52else53flash.now[:danger] = "Incorrect code, please try again"54render :show_verify55end56end5758def resend59@user = current_user60Authy::API.request_sms(id: @user.authy_id)61flash[:notice] = 'Verification code re-sent'62redirect_to verify_path63end6465private6667def send_message(message)68@user = current_user69twilio_number = ENV['TWILIO_NUMBER']70account_sid = ENV['TWILIO_ACCOUNT_SID']71@client = Twilio::REST::Client.new account_sid, ENV['TWILIO_AUTH_TOKEN']72message = @client.api.accounts(account_sid).messages.create(73:from => twilio_number,74:to => @user.country_code+@user.phone_number,75:body => message76)77end7879def user_params80params.require(:user).permit(81:email, :password, :name, :country_code, :phone_number82)83end84end85
To wrap things up, let's implement our last user story where we confirm the user's account creation and verification.
As a user, I want to view a success page and receive a text message indicating that my account has been created successfully.
This story completes the account verification use case by indicating to the user that their account has been created and verified successfully. To implement this story, we need to:
- Display a page that indicates that the user account has been created and verified successfully.
- Send a text message to the user's phone indicating their account has been verified.
app/views/users/show.html.erb
1<h1><%= @user.name %></h1>2<p>Account Status: <% if @user.verified? %>Verified<% else -%>Not Verified<% end -%>3<% if !@user.verified? %>4<p>5<%= link_to "Verify your account now.", verify_path %>6</p>7<% end -%>
This .erb template displays a user name and let's them know they've been verified.
Just a reminder that our router is automatically looking for a 'show.html.erb' template to render since we told it to use Resource Routing which automatically creates a users/show/:id route.
app/views/users/show.html.erb
1<h1><%= @user.name %></h1>2<p>Account Status: <% if @user.verified? %>Verified<% else -%>Not Verified<% end -%>3<% if !@user.verified? %>4<p>5<%= link_to "Verify your account now.", verify_path %>6</p>7<% end -%>
This should suffice for in-browser confirmation that the user has been verified. Let's see how we might send that text message next.
Authy is awesome for abstracting SMS and handling 2FA and account verification, but we can't use it to send arbitrary text messages. Let's use the Twilio API directly to do that!
In order to use the 'twilio-ruby' SDK we just need to include it in our Gemfile.
But first, we need to configure our Twilio account. We'll need three things, all of which can be found or set up through the Twilio console:
- Our Twilio account SID
- Our Twilio auth token
- A Twilio number in our account that can send text messages
1source 'https://rubygems.org'234# Bundle edge Rails instead: gem 'rails', github: 'rails/rails'5gem 'rails', '4.2.3'6# Use postgresql as the database for Active Record7gem 'pg'8# Use SCSS for stylesheets9gem 'sass-rails', '~> 5.0'10# Use Uglifier as compressor for JavaScript assets11gem 'uglifier', '>= 1.3.0'12# Use CoffeeScript for .coffee assets and views13gem 'coffee-rails', '~> 4.1.0'14# See https://github.com/sstephenson/execjs#readme for more supported runtimes15# gem 'therubyracer', platforms: :ruby1617# Use jquery as the JavaScript library18gem 'jquery-rails'19# Turbolinks makes following links in your web application faster. Read more: https://github.com/rails/turbolinks20gem 'turbolinks'21# Build JSON APIs with ease. Read more: https://github.com/rails/jbuilder22gem 'jbuilder', '~> 2.0'23# bundle exec rake doc:rails generates the API under doc/api.24gem 'sdoc', '~> 0.4.0', group: :doc2526# Use ActiveModel has_secure_password27gem 'bcrypt', '~> 3.1.7'2829# Use Authy for sending token30gem 'authy'3132# Use Twilio to send confirmation message33gem 'twilio-ruby', '~>5.0.0'3435# Use Unicorn as the app server36gem 'unicorn'3738group :production do39gem 'rails_12factor'40end4142group :development do43# Call 'byebug' anywhere in the code to stop execution and get a debugger console44gem 'byebug'4546# Access an IRB console on exception pages or by using <%= console %> in views47gem 'web-console', '~> 2.0'4849# Spring speeds up development by keeping your application running in the background. Read more: https://github.com/rails/spring50gem 'spring'5152# Mocha for mocking53gem 'mocha'54end
Much as we did for our Authy client, we create a single instance of the Twilio REST API helper, called @client in this example.
Then all we need to do to send an sms is use the built in messages.create() to send an SMS to the user's phone. Notice we are combing country_code and phone_number to make sure we support international numbers.
app/controllers/users_controller.rb
1class UsersController < ApplicationController2def new3@user = User.new4end56def show7@user = current_user8end910def create11@user = User.new(user_params)12if @user.save13# Save the user_id to the session object14session[:user_id] = @user.id1516# Create user on Authy, will return an id on the object17authy = Authy::API.register_user(18email: @user.email,19cellphone: @user.phone_number,20country_code: @user.country_code21)22@user.update(authy_id: authy.id)2324# Send an SMS to your user25Authy::API.request_sms(id: @user.authy_id)2627redirect_to verify_path28else29render :new30end31end3233def show_verify34return redirect_to new_user_path unless session[:user_id]35end3637def verify38@user = current_user3940# Use Authy to send the verification token41token = Authy::API.verify(id: @user.authy_id, token: params[:token])4243if token.ok?44# Mark the user as verified for get /user/:id45@user.update(verified: true)4647# Send an SMS to the user 'success'48send_message("You did it! Signup complete :)")4950# Show the user profile51redirect_to user_path(@user.id)52else53flash.now[:danger] = "Incorrect code, please try again"54render :show_verify55end56end5758def resend59@user = current_user60Authy::API.request_sms(id: @user.authy_id)61flash[:notice] = 'Verification code re-sent'62redirect_to verify_path63end6465private6667def send_message(message)68@user = current_user69twilio_number = ENV['TWILIO_NUMBER']70account_sid = ENV['TWILIO_ACCOUNT_SID']71@client = Twilio::REST::Client.new account_sid, ENV['TWILIO_AUTH_TOKEN']72message = @client.api.accounts(account_sid).messages.create(73:from => twilio_number,74:to => @user.country_code+@user.phone_number,75:body => message76)77end7879def user_params80params.require(:user).permit(81:email, :password, :name, :country_code, :phone_number82)83end84end85
In the controller, after a new user has been successfully verified, we use send_message to deliver them the happy news!
app/controllers/users_controller.rb
1class UsersController < ApplicationController2def new3@user = User.new4end56def show7@user = current_user8end910def create11@user = User.new(user_params)12if @user.save13# Save the user_id to the session object14session[:user_id] = @user.id1516# Create user on Authy, will return an id on the object17authy = Authy::API.register_user(18email: @user.email,19cellphone: @user.phone_number,20country_code: @user.country_code21)22@user.update(authy_id: authy.id)2324# Send an SMS to your user25Authy::API.request_sms(id: @user.authy_id)2627redirect_to verify_path28else29render :new30end31end3233def show_verify34return redirect_to new_user_path unless session[:user_id]35end3637def verify38@user = current_user3940# Use Authy to send the verification token41token = Authy::API.verify(id: @user.authy_id, token: params[:token])4243if token.ok?44# Mark the user as verified for get /user/:id45@user.update(verified: true)4647# Send an SMS to the user 'success'48send_message("You did it! Signup complete :)")4950# Show the user profile51redirect_to user_path(@user.id)52else53flash.now[:danger] = "Incorrect code, please try again"54render :show_verify55end56end5758def resend59@user = current_user60Authy::API.request_sms(id: @user.authy_id)61flash[:notice] = 'Verification code re-sent'62redirect_to verify_path63end6465private6667def send_message(message)68@user = current_user69twilio_number = ENV['TWILIO_NUMBER']70account_sid = ENV['TWILIO_ACCOUNT_SID']71@client = Twilio::REST::Client.new account_sid, ENV['TWILIO_AUTH_TOKEN']72message = @client.api.accounts(account_sid).messages.create(73:from => twilio_number,74:to => @user.country_code+@user.phone_number,75:body => message76)77end7879def user_params80params.require(:user).permit(81:email, :password, :name, :country_code, :phone_number82)83end84end85
Congratulations! You now have the power to register and verify users with Authy and Twilio SMS.
If you're a Ruby developer working with Twilio, you might want to check out these other tutorials:
Put a button on your web page that connects visitors to live support or sales people via telephone.
Instantly collect structured data from your users with a survey conducted over a voice call or SMS text messages.