Conversations API Quickstart
With Twilio's Conversations API, you can build virtual spaces ("conversations") for customers to communicate across multiple channels.
Instead of building separate solutions for online chat versus SMS engagement, you now have one API to create customer engagement across all of them.
This Quickstart will cover:
- Signing up for Twilio and provisioning your first SMS-enabled phone number
- Creating your first Conversation with the Conversations API
- Connecting an SMS Participant to a Conversation
- Configuring a demo Conversations application
- Adding a chat Participant to a Conversation to talk with the SMS Participant
You will need:
- Your Twilio credentials (Twilio Account SID and Twilio Auth Token) found in the Console
- An installed version of the twilio-cli (We'll go over how to install and set this up.)
- A CodeSandbox account
Info
Twilio Conversations is built on top of several Twilio products. It may also be useful to pull up a document or sticky note to keep track of the various values that you'll need throughout this Quickstart.
Info
If you've already signed up for Twilio and have an SMS-enabled phone number, you can skip ahead to installing the Twilio CLI.
Before you create your first Conversation, you'll need to sign up for a Twilio account or sign into your existing account.
You can sign up for a free Twilio trial account here.
- When you sign up, you'll be asked to verify your personal phone number. This helps Twilio verify your identity and also allows you to send test messages to your phone from your Twilio account while in trial mode.
- Once you verify your number, you'll be asked a series of questions to customize your experience.
- Once you finish the onboarding flow, you'll arrive at your project dashboard in the Twilio Console. This is where you'll be able to access your Account SID, authentication token, find a Twilio phone number, and more.
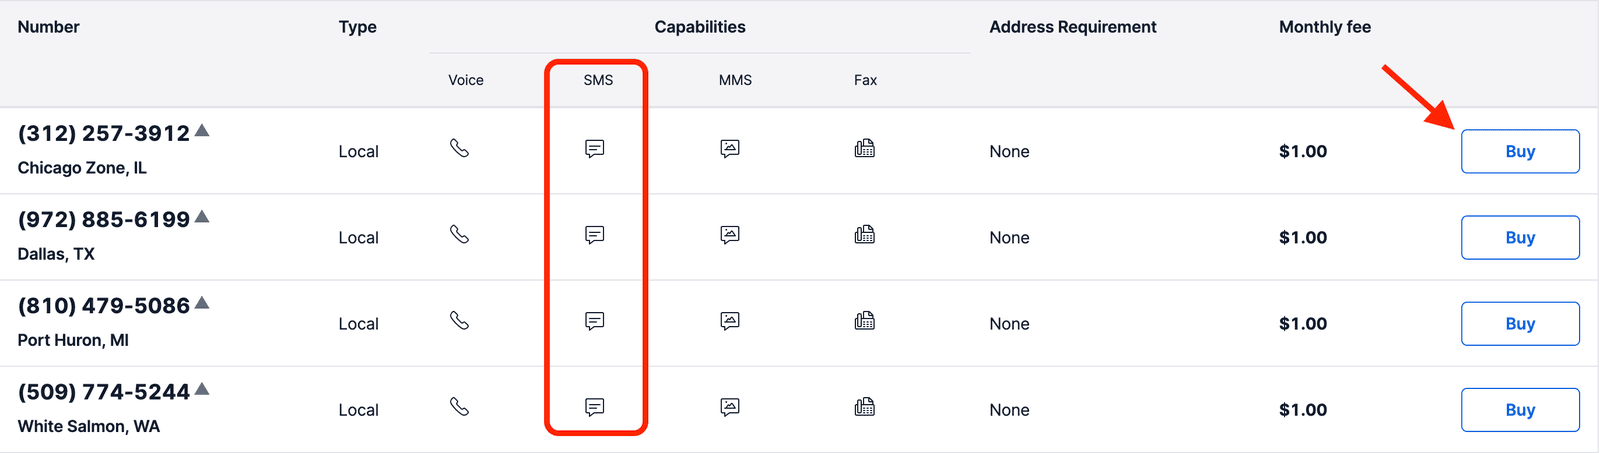
If you don't currently own a Twilio phone number with SMS functionality, you'll need to purchase one. After navigating to the Buy a Number page, check the SMS box and click Search.
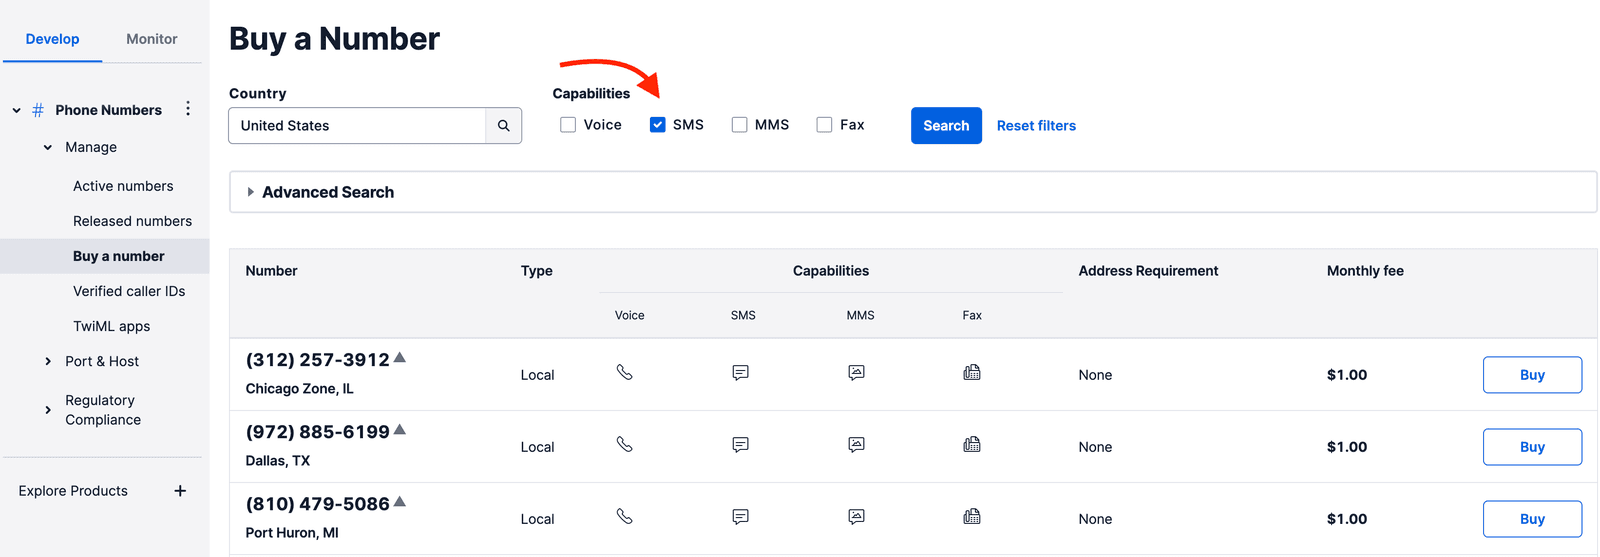
You'll then see a list of available phone numbers and their capabilities. Find a number that suits your fancy and click Buy to add it to your account.
Next, we'll install the Twilio CLI and log in to it.
First, install twilio-cli if you haven't done so already:
The suggested way to install twilio-cli on macOS is to use Homebrew. If you don't already have it installed, visit the Homebrew site for installation instructions and then return here.
Once you have installed Homebrew, run the following command to install twilio-cli:
brew tap twilio/brew && brew install twilio
Info
For other installation methods, see the Twilio CLI Quickstart.
To access your Twilio account, you must provide your Twilio credentials to twilio-cli. This can be done by running this command:
twilio login
You will be prompted for:
- A shorthand identifier for your profile: This can be anything, e.g.,
project-danger. - Your Account SID and Auth Token, both of which you can find on the dashboard of your Twilio Console.
This will create an API Key for you that will be stored securely for future use.
Now that you have a Twilio account, the Twilio CLI, and a programmable phone number, you can start writing some code.
It's time to make our first Conversation! In the sample code, replace the Account SID and Auth Token with the values from your Twilio Console:
1// Download the helper library from https://www.twilio.com/docs/node/install2const twilio = require("twilio"); // Or, for ESM: import twilio from "twilio";34// Find your Account SID and Auth Token at twilio.com/console5// and set the environment variables. See http://twil.io/secure6const accountSid = process.env.TWILIO_ACCOUNT_SID;7const authToken = process.env.TWILIO_AUTH_TOKEN;8const client = twilio(accountSid, authToken);910async function createConversation() {11const conversation = await client.conversations.v1.conversations.create({12friendlyName: "My First Conversation",13});1415console.log(conversation.sid);16}1718createConversation();
Response
1{2"sid": "CHaaaaaaaaaaaaaaaaaaaaaaaaaaaaaaaa",3"account_sid": "ACaaaaaaaaaaaaaaaaaaaaaaaaaaaaaaaa",4"chat_service_sid": "ISaaaaaaaaaaaaaaaaaaaaaaaaaaaaaaaa",5"messaging_service_sid": "MGaaaaaaaaaaaaaaaaaaaaaaaaaaaaaaaa",6"friendly_name": "My First Conversation",7"unique_name": "unique_name",8"attributes": "{ \"topic\": \"feedback\" }",9"date_created": "2015-12-16T22:18:37Z",10"date_updated": "2015-12-16T22:18:38Z",11"state": "inactive",12"timers": {13"date_inactive": "2015-12-16T22:19:38Z",14"date_closed": "2015-12-16T22:28:38Z"15},16"bindings": {},17"url": "https://conversations.twilio.com/v1/Conversations/CHaaaaaaaaaaaaaaaaaaaaaaaaaaaaaaaa",18"links": {19"participants": "https://conversations.twilio.com/v1/Conversations/CHaaaaaaaaaaaaaaaaaaaaaaaaaaaaaaaa/Participants",20"messages": "https://conversations.twilio.com/v1/Conversations/CHaaaaaaaaaaaaaaaaaaaaaaaaaaaaaaaa/Messages",21"webhooks": "https://conversations.twilio.com/v1/Conversations/CHaaaaaaaaaaaaaaaaaaaaaaaaaaaaaaaa/Webhooks",22"export": "https://conversations.twilio.com/v1/Conversations/CHaaaaaaaaaaaaaaaaaaaaaaaaaaaaaaaa/Export"23}24}
Info
It's okay to hardcode your credentials when testing locally, but you should use environment variables to keep them secret before committing any code or deploying to production. Check out How to Set Environment Variables for more information.
Copy down the Conversation SID (It starts with CHXXX). Now, let's use it to fetch that Conversation we just created.
1// Download the helper library from https://www.twilio.com/docs/node/install2const twilio = require("twilio"); // Or, for ESM: import twilio from "twilio";34// Find your Account SID and Auth Token at twilio.com/console5// and set the environment variables. See http://twil.io/secure6const accountSid = process.env.TWILIO_ACCOUNT_SID;7const authToken = process.env.TWILIO_AUTH_TOKEN;8const client = twilio(accountSid, authToken);910async function fetchConversation() {11const conversation = await client.conversations.v112.conversations("CHXXXXXXXXXXXXXXXXXXXXXXXXXXXXXXXX")13.fetch();1415console.log(conversation.chatServiceSid);16}1718fetchConversation();
Response
1{2"sid": "CHXXXXXXXXXXXXXXXXXXXXXXXXXXXXXXXX",3"account_sid": "ACaaaaaaaaaaaaaaaaaaaaaaaaaaaaaaaa",4"chat_service_sid": "ISaaaaaaaaaaaaaaaaaaaaaaaaaaaaaaaa",5"messaging_service_sid": "MGaaaaaaaaaaaaaaaaaaaaaaaaaaaaaaaa",6"friendly_name": "My First Conversation",7"unique_name": "first_conversation",8"attributes": "{ \"topic\": \"feedback\" }",9"date_created": "2015-12-16T22:18:37Z",10"date_updated": "2015-12-16T22:18:38Z",11"state": "active",12"timers": {13"date_inactive": "2015-12-16T22:19:38Z",14"date_closed": "2015-12-16T22:28:38Z"15},16"bindings": {},17"url": "https://conversations.twilio.com/v1/Conversations/CHaaaaaaaaaaaaaaaaaaaaaaaaaaaaaaaa",18"links": {19"participants": "https://conversations.twilio.com/v1/Conversations/CHaaaaaaaaaaaaaaaaaaaaaaaaaaaaaaaa/Participants",20"messages": "https://conversations.twilio.com/v1/Conversations/CHaaaaaaaaaaaaaaaaaaaaaaaaaaaaaaaa/Messages",21"webhooks": "https://conversations.twilio.com/v1/Conversations/CHaaaaaaaaaaaaaaaaaaaaaaaaaaaaaaaa/Webhooks",22"export": "https://conversations.twilio.com/v1/Conversations/CHaaaaaaaaaaaaaaaaaaaaaaaaaaaaaaaa/Export"23}24}
Copy down the Conversation Service SID (It starts with ISXXX), and make sure you've copied the Conversation SID (It starts with CHXXX) as well. We'll be using these values in the next few steps when we add participants to the Conversation you just created.
You've created a Conversation, which you can think of as a virtual space for users to join from the channel of their choice.
Next, you'll add your first Participant: someone connecting to the Conversation with an SMS-enabled phone number. (Hint: Use the number that you purchased above.)
For the following code sample, replace the placeholder values for:
CHXXX...: use the Conversation SID you just copied<Your Personal Mobile Number>: your own mobile number, in E.164 format<Your Purchased Twilio Phone Number>: the Twilio number you purchased in step 1, in E.164 formatTWILIO_ACCOUNT_SID: Your Twilio Account SIDTWILIO_AUTH_TOKEN: Your Twilio Auth Token
1// Download the helper library from https://www.twilio.com/docs/node/install2const twilio = require("twilio"); // Or, for ESM: import twilio from "twilio";34// Find your Account SID and Auth Token at twilio.com/console5// and set the environment variables. See http://twil.io/secure6const accountSid = process.env.TWILIO_ACCOUNT_SID;7const authToken = process.env.TWILIO_AUTH_TOKEN;8const client = twilio(accountSid, authToken);910async function createConversationParticipant() {11const participant = await client.conversations.v112.conversations("CHXXXXXXXXXXXXXXXXXXXXXXXXXXXXXXXX")13.participants.create({14"messagingBinding.address": "<Your Personal Mobile Number>",15"messagingBinding.proxyAddress": "<Your Purchased Twilio Phone Number>",16});1718console.log(participant.sid);19}2021createConversationParticipant();
Response
1{2"account_sid": "ACaaaaaaaaaaaaaaaaaaaaaaaaaaaaaaaa",3"conversation_sid": "CHXXXXXXXXXXXXXXXXXXXXXXXXXXXXXXXX",4"sid": "MBaaaaaaaaaaaaaaaaaaaaaaaaaaaaaaaa",5"identity": null,6"attributes": "{ \"role\": \"driver\" }",7"messaging_binding": {8"type": "sms",9"address": "+15558675310",10"proxy_address": "+15017122661"11},12"role_sid": "RLaaaaaaaaaaaaaaaaaaaaaaaaaaaaaaaa",13"date_created": "2015-12-16T22:18:37Z",14"date_updated": "2015-12-16T22:18:38Z",15"url": "https://conversations.twilio.com/v1/Conversations/CHaaaaaaaaaaaaaaaaaaaaaaaaaaaaaaaa/Participants/MBaaaaaaaaaaaaaaaaaaaaaaaaaaaaaaaa",16"last_read_message_index": null,17"last_read_timestamp": null18}
Now you have one SMS Participant in the Conversation that you created!
Great, you've got a Conversation with an SMS Participant. Just one problem: it's quiet because it's hard to have a conversation with just one person.
It's time to add a second chat Participant to talk with your SMS Participant (which we just created).
For this Quickstart, we'll be using a basic chat-interface application to join our Conversation. We need to take a quick detour to set up the sample Conversations application.
For your convenience, we've created a demo application that provides a basic JavaScript-based chat interface in which you can send and receive messages in your new Conversation.
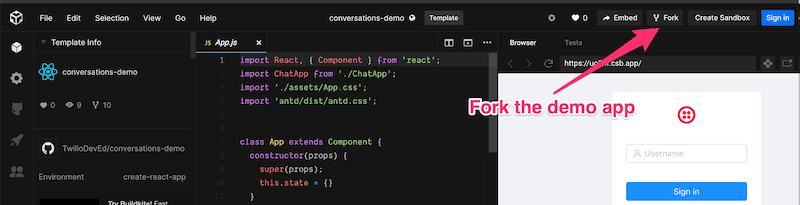
Sign in to Codesandbox.io and fork the demo app into your own Sandbox. CodeSandbox is a cloud-based online editor that we can use to host, update, and edit our sample chat application.
- You will need a CodeSandbox account, which uses your Github credentials.
- Go to our
conversations-demoapplication Sandbox and fork it to your own account with the "Fork" button in the upper right corner
Now that you have forked the demo application, you have your own sandbox and online editor to adapt the code. Your changes will be instantly reflected in the deployed application.
In order for your Conversations demo application to work, we need to authenticate our chat user by retrieving a short-lived token attached to your API Key. We'll use twilio-cli to generate a token that you can use in your application.
Run the following command to add the Twilio token plugin that handles token generation:
twilio plugins:install @twilio-labs/plugin-token
You can create a token with this command, replacing the arguments with your own values:
twilio token:chat --identity testPineapple --chat-service-sid ISXXXXXXXXXXXXXXXXXXXXXXXXXXXXXXXX --profile project-danger
- For the value you pass to
identity, use the username that your chat Participant will use to log into the chat demo application. Use any identity that you like. May we suggesttestPineapple? - For your
chat-service-sid, use the unique Conversation Service SID starting withISXXXthat you copied after creating your Conversation. - For the profile, enter what you used as the shorthand identifier for your profile when setting up the Twilio CLI. In this instance, we used
project-danger.
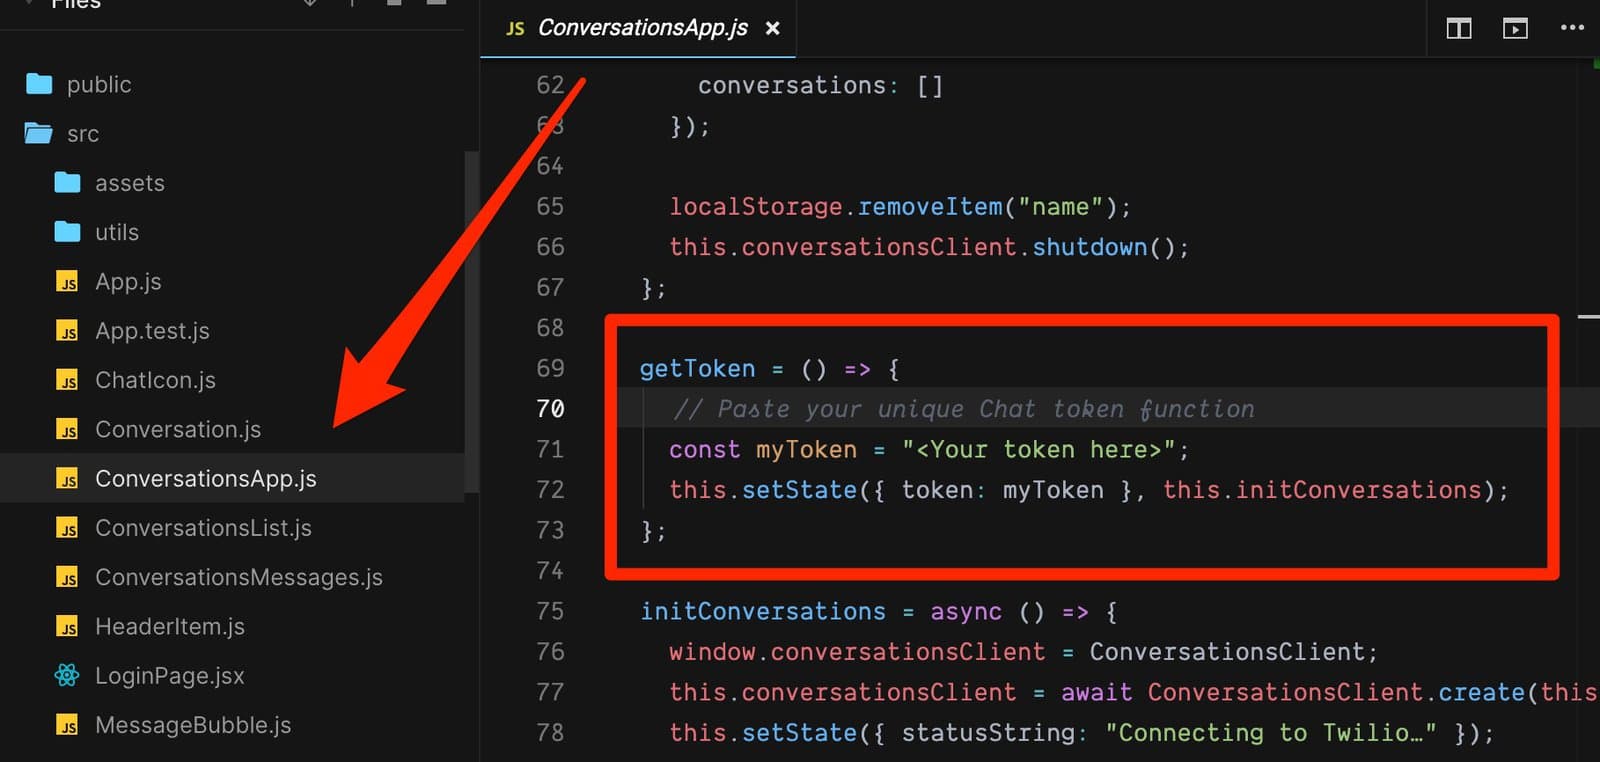
Copy the token returned from the previous command and paste it into the ConversationsApp.js placeholder field in the getToken function.
Reload your Conversations demo application, which now includes a token for your chosen chat identity (i.e., the one you just attached to the token we created). Log in with that identity in the web interface.
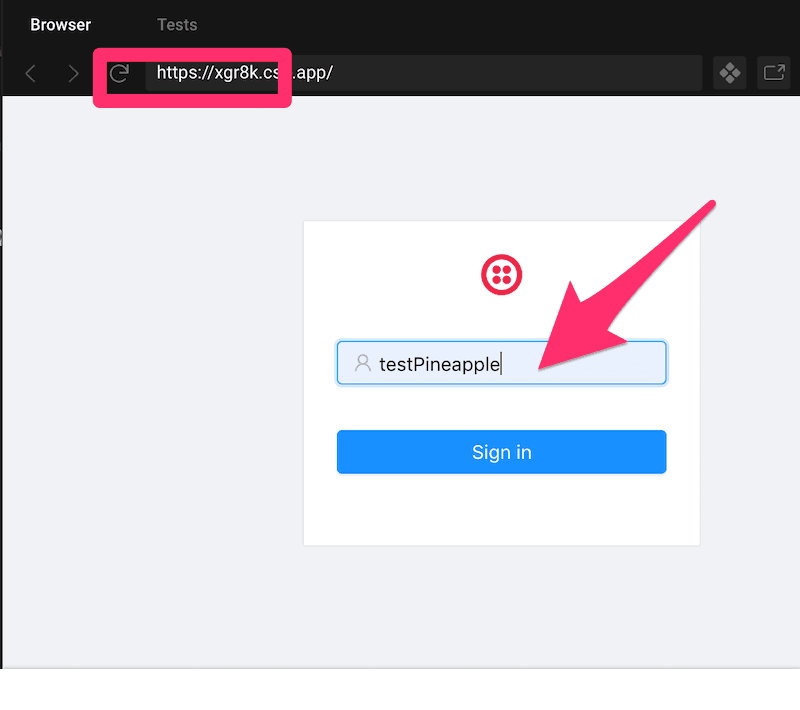
Once you see "You are connected." You know that you have logged into the Conversations demo application:
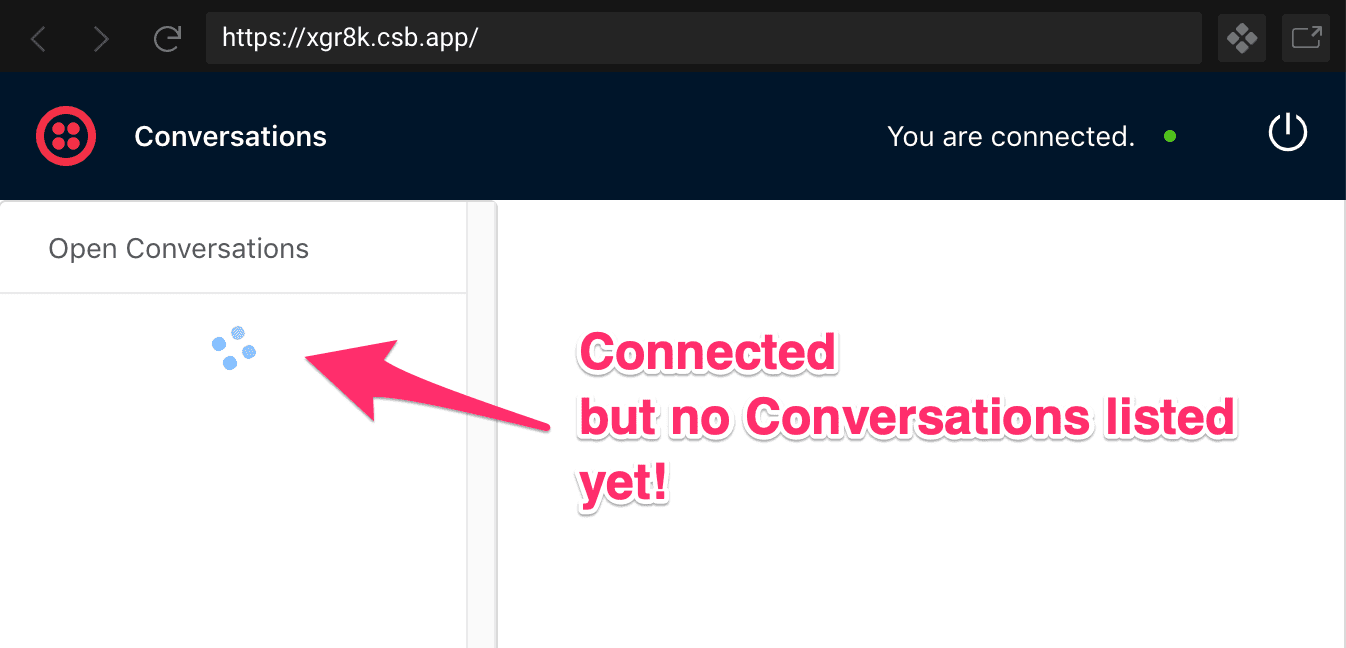
Phew! Your Conversations demo application is all set up and ready to go. We're on to the last part: adding this chat Participant to your Conversation.
Let's add a chat participant to our Conversation so it isn't so lonely in there. The following code sample adds a chat Participant to the Conversation. You will need to replace the following information:
- Conversation SID: the same
CHXXXSID that you used previously - Identity: the identity that you just created in the Conversations demo application (For this example, we'll use
testPineapple)
1// Download the helper library from https://www.twilio.com/docs/node/install2const twilio = require("twilio"); // Or, for ESM: import twilio from "twilio";34// Find your Account SID and Auth Token at twilio.com/console5// and set the environment variables. See http://twil.io/secure6const accountSid = process.env.TWILIO_ACCOUNT_SID;7const authToken = process.env.TWILIO_AUTH_TOKEN;8const client = twilio(accountSid, authToken);910async function createConversationParticipant() {11const participant = await client.conversations.v112.conversations("CHXXXXXXXXXXXXXXXXXXXXXXXXXXXXXXXX")13.participants.create({ identity: "testPineapple" });1415console.log(participant.sid);16}1718createConversationParticipant();
Response
1{2"account_sid": "ACaaaaaaaaaaaaaaaaaaaaaaaaaaaaaaaa",3"conversation_sid": "CHXXXXXXXXXXXXXXXXXXXXXXXXXXXXXXXX",4"sid": "MBaaaaaaaaaaaaaaaaaaaaaaaaaaaaaaaa",5"identity": "testPineapple",6"attributes": "{ \"role\": \"driver\" }",7"messaging_binding": {8"type": "sms",9"address": "+15558675310",10"proxy_address": "+15017122661"11},12"role_sid": "RLaaaaaaaaaaaaaaaaaaaaaaaaaaaaaaaa",13"date_created": "2015-12-16T22:18:37Z",14"date_updated": "2015-12-16T22:18:38Z",15"url": "https://conversations.twilio.com/v1/Conversations/CHaaaaaaaaaaaaaaaaaaaaaaaaaaaaaaaa/Participants/MBaaaaaaaaaaaaaaaaaaaaaaaaaaaaaaaa",16"last_read_message_index": null,17"last_read_timestamp": null18}
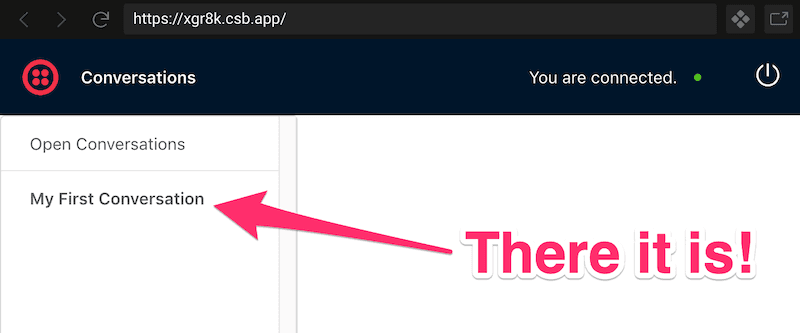
After you run this code, you should see a link with your Conversation's "friendly name" pop up in the Conversations Demo Application. That means you're connected and can start chatting!
New Conversation? Check. Working demo application? Check. Two Participants? Check.
It's time to start talking. On your mobile phone, send a text message to the Twilio number you used to set up your Conversation. Your Conversations demo application should receive the same message almost immediately!
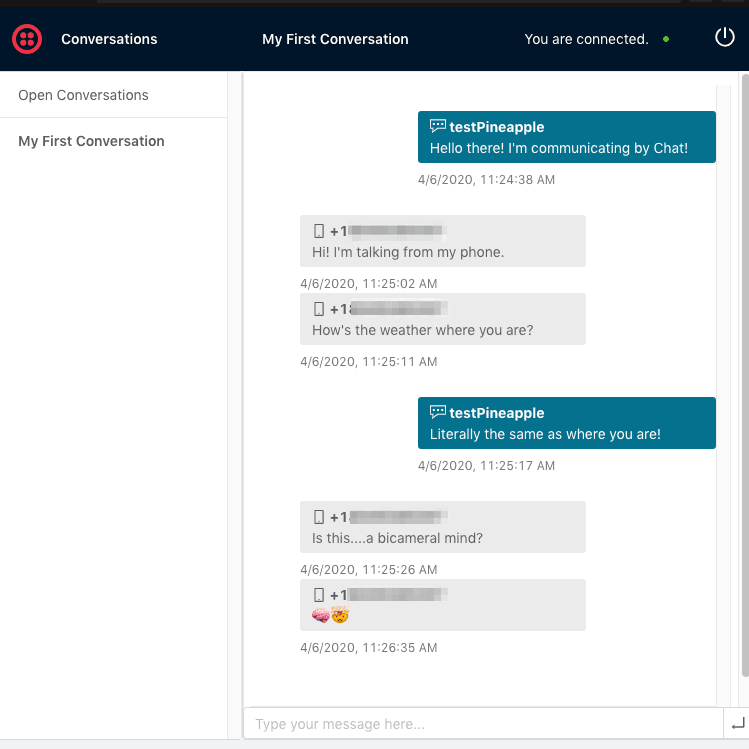
If you reply in the demo application browser, you'll receive the message as a text on your phone. Notice how all of this routing between the two channels (SMS and chat) is done automatically on your behalf. Three REST requests in, and you have a working use-case, congratulations!
From here, you can add more participants to your Conversation via chat, SMS, or even WhatsApp. New participants start receiving new messages automatically, and deleting those same participants removes them from the Conversation.
Subject to regional SMS limitations, you can have any number of SMS participants ("user address") for each Twilio number ("proxy address"), or you can have a separate proxy address for each of your users. However, a mobile phone number can be in only one conversation with any given Twilio number—you cannot have multiple conversations containing the same Twilio number and mobile phone number pair.
Want to know more about the Twilio Conversations API?
- Check out the Conversations API Reference docs
- Add a WhatsApp participant to a Conversation
- Learn about Webhooks in Conversations
- Learn more about how Conversations works by Exploring the Conversations JavaScript Quickstart