Using Google Business Messages with Conversations
End of Life
Google Business Messages (GBM) will be turned off on July 31, 2024. The Twilio GBM API and Google Business Profiles chat will no longer work after that point.
With Google's Business Messages (GBM) and Conversations, your customers can connect with your business from Google Search, Maps and other entry points. In this guide, you'll learn how to:
- Integrate GBM with Conversations
- Set up a Studio Flow chatbot to respond to GBM messages.
Let's get started!
Setting up a test sender for GBM is a self-serve process. In the Twilio Console, navigate to Channels > Google Business Messages and create a new brand and new sender. If you can't locate Channels, please use the "Explore Products" page. See Google Business Messages (Public Beta) for a step-by-step guide on testing and launching a GBM sender.
Google Business Messages is a user-initiated messaging channel, so businesses are not able to start a conversation. Businesses can send messages to users for a period of 30 days after an end user starts the conversation.
To receive and respond to GBM messages, you will need to configure an Address Configuration resource with your GBM sender ID, and enable the Autocreate functionality. This makes it so that a conversation is automatically created when a new user messages your business through a GBM entry point. This conversation will keep a record of the entire message history between the end user and your business. When repeat users come back, any messages exchanged will also be stored in the existing conversation. If you want future interactions with a user to create a new conversation, you can set the conversation state to closed when the current interaction ends.
In the following section we'll create a Studio Flow chatbot and set up autocreate to trigger it directly. Go to the API section to see the POST request and response. Alternatively, you can set the autocreation type to either:
default: Triggers global or per-service webhooks you have configured.webhook: Lets you configure a webhook for this specific Address Configuration.
Let's implement a chatbot to send an immediate response to your end user when your particular sender receives a message that wouldn't be mapped to an existing Conversation. To get started, let's build a chatbot using Twilio Studio.
Head over to the Studio area in the Twilio Console, and let's build a Studio flow:
- Log into your Twilio account in the Twilio Console
- Navigate to the Studio Flow section in the Console
- Click the Create new Flow button
- Name your Flow and click Next
- You'll see a list of possible templates you can use. Select the Start from scratch option and click Next. Once you've created the Flow, you'll see the Flow's Canvas.
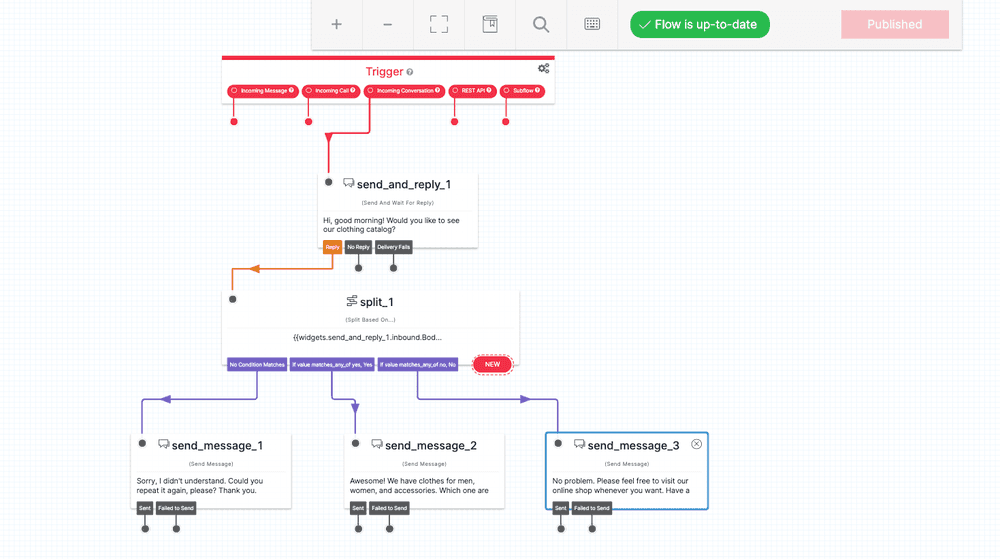
Now, let's add Widgets to the Canvas. Studio Flows are built from Widgets. These items represent pieces of logic that allow you to handle incoming actions and respond accordingly by performing specific tasks, like sending a message. Let's start by adding a Send & Wait For Reply Widget to the "Incoming Conversation" Trigger.
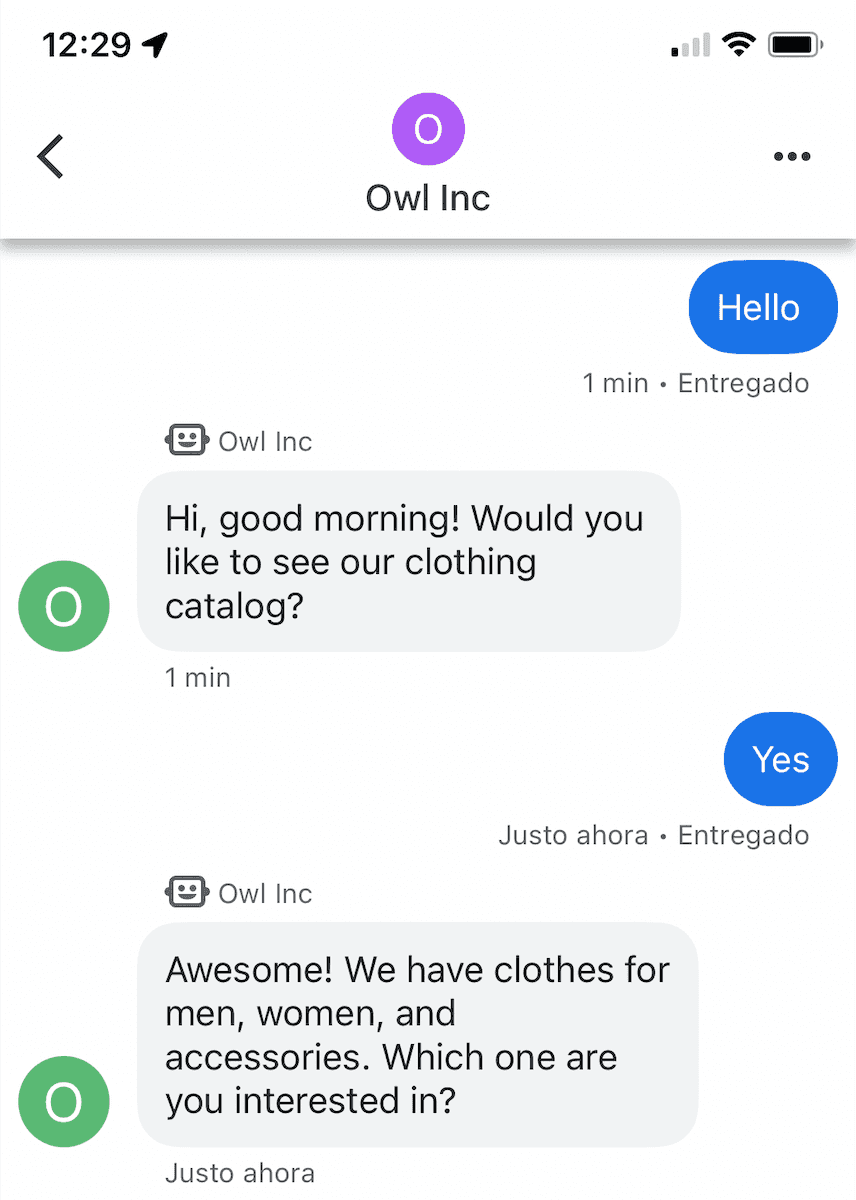
Then, click on the Send & Wait For Reply Widget to show its Inspector Panel. In the Config tab, add a message body (i.e., Hi, good morning! Would you like to see our clothing catalog?") and click Save. This tells Studio to receive the incoming message, and then reply with the message you see there in the Widget.
Next, add to the Send & Wait For Reply transition the Split Based On... Widget to parse the user response. Open the Split Based On... Widget Inspect Panel and in the Config tab, select the inbound.Body option for the "Variable to test" field and click Save.
In the Split Based On... Transitions tab, let's add conditions that match the possible responses you want to test for:
- If no condition matches, add the send_message_1 widget
- If the value matches_any_of, yes, Yes (value), then add the send_message_2 widget
- If the value matches_any_of, no, No (value), then add the send_message_3 widget
The Split Based On... Widget lets you access a variable and test conditions on it to determine how to react. In this case, we're testing the body of the message the user sent in response to your "Hi, good morning! Would you like to see our clothing catalog?" message.
Finally, let's add to the Send Message Widgets, on the message body, the response you want to send:
- For the send_message_1 widget, add the following message: "Sorry, I didn't understand. Could you repeat it again, please? Thank you."
- For the send_message_2 widget, add the following message: "Awesome! We have clothes for men, women, and accessories. Which one are you interested in?"
- For the send_message_3 widget, add the following message: "No problem. Please feel free to visit our online shop whenever you want. Have a great day!"
The reply will be different depending on how the user responded to your initial message.
Your Canvas is now set up! To publish the Flow, click Publish from the top Canvas menu.
When you're finished, your Studio Flow should look like this:
Copy down the Flow SID (It starts with FWXXXXXX). We'll be using this value later. You can also use any of the pre-existing bot templates, so you don't have to start from scratch.
Now, that your Studio flow is created, let's use the Address Configuration API to automatically connect each new conversation to your Studio flow.
For the code sample below, replace the placeholder values for:
- sender_id: the Sender ID that you received when you finished the onboarding process through the Console
- StudioFlowSid: the Flow ID (FWXXXXXX) that you saved before
- TWILIO_ACCOUNT_SID: Your Twilio Account SID
- TWILIO_AUTH_TOKEN: Your Twilio Auth Token
POST Request:
1curl --location --request POST 'https://conversations.twilio.com/v1/Configuration/Addresses' \2--header 'Content-Type: application/x-www-form-urlencoded' \3--data-urlencode 'Type=gbm' \4--data-urlencode 'Address=gbm:<sender_id>' \5--data-urlencode 'AutoCreation.Enabled=true' \6--data-urlencode 'AutoCreation.Type=studio' \7--data-urlencode 'AutoCreation.StudioFlowSid=FWxxxxxxxx' \8-u $TWILIO_ACCOUNT_SID:$TWILIO_AUTH_TOKEN
Response:
1{2"auto_creation": {3"conversation_service_sid": null,4"studio_flow_sid": "FWXXXXXXXXXXX",5"binding_name": null,6"enabled": true,7"webhook_method": null,8"webhook_filters": null,9"webhook_url": null,10"studio_retry_count": null,11"type": "studio"12},13"date_updated": "2023-03-13T19:48:49Z",14"sid": "IGXXXXXXXXXXX",15"friendly_name": null,16"account_sid": "ACXXXXXXXXXX",17"url": "https://conversations.twilio.com/v1/Configuration/Addresses/IGXXXXXXXXXX",18"address": "gbm:<sender_id>",19"date_created": "2023-03-13T19:48:49Z",20"type": "gbm"21}
Well done! Now, any inbound messages sent to the GBM address will create a new Conversation and add the Studio Flow to it.