Send Email Verifications with Verify and Twilio SendGrid
This guide explains how to set up and send email verifications using Twilio Verify and Twilio SendGrid.
Using Verify with Twilio SendGrid requires the following configurations.
Create a Twilio SendGrid account or log in to your existing account. Email verifications use the Twilio SendGrid transactional email API.
To create a Twilio SendGrid API key, use the Twilio SendGrid API or the Twilio SendGrid console.
Create Twilio SendGrid API keys with limited scopes. Set to Restricted Access with the following limited scopes:
| Access details | Access level |
|---|---|
| Mail Send > Mail Send | Full Access |
| Mail Send > Scheduled Send | No Access |
| Template Engine | Read Access |
To set up your Verify email integration, save your Twilio SendGrid API key.
Domain authentication lets you send email from your company's domain without via sendgrid.net. Configure domain authentication, then authenticate your domain in the Twilio SendGrid console.
To create or select a design for your template, go to the Twilio SendGrid Dynamic Templates page. To include the Verify code in your email template, use at least one of the following three variables.
| Variable | Necessity | Contents |
|---|---|---|
twilio_code | Required | The 4-10 digit One Time Passcode (OTP) without descriptive text. |
twilio_message | Required | Both the internationalized descriptive text and the OTP. Language defaults to English. To override language, use the Locale parameter. |
twilio_message_without_code | Required | The internationalized descriptive text only. |
twilio_service_name | Optional | The human-readable name given to the Service. |
- The
twilio_messagevalue resembles Your MyServiceName verification code is: 123456 or Su codigo de verificación para MyServiceName es: 123456. - The
twilio_message_without_codevalue resembles Your MyServiceName verification code is or Su codigo de verificacion para MyServiceName es.
To find a list of your templates and their unique IDs, go to the Twilio SendGrid Dynamic Templates page. Creating a Verify email integration requires a template ID. This ID contains 64 characters with one dash (d-uuid).
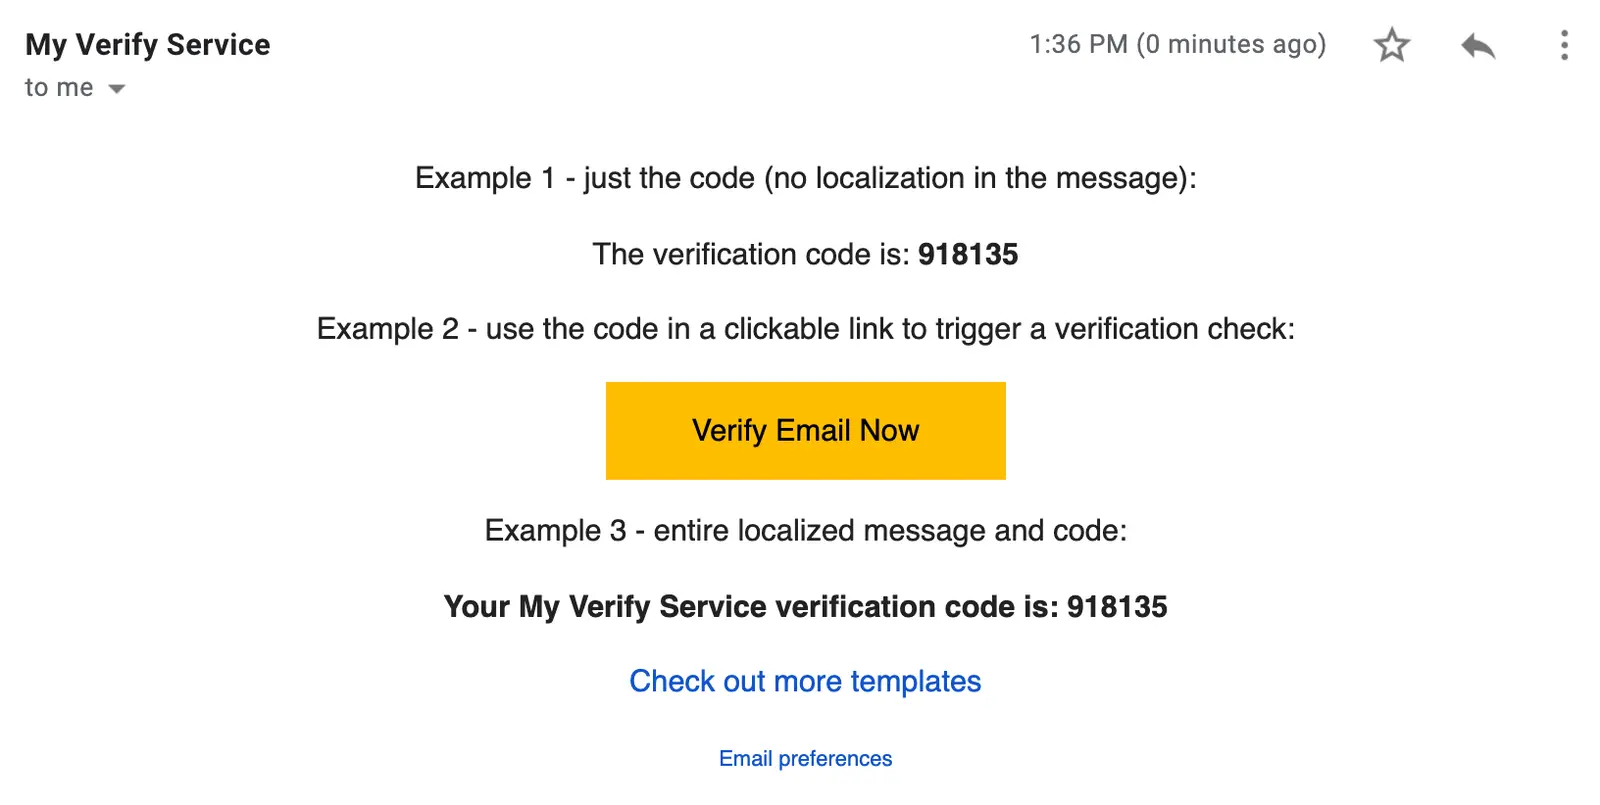
1<html>2<head>3<style type="text/css">4body, p, div {5font-family: Helvetica, Arial, sans-serif;6font-size: 14px;7}8a {9text-decoration: none;10}11a.verify {12background-color:#ffbe00;13color:#000000;14display:inline-block;15padding:12px 40px 12px 40px;16text-align:center;17}18</style>19<title></title>20</head>21<body>22<center>23<p>Example 1 - just the code (no localization in the message):</p>24<p>The verification code is: <strong>{{twilio_code}}</strong></p>25<p>Example 2 - use the code in a clickable link to trigger a verification check:</p>26<p>27<a href="https://example.com/signup/email/verify?token={{twilio_code}}"28class="verify" target="_blank">Verify Email Now</a>29</p>30<p>Example 3 - entire localized message and code:</p>31<p><strong>{{twilio_message}}</strong></p>32<p><a href="https://www.twilio.com/en-us/blog/insights/open-source-transactional-email-templates">Check out more templates</a></p>33<span style="font-size: 10px;"><a href=".">Email preferences</a></span>34</center>35</body>36</html>
This produces an email that resembles the following:
Transactional emails use Email preferences instead of Unsubscribe.
Integrating Verify with Twilio SendGrid involves creating an email integration and connecting to the Verify service.
To create an integration in the Twilio Console:
-
Log in to the legacy Twilio Console.
-
Go to Settings > Email Integration.
-
Click Create new email integration. The Create new email integration modal appears.
-
Provide values for the following fields:
Field Value Integration name Human-readable name only visible within the Twilio console. “From” email address The sender email address displayed in the recipient's inbox. This
address must be verified in Twilio SendGrid. |
| "From" name | Sender name displayed in the recipients's inbox. |
| SendGrid API key | 69 character long key formatted as SG.xxxxxxxx.yyyyyyyy. |
| Template ID | Found in your Twilio SendGrid account when you created your template. |
5. Click Create.
Connect your email integration to your Verify service in one of two ways:
- Go to Email Integration.
- To associate with an email integration, choose one or more services you want.
You can use one email integration for multiple services.
An email verification can use a create Verify request with or without overrides that modify the email template and other details or use Twilio SendGrid substitutions.
1// Download the helper library from https://www.twilio.com/docs/node/install2const twilio = require("twilio"); // Or, for ESM: import twilio from "twilio";34// Find your Account SID and Auth Token at twilio.com/console5// and set the environment variables. See http://twil.io/secure6const accountSid = process.env.TWILIO_ACCOUNT_SID;7const authToken = process.env.TWILIO_AUTH_TOKEN;8const client = twilio(accountSid, authToken);910async function createVerification() {11const verification = await client.verify.v212.services("VA305f5177a5c94bd22dba9aed7494c784")13.verifications.create({14channel: "email",15to: "recipient@foo.com",16});1718console.log(verification.sid);19}2021createVerification();
To check an email verification token, use the same code as other channels like SMS or voice.
1// Download the helper library from https://www.twilio.com/docs/node/install2const twilio = require("twilio"); // Or, for ESM: import twilio from "twilio";34// Find your Account SID and Auth Token at twilio.com/console5// and set the environment variables. See http://twil.io/secure6const accountSid = process.env.TWILIO_ACCOUNT_SID;7const authToken = process.env.TWILIO_AUTH_TOKEN;8const client = twilio(accountSid, authToken);910async function createVerificationCheck() {11const verificationCheck = await client.verify.v212.services("VA305f5177a5c94bd22dba9aed7494c784")13.verificationChecks.create({14code: "123456",15to: "recipient@foo.com",16});1718console.log(verificationCheck.sid);19}2021createVerificationCheck();