Verify Push iOS Client Library Quickstart
Twilio Verify Push Client Library (SDK) helps you verify users by adding a low-friction, secure, cost-effective, push verification or device approval factor into your own mobile application. It works by registering your user's iOS devices as a secure key via public-key cryptography. When your app backend needs to verify that the user is who they say they are, you challenge the user to prove that they still possess their secure key (iOS device). This still works even if the user has disabled push notifications (APNs), as your mobile app can poll for challenges via the SDK.
You can also perform Silent Device Approval authentications from the Client Library, which are invisible to the end-user and don't require push notifications. See the How to Implement Silent Device Approval section for more information on implementing this strategy.
You can run the Verify Push iOS Client Library in your existing iOS app and verify a user using the Verify Push API. This quickstart walks you through the entire process step-by-step:
- Sign up for Twilio
- Configure Push Credential and Verify Service
- Embed the client SDK into your iOS app
- Set up your app backend
- Register a user and their device in Verify Push
- Configure webhooks
- Verify a user
This gives you a foundation for implementing Verify Push or Silent Device Approval to verify users at login, transaction, and other sensitive actions.
Check out the Verify Push SDK Technical Overview to view its data model, sequence diagrams, and security FAQs.
If you don't want to setup Verify Push with your own app or backend immediately, we have built a Sample App embedded with the client Verify Push iOS SDK and a Sample Backend using Twilio functions that you can run to see Verify Push in action. These samples can also be helpful for troubleshooting.
Add Verify Push to your Android app with the Android SDK quickstart.
Info
Already have a Twilio account? Go ahead and skip this section.
You can sign up for a free 30-day Twilio trial account here. For details on trial free units and restrictions, see Twilio trial account.
- When you sign up, you'll be asked to verify your personal phone number. This helps Twilio verify your identity.
- Once you verify your number, you'll be asked to create a project. For the sake of this tutorial, you can click on the "Learn and Explore" template. Give your project a name, or just click "skip remaining steps" to continue with the default.
- Once you get through the project creation flow, you'll arrive at your project dashboard in the Twilio Console. This is where you'll be able to access your Account SID, an authentication token, create a Push Credential, create a Verify Service and more.
Verify Push and Push Notification
Verify Push doesn't require Firebase Cloud Messaging (FCM) or Apple Push Notification Service (APNS). Critical flows don't rely on push notifications with deliverability, connectivity, manufacturing, or other issues. To improve the Verify Push experience, send a verification request to your user's device. Configure push notifications for your apps.
Info
Already configured push notifications for your iOS app? Go ahead and skip this section.
To configure push notifications, follow these Apple Push Notification service (APNs) setup steps.
Log into your Apple development account and click on Identifiers under the Certificates, IDs & Profiles. This will show a list of identifiers, including App IDs.
If your App ID is already on this list, click on it and a list of capabilities will be shown.
- Check the 'Push Notifications' capability.
- Don't worry about the Configure button right now, just click the Save button in the upper right.
If your App ID isn't on this list, click the "+" symbol to add a new App ID.
- Choose App IDs and click the Continue button in the upper right.
- Select App as type
- Give your app a description as you see fit.
- Give it an Explicit Bundle ID that matches the bundle identifier in Xcode (such as com.twilio.TwilioVerifyDemo).
- Under Capabilities check Push Notifications
- Click the Continue button
- Click the Register button to confirm your new App ID and create it.
Be sure to add Push notifications and Remote notifications capabilities to your Xcode project
Now you will need to create a push notification certificate. This will enable your app to receive notifications. You can either make a development certificate or a production certificate. For this guide, we'll make a development certificate.
- Add a certificate on the Apple Developer Portal
- Under Services, select 'Apple Push Notification service SSL (Sandbox)'.
- Click 'Continue'
- Select the App ID you previously created.
- Click 'Continue' again
- It will prompt you to create a Certificate Signing Request, with instructions on how to do it in the 'Learn more' link. Create one.
- Upload the Certificate Signing Request.
- Click 'Continue' again
- Click 'Download' to obtain your certificate.
Congrats! You just created an Apple Development iOS Push Services certificate. Now you can download it and double click on it locally to add it to your Keychain access.
Info
When creating a certificate for push notifications, you can use 'Apple Push Notification service SSL (Sandbox & Production)' if you want to use only one certificate for both environments. The certificate will be labeled as "Apple Push Services".
For Verify Push to send push notifications to your iOS app, you will need to create an Apple Push Notification (APN) Push Credential that contains your APN certificate and private key.
In Keychain Access, go to the 'Certificates' Category in the left sidebar.
- Right-click your push certificate. It should be labeled "Apple Development iOS Push Services" (or "Apple Push Services").
- Choose "Export"
- Save it as cred.p12. (Leave the password blank)
This is your credential file. We're going to extract your certificate key and private key from this file. We need these 2 keys to create a Twilio Credential.
Run the following command in terminal
openssl pkcs12 -in cred.p12 -nokeys -out cert.pem -nodes
Run the following command in terminal
openssl pkcs12 -in cred.p12 -nocerts -out key.pem -nodes
Run the following command in terminal
openssl rsa -in key.pem -out key.pem
Then you can use the certificate in the cert.pem file and the private key in the key.pem file to create a push credential
Follow these steps to do it in the Twilio Console.
- Go to Twilio Console > Account > Keys & Credentials > Credentials > Push Credentials:
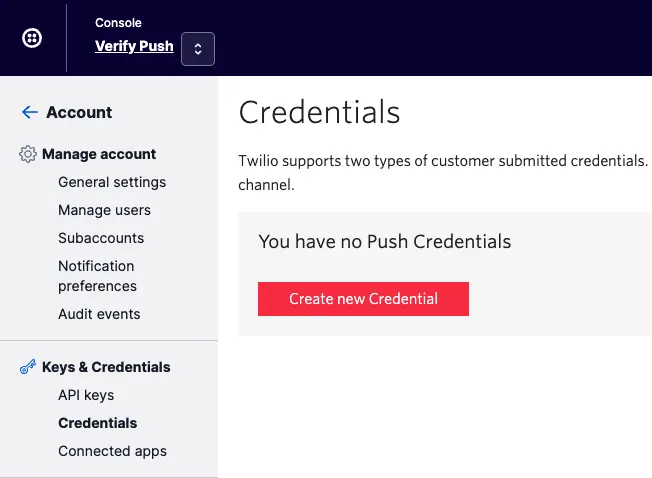
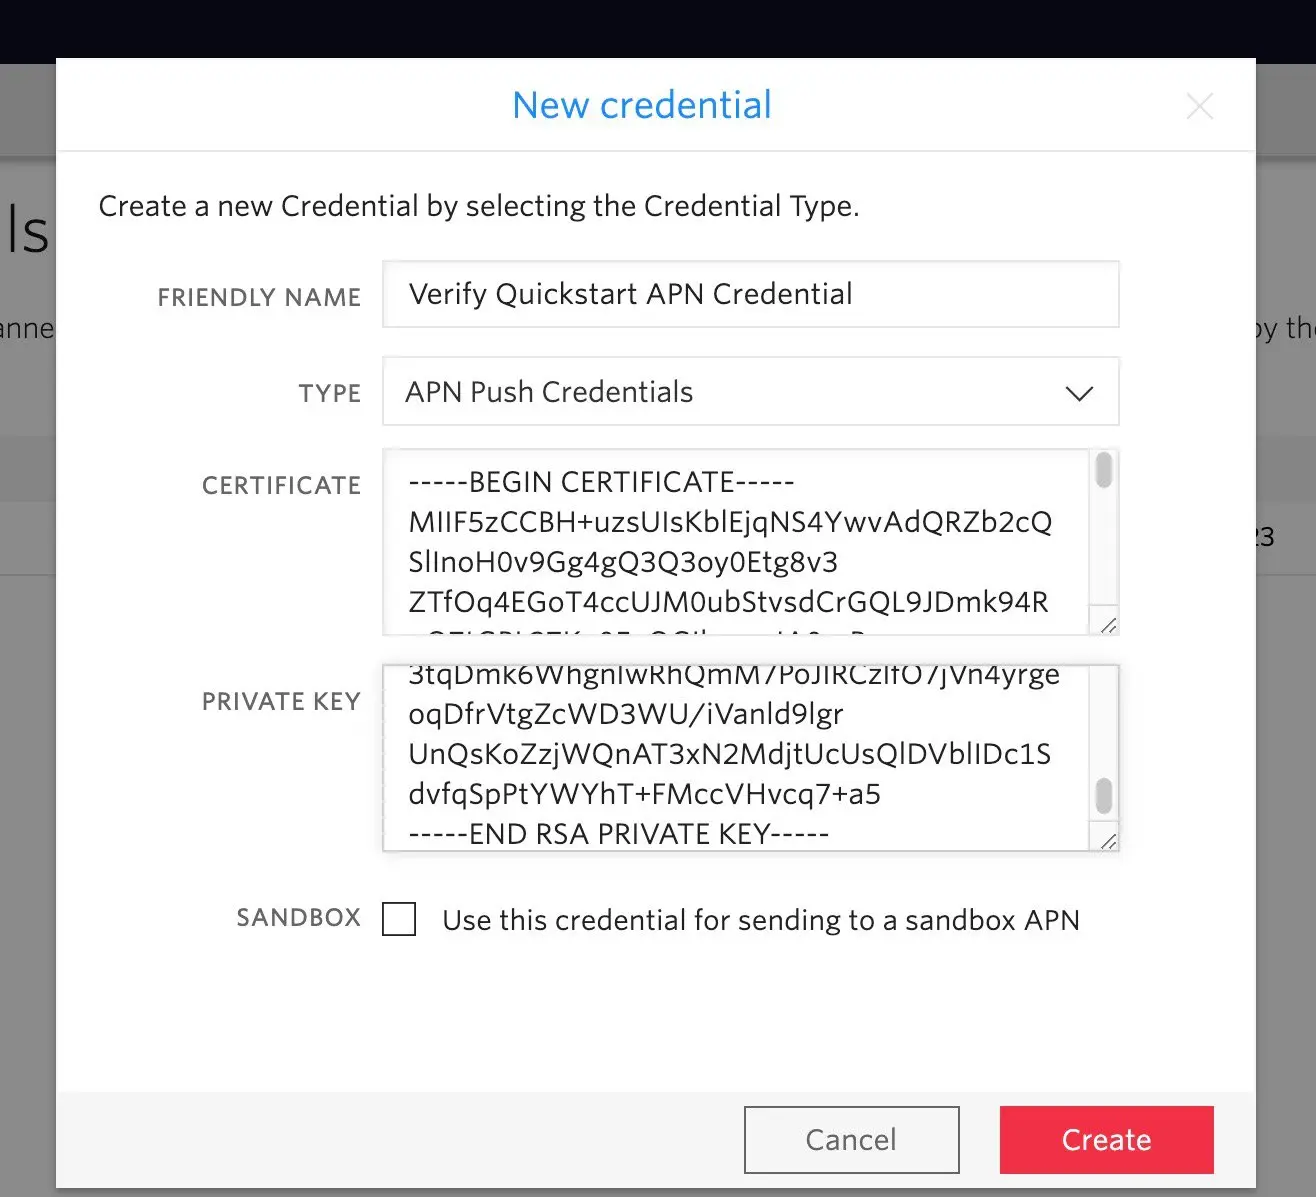
- Click the "Create new Credential" button to add a new credential and a form will pop-up:
-
Enter a friendly name, such as "Verify Quickstart App Credentials"
-
Select
APN push credentialsas type -
Enter the
Certificatefrom the cert.pem- strip anything outside of "-----BEGIN CERTIFICATE-----" and "-----END CERTIFICATE-----" boundaries.
-
Enter the
Private keyfrom the key.pem.- strip anything outside of "-----BEGIN RSA PRIVATE KEY-----" and "-----END RSA PRIVATE KEY-----" boundaries
-
Check the
Sandboxoption- Your app should be signed with a development certificate to use sandbox
-
Click the
Createbutton -
Note: Although Verify Push uses Twilio Notify for sending push notifications, you do not need to create your own Notify Service
Warning
You will need to create/update your push credential for production use, using the certificate and private key for an 'Apple Push Notification service SSL (Sandbox & Production)' certificate and the Sandbox checkbox should be unchecked. Your app should be signed with a production certificate.
Warning
Certificates for push are valid for a year and must be updated to continue communicating with APNs. To avoid a disruption when sending push notifications for your users, update your certificate before they expire by creating a new one and updating the push credential.
- Go to Twilio Console > Verify > Services and create a new Service.
- Alternatively, you can select any existing Service. However, we recommend creating a new service for testing so you don't accidentally interfere with a production environment.
- From Twilio Console > Verify > Services, select your Service to access its Settings. Under the Push section, select the Push Credential SID(s) that you want this Service to use for sending push notifications. One SID can be selected for your Android app (FCM) and one for your iOS app (APN).
Follow the installation steps in the README file of the Twilio Verify iOS repo. The installation steps will explain how to add the iOS library to your project and setup your iOS app to work with Apple Push Notification service (APNs).
After you import the Twilio Verify iOS library, you can start to integrate your existing app with Verify Push.
To get started, you will need to create an instance of the TwilioVerify class, using its Builder. Do this by typing or pasting in the code sample.
1do {2let twilioVerify = try TwilioVerifyBuilder().build()3} catch {4// Handle error5}
Warning
The SDK should be used from a Swift class.
Your iOS app needs to obtain an Access Token (technically an Enrollment JWE, similar to a JSON Web Token (JWT)) to make direct requests to the Verify Push API in the future. This Access Token request needs to be brokered by your app backend. To do this, you need to:
- Expose an API endpoint in your app backend for your iOS app to request the Access Token
- Have your app backend request an Access Token from Verify Push API
- Return the Access Token,
identityandVerify Service SIDto the iOS app
Check out our Sample Backend using Twilio functions for an implementation example. In a production web application, you would restrict access token retrieval to the currently authenticated user, using whatever type of authentication your service already uses.
In the sidebar to the right (or below) is sample code for requesting an access token from the Verify Push API in all languages supported by Twilio server-side SDKs. You will need the Verify service_sid, as well as the user id (such as a GUID or the user's primary key in your database table) you use as the identity with this Verify service.
1// Download the helper library from https://www.twilio.com/docs/node/install2const twilio = require("twilio"); // Or, for ESM: import twilio from "twilio";34// Find your Account SID and Auth Token at twilio.com/console5// and set the environment variables. See http://twil.io/secure6const accountSid = process.env.TWILIO_ACCOUNT_SID;7const authToken = process.env.TWILIO_AUTH_TOKEN;8const client = twilio(accountSid, authToken);910async function createAccessToken() {11const accessToken = await client.verify.v212.services("VAXXXXXXXXXXXXXXXXXXXXXXXXXXXXXXXX")13.accessTokens.create({14factorType: "push",15identity: "User_UUID",16});1718console.log(accessToken.sid);19}2021createAccessToken();
Response
1{2"sid": "YKaaaaaaaaaaaaaaaaaaaaaaaaaaaaaaaa",3"account_sid": "ACaaaaaaaaaaaaaaaaaaaaaaaaaaaaaaaa",4"service_sid": "VAXXXXXXXXXXXXXXXXXXXXXXXXXXXXXXXX",5"entity_identity": "ff483d1ff591898a9942916050d2ca3f",6"factor_type": "push",7"factor_friendly_name": "John Doe iPhone",8"ttl": 300,9"date_created": "2015-07-30T20:00:00Z",10"token": "eyJ6aXAiOiJERUYiLCJraWQiOiJTQVNfUzNfX19LTVNfdjEiLCJjdHkiOiJ0d2lsaW8tZnBhO3Y9MSIsImVuYyI6IkEyNTZHQ00iLCJhbGciOiJkaXIifQ..qjltWfIgQaTwp2De.81Z_6W4kR-hdlAUvJQCbwS8CQ7QAoFRkOvNMoySEj8zEB4BAY3MXhPARfaK4Lnr4YceA2cXEmrzPKQ7bPm0XZMGYm1fqLYzAR8YAqUetI9WEdQLFytg1h4XnJnXhgd99eNXsLkpKHhsCnFkchV9eGpRrdrfB0STR5Xq0fdakomb98iuIFt1XtP0_iqxvxQZKe1O4035XhK_ELVwQBz_qdI77XRZBFM0REAzlnEOe61nOcQxkaIM9Qel9L7RPhcndcCPFAyYjxo6Ri5c4vOnszLDiHmeK9Ep9fRE5-Oz0px0ZEg_FgTUEPFPo2OHQj076H1plJnFr-qPINDJkUL_i7loqG1IlapOi1JSlflPH-Ebj4hhpBdMIcs-OX7jhqzmVqkIKWkpPyPEmfvY2-eA5Zpoo08YpqAJ3G1l_xEcHl28Ijkefj1mdb6E8POx41skAwXCpdfIbzWzV_VjFpmwhacS3JZNt9C4hVG4Yp-RGPEl1C7aJHRIUavAmoRHaXbfG20zzv5Zu0P5PcopDszzoqVfZpzc.GCt35DWTurtP-QaIL5aBSQ",11"url": "https://verify.twilio.com/v2/Services/VAaaaaaaaaaaaaaaaaaaaaaaaaaaaaaaaa/AccessTokens/YKaaaaaaaaaaaaaaaaaaaaaaaaaaaaaaaa"12}
Warning
Do not use Personally Identifiable Information for identity. Use an immutable user identifier like a UUID, GUID, or SID.
Verify Push uses identity as a unique identifier of a user. You should not use directly identifying information (aka personally identifiable information or PII) like a person's name, home address, email or phone number, etc., as identity because the systems that will process this attribute assume it is not directly identifying information.
Warning
Do not store your Verify Service SID in your app. Get it from your backend, as well as the identity. You can find an example in the Sample Backend using Twilio functions
Register a user and their device in Verify Push by creating and verifying a Factor. Type or paste the code samples for both of these steps.
Info
You don't need to make a separate Create Entity call, because the Create Factor call will create an Entity and a Factor at the same time.
Info
You can add custom metadata associated with the factor on creation. This is added by the Device/SDK directly to allow for the inclusion of device information. Available in SDK version 2.2.0 and above.
Warning
As getting the device token for push could happen in a different moment before creating the factor, please validate that your app has a device token before using it as a pushToken in the create factor method. You will need to pass the device token as a hexadecimal string representation, check the implementation. If you don't want to configure push notification for this factor, then set the pushToken to nil.
1let payload = PushFactorPayload(2friendlyName: factorName,3serviceSid: verifyServiceSid,4identity: identity,5pushToken: pushToken,6accessToken: accessToken,7metadata: ["os": "iOS"] // Custom metadata associated with the factor. Optional8)9twilioVerify.createFactor(withPayload: payload, success: { factor in10// Success11}) { error in12// Error13}
1let payload = VerifyPushFactorPayload(sid: factorSid)2twilioVerify.verifyFactor(withPayload: payload, success: { factor in3// Success4}) { error in5// Error6}
Info
- By default, the created factors and key pairs will not persist in the device after the app is uninstalled and reinstalled for security reasons. However, it's possible to change this default behavior and persist the factors and key pairs after a reinstall, because both are saved in the keychain. Check this to know how to do it.
- The Verify API has a limit of 20 Factors of
factor_type=pushper Entity. This limit could be reached if a user uninstalls and reinstalls your app frequently. Unverified Factors will be automatically deleted and unverifiable after 1-24 hours from when they were created, but you will need to explicitly delete verified Factors.
Configure a webhook callback for your app backend to be notified of events such as when a Factor has been verified or when a Challenge has been approved, so that it knows to advance the user to the next step in your flow. This is more real-time and efficient than constantly polling the Verify Push API for the status of a Factor or Challenge.
Follow the steps in this Verify Webhooks page.
1// Download the helper library from https://www.twilio.com/docs/node/install2const twilio = require("twilio"); // Or, for ESM: import twilio from "twilio";34// Find your Account SID and Auth Token at twilio.com/console5// and set the environment variables. See http://twil.io/secure6const accountSid = process.env.TWILIO_ACCOUNT_SID;7const authToken = process.env.TWILIO_AUTH_TOKEN;8const client = twilio(accountSid, authToken);910async function createWebhook() {11const webhook = await client.verify.v212.services("VAaaaaaaaaaaaaaaaaaaaaaaaaaaaaaaaa")13.webhooks.create({14eventTypes: ["*"],15friendlyName: "My Webhook",16webhookUrl: "https://example.com/webhook",17});1819console.log(webhook.sid);20}2122createWebhook();
Response
1{2"url": "https://verify.twilio.com/v2/Services/VAaaaaaaaaaaaaaaaaaaaaaaaaaaaaaaaa/Webhooks/YWaaaaaaaaaaaaaaaaaaaaaaaaaaaaaaaa",3"sid": "YWaaaaaaaaaaaaaaaaaaaaaaaaaaaaaaaa",4"account_sid": "ACaaaaaaaaaaaaaaaaaaaaaaaaaaaaaaaa",5"service_sid": "VAaaaaaaaaaaaaaaaaaaaaaaaaaaaaaaaa",6"friendly_name": "My Webhook",7"event_types": [8"*"9],10"webhook_method": "POST",11"webhook_url": "https://example.com/webhook",12"status": "enabled",13"version": "v2",14"date_created": "2015-07-30T20:00:00Z",15"date_updated": "2015-07-30T20:00:00Z"16}
Congratulations! Verify Push consists of two user sequences, and you've just completed the first one: user and device registration. The second sequence is to challenge and verify (authenticate) a user with their registered device. Read on for the step-by-step instructions.
Your web application backend needs to call the Verify Push API to create a Challenge using the Factor that you've just created. When the challenge is created, Verify Push sends a push notification to the registered device using the configured Push Credential.
The code in the sidebar to the right/bottom demonstrates how to create those challenges using the Twilio server-side SDKs.
1// Download the helper library from https://www.twilio.com/docs/node/install2const twilio = require("twilio"); // Or, for ESM: import twilio from "twilio";34// Find your Account SID and Auth Token at twilio.com/console5// and set the environment variables. See http://twil.io/secure6const accountSid = process.env.TWILIO_ACCOUNT_SID;7const authToken = process.env.TWILIO_AUTH_TOKEN;8const client = twilio(accountSid, authToken);910async function createChallenge() {11const challenge = await client.verify.v212.services("VAXXXXXXXXXXXXXXXXXXXXXXXXXXXXXXXX")13.entities("User_UUID")14.challenges.create({15"details.fields": [16{17label: "msg",18value: "Challenge details shown to user",19},20],21"details.message":22"Message shown to the user when the push notification arrives",23expirationDate: new Date("2020-07-30 21:00:00"),24factorSid: "YFXXXXXXXXXXXXXXXXXXXXXXXXXXXXXXXX",25hiddenDetails: {26msg: "Challenge details not shown to user",27},28});2930console.log(challenge.sid);31}3233createChallenge();
Response
1{2"sid": "YC03aaaaaaaaaaaaaaaaaaaaaaaaaaaaaa",3"account_sid": "ACaaaaaaaaaaaaaaaaaaaaaaaaaaaaaaaa",4"service_sid": "VAXXXXXXXXXXXXXXXXXXXXXXXXXXXXXXXX",5"entity_sid": "YEaaaaaaaaaaaaaaaaaaaaaaaaaaaaaaaa",6"identity": "User_UUID",7"factor_sid": "YFXXXXXXXXXXXXXXXXXXXXXXXXXXXXXXXX",8"date_created": "2015-07-30T20:00:00Z",9"date_updated": "2015-07-30T20:00:00Z",10"date_responded": "2015-07-30T20:00:00Z",11"expiration_date": "2020-07-30T21:00:00Z",12"status": "pending",13"responded_reason": "none",14"details": {15"message": "Hi! Mr. John Doe, would you like to sign up?",16"date": "2020-07-01T12:13:14Z",17"fields": [18{19"label": "Action",20"value": "Sign up in portal"21}22]23},24"hidden_details": {25"msg": "Challenge details not shown to user"26},27"metadata": null,28"factor_type": "push",29"url": "https://verify.twilio.com/v2/Services/VAaaaaaaaaaaaaaaaaaaaaaaaaaaaaaaaa/Entities/ff483d1ff591898a9942916050d2ca3f/Challenges/YC03aaaaaaaaaaaaaaaaaaaaaaaaaaaaaa",30"links": {31"notifications": "https://verify.twilio.com/v2/Services/VAaaaaaaaaaaaaaaaaaaaaaaaaaaaaaaaa/Entities/ff483d1ff591898a9942916050d2ca3f/Challenges/YC03aaaaaaaaaaaaaaaaaaaaaaaaaaaaaa/Notifications"32}33}
Info
- You may choose to put Personally Identifiable Information (PII) or other sensitive information in
detailsandhidden_details. The data in each param will be stored per its retention policy listed in the Challengeresource. - If you are sending push notifications, use the Notifications resource to resend a push notification if the first one fails for some reason. This is better than creating another duplicate Challenge.
Now that the pending Challenge has been created in the Verify API, your mobile app needs to become aware of it. This can be done by telling your user to open up your mobile app on the registered device, and then having your app check (poll) the Verify API for any pending Challenges whenever it's opened.
Example implementation
-
Display a message for your user to open your app on the registered device: "Approve this login/transaction by opening the
[App name]app and tapping[Approve button text] -
Know when the app is opened and in foreground, then automatically poll for pending challenges.
- Android: Use the onResume() method of your activity or subscribe to a lifecycle observer.
- iOS: Use the applicationWillEnterForeground method in your application delegate or sceneWillEnterForeground if your app supports scenes, see more info here.
-
Alternatively, you can display to the user an "inbox" menu item to manually check for "pending verification requests" (challenges)
-
To get the pending challenges you can call the
getAllChallengesmethod in the SDK, passingPendingasChallengeListPayload's statusandDescasChallengeListPayload's order -
You can define the number of challenges to be returned using
ChallengeListPayload's pageSize.To show only one challenge, pass1asChallengeListPayload's pageSize -
You can display the pending challenge(s) as a pop-up, just like if your app had received a push notification
-
Alternatively, you can show multiple pending challenges in an "inbox" menu item. You can display a badge number in the inbox to let the user know how many pending challenges are waiting for them.
Warning
Make sure to specify Desc as the ChallengeListPayload's order in step 4 above and whenever you want to get the most recent challenge first. If you don't specify Desc, the list will default to returning Asc order (oldest challenge first), which could create high latency and a timeout error if the list of challenges is long and you are looking for the most recent challenge.
1let payload = ChallengeListPayload(factorSid: factorSid, pageSize: defaultPageSize, status: .pending, order: .desc)2twilioVerify.getAllChallenges(withPayload: payload, success: { [weak self] list in3guard let strongSelf = self else { return }4// Show pending challenge(s)5}) { [weak self] error in6// Error7}
Your iOS app needs to read the contents of the push notification payload to obtain the challengeSid, factorSid, and message parameters.
Typically, you would do this either directly in the AppDelegate class, or you would create a new class that handled incoming push notifications that you reference in your AppDelegate class.
The following code sample runs when there is an incoming push notification, and if the type is verify_push_challenge, reads the parameters out of the notification.
Warning
Because the user might consider notification-based interactions disruptive, you must obtain permission to use them.
1// Background2func userNotificationCenter(_ center: UNUserNotificationCenter, didReceive response: UNNotificationResponse, withCompletionHandler completionHandler: @escaping () -> Void) {3defer { completionHandler() }45guard response.actionIdentifier == UNNotificationDefaultActionIdentifier else {6return7}8guard let data = response.notification.request.content.userInfo as? [AnyHashable: Any] else {9return10}11guard let challengeSid = data["challenge_sid"] as? String,12let factorSid = data["factor_sid"] as? String,13let type = data["type"] as? String, type == "verify_push_challenge" else {14return15}1617// Show push notification or update challenge18}1920// Foreground21func userNotificationCenter(_ center: UNUserNotificationCenter, willPresent notification: UNNotification, withCompletionHandler completionHandler: @escaping (UNNotificationPresentationOptions) -> Void) {22guard response.actionIdentifier == UNNotificationDefaultActionIdentifier else {23completionHandler(UNNotificationPresentationOptions(rawValue: 0))24return25}26guard let data = response.notification.request.content.userInfo as? [AnyHashable: Any] else {27completionHandler(UNNotificationPresentationOptions(rawValue: 0))28return29}30guard let challengeSid = data["challenge_sid"] as? String,31let factorSid = data["factor_sid"] as? String,32let type = data["type"] as? String, type == "verify_push_challenge" else {33completionHandler(UNNotificationPresentationOptions(rawValue: 0))34return35}3637// Show push notification or update challenge38completionHandler(.sound)39}
You can test push notifications on simulators. The Xcode command-line tools allow you to send push notifications from the terminal, this command allows you to send a push notification to the iOS simulator:
1xcrun simctl push --help2Send a simulated push notification3Usage: simctl push <device> [<bundle identifier>] (<json file> | -)45bundle identifier6The bundle identifier of the target application7If the payload file contains a 'Simulator Target Bundle' top-level key this parameter may be omitted.8If both are provided this argument will override the value from the payload.9json file10Path to a JSON payload or '-' to read from stdin. The payload must:11- Contain an object at the top level.12- Contain an 'aps' key with valid Apple Push Notification values.13- Be 4096 bytes or less.1415Only application remote push notifications are supported. VoIP, Complication, File Provider, and other types are not supported.
The command requires the arguments:
- <device>: set this to booted to use the open simulator. You can also use a device identifier which you could get with the
xcrun simctl list devices | grep Bootedcommand. - <bundle identifier>: bundle identifier of the app you are testing.
- <json file>: a JSON file containing the push notification details.
The JSON content for getting a challenge push notification is:
1{2"aps": {3"alert": "<Challenge message>",4"category": "verify_push_challenge"5},6"message": "<Challenge message>",7"challenge_sid": "<challenge_sid>",8"factor_sid": "<factor_sid>",9"type": "verify_push_challenge"10}
- <Challenge message>: The message for the challenge
- <factor_sid>: A valid factor Sid, created in the device
- <challenge_sid>: A valid challenge Sid, created for the factor
Running this command for the sample app will be:
xcrun simctl push booted com.twilio.TwilioVerifyDemo payload.json
You can see an example here
Once your app receives the push notification containing the challengeSid, it needs to retrieve the challenge details that correspond to that sid. Type/paste the sample code below. This step is not necessary if you have already retrieved the challenge details via the getAllChallenges method as previously instructed in the "poll for the challenge" section.
1twilioVerify.getChallenge(challengeSid: challengeSid, factorSid: factorSid, success: { challenge in2// Success3}) { error in4// Error5}
Info
See additional tips for push notifications and ensuring that the device receives the challenge here.
In an actual implementation, your iOS app should either display the Challenge details to the user and request confirmation that the Challenge is expected, or silently approve the Challenge, because your app already knows that the user is trying to login on the same device as the registered device that is being challenged.
In either case, the next step is for your app to call the Verify Push API directly and update the Challenge status as approved or denied. Type or paste the sample code into your iOS app.
1let payload = UpdatePushChallengePayload(2factorSid: factorSid,3challengeSid: challengeSid,4status: newStatus5)6twilioVerify.updateChallenge(withPayload: payload, success: {7// Success8}) { error in9// Error10}
By optionally implementing Silent Device Approval within the Verify Push Client Library, you can silently approve challenges without push notifications when your app already knows that the user is trying to complete an action (actively logging in, making a transaction, etc.) on the same device as the registered device that is being challenged. This results in an authentication that is completely invisible to the user. While implementation details will vary, here are some suggested steps:
-
In order to be confident about the user's intent, the challenge approval should be done when the app is in foreground during the flow of the action that is being approved (e.g. immediately after the user taps "login").
-
Identify the device starting the action and create a challenge for the factor linked to that device (a factor only represents one device).
-
If you want to send challenges for multiple devices (factors) or if you want to be sure that you're approving the correct challenge, there are two options:
- Include the associated challenge sid for the action in the response to the device and validate that it's the expected challenge sid before approving it.
- Assign a transaction id to the started action and include it in the response to the device, and add the transaction id to the challenge's hidden details, so before approving the challenge you can get the challenge's hidden details to validate it is the expected challenge
-
To receive the challenge on the client-side, you can:
- Implement a strategy to listen for incoming push notifications when the app is in foreground and after some seconds, poll for pending challenges just in case the push notification did not arrive.
- Poll for the latest pending challenge for an immediate approval, if your backend implementation can guarantee that the challenge was already created.
For additional suggestions, see:
- Getting challenge's hidden details
- Full source for listening to incoming push notifications when the app is in foreground
- Poll for the challenge
Once Verify Push API receives a Challenge update from your iOS app, it will forward the update by sending a webhook callback (challenge.approved or challenge.denied) to your app backend, so that it knows to take your user to the next step in your flow. If you don't have a webhook configured, you can poll the Verify Push API for the status of the Challenge.
This completes the second user sequence of Verify Push: Challenge and verify a user.
Now that you've verified your first user, check out the following resources to continue your Verify Push journey with Twilio:
- Add Verify Push to your Android app by following the Android SDK Quickstart
- Prepare to go-live by reviewing Verify Push Best Practices for Production use
- Explore adding Verify's other verification channels beyond Push