Edit and Deploy an IVR with Twilio Studio to Route Calls to Queues
In the previous section of the Onboarding Guide, you set up the necessary pieces for Skill-based routing. Now that you have Workflows, Task Queues, and Agents who match some of those Queues, you can start building the logic to route your end-users to the appropriate Agent based on their needs. This is the final piece you will build in this onboarding guide.
You will build this solution using Twilio Studio, a visual tool that allows you to build applications using no or little code. Using Studio, you will create a minimal IVR system that will ask an inbound caller to indicate whether they wish to speak to Sales or Support. The IVR will route the caller to the new Workflow you created, which will dispatch the call to the appropriate Queue.
A Flow in Twilio Studio is a logical workflow that you create to build your application. A Flow can handle one or more use cases.
To get started, navigate to Twilio Studio in the Twilio Console.
You should see that you already have a few Flows created in your account - these are Flows that were automatically created when you started your Flex account. They currently are set up to handle inbound calls and messages to your Flex number and route them to your Flex UI; they are powering the behavior you have already tested by calling and texting your Flex instance.
You will now create a new Flow that has more nuanced logic for routing Tasks based on an end-user's goals.
Info
For the purposes of this onboarding guide, you do not need to be familiar with all of Studio's mechanics. If you would like to learn how to build Twilio Studio Flows from scratch, check out this Getting Started guide.
Click Create new Flow in the Twilio Studio dashboard in the Console to get started. You can name the Flow anything you want, such as "Sales and Support IVR". Then click Next.
Next, you will be presented with a number of options for getting started with your Flow. Twilio offers several templates for common use cases. In this guide, you will use a JSON template to get started - it will contain all the pieces you need for a minimal IVR, and you will edit a few of the components to make it work for your account.
Select Import from JSON at the bottom of the list of options and then click Next.
You will then see a text editor where you can paste in JSON, which will populate all the required components for the Studio Flow. Delete the two empty curly brackets in that editor and then paste the following JSON code into the editor:
1{2"description": "A New Flow",3"states": [4{5"name": "Trigger",6"type": "trigger",7"transitions": [8{9"event": "incomingMessage"10},11{12"next": "Greeting",13"event": "incomingCall"14},15{16"event": "incomingConversationMessage"17},18{19"event": "incomingRequest"20},21{22"event": "incomingParent"23}24],25"properties": {26"offset": {27"x": 0,28"y": 029}30}31},32{33"name": "Greeting",34"type": "gather-input-on-call",35"transitions": [36{37"next": "DigitInput",38"event": "keypress"39},40{41"next": "SpeechInput",42"event": "speech"43},44{45"event": "timeout"46}47],48"properties": {49"speech_timeout": "auto",50"offset": {51"x": 70,52"y": 21053},54"loop": 1,55"finish_on_key": "#",56"say": "Hello! Thank you for calling. Press or say one to speak to Sales or two to speak to Support.",57"stop_gather": true,58"gather_language": "en",59"profanity_filter": "true",60"timeout": 561}62},63{64"name": "DigitInput",65"type": "split-based-on",66"transitions": [67{68"event": "noMatch"69},70{71"next": "SendToSales",72"event": "match",73"conditions": [74{75"friendly_name": "If value equal_to 1",76"arguments": [77"{{widgets.Greeting.Digits}}"78],79"type": "equal_to",80"value": "1"81}82]83},84{85"next": "SendToSupport",86"event": "match",87"conditions": [88{89"friendly_name": "If value equal_to 2",90"arguments": [91"{{widgets.Greeting.Digits}}"92],93"type": "equal_to",94"value": "2"95}96]97}98],99"properties": {100"input": "{{widgets.Greeting.Digits}}",101"offset": {102"x": -220,103"y": 430104}105}106},107{108"name": "SpeechInput",109"type": "split-based-on",110"transitions": [111{112"event": "noMatch"113},114{115"next": "SendToSales",116"event": "match",117"conditions": [118{119"friendly_name": "If value equal_to one",120"arguments": [121"{{widgets.Greeting.SpeechResult}}"122],123"type": "equal_to",124"value": "one"125}126]127},128{129"next": "SendToSupport",130"event": "match",131"conditions": [132{133"friendly_name": "If value equal_to two",134"arguments": [135"{{widgets.Greeting.SpeechResult}}"136],137"type": "equal_to",138"value": "two"139}140]141}142],143"properties": {144"input": "{{widgets.Greeting.SpeechResult}}",145"offset": {146"x": 350,147"y": 470148}149}150},151{152"name": "SendToSales",153"type": "send-to-flex",154"transitions": [155{156"event": "callComplete"157},158{159"event": "failedToEnqueue"160},161{162"event": "callFailure"163}164],165"properties": {166"offset": {167"x": -180,168"y": 860169},170"workflow": "",171"channel": "",172"attributes": "{\"type\": \"inbound\", \"name\": \"{{trigger.call.From}}\", \"task\": {\"skillsNeeded\": \"Sales\"} }"173}174},175{176"name": "SendToSupport",177"type": "send-to-flex",178"transitions": [179{180"event": "callComplete"181},182{183"event": "failedToEnqueue"184},185{186"event": "callFailure"187}188],189"properties": {190"offset": {191"x": 440,192"y": 840193},194"workflow": "",195"channel": "",196"attributes": "{\"type\": \"inbound\", \"name\": \"{{trigger.call.From}}\", \"task\": {\"skillsNeeded\": \"Support\"} }"197}198}199],200"initial_state": "Trigger",201"flags": {202"allow_concurrent_calls": true203}204}
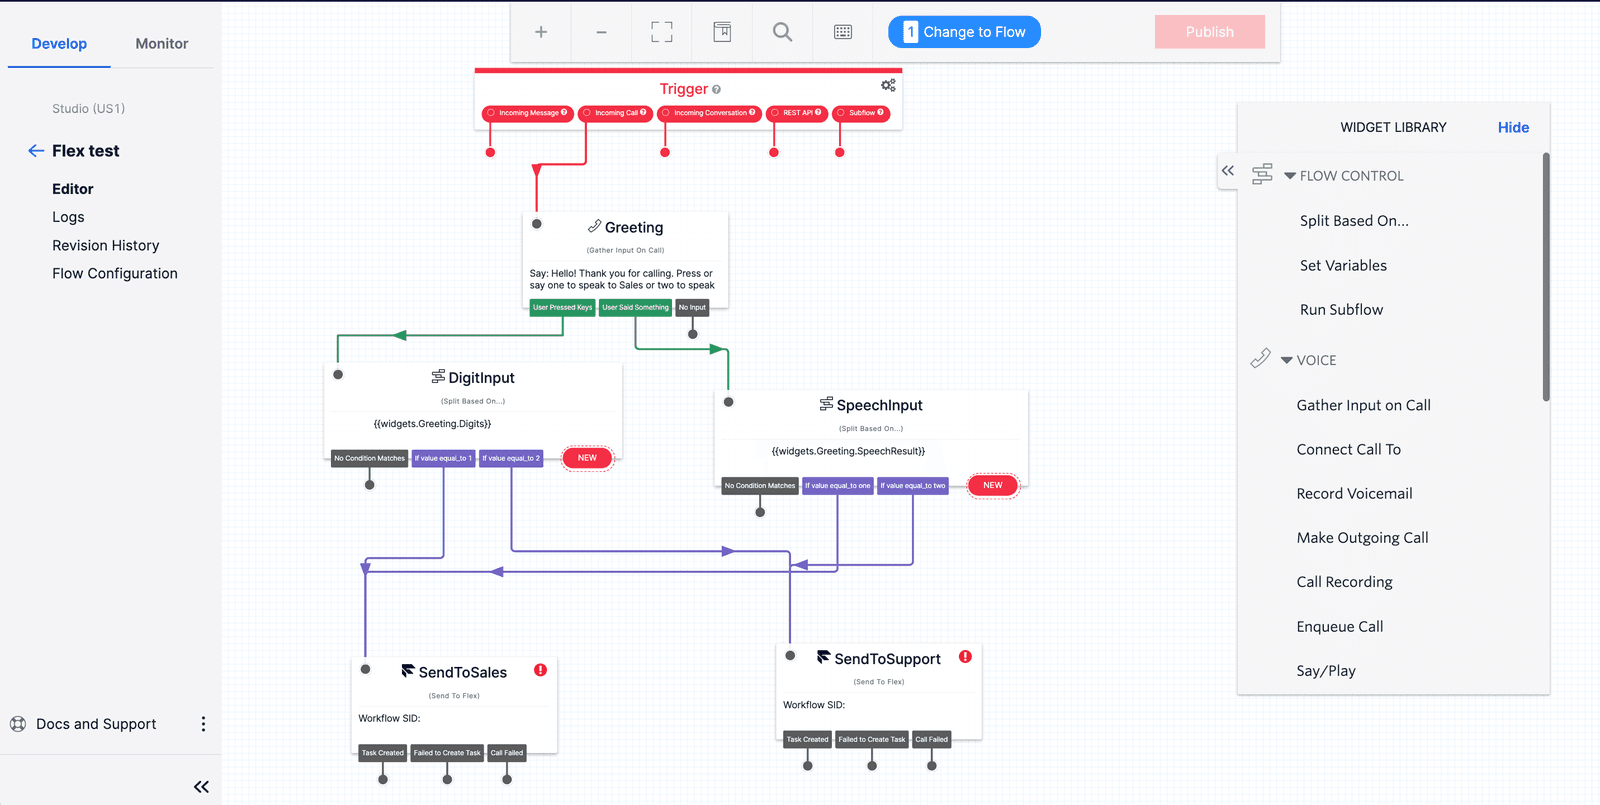
Then, click Next to create this new Flow with the configuration in this JSON file. You will then see your Flow in Studio's visual editor. This visual editor is also called the Flow's Canvas. It should look like this:
You can learn about how to navigate the Canvas in the Studio Getting Started Guide.
Each block that you see here is called a Widget. A Widget accomplishes a single logical task of your application. You can follow the arrows (also called Transitions) to see what happens after each Widget accomplishes its task and moves to the next step.
This current Flow accomplishes the following steps:
- When an incoming call comes in (which you can see in the top Trigger Widget), the Greeting Widget runs.
- The Greeting Widget is a Gather Input on Call Widget. It will speak a message to the caller and then wait for the user to enter input based on the prompt. You can click on this Widget to see the message in full and view its other configuration options.
- The user can enter their choice by speaking or pressing digits. Depending on how the user enters their input, the next Widget will either be the DigitInput or SpeechInput Widget.
- Both DigitInput and SpeechInput are Split Based On… Widgets. These Widgets evaluate the value of a variable (in this case, the input the user entered) and move to the next Widget based on a set of conditions. These two Widgets look for whether the user entered or said "1" or "2" and then routes to the next step based on that.
- If the user entered or said "1" for Sales, the two Split Based On… Widgets route to the SendToSales Widget. If the user entered or said "2" for Support, the next Widget is the SendToSupport Widget. Both of these are Send To Flex Widgets, which will route a Task to your Flex instance.
Info
This workflow is minimal and does not handle if the user does not enter input or if they enter something other than "1" or "2". You can add more Widgets and Transitions to handle these cases. For example, if the Greeting Widget does not receive input, you might have it loop back to the beginning to play the message again. You might also want to add conditions to the SpeechInput Widget to route calls if they say "Sales" or "Support" instead of "one" or "two". Learn more about how to do this in the Studio Getting Started guide. You can also review this tutorial for building an IVR in Studio to see other options to add to your IVR.
You will see that there are red exclamation points on both of your Send To Flex Widgets. They are not fully configured yet, because you will need to enter a few details that are specific to your Flex account.
Click on the SendToSales Widget to see its Configuration Menu on the right side of the screen.

The red exclamation points indicate where there are problems that you need to fix. Currently, the Widget is not configured to go anywhere - you will need to tell the Widget where within your Flex instance you would like to direct this Task.
Under Workflow, click on the dropdown and select the Sales and Support Workflow that you created.
Under Task Channel, select Voice, as this is a voice call.
If you scroll down in this Configuration Menu you will see an Attributes field. This is the critical field that tells your Workflow how to route the Task. You can add any attributes you want to pass on about this Task to your Flex instance, but the most important one here is the "task": {"skillsNeeded": "Sales"} line. This is how your Workflow will evaluate the Task and send it to the appropriate Queue. (Recall that your Send To Sales filter in your Workflow was looking for Tasks that matched "Sales" IN task.skillsNeeded).
Click Save at the bottom of the Widget. The red exclamation mark should now be gone, indicating that the Widget is functional. Next, complete the same steps for the SendToSupport Widget:
- Click on the SendToSupport Widget to open its Configuration Menu
- Under Workflow, select Sales and Support Workflow
- Click Save
You can also verify that the attributes for this Widget include "task": {"skillsNeeded": "Support"} and that the Task will be routed appropriately.
You have now fixed both Widgets. Finally, make sure to click Publish at the top of the screen, so that your changes live.
Warning
Any time you make changes to your Studio Flow, you will have to click Publish to make them live. Any changes you make without clicking Publish will be saved but will not be live.
The final step you need to take before you can test this new IVR is to configure your Flex phone number to point to this new Studio flow you created.
Navigate to the Active Numbers section of the Twilio Console and click on your Flex phone number.
After clicking on the number, you will see its configuration menu where you can connect the number to your Studio Flow.
To configure this number to trigger your Studio Flow from an Incoming Call:
- Scroll down to the Voice & Fax section
- Under Configure With, select the dropdown option "Webhook, TwiML Bin, Function, Studio Flow, Proxy Service"
- Under A Call Comes In, select the dropdown option "Studio Flow"
- You'll see another dropdown menu appear where you can select the Studio Flow you'd like to connect to when a call comes in to this number

Choose the new Studio Flow that you created and then press Save to save these changes. Your Flow is now connected to your Flex phone number, and any incoming calls will be routed through the IVR. Time to test it out!
Go back to the Flex UI and make sure your Agent status is set to available. You should also make sure that you do not have any active ongoing Tasks, so that you are available to accept new Tasks.
Place a call to your Flex phone number; you should now hear your new IVR greeting asking you to indicate 1 for Sales and 2 for Support. If your account is in Trial mode, you will also hear the warning at the beginning of the call and will need to press any number to continue before hearing the IVR greeting.
Press or say 1 to be routed to your Sales Queue. Earlier in this tutorial, you classified your Agent as having the Sales skill. If your Agent is set to Available, you should now see an incoming call in your Flex UI, which you can accept and then wrap up and complete.
You can also test that your Agent does not receive the Task if you do not have the Sales skill. Go to your Agent's Detail View (from the Teams View) and toggle off the Sales skill. Then, place another call to your Flex number. This time, if you indicate 1 for Sales, your Agent should not receive the incoming call because your Agent is no longer a Worker in the Sales Queue.
You can repeat the same process for the Support skill to make sure it also works as expected.
Congratulations! You have now completed the Flex Onboarding Guide. You've accomplished the following:
- Completed a walkthrough of the different Flex UI views
- Handled incoming call and SMS tasks
- Created a skill-based routing workflow
- Created new Skills
- Assigned Workers to those Skills
- Created Queues for those Skills
- Created a Workflow to route incoming Tasks to the appropriate Queue
- Published an IVR system that routes incoming call Tasks to the correct set of Agents
You are now ready to continue building your Flex instance to meet your business needs.
To continue learning and building with Flex, you can explore the following topics:
- Customize your Flex UI with plugins and with custom React code
- Set up SSO and add more agents to your Flex instance
- Get insights and reporting about your Flex instance with Flex Insights
- Connect with Twilio's Professional Services for expert guidance on building your specific customer engagement solution