Telemedicine Virtual Visits
This guide includes a set of workflows that are commonly used for telehealth applications. The guide will walk through a standard implementation using best practices, and highlight exceptions where appropriate. If you are just starting to build your video application, consider starting with the Twilio Video React App. This document is not meant to inform you and your legal team on HIPAA compliance when using Twilio, for that please see Architecting for HIPAA documentation and talk to sales.
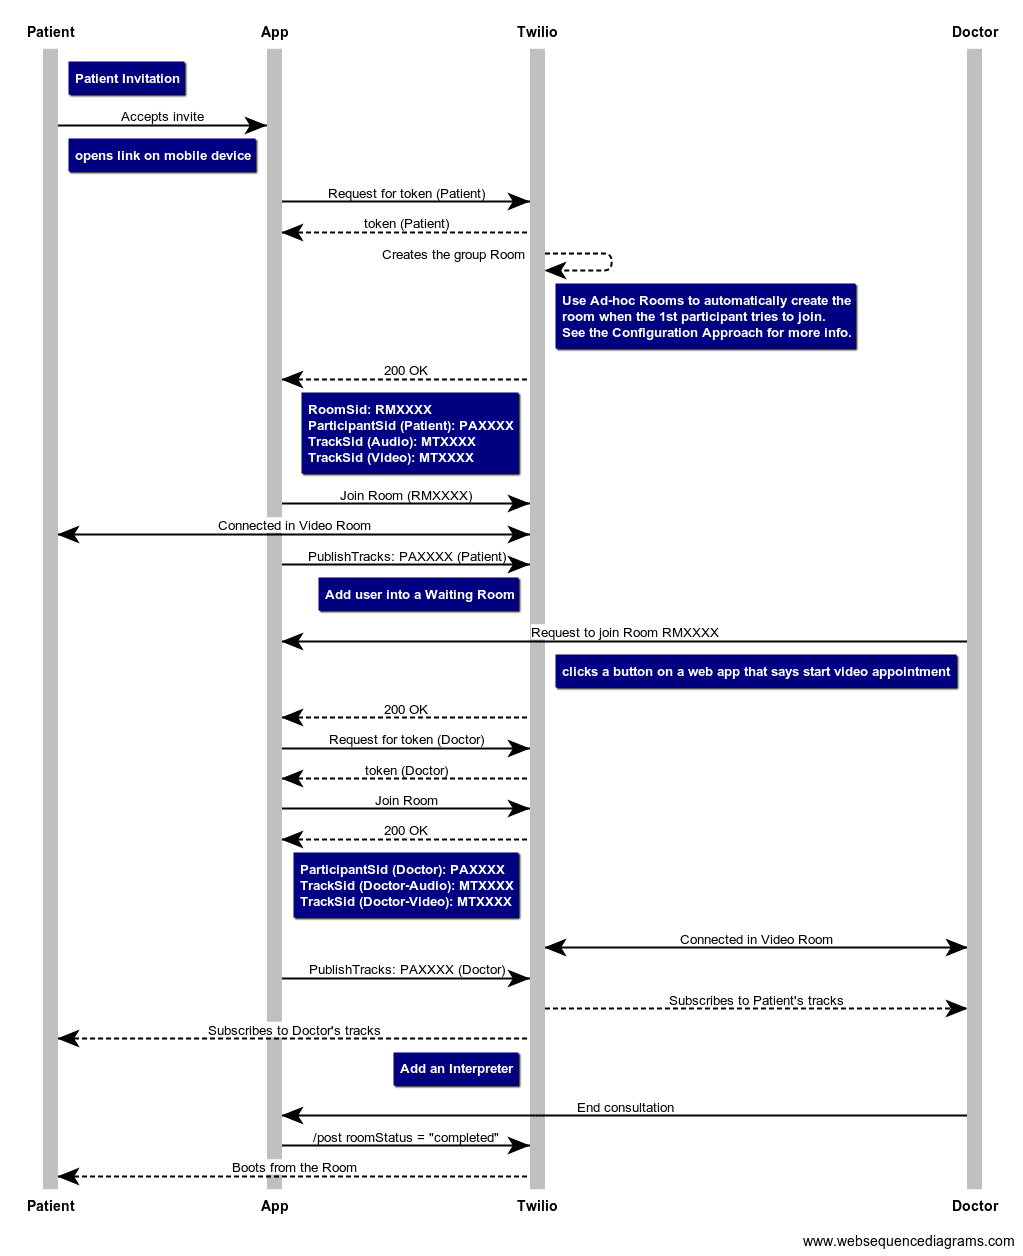
Telemedicine applications typically contain two participants (provider and patient). Occasionally there can be three or four participants if a family member joins or if an interpreter is needed. In general, a web app is used both on the provider side and on the patient side; however, patients are often on mobile devices and as such mobile browsers or mobile apps if they are available. Applications might also support PSTN dial-in. This guide will walk through the use case that is diagrammed below:
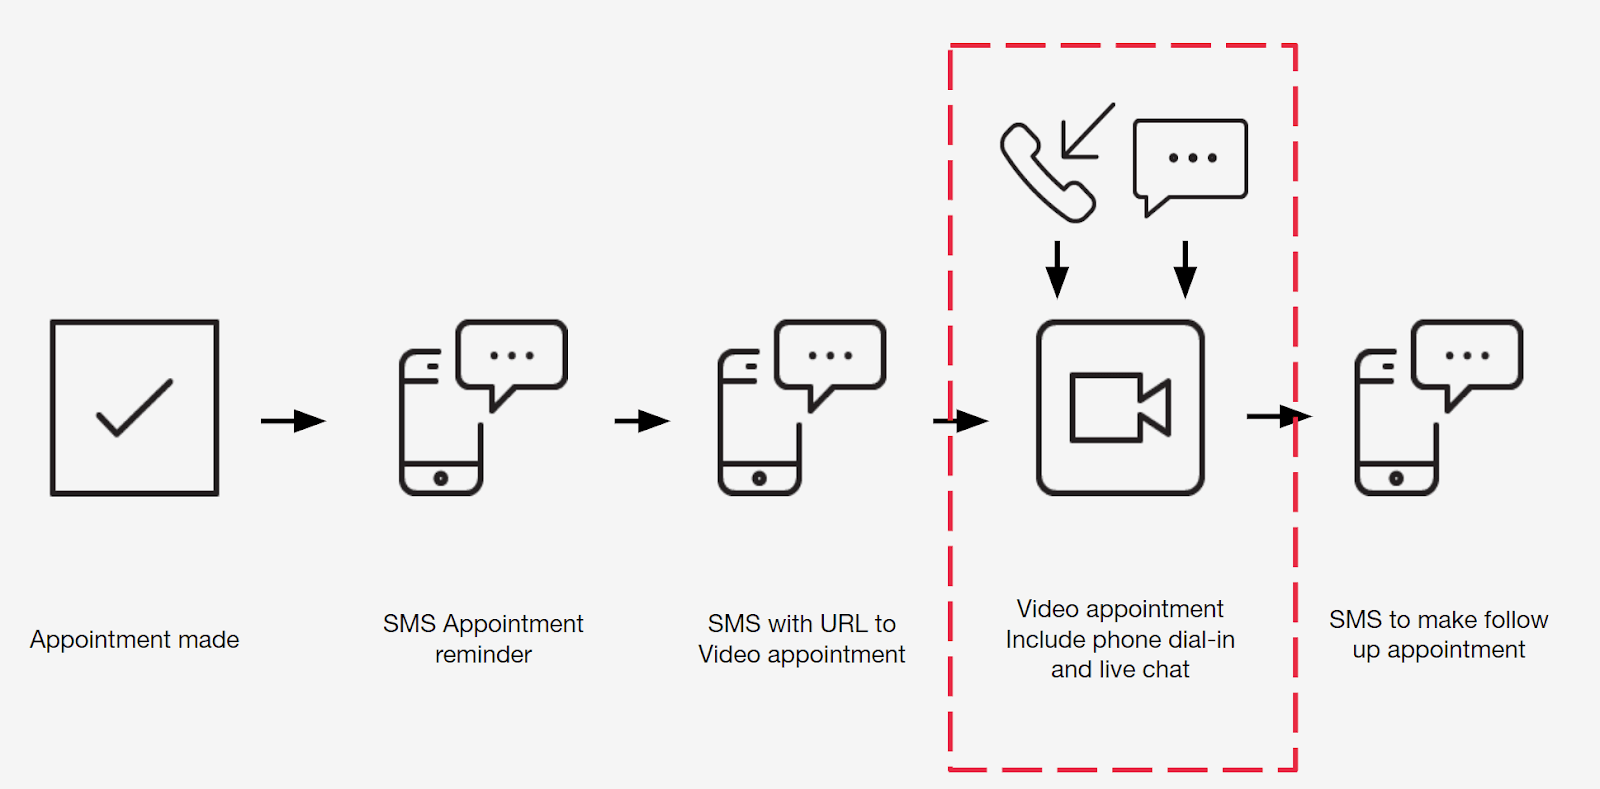
The best way to reach a patient does depend upon the information known about the individual that scheduled an appointment; however, SMS is a HIPAA eligible and effective way for reaching the vast majority of users regardless of device type. In order to reach out to the patient, it will require the end user's phone number, a link to the video consultation, and a Twilio phone number. A common place for this link to go is your patient portal; this allows you to have the patient fill out forms, acknowledge copay, and more within the portal before beginning their virtual visit. It is best to talk to the sales team on building out your notifications, but here is a good place to get started with appointment reminders.
Waiting rooms are a great time to ensure that the patient has an effective visit prior to joining into the actual consultation. Here is a guide to building a waiting room that includes some code snippets and an example. In terms of checking that the visit will work properly, your application should see if a user is capable of joining a room. Here are some things to consider checking for before a user tries to join their consultation. You can use the RTC diagnostics SDK to test for the following:
- Check the user's platform and browser to ensure that the user is on a supported browser, if the user is not on a supported browser for their device, then consider showing a web page notifying them that they should switch browsers or devices.
- Ensure that the patient has properly configured their audio and video devices.
- Look into the user's network connection to see that they will be able to join the room on their current network.
In addition to doing some initial technical check ups, the patient experience can be drastically improved in this step; here are some examples of how that journey could be enhanced:
- Give patients a virtual intake form so that they can provide basic information prior to their visit.
- Allow doctors to have a YouTube video for their patients to watch while they wait (for example, a pediatrician could play a video on healthy eating).
- Providing real-time updates to the patient. This could be done either programmatically to see if they are in another meeting or through live chat.
Adding an interpreter, family member, or other third party is a common feature in virtual visit applications. There are a variety of ways to add an interpreter depending on the language needed and services used. Outlined here are three common ways to add in a third party participant to an ongoing meeting.
Adding the third party through WebRTC:
Have the third party connect into the room as a regular participant. In order to ensure that the third party joins the correct consultation, you can limit the room access to just be that specific room. You can then create a new token, and thus new access, when they have another consultation that said third party is requested for (this is a common workflow for interpreters). This will be a similar process to adding the doctor and patient into the room.
One specific way to allow guest access to a video session without having the guest logging in is to generate an access token from an already logged-in user. In this case, we assume either the patient or provider is logged in and is able to generate an access token for themselves, as well as any additional participant. To generate a guest access token, the patient/provider can use the same token server and assign a different identity (e.g. thirdParty) to generate the new token. Make sure you are limiting the scope of the access token to the desired Room by specifying RoomSID in the token grant. By creating a token this way the third party can only use said token to access the unique Room that's happening right now, and not allow the creation of any new Rooms. For example you could run this on your application server:
1const AccessToken = require('twilio').jwt.AccessToken;2const VideoGrant = AccessToken.VideoGrant;3// Used when generating any kind of Access Token4const twilioAccountSid = process.env.ACCOUNT_SID;5const twilioApiKey = process.env.TWILIO_API_KEY;6const twilioApiSecret = process.env.TWILIO_API_SECRET;7// Create an access token which we will sign and return to the client,8// containing the grant we just created9const token = new AccessToken(twilioAccountSid, twilioApiKey, twilioApiSecret);10token.identity = 'thirdParty';11// Create a Video grant which enables a client to use Video12// and limits access to the specified RoomSID13const videoGrant = new VideoGrant({14room: roomSid15});16// Add the grant to the token17token.addGrant(videoGrant);18// Serialize the token to a JWT string19console.log(token.toJwt());
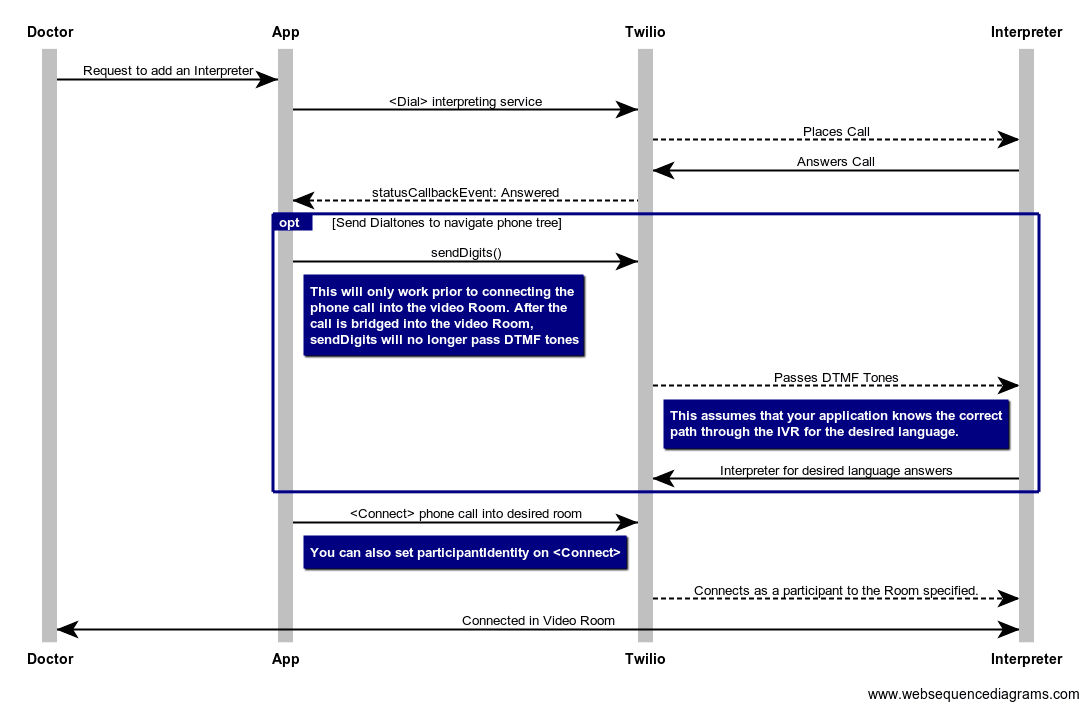
Placing a phone call to the third party:
Having a third party join through the phone is a common request that allows users to have a variety of translation services to choose from. The recommended way to accomplish this is by using Twilio Programmable Voice to dial out to the third party, wait for them to answer the call using statusCallbackEvents, navigate the interpreter's phone tree (IVR) if necessary, then connect to the existing Room.
Using third party APIs:
Some interpreting services have APIs or other ways to connect with them directly rather than going with a dial-in approach, this could create a more streamlined workflow depending on the service you are using. VOYCE wrote a blog post on accomplishing this with their platform.
In order to build your application for scale you should make some considerations about how Rooms are created and how participants connect to them. The recommended approach to creating rooms is to use Ad-hoc Rooms when possible. Using the REST API is only best practice when Rooms need different settings upon setup. As an example, let's say some Rooms need to use H.264 rather than VP8; best practice is to have rooms that need VP8 (the more common codec in this example) created through Ad-Hoc Rooms, then make all exceptions (rooms that need H.264) through the REST API. Since the vast majority of the calls have 2 participants, the Configuration for 2 participant Calls listed below is the recommended configuration for Telemedicine calls. Although this configuration will also work for 3+ participants, it will not always provide the best experience if one participant has a poor network connection. If the Telemedicine application knows ahead of time that the call will contain more than 2 participants then the Configuration for 3+ Participant Calls can be used.
Configuration for 2 Participant Calls
The following settings should be used for consultations with 2 participants or if the number of participants on the call cannot be determined ahead of time.
Video Capture Settings:
- Capture dimensions: 1280x720 (for both mobile and desktop browsers)
- Capture frame rate: 24 frames per second
- Codec: VP8
- Simulcast: disabled
Note that on lower end mobile devices 480p can be used for the capture resolution in order to reduce the CPU load on the device. A variation on this is to limit the capture bitrate (maxVideoBitrate) to a value in the range 500 kbps-1000 kbps.
Bandwidth Profile Settings:
- Bandwidth profile should not be used in this scenario.
Configuration for 3+ Participant Calls
Video Capture Settings:
- Capture resolution: 1280x720 (for both mobile and desktop browsers)
- Capture frame rate: 24 frames per second
- Codec: VP8
- Simulcast: enabled
Note that on lower end mobile devices 480p can be used for the capture resolution in order to reduce the CPU load on the device. A variation on this is to limit the capture bitrate (maxVideoBitrate) to the range 500 kbps-1000 kbps.
Bandwidth Profile Settings:
- Use the Bandwidth Profile collaboration mode.
- Publish all tracks with track priority set to standard, which is the default.
- Keep the default settings for MaxTracks and RenderDimensions detailed here.
Desktop Browser settings:
1Twilio.Video.connect('$TOKEN', {2name: 'my-room-name'3audio: true,4video: { height: 720, frameRate: 24, width: 1280 },5bandwidthProfile: {6video: {7mode: 'collaboration',8dominantSpeakerPriority: 'high',9}10},11dominantSpeaker: true,12preferredVideoCodecs: [{ codec: 'VP8', simulcast: true }],13networkQuality: {local:1, remote: 1}14});
Mobile Browser Settings:
1Twilio.Video.connect('$TOKEN', {2name: 'my-room-name'3audio: true,4video: { height: 480, frameRate: 24, width: 640 },5// Use this for lower end mobile devices6bandwidthProfile: {7video: {8mode: 'collaboration',9dominantSpeakerPriority: 'high'10}11},12dominantSpeaker: true,13preferredVideoCodecs: [{ codec: 'VP8', simulcast: true }],14networkQuality: {local:1, remote: 1}15});
This configuration has dominant speaker detection enabled and the priority of the dominant speaker track is set to high. This means that the priority of the dominant speaker video track will transition from standard to high when that participant becomes the dominant speaker and back to standard when another participant is the dominant speaker. Note that the client SDK does not generate track priority changed events when the track priority changes due to the dominant speaker. This approach of giving the dominant speaker priority works best when the UI window for the dominant speaker is large and other participants are shown as thumbnails.
The diagram below details the end-to-end workflow of the typical virtual visit when using Twilio Programmable Video.