Encrypting your Stored Media
Twilio Editions feature
Encryption is available to Twilio Enterprise Edition and Twilio Security Edition customers. Learn more about Editions.
Encrypt Twilio Video Recordings and Compositions to ensure your recorded media is encrypted end-to-end. Use this feature when you are willing to accept the additional work of decrypting and post-processing your audio/video recordings yourself.
Note: Once you activate encryption, only you can decrypt your content. No one at Twilio, including Twilio support, can decrypt it.
- Encrypted Recordings Vs Encrypted Compositions
- How Encryption works
- Enabling Encryption in your Twilio account
- Decrypting your Recordings and Compositions
Video Recordings and Video Compositions have separated encryption settings. This means that encryption can be activated independently on them. However, composing Recordings requires access to their raw media. As a result:
If you encrypt your Recordings, you will not be able to compose them.
If you need to compose your Recordings, you must store them unencrypted. However, those Recordings are only needed temporarily: as soon as the Composition is created they can be deleted permanently and irrevocably using Twilio's Video Recordings API.
Twilio Video uses the standard WebRTC security architecture to guarantee that the live audio/video communication is cryptographically protected point-to-point.
When you enable Recording in your Rooms, audio/video is decrypted in memory before being stored securely in Twilio's cloud. Once stored, you can only access the decrypted recordings using your Twilio account credentials (your Account SID/Token or an API Key/API Key Secret).
When you enable encryption in your Video Recordings or Compositions, Twilio adds an additional layer of security: All the media files are encrypted as they are written to disk using the AES 256-bit symmetric encryption algorithm. Once encrypted, only a user who has the private key can decrypt the recordings.
Programmable Video uses an encryption mechanism provided by Amazon clients called "envelope encryption". Here is how it works:
- First, you create a public cryptography key pair. You provide to Twilio the public key, but you keep the private key secret and safe.
- For each encrypted Recording or Composition, a one-time-use 256-bit envelope
symmetric cryptographic key is generated and fed to an
AES/CBC/PKCS5Paddingcipher that encrypts the envelope payload (i.e the media content), and generates the protected file. - The envelope symmetric key is then ciphered itself with the provided public key and stored as part of the envelope. After that, the symmetric key is discarded and cannot be recovered by Twilio never again.
Only a user with the private key can decrypt the media content as the original AES symmetric key cannot be recovered. This mechanism guarantees that unencrypted media files are never persisted, and that Twilio cannot decrypt the envelope once it is generated.
First, generate an RSA PKCS#1 key pair. There are many different ways to do this, but the simplest one is to use openssl. Once you have openssl installed, you can generate a 2048 length private key with this command:
openssl genrsa -out private_key.pem 2048
The generated file private_key.pem contains your private key, which should be
similar to this:
1$ cat private_key.pem23-----BEGIN RSA PRIVATE KEY-----4MIIEpAIBAAKCAQEAtePBUk3IM45Jj8eFFrmwzjr/2seEtMknl5OD7VDBipazsq5v5.6.7.8h1icaQZp8WKxBOzVilj3DLoHJEyIrsWWMnDHazV4fxbxijpj4uwJCw==9-----END RSA PRIVATE KEY-----
Note: It is your responsibility to keep your private key safe. If you lose your private key, you will never be able to decrypt any of the files stored using the corresponding public key.
You can obtain the public key executing the following:
openssl rsa -in private_key.pem -pubout -out public_key.pem
The file public_key.pem contains the public key. It should look like this:
1$ cat public_key.pem23-----BEGIN PUBLIC KEY-----4MIIBIjANBgkqhkiG9w0BAQEFAAOCAQ8AMIIBCgKCAQEAtePBUk3IM45Jj8eFFrmw5.6.7.8aQIDAQAB9-----END PUBLIC KEY-----
In the next step, you will configure Twilio with this public key.
Warning
Twilio is launching a new Console. Some screenshots on this page may show the Legacy Console and therefore may no longer be accurate. We are working to update all screenshots to reflect the new Console experience. Learn more about the new Console.
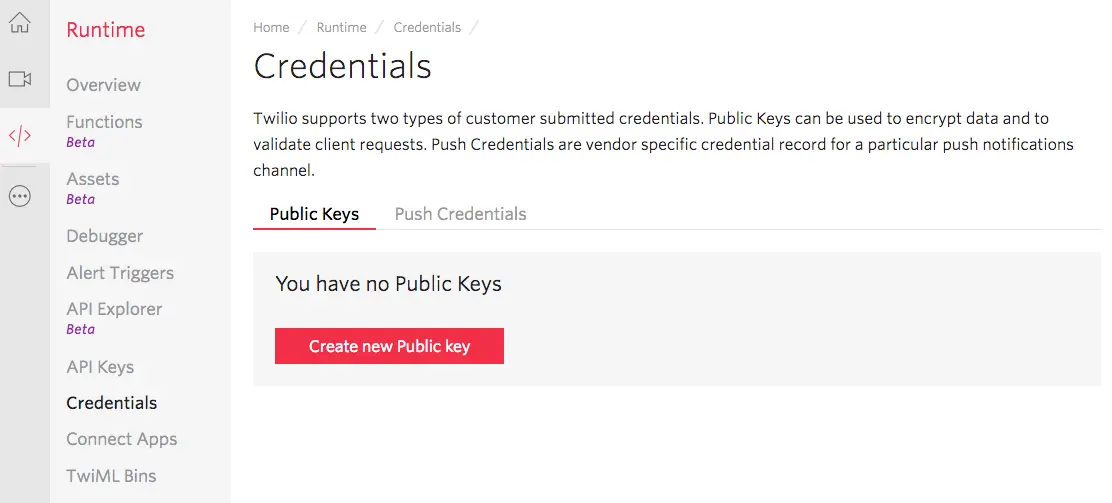
Once you have the RSA public key, you must create a Twilio Public Key resource that contains your public key. You can do this with the Public Key Resource REST API or, in the Twilio Console in the Runtime Public Keys management page. Press the button Create new Public key:
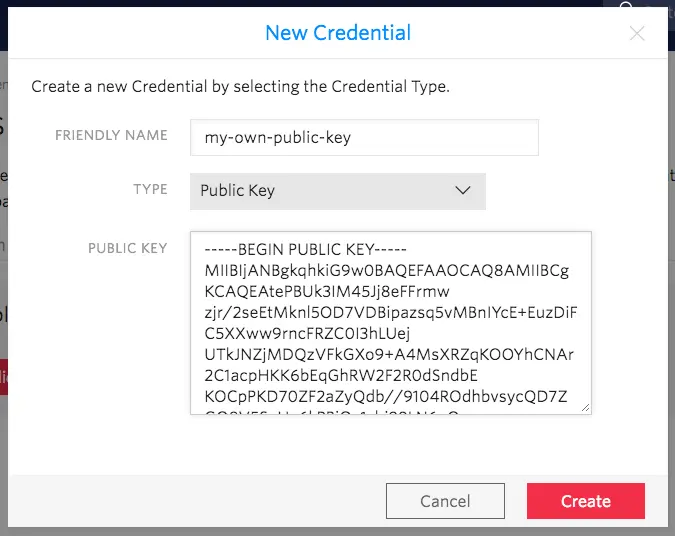
On the popup that opens, provide a friendly name for your public key. Then, copy
the content of the public_key.pem file generated in step 1 and paste
it into the PUBLIC KEY field. Press Create to create the Twilio Public Key:
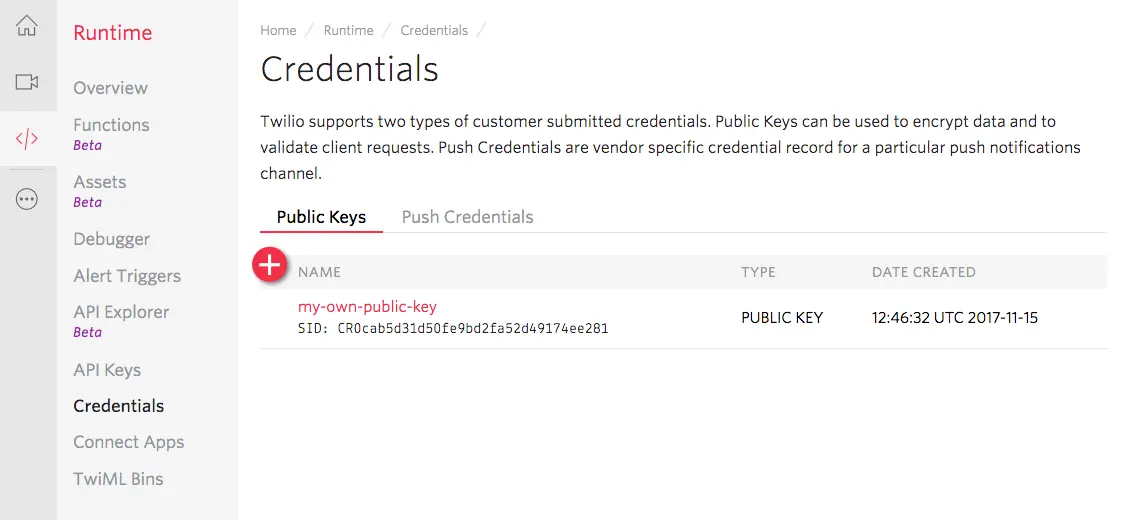
The Twilio Public Key resource has an associated unique SID identifier with the
form CRxx. Make note of this Public Key SID because you will need it later:
You have two options to enable encrypted Recordings:
Enabling Encrypted Recordings using the Twilio's Console
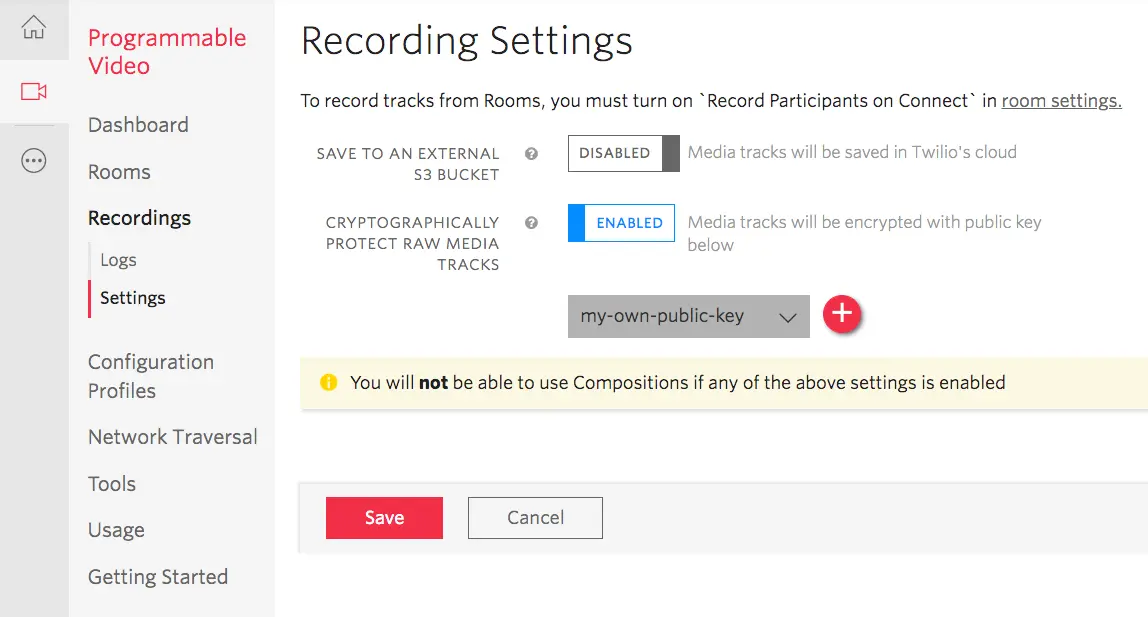
- Open the Twilio's Console in your account or project.
- Navigate to Programmable Video > Recordings > Settings.
- Enable Encryption and specify the public key you uploaded in step 2.
- Save your settings.
- All recordings created thereafter will be encrypted.
Enabling Encryption using the Recording Settings API
Check the Recording Settings API documentation for detailed information on how to enable programmatically encrypted recordings.
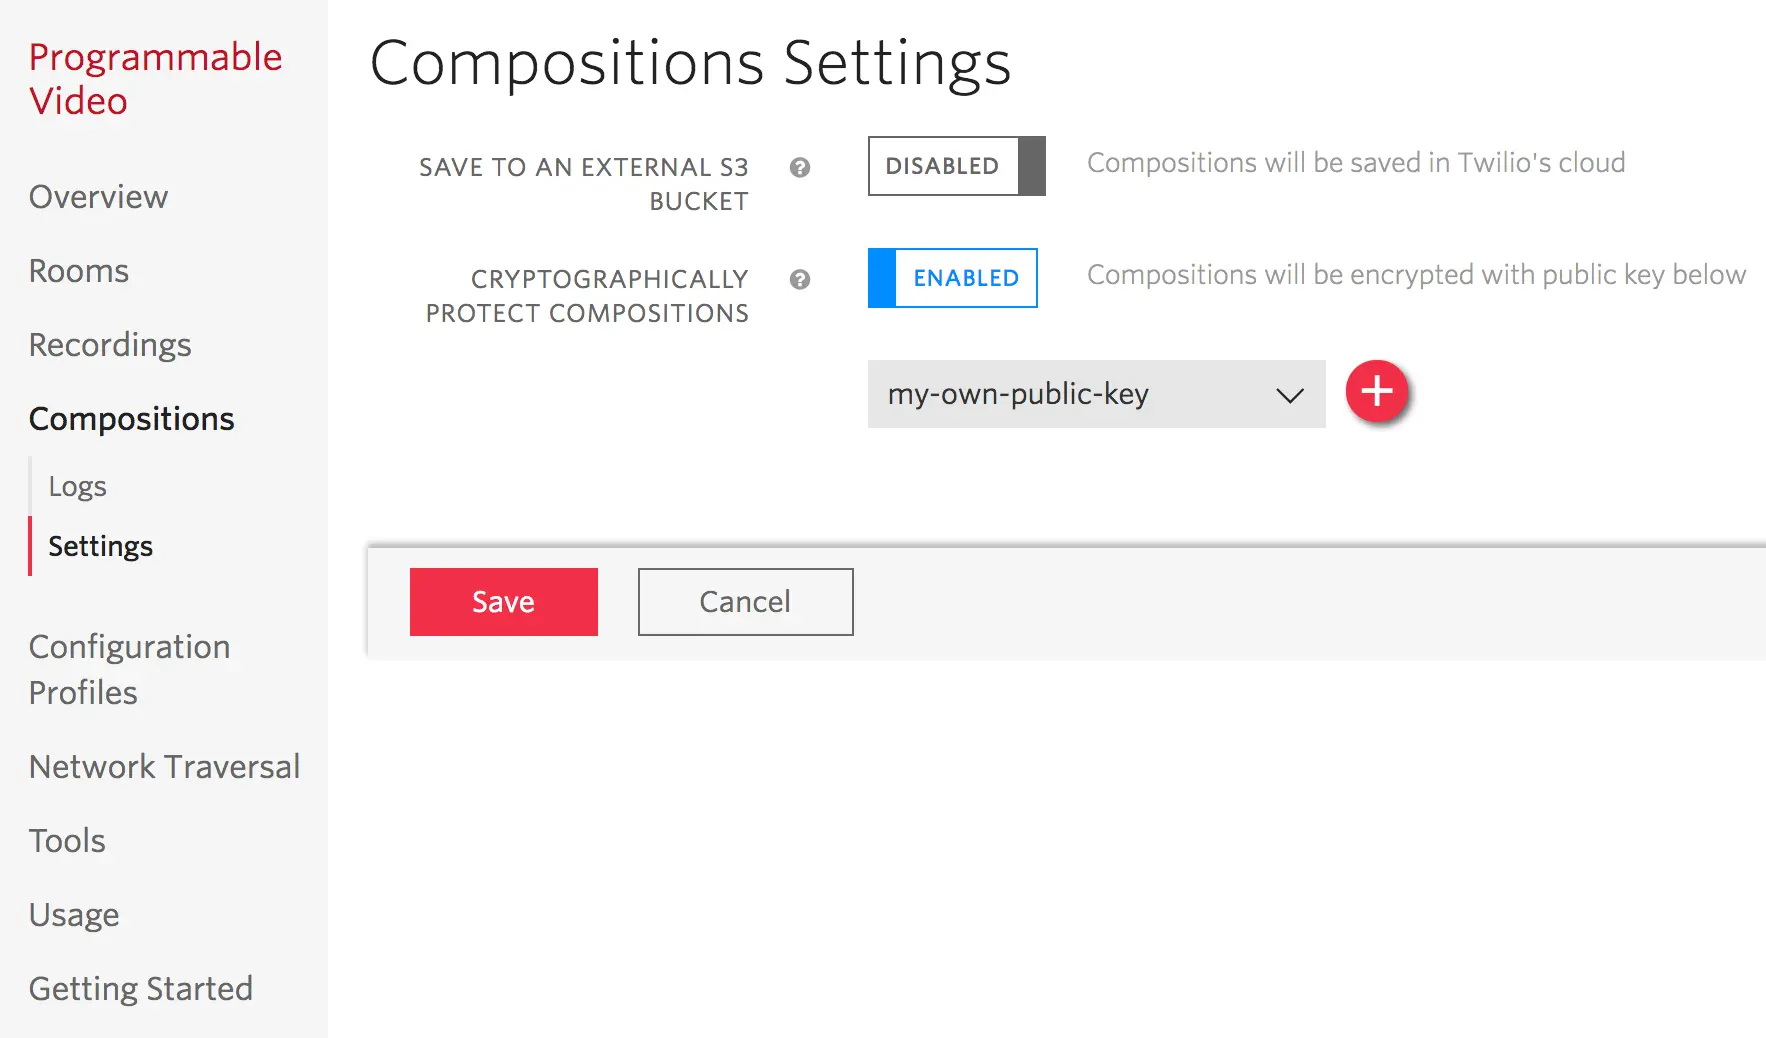
You have two options to enable encrypted Compositions:
Enabling Encrypted Compositions using the Twilio's Console
- Open the Twilio's Console in your account or project.
- Navigate to Programmable Video > Compositions > Settings.
- Enable Encryption and specify the public key you uploaded in step 2.
- Save your settings.
- All compositions created thereafter will be encrypted.
Enabling Encryption using the Composition Settings API
Check the Composition Settings API documentation for detailed information on how to enable programmatically encrypted compositions.
We suggest two decrypting alternatives:
To decrypt your media with a Java program, follow these steps.
If you are using Oracle's JRE, and due to legal restrictions, you need to install
separately the JCE (Java Cryptography extensions). For doing so, just download the JCE,
decompress it and follow the instructions provided in the included README.txt file.
JCE requires your private key to be in PKCS #8 format, for converting it, you just need to execute the following:
openssl pkcs8 -in private_key.pem -topk8 -nocrypt -out private_key_pkcs8.pem
In the above:
private_key.pemis the filename of the private key you generated in Step 1.private_key_pkcs8.pemis the filename of your PKCS #8 private key.
The Java decrypting utility can be cloned from this GitHub project. After cloning, execute the following Maven command at its root folder:
mvn clean package
Once the compilation is completed, do the following:
java -jar target/twilio-media-decrypter.jar SKxx:API_SECRET SidToDecrypt private_key_pkcs8.pem decrypted-filename
In the above:
- Replace
SKxxwith your Twilio API Key SID. - Replace
SK_SECRETwith the corresponding Twilio API Key Secret. - Replace
SidToDecryptwith the SID of the Recording (e.g. RTXXXX) or Composition (e.g. CJXXXX) you want to decrypt. private_key_pkcs8.pemis the filename of the PKCS #8 key you generated in step 4.2decrypted-filenameis the name of the file where you want to store your decrypted media data. You may wish to add the appropriate extension so that your media player recognizes it (e.g..mkvfor video recordings,.mkafor audio recordings,.mp4or.webmfor Compositions, etc.)
Remember that this Java utility is provided for tutorial purposes and is not intended to be used in production applications.
You can retrieve the media data of a specific Recording or Composition by
fetching its /Media subresource. Any request to this resource will return a
URL where the corresponding media file can be downloaded, you just need to
do the following:
For Recordings
1curl 'https://video.twilio.com/v1/Recordings/RTxx/Media' \2-u 'SKxx:SK_SECRET'
For Compositions
1curl 'https://video.twilio.com/v1/Compositions/CJxx/Media' \2-u 'SKxx:SK_SECRET'
In the above:
- Replace
RTxxorCJxxwith the corresponding Recording or Composition SID. - Replace
SKxxwith your Twilio API Key SID. - Replace
SK_SECRETwith the corresponding Twilio API Key Secret.
In both cases, as part of the answer to the request you will receive a redirect to a URL with the following structure:
https://documentation-example-twilio-bucket.s3.amazonaws.com/ACxx/RTyy.mkv?X-Amz-Security-Token=zz
We call this the encrypted media URL.
Execute the following command replacing:
encrypted-media-urlwith the encrypted media URL obtained in step 5.1.encrypted-filenamewith the filename where you want to store the encrypted data.
wget -S encrypted-media-url -O encrypted-filename
When a media file is cryptographically protected, a request to the encrypted
media URL returns the encrypted file, along with an initialization vector and
the encrypted one-time symmetric master key at the HTTP headers
x-amz-meta-x-amz-iv and x-amz-meta-x-amz-key. To obtain both take a look to
the output of the command above:
1Resolving documentation-example-twilio-bucket.s3.amazonaws.com... 52.216.64.962Connecting to documentation-example-twilio-bucket.s3.amazonaws.com|52.216.64.96|:443... connected.3HTTP request sent, awaiting response...4HTTP/1.1 200 OK5x-amz-id-2: 8x0XN6KDeLuhHLIe8fa58OdD3+xVyNgv2og/gpMOFpSqWc5JGV+aDpc7fJSCS9yGkwRtey+9lk8=6x-amz-request-id: 5B3FBF0985E71EEC7Date: Fri, 24 Nov 2017 14:11:30 GMT8Last-Modified: Thu, 23 Nov 2017 16:47:17 GMT9ETag: "d9e5869fc33019fc7fb055c0b705e105"10x-amz-meta-x-amz-key: 0ZY1jiGSu/FlI4l1OnNFeWvWFXUOEQ2apv3/OtMFlwLO83bHlB44gbZe2SW6wOBs8UTsxC7bEnY+Gn2tdzp7ltzrKtBu7cfMzOxshABFiiJbCSBmOzUHs3OkU30Wi3Hq953SJJO+4W0DAINfhGiDlWxgIbjHegamneJ983DDpm+AyKa77jq5T+4LxJdOv5bqU4ioZKetv/OA987JZaetPVTr55uSmqr8SbsX9xmaIKjo7V6ivutwcCKWX9bvf1qxUu/ZohTmouL2MOocojNMMx5ovTX3QXLCGUwx6pOS83zqHNxmFhU2EHENCs5KNYL6GjhOwmoGyeQPS+pe8bPRFg==11x-amz-meta-x-amz-unencrypted-content-length: 74651812x-amz-meta-x-amz-matdesc: {}13x-amz-meta-x-amz-iv: EmKjzVpvXC9rE6DJ00Xv7Q==14Accept-Ranges: bytes15Content-Type: application/octet-stream16Content-Length: 74652817Server: AmazonS318Length: 746528 (729K) [application/octet-stream]19Saving to: 'encrypted-filename'2021encrypted-filename 100%[=======================================================================>] 729.03K 789KB/s in 0.9s22232017-11-24 15:11:33 (789 KB/s) - 'encrypted-filename' saved [746528/746528]
As you can see, both headers x-amz-meta-x-amz-key and x-amz-meta-x-amz-iv
are provided. Write down their values: you will need them.
The encrypted envelope symmetric key in x-amz-meta-x-amz-key is base64-encoded.
We need first to decode it. For it, replace in, the command below, 0ZY1jiGSu ...
with the value of the x-amz-meta-x-amz-key obtained in step 5.2
base64 -D << '0ZY1jiGSu ...' >> key.bin.enc
Now, we can decrypt the public key. For this, and assuming the private_key.pem
file you created in step 1 is on the local folder, execute:
openssl rsautl -decrypt -inkey private_key.pem -in key.bin.enc -out key.bin
Now, we need to do the same steps with the initialization vector. Execute the
following replacing the value of the x-amz-meta-x-amz-iv you obtained
in step 5.2:
base64 -D << 'EmKjzVpvXC9rE6DJ00Xv7Q==' >> iv.bin
Now, the unencrypted AES key and the initialization vector are respectively in
the key.bin and iv.bin files in your local folder.
Once the previous steps have been completed, you just need to execute the following for decrypting your encrypted file:
openssl enc -d -aes-256-cbc -in encrypted-filename -out decrypted-filename -K $(hexdump -v -e '/1 "%02X"' < key.bin) -iv $(hexdump -v -e '/1 "%02X"' < iv.bin)
In the above:
encrypted-file-nameis the name of the file where you stored your encrypted media file in step 5.2decrypted-filenameis the name of the file where you want to store your decrypted media data. You may wish to add the appropriate extension so that your media player recognizes it (e.g..mkvfor video recordings,.mkafor audio recordings,.mp4or.webmfor Compositions, etc.)