Connecting Twilio Studio to Conversations
Twilio Studio is a flexible low-code/no-code application builder for creating your own chatbots and interaction flows triggered by an incoming message from an end-user. You can leverage Studio to automate some level of interaction with your users.
By connecting to Studio via Conversations, you create a distinct message thread for that interaction and unlock the possibility of adding human Participants from other channels after you complete your automated handling. For example, you could add an agent from a web or mobile app that implements the Conversations SDK, or you could connect them to someone via SMS or WhatsApp.
Let's get started!
First, let's create a basic Studio Flow:
-
Log into your Twilio account in the Twilio Console
-
Navigate to the Studio Flow section in the Console
-
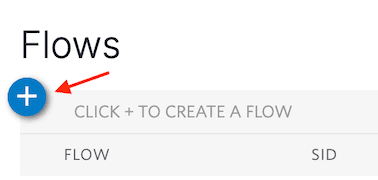
Click the + icon underneath the Flows heading to create a new Flow
-
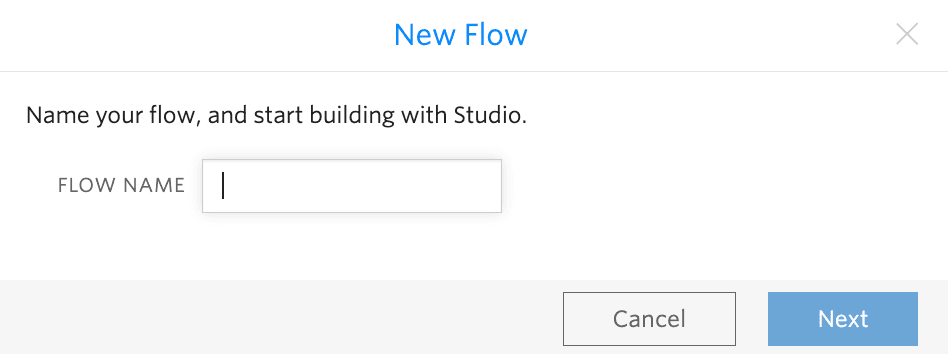
Name your Flow and click Next
-
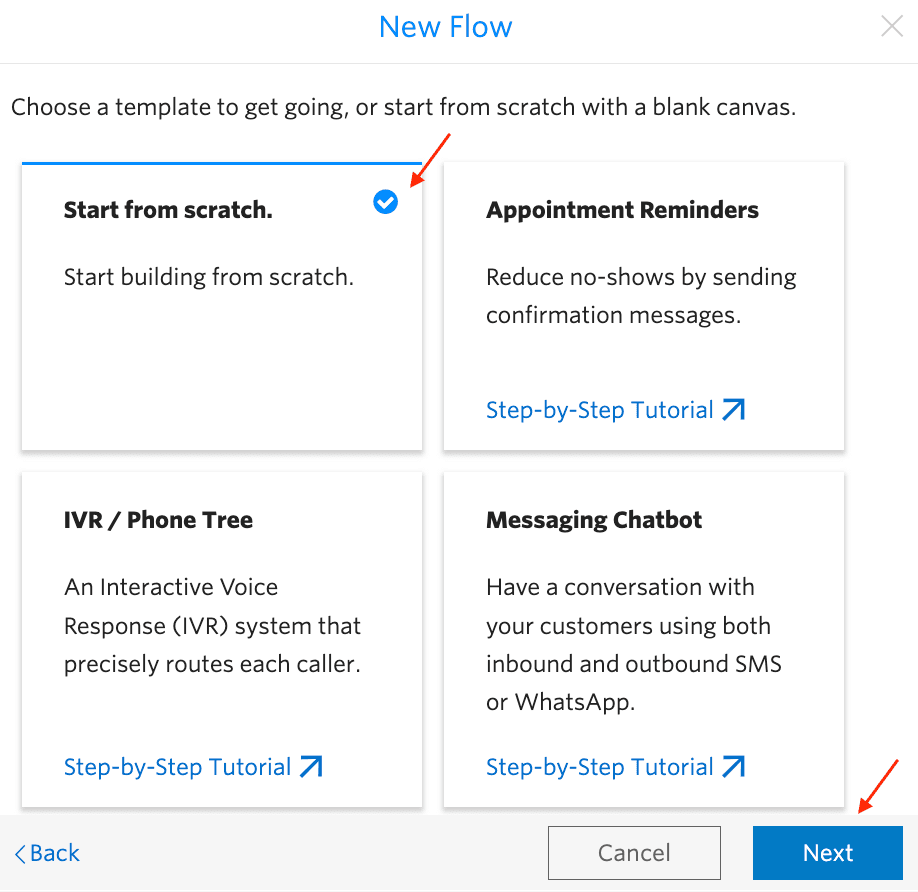
You'll see a list of possible templates you can use. Select the Start from scratch option and click Next
Once you've created the Flow, you'll see the Flow's Canvas. Let's build out the rest of the project's logic.
Studio Flows are built from Widgets. These items represent pieces of logic that allow you to handle incoming actions and respond accordingly by performing specific tasks, like sending a message.
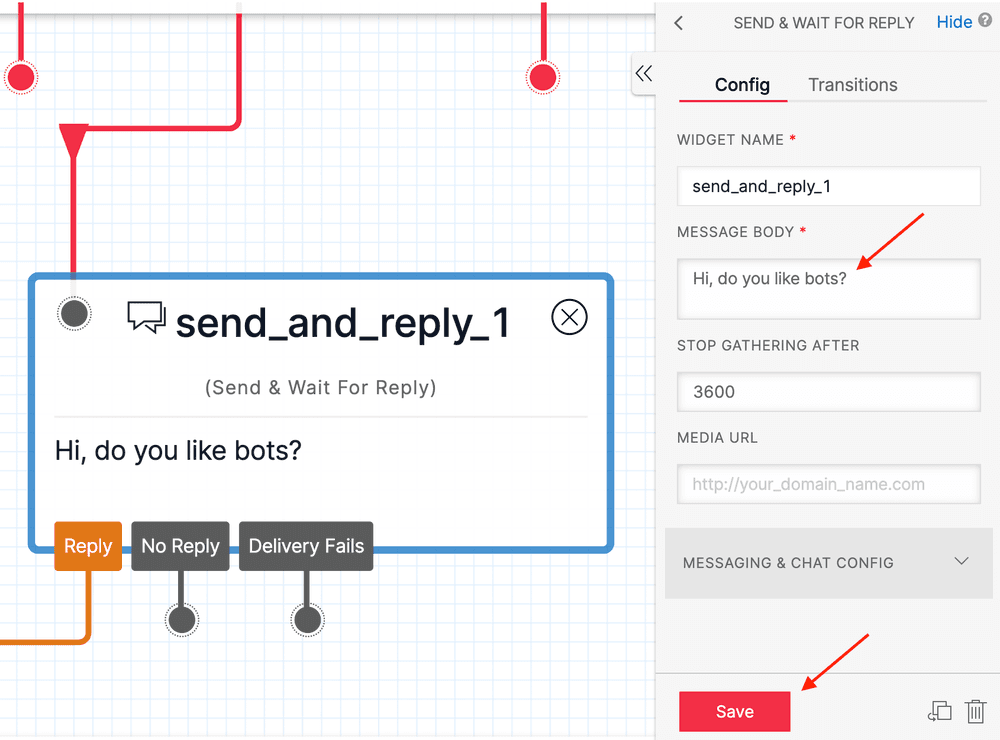
Let's start by adding a Send & Wait For Reply Widget to the "Incoming Conversation" Trigger.
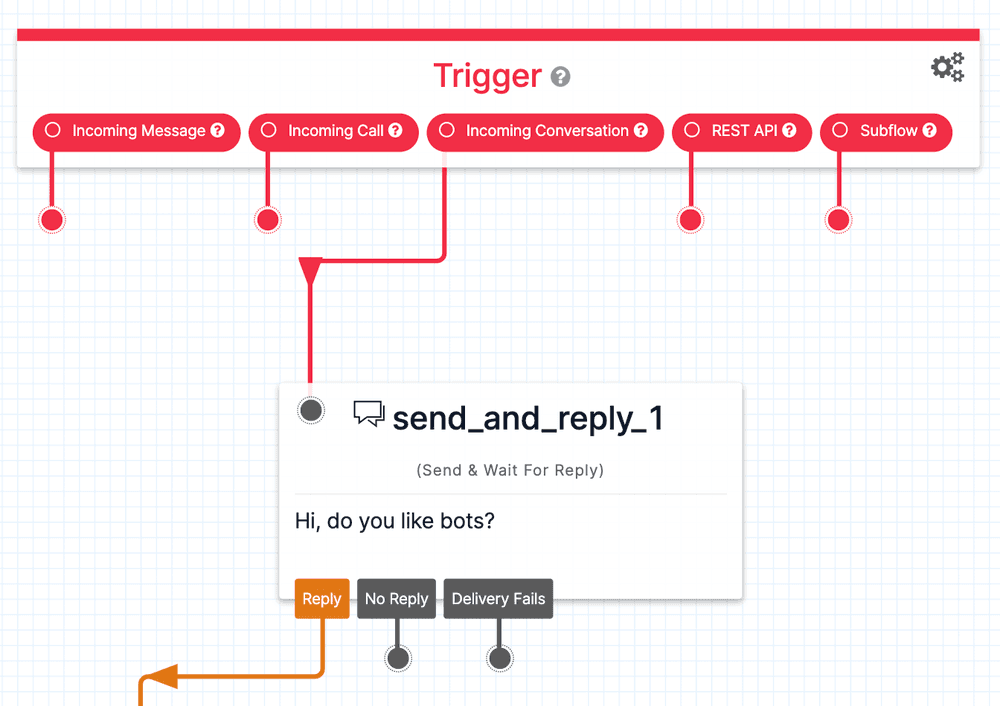
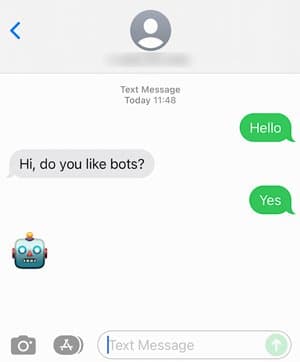
Then, click on the Send & Wait For Reply Widget to show its Inspector Panel. In the Config tab, add a message body (i.e. "Hi, do you like bots?") and click Save. This tells Studio to receive the incoming message, and then reply with the message you see there in the Widget.
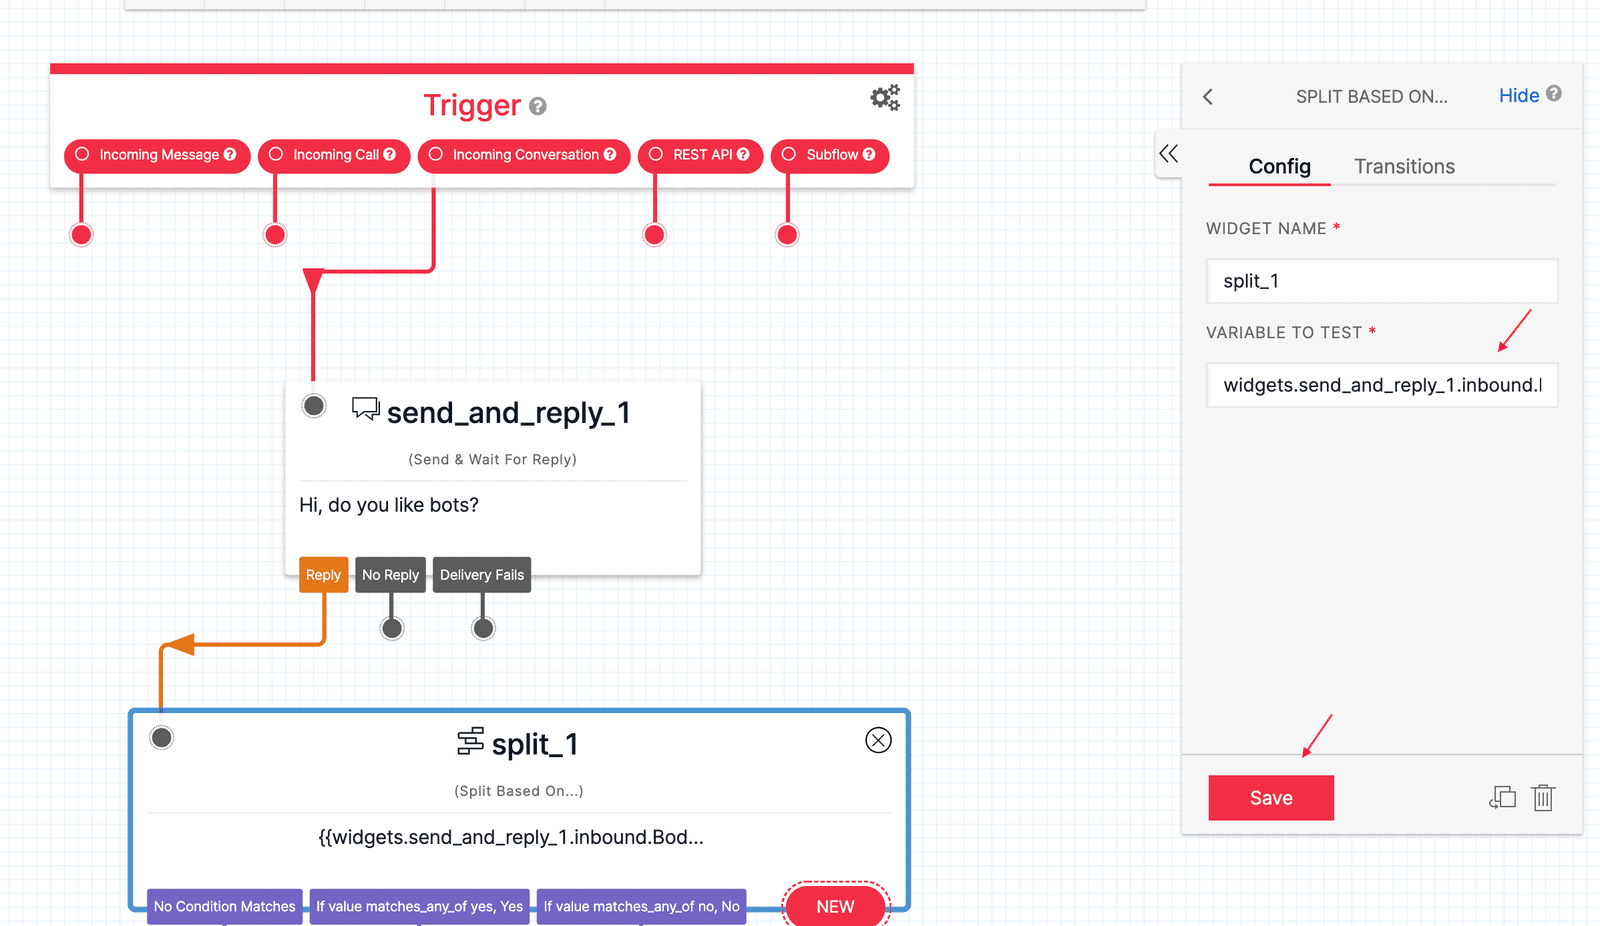
Next, add to the "Reply" transition the "Split Based On…" Widget to parse the user response.
Then, open the Split Based On... Widget Inspect Panel and in the Config tab, select the "inbound.Body" option for the "Variable to test" field. Click Save.
In the Split Based On... Transitions tab, let's add conditions that match the possible responses you want to test for:
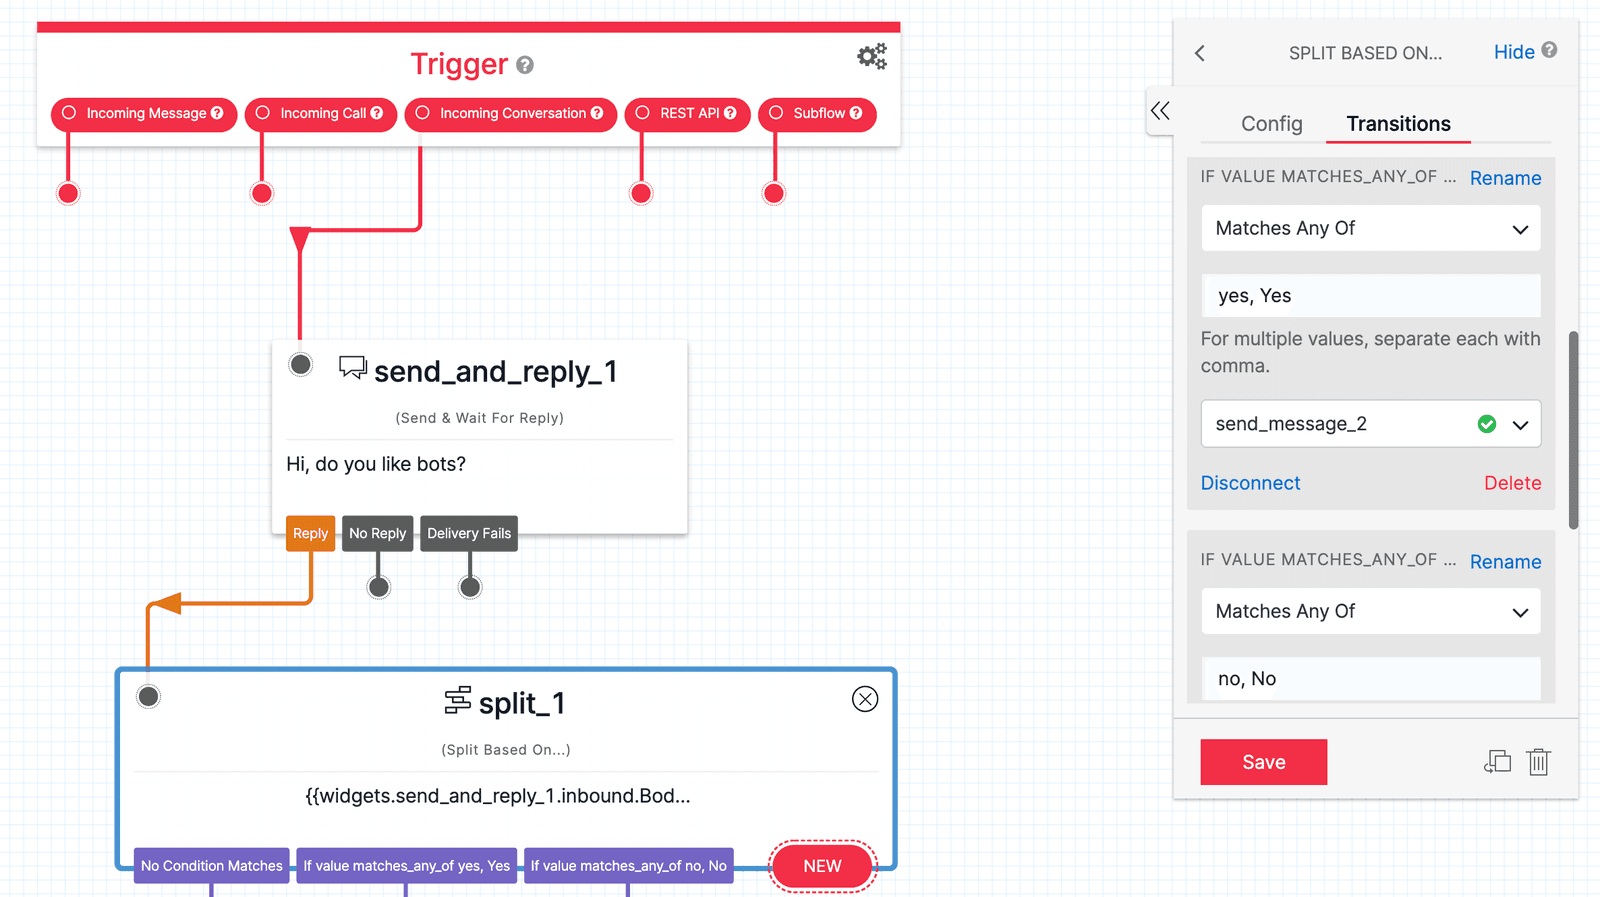
The Split Based On... Widget lets you access a variable and test conditions on it to determine how to react. In this case, we're testing the body of the message the user sent in response to your "Hi, do you like bots?" message.
Finally, let's add Send Message Widgets on each transition with the response you want to send:
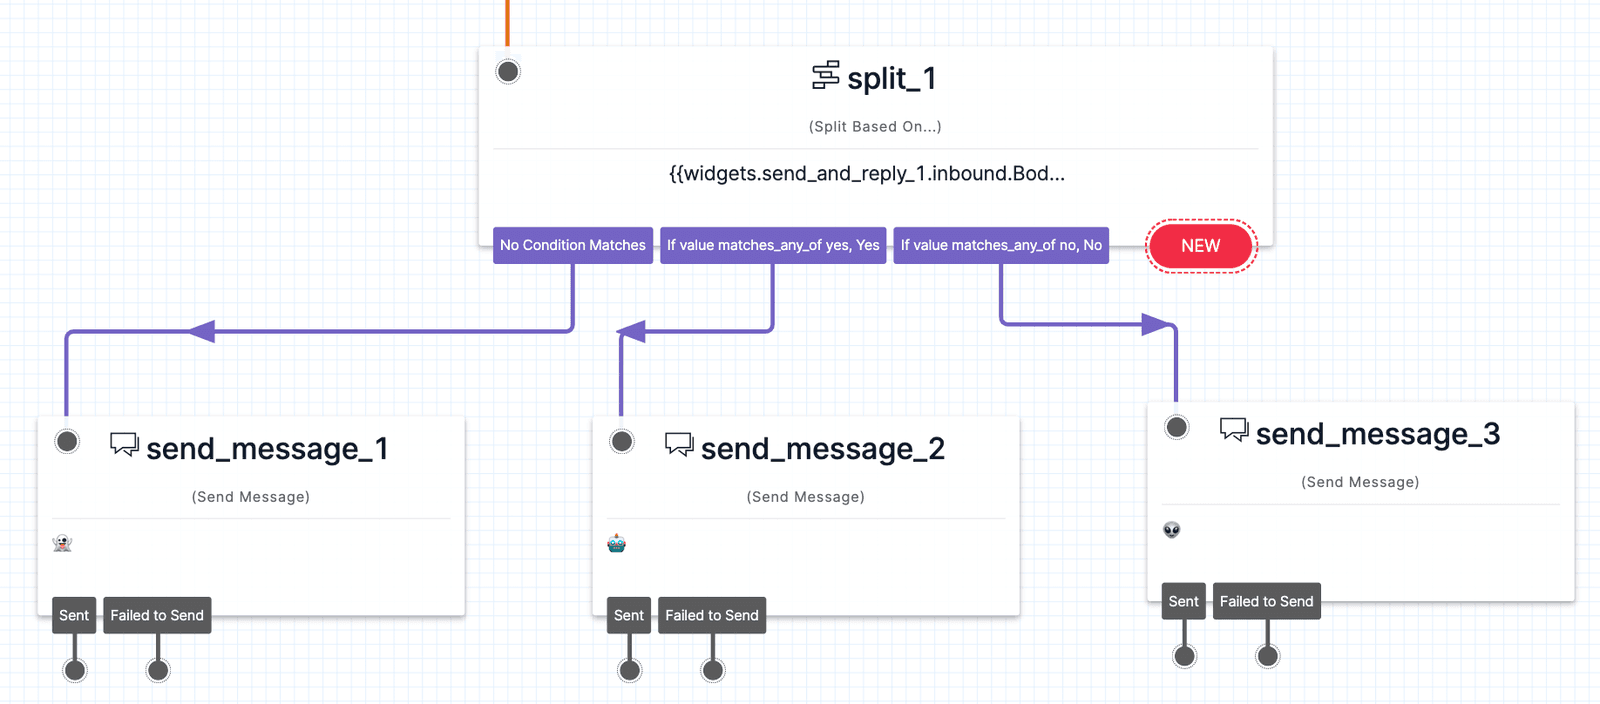
This will reply with different messages depending on how the user replied to your initial message. Your Canvas is now set up! To publish the Flow, click Publish from the top Canvas menu.
There are two ways to connect Twilio Studio to Conversations. First, you can set a particular "sender" (e.g. Twilio SMS number or Twilio WhatsApp sender) to automatically create a new Conversation when it receives a message that wouldn't be mapped to an existing Conversation. Second, you can add the Studio Flow to a Conversation that already exists.
Info
You'll need your Studio Flow's SID (FWXXX). You can get this in a few places, like the Studio Flow Console page or in the URL when you're editing the Flow.
Info
Your Twilio Phone Number should be in E.164 format, like this: +12345678901
For this example, we'll use the Address Configuration API. We're using SMS here, but you could also use other channels we support, like WhatsApp or Messenger.
1twilio api:conversations:v1:configuration:addresses:create \2--type sms \3--address your_twilio_number \4--auto-creation.enabled \5--auto-creation.type studio \6--auto-creation.studio-flow-sid FWXXXXXXX7
Well done! Now, inbound messages to this address (Twilio phone number) will create a new Conversation (if there isn't one for that number pair) and add the Studio Flow to it.
Note: To disable inbound conversation autocreation, delete the Address Configuration.
Alternatively, you can set this up manually on a specific Conversation. First, create a Conversation:
1twilio api:conversations:v1:conversations:create \2—-friendly-name "studio_test"3
Next, add an external Participant (for this example, we'll use SMS, but it could be any channel):
Info
Make sure to replace CHXXXXX with your Conversations SID for the Conversation you created in the step above.
1twilio api:conversations:v1:conversations:participants:create \2--conversation-sid CHXXXXXXXXXXXXX \3--messaging-binding.address +15558675310 \4--messaging-binding.proxy-address your_twilio_number
Finally, add a Conversation-Scoped Webhook that points to Studio:
1twilio api:conversations:v1:conversations:webhooks:create \2--target studio \3--conversation-sid CHXXXXXXXXXXX \4--configuration.flow-sid FWXXXXXXXXXXX
Send a text to the ProxyAddress you specified in your MessagingBinding using the phone number you used as the Address and watch the magic happen! 🎉
Instead of adding Widgets to the Canvas, you can import this basic tutorial Flow. You can do this by creating a new Flow, selecting Import from JSON from the list of templates in the selection modal, and pasting the JSON Flow definition into the import window.
Example JSON Flow definition:
1{2"description": "A New Flow",3"states": [4{5"name": "Trigger",6"type": "trigger",7"transitions": [8{9"event": "incomingMessage"10},11{12"event": "incomingCall"13},14{15"next": "send_and_reply_1",16"event": "incomingConversationMessage"17},18{19"event": "incomingRequest"20},21{22"event": "incomingParent"23}24],25"properties": {26"offset": {27"x": 0,28"y": 029}30}31},32{33"name": "send_and_reply_1",34"type": "send-and-wait-for-reply",35"transitions": [36{37"next": "split_1",38"event": "incomingMessage"39},40{41"event": "timeout"42},43{44"event": "deliveryFailure"45}46],47"properties": {48"offset": {49"x": 70,50"y": 17051},52"service": "{{trigger.message.InstanceSid}}",53"channel": "{{trigger.message.ChannelSid}}",54"from": "{{flow.channel.address}}",55"body": "Hi, do you like bots?",56"timeout": "3600"57}58},59{60"name": "send_message_1",61"type": "send-message",62"transitions": [63{64"event": "sent"65},66{67"event": "failed"68}69],70"properties": {71"offset": {72"x": -280,73"y": 60074},75"service": "{{trigger.message.InstanceSid}}",76"channel": "{{trigger.message.ChannelSid}}",77"from": "{{flow.channel.address}}",78"to": "{{contact.channel.address}}",79"body": "👻"80}81},82{83"name": "send_message_2",84"type": "send-message",85"transitions": [86{87"event": "sent"88},89{90"event": "failed"91}92],93"properties": {94"offset": {95"x": 30,96"y": 60097},98"service": "{{trigger.message.InstanceSid}}",99"channel": "{{trigger.message.ChannelSid}}",100"from": "{{flow.channel.address}}",101"to": "{{contact.channel.address}}",102"body": "🤖"103}104},105{106"name": "send_message_3",107"type": "send-message",108"transitions": [109{110"event": "sent"111},112{113"event": "failed"114}115],116"properties": {117"offset": {118"x": 340,119"y": 590120},121"service": "{{trigger.message.InstanceSid}}",122"channel": "{{trigger.message.ChannelSid}}",123"from": "{{flow.channel.address}}",124"to": "{{contact.channel.address}}",125"body": "👽"126}127},128{129"name": "split_1",130"type": "split-based-on",131"transitions": [132{133"next": "send_message_1",134"event": "noMatch"135},136{137"next": "send_message_2",138"event": "match",139"conditions": [140{141"friendly_name": "If value matches_any_of yes,Yes",142"arguments": [143"{{widgets.send_and_reply_1.inbound.Body}}"144],145"type": "matches_any_of",146"value": "yes,Yes"147}148]149},150{151"next": "send_message_3",152"event": "match",153"conditions": [154{155"friendly_name": "If value matches_any_of no,No",156"arguments": [157"{{widgets.send_and_reply_1.inbound.Body}}"158],159"type": "matches_any_of",160"value": "no,No"161}162]163}164],165"properties": {166"input": "{{widgets.send_and_reply_1.inbound.Body}}",167"offset": {168"x": -100,169"y": 370170}171}172}173],174"initial_state": "Trigger",175"flags": {176"allow_concurrent_calls": true177}178}179
Well done! You've learned how to connect Twilio Studio with Conversations. To continue, check out these other resources:
- Learn how to use Facebook Messenger with Twilio Conversations
- Explore Conversations API Quickstart