Trigger (Start) widget
Studio widgets represent various parts of Twilio's functionality that you can combine in your Studio Flow to build out robust applications that don't require you to do any coding.
Info
New to Twilio Studio? Check out our Getting Started guide.
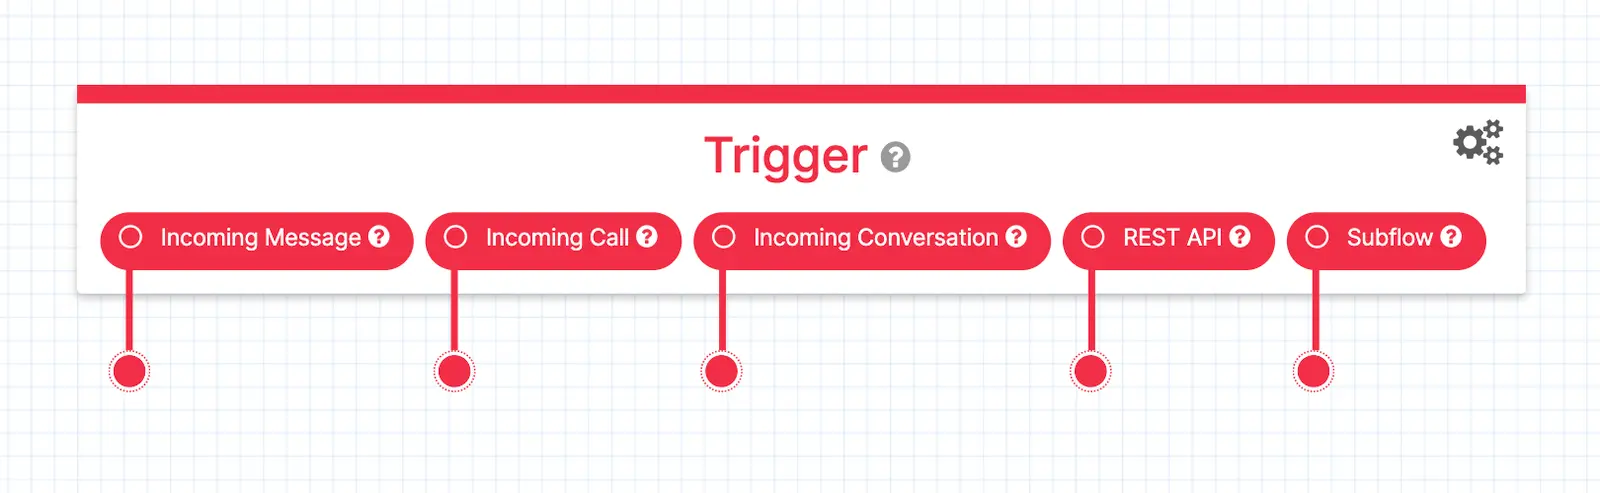
The Trigger (Start) widget begins each unique Studio Flow, and allows your Flow to respond to an incoming message, call, or a Flow initiated with the Studio REST API. You cannot delete this widget from your Flow.
This widget begins your Studio Flow and will route inbound communication to any widget you attach to it.
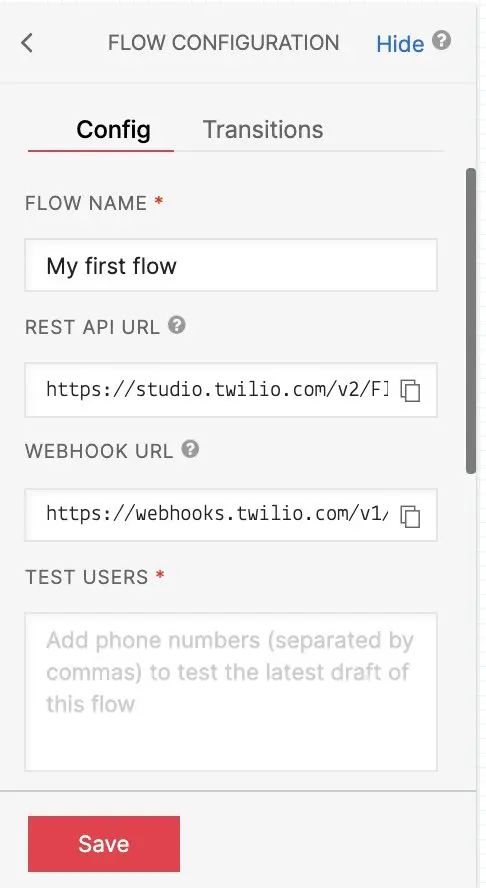
The Trigger (Start) widget requires several pieces of information to function properly. All required fields are auto-populated for you by Studio, but you can change them if you need to.
| Name | Description | Example | Default |
|---|---|---|---|
| Flow Name | The name of this Studio Flow. | Sales Team IVR | This field defaults to the name you entered when you created this Flow through the Twilio console. |
| Webhook URL | The URL for this Studio Flow. | https://webhooks.twilio.com/v1/Accounts/{account_sid}/Flows/{flow_sid} | This field is auto-populated and cannot be changed. |
| Rest API URL | The URL where you can send a POST request to trigger an execution. | https://studio.twilio.com/v2/Flows/{flow_sid}/Executions | This field is auto-populated and cannot be changed. |
You may wish to copy the Flow URL to the clipboard to connect it to a Twilio number or make REST API requests.
These events trigger transitions from this widget to another widget in your Flow. For more information on working with Studio transitions, see the Studio user guide.
| Name | Description |
|---|---|
| Incoming Call | An incoming call has initiated execution of the Flow. |
| Incoming Message | An incoming message has initiated execution of the Flow. |
| REST API | An incoming REST API request has initiated execution of the Flow. |
| Incoming Conversation | An incoming Conversation has initiated execution of the Flow. |
You must connect at least one widget to at least one of these Triggers for your Studio Flow to work. The Trigger widget does not allow custom Transition events.
When the Trigger (Start) widget executes, it stores the following variables for use throughout your Studio Flow. Depending on which inbound Trigger you use (Message, Call, Conversation, or REST API), a set of variables is made available for use throughout your Studio Flow. To learn more, see Use variables in your Studio Flow in the Getting Started documentation.
Find definitions and examples for these variables on the Message Resource.
| Name | Liquid Template Language |
|---|---|
| Account SID | {{trigger.message.AccountSid}} |
| Body | {{trigger.message.Body}} |
| From (User) | {{trigger.message.From}} |
| From City | {{trigger.message.FromCity}} |
| From Country | {{trigger.message.FromCountry}} |
| From State | {{trigger.message.FromState}} |
| From ZIP | {{trigger.message.FromZip}} |
| Message SID | {{trigger.message.MessageSid}} |
| Messaging Service SID | {{trigger.message.MessagingServiceSid}} |
| Media URL | {{trigger.message.MediaUrl{N}}} |
| Number of Media Items | {{trigger.message.NumMedia}} |
| To (Studio Flow Phone Number) | {{trigger.message.To}} |
| To City | {{trigger.message.ToCity}} |
| To Country | {{trigger.message.ToCountry}} |
| To State | {{trigger.message.ToState}} |
| To ZIP | {{trigger.message.ToZip}} |
Info
The Media URL variable is used by specifying the index of the media element you want to access. For example, if a single media element was sent in the incoming message, the variable {{trigger.message.MediaUrl0}} can be used to access the URL where the media element is hosted.
Find definitions and examples for these variables on Call Resource.
| Name | Liquid template language |
|---|---|
| Account SID | {{trigger.call.AccountSid}} |
| API Version | {{trigger.call.ApiVersion}} |
| Called (Studio Flow Phone Number) | {{trigger.call.Called}} |
| Caller (User) | {{trigger.call.Caller}} |
| Call Status | {{trigger.call.CallStatus}} |
| Direction | {{trigger.call.Direction}} |
| From (User) | {{trigger.call.From}} |
| From City | {{trigger.call.FromCity}} |
| From Country | {{trigger.call.FromCountry}} |
| From State | {{trigger.call.FromState}} |
| From ZIP | {{trigger.call.FromZip}} |
| Caller City | {{trigger.call.CallerCity}} |
| Caller Country | {{trigger.call.CallerCountry}} |
| Caller State | {{trigger.call.CallerState}} |
| Caller ZIP | {{trigger.call.CallerZip}} |
| Call SID | {{trigger.call.CallSid}} |
| Called City | {{trigger.call.CalledCity}} |
| Called Country | {{trigger.call.CalledCountry}} |
| Called State | {{trigger.call.CalledState}} |
| Called ZIP | {{trigger.call.CalledZip}} |
| To (Studio Flow Phone Number) | {{trigger.call.To}} |
| To City | {{trigger.call.ToCity}} |
| To Country | {{trigger.call.ToCountry}} |
| To State | {{trigger.call.ToState}} |
| To ZIP | {{trigger.call.ToZip}} |
Find definitions and examples for these variables in Conversation Resource.
| Name | Liquid template language |
|---|---|
| Account SID | {{trigger.conversation.AccountSid}} |
| Body | {{trigger.conversation.Body}} |
| Channel SID | {{trigger.conversation.ChannelSid}} |
| Conversation SID | {{trigger.conversation.ConversationSid}} |
| Date Created | {{trigger.conversation.DateCreated}} |
| From (Conversation) | {{trigger.conversation.From}} |
| Message SID | {{trigger.conversation.MessageSid}} |
| Messaging Service SID | {{trigger.conversation.MessagingServiceSid}} |
Variables passed in via REST API trigger are available as Flow Data and accessible using {{flow.data.MY_CUSTOM_VARIABLE}} syntax. To learn more, see the REST API documentation.
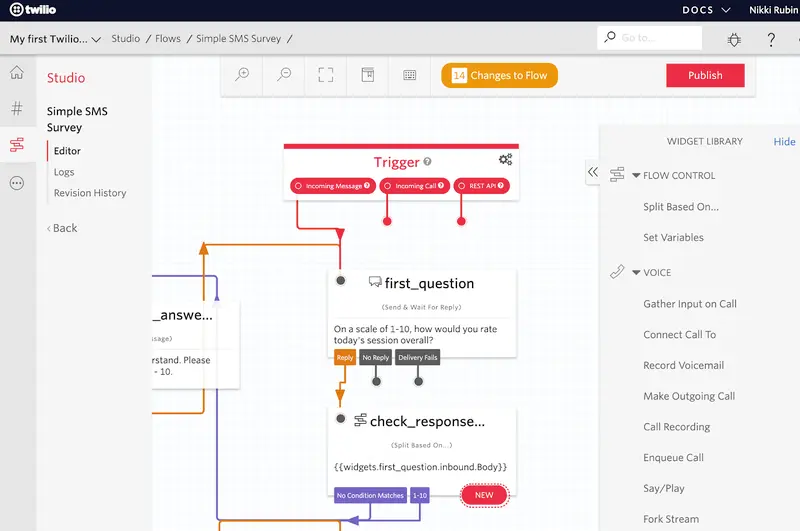
Every Flow you create will start with a Trigger (Start) widget. The following screenshot shows how this widget looks when connected to a Send & Wait for Reply widget, which begins a Flow that takes users through a SMS survey.
Now that you know the basics of the Trigger (Start) widget, why not learn how to build a complete Studio Flow? You can follow along with any of the following tutorials to see this widget in action:
- Learn how to use the REST API trigger with the Conduct an SMS survey with Studio tutorial.
- Learn how to use the Incoming Call Trigger with the Build a phone call IVR with Studio tutorial.
- Learn how to use the Incoming Message Trigger with the Set up an SMS auto-responder with Studio tutorial.
- Learn how to use Studio with Conversations.
Let's build something amazing.