Twilio Verify Java Servlets Quickstart
With just a few lines of code, your Java application can verify phone numbers and add an additional layer of security with Twilio Verify.
This Java Verify Quickstart will teach you how to do this using our Verify REST API, the Twilio Java SDK, and Java Servlet Technology to ease development.
In this Quickstart, you will learn how to:
- Sign up for Twilio
- Set up your development environment
- Send your first SMS phone verification
- Check verification codes
Info
Short on time? Spin up a low-code, fully editable verification demo in less than 2 minutes using Twilio's Code Exchange and Quick Deploy here.
If you already have a Twilio account, you're all set here! Feel free to jump to the next step.
Before you can send an SMS from Java, you'll need to sign up for a Twilio account or sign into your existing account.
You can sign up for a free 30-day Twilio trial account. For details on trial free units and restrictions, see Twilio trial account.
- When you sign up, you'll be asked to verify your personal phone number. This helps Twilio verify your identity and also allows you to send test verification messages to your phone from your Twilio account while in trial mode. This phone verification step is exactly what you'll learn how to build in this tutorial!
- Once you verify your number, you'll be asked to create a project. For the sake of this tutorial, you can click on the "Learn and Explore" template. Give your project a name, or just click "skip remaining steps" to continue with the default.
- Once you get through the project creation flow, you'll arrive at your project dashboard in the Twilio Console. This is where you'll be able to access your Account SID, authentication token, create a verification service, and more.
If you've sent SMS with Twilio in the past, you might remember needing to buy a phone number. With Twilio Verify, we take care of that for you! The Verify API selects the best routes for quickly and reliably delivering verification codes globally.
Verify uses Services for configuration. To send a Verify API request you will need both your Twilio Credentials and a Service SID. You can create and update a Service in two ways:
- In the Verify Console
- With the Verify API
Services can be used to edit the name (which shows up in the message template), set the code length (4-10 characters), enable settings like the "do not share warning" and more.
Now that you have a Twilio account and a verification service, you can start writing some code! To make things even easier we will use Twilio's official helper for Java applications.
If you've gone through one of our other Java Quickstarts already and have Java installed, you can skip this step and get straight to sending your first verification.
To start a phone verification, you'll need to have Java and the Twilio Java SDK installed.
To send your first SMS, you'll need to have the Java Standard Edition (SE) Development Kit (JDK) installed - if you don't know if you have the JDK installed, run the following command to see what version you have:
javac -version
You should see something similar to this output:
javac 1.8.0_92
The Twilio SDK requires Java SE 7 or higher, which will appear as version number "1.7" or above when you run the above command.
If you have an older version of Java or no JDK at all, you'll need to install the JDK before going any further. Follow the directions for installing the Java SE Development Kit for your platform (Windows, Mac, Linux) from the Java SE Download Page.
1// Install the Java helper library from twilio.com/docs/java/install23import com.twilio.Twilio;4import com.twilio.rest.verify.v2.service.Verification;56public class Example {7// Find your Account SID and Auth Token at twilio.com/console8// and set the environment variables. See http://twil.io/secure9public static final String ACCOUNT_SID = System.getenv("TWILIO_ACCOUNT_SID");10public static final String AUTH_TOKEN = System.getenv("TWILIO_AUTH_TOKEN");1112public static void main(String[] args) {13Twilio.init(ACCOUNT_SID, AUTH_TOKEN);14Verification verification =15Verification.creator("VAaaaaaaaaaaaaaaaaaaaaaaaaaaaaaaaa", "+15017122661", "sms").create();1617System.out.println(verification.getStatus());18}19}
Response
1{2"sid": "VEaaaaaaaaaaaaaaaaaaaaaaaaaaaaaaaa",3"service_sid": "VAaaaaaaaaaaaaaaaaaaaaaaaaaaaaaaaa",4"account_sid": "ACaaaaaaaaaaaaaaaaaaaaaaaaaaaaaaaa",5"to": "+15017122661",6"channel": "sms",7"status": "pending",8"valid": false,9"date_created": "2015-07-30T20:00:00Z",10"date_updated": "2015-07-30T20:00:00Z",11"lookup": {},12"amount": null,13"payee": null,14"send_code_attempts": [15{16"time": "2015-07-30T20:00:00Z",17"channel": "SMS",18"attempt_sid": "VLaaaaaaaaaaaaaaaaaaaaaaaaaaaaaaaa"19}20],21"sna": null,22"url": "https://verify.twilio.com/v2/Services/VAaaaaaaaaaaaaaaaaaaaaaaaaaaaaaaaa/Verifications/VEaaaaaaaaaaaaaaaaaaaaaaaaaaaaaaaa"23}
1// Install the Java helper library from twilio.com/docs/java/install23import com.twilio.Twilio;4import com.twilio.rest.verify.v2.service.VerificationCheck;56public class Example {7// Find your Account SID and Auth Token at twilio.com/console8// and set the environment variables. See http://twil.io/secure9public static final String ACCOUNT_SID = System.getenv("TWILIO_ACCOUNT_SID");10public static final String AUTH_TOKEN = System.getenv("TWILIO_AUTH_TOKEN");1112public static void main(String[] args) {13Twilio.init(ACCOUNT_SID, AUTH_TOKEN);14VerificationCheck verificationCheck = VerificationCheck.creator("VAaaaaaaaaaaaaaaaaaaaaaaaaaaaaaaaa")15.setTo("+15017122661")16.setCode("123456")17.create();1819System.out.println(verificationCheck.getStatus());20}21}
Response
1{2"sid": "VEaaaaaaaaaaaaaaaaaaaaaaaaaaaaaaaa",3"service_sid": "VAaaaaaaaaaaaaaaaaaaaaaaaaaaaaaaaa",4"account_sid": "ACaaaaaaaaaaaaaaaaaaaaaaaaaaaaaaaa",5"to": "+15017122661",6"channel": "sms",7"status": "approved",8"valid": true,9"amount": null,10"payee": null,11"sna_attempts_error_codes": [],12"date_created": "2015-07-30T20:00:00Z",13"date_updated": "2015-07-30T20:00:00Z"14}
Start by cloning our Java Servlets repository.
git clone git@github.com:TwilioDevEd/verify-v2-quickstart-java.git
If you don't have git installed or prefer to download the source code you can grab a zip file of the project here.
For this project, we used Apache Maven as the management tool. If you're familiar with Java you probably have Apache Maven installed, if not follow these links to download and install it. Navigate into the project folder and compile the project to install your dependencies.
Twilio Java SDK is already in the dependencies of the project in the pom.xml file.
1cd verify-v2-quickstart-java23mvn compile4
Copy .env.example to .env. This is where we'll store sensitive data in environment variables.
cp .env.example .env
Update your new .env file with your own TWILIO_ACCOUNT_SID, TWILIO_AUTH_TOKEN, and VERIFICATION_SID. You can find this information in the Twilio Console.
Run the application
1mvn flyway:migrate23mvn jetty:run
If your credentials are set up correctly you'll soon get a message that the app is up!
Navigate to http://localhost:8080/register. You should see a registration form that looks like this:
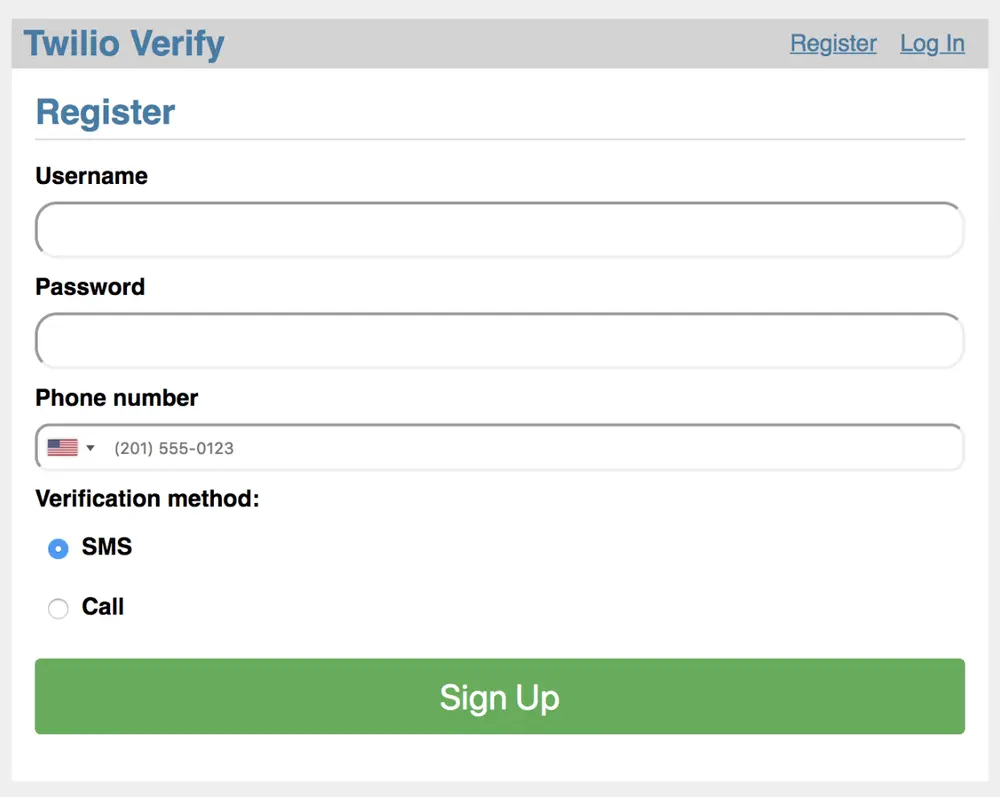
Enter your phone number and choose which channel to request verification over. Finally hit the green Sign Up button and wait. You'll either receive a phone call or an SMS with the verification token. If you requested a phone call, as an additional security feature you may need to interact to proceed (the call will tell you to enter a number on the phone keypad).
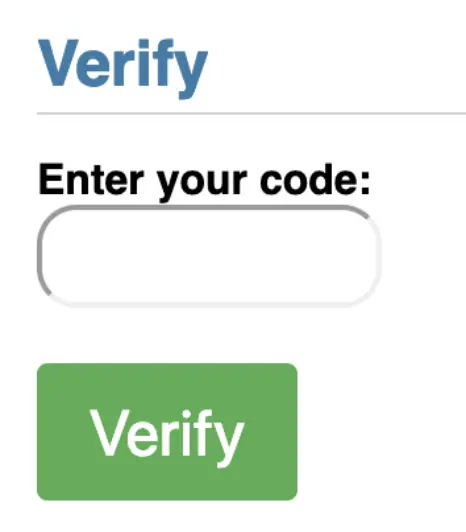
Enter the token into the Verification entry form and click 'Verify':
And with that, your demo app is protected with Twilio's Phone Verification! You can now log out to try the untried channel.
Your demo app is now keeping fraudulent users from registering with your business and polluting your database. Next, check out all of the variables and options available to you in the Verify API Reference.
After that, check out adding additional verification channels supported by the Verify API like:
Info
Lastly, to protect your service against fraud, view our guidance on Preventing Toll Fraud when using Verify.