Video Source APIs - iOS 4.x
In this guide, we will show you how to use the VideoSource APIs to share video in a Room. These APIs allow you to choose the built in camera(s), or any other source of content that is available to your application (or extension).
The VideoSource APIs describe producers and consumers of video content. A TVIVideoSource produces content for a TVILocalVideoTrack. Sources have the following properties.
- VideoSources produce VideoFrames, and deliver them to VideoSinks.
- VideoSources receive format requests, and deliver requests to VideoSinks.
- The recommended maximum frame size is 1920x1080.
- The recommended maximum frame rate is 30 frames per second.
- The recommended pixel format is NV12.
A TVIVideoSink consumes content from a TVIVideoSource. Sinks have the following properties.
- VideoSinks handle format requests from VideoSources.
- VideoSinks consume frames from VideoSources.
In the next section we will show you how to use the CameraSource API.
A TVICameraSource is a TVIVideoSource that produces content from the built-in cameras. This is probably the first kind of video that you want to share, so it is a good place to begin.
First we want to create a TVICameraSource, and use that source to create a TVILocalVideoTrack.
1guard let cameraSource = CameraSource() else {2// Unable to initialize a camera source3return4}5var videoTrack = LocalVideoTrack(source: cameraSource)
Now that we've setup our Track and Source, its time to start producing frames from one of the built-in cameras. Lets use a TVICameraSource utility method to help us discover a front facing AVCaptureDevice.
1guard let frontCamera = CameraSource.captureDevice(position: .front) else {2// The device does not have a front camera.3return4}56// Start capturing with the device that we discovered.7cameraSource.startCapture(device: frontCamera)
In this example, TVICameraSource is automatically determining the best format to capture in. Typically, 640x480 at 30 frames / second is used as the default value.
Next, we want to connect to a Room with the TVILocalVideoTrack we created earlier.
1let connectOptions = ConnectOptions(token: accessToken){ (builder) in2builder.roomName = "my-room"3if let localVideoTrack = self.localVideoTrack {4builder.videoTracks = [localVideoTrack]5}6}7self.room = TwilioVideoSDK.connect(options: connectOptions, delegate: self)
While you can select a single device at start time, TVICameraSource also supports switching devices while it is already running. For example, you could switch from a front facing device to a rear facing device.
1guard let rearCamera = CameraSource.captureDevice(position: .back) else {2// The device does not have a rear camera.3return4}56cameraSource.selectCaptureDevice(rearCamera)
At some point after connecting to a Room, you might decide that you want to stop sharing video from the camera. Start with unpublishing the Track.
1// Unpublish the Track. We will no longer be sharing video in the Room.2if let participant = self.room?.localParticipant,3let videoTrack = self.localVideoTrack {4participant.unpublishVideoTrack(videoTrack)5}
Finally, we will stop the source and destroy the objects.
1// Stop capturing from the device.2self.camera?.stopCapture(completion: { (error) in3if let theError = error {4print("Error stopping capture:", theError as Any)5}67self.camera = nil8self.localVideoTrack = nil9})
An AVCaptureDevice can produce video in many possible formats. TVICameraSource offers utility methods to discover formats that are suitable for video streaming. Consider executing the following code on your iOS device:
1// Assume that we discovered "frontDevice" earlier.23let formats = CameraSource.supportedFormats(captureDevice: frontDevice)4print(formats)
When this code is run on an iPhone X with iOS 12.4, the following formats are returned.
| Dimensions | Frame Rate | Pixel Format |
|---|---|---|
| 192 x 144 | 30 | 420f |
| 352 x 288 | 30 | 420f |
| 480 x 360 | 30 | 420f |
| 640 x 480 | 30 | 420f |
| 960 x 540 | 30 | 420f |
| 1280 x 720 | 30 | 420f |
| 1920 x 1080 | 30 | 420f |
| 1920 x 1440 | 30 | 420f |
| 3088 x 2320 | 30 | 420f |
Once you've determined which format you would like to use, you can provide it when starting capture.
1// Formats are ordered by increasing dimensions. Start with the smallest size.2cameraSource.startCapture(device: frontDevice,3format: formats.firstObject as! VideoFormat,4completion: nil)
In some applications, it may be important to change formats at runtime with as little disruption to the camera feed as possible.
1// Select another format for the front facing camera.2cameraSource.selectCaptureDevice(frontDevice,3format: formats.lastObject as! VideoFormat,4completion: nil)
Device formats afford quite a lot of flexibility, but there are some cases that AVCaptureDevice does not support out of the box. For example, what if you wanted to:
- Produce square video.
- Produce video that fills a portrait iPhone X / XR / XS screen.
These are both cases where you want to publish video in a different aspect ratio or size than AVCaptureDevice can produce. That is okay, because format requests are here to help with this problem.
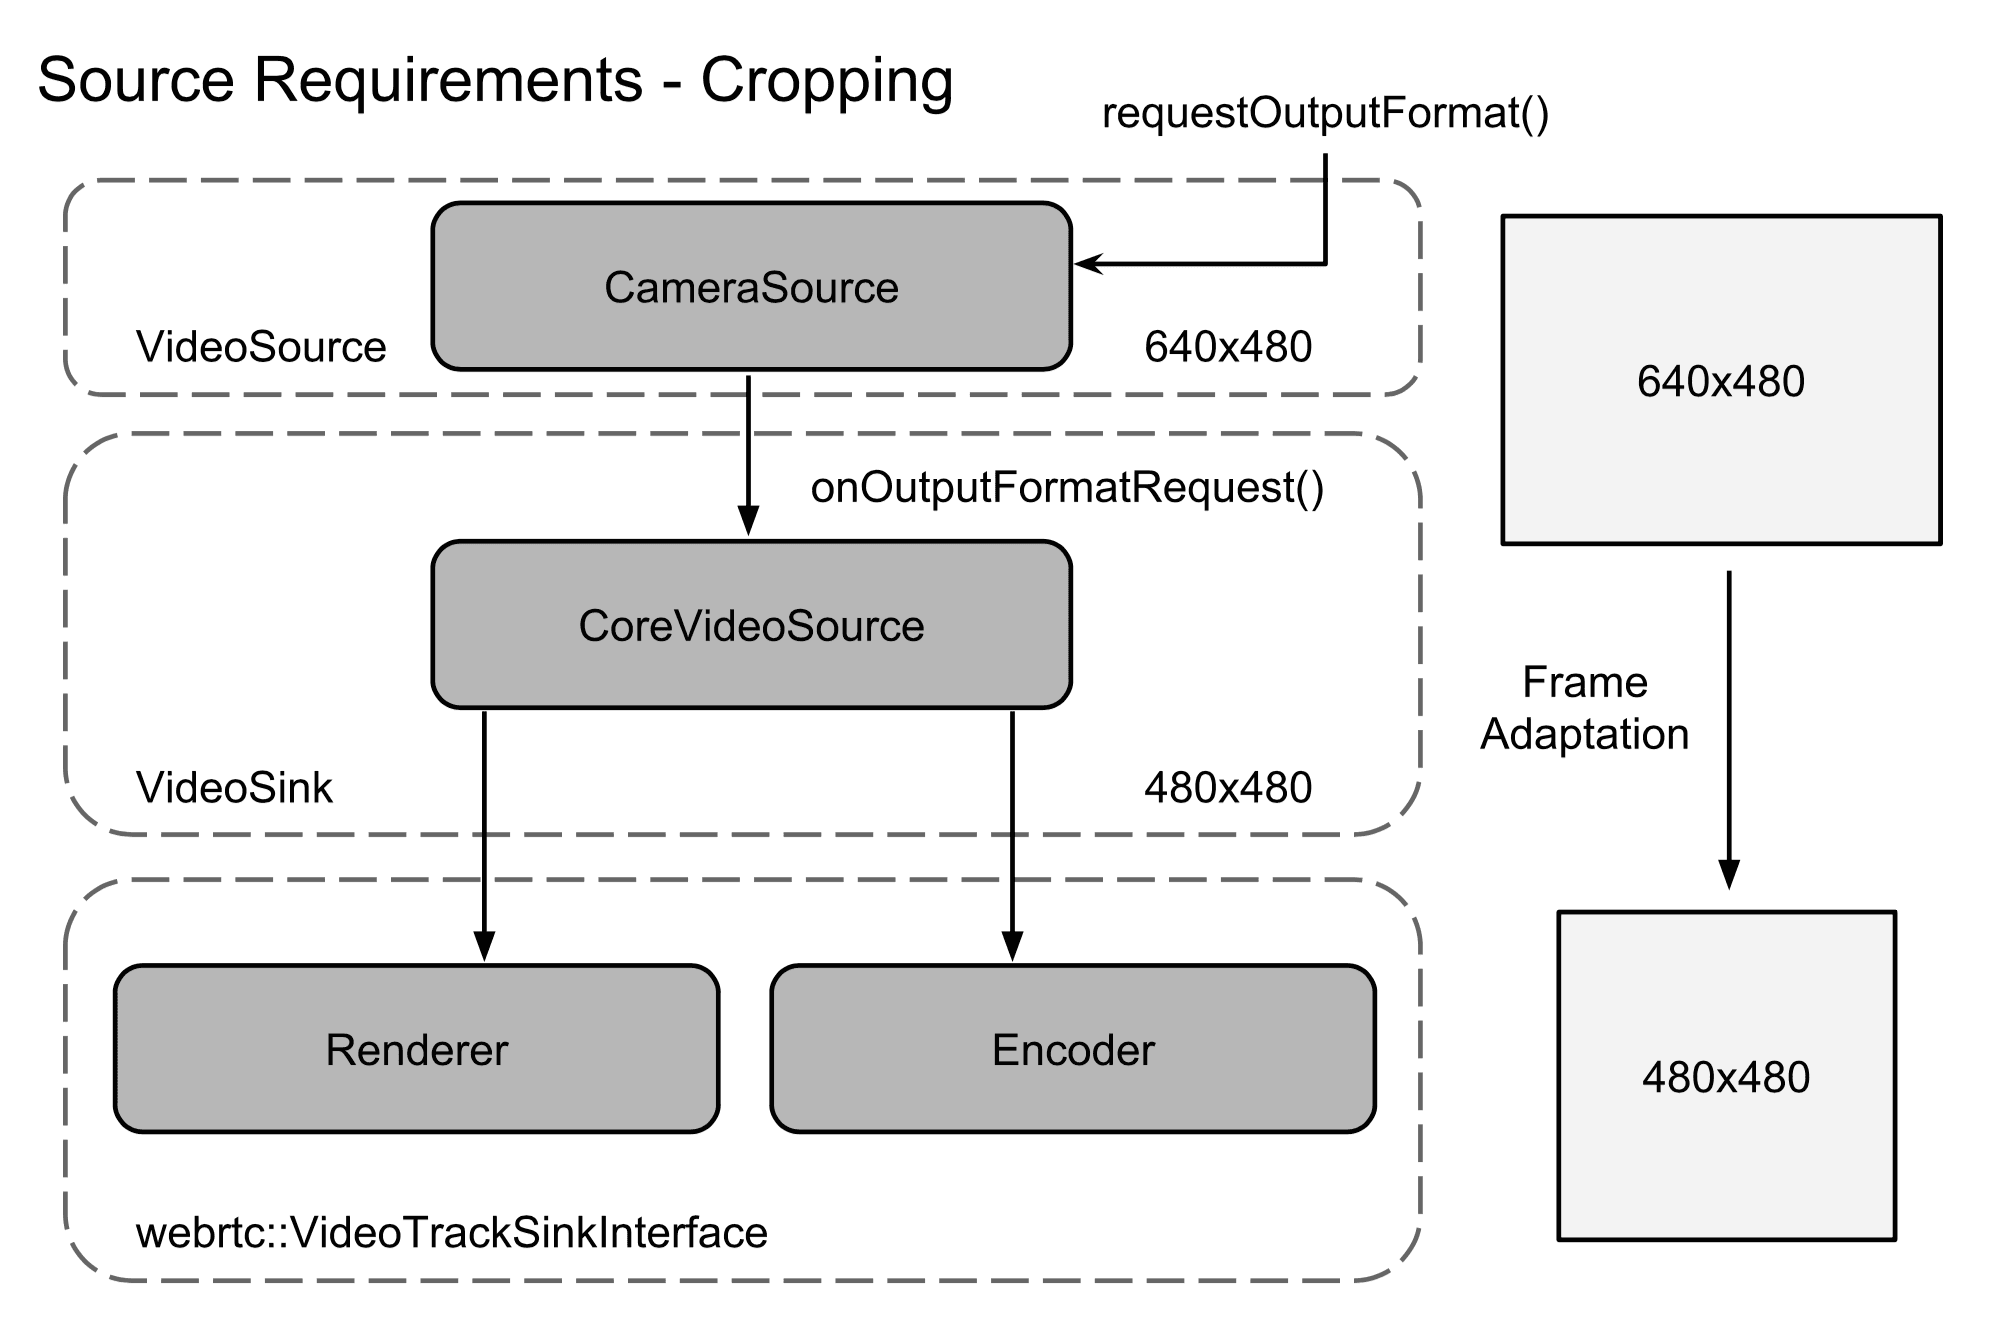
1let frontDevice = CameraSource.captureDevice(position: .front)!2let formats = CameraSource.supportedFormats(captureDevice: frontDevice)34// We match 640x480 directly, since it is known to be supported by all devices.5var preferredFormat: VideoFormat?6for format in formats {7let theFormat = format as! VideoFormat8if theFormat.dimensions.width == 640,9theFormat.dimensions.height == 480 {10preferredFormat = theFormat11}12}1314guard let captureFormat = preferredFormat else {15// The preferred format could not be found.16return17}1819// Request cropping to 480x480.20let croppingRequest = VideoFormat()21let dimension = captureFormat.dimensions.height22croppingRequest.dimensions = CMVideoDimensions(width: dimension,23height: dimension)2425self.camera?.requestOutputFormat(croppingRequest)26self.camera?.startCapture(device: frontDevice,27format: captureFormat,28completion: nil)
The following diagram shows the effect of a format request on frames produced by TVICameraSource.
Take a look at the iOS QuickStart Example to learn more about using TVICameraSource.
The TVICameraSource provides flexibility in how it tracks video orientation for capture and preview. By default, the TVICameraSource monitors -[UIApplication statusBarOrientation] for orientation changes. With the addition of the UIWindowScene APIs in iOS 13, TVICameraSource now has a property, TVICameraSourceOptions.orientationTracker, which allows you to specify how the TVICameraSource should track orientation changes.
The orientationTracker property accepts an object that implements the TVICameraSourceOrientationTracker protocol. A default implementation, TVIUserInterfaceTracker is provided with the SDK. TVIUserInterfaceTracker monitors for changes in UIInterfaceOrientation at the application or scene level. For example, if you wish to track orientation changes based on a scene, you would provide the scene to track when creating the TVICameraSourceOptions.
1// Track the orientation of the key window's scene.2let options = CameraSourceOptions { (builder) in3if let keyScene = UIApplication.shared.keyWindow?.windowScene {4builder.orientationTracker = UserInterfaceTracker(scene: keyScene)5}6}7let camera = CameraSource(options: options, delegate: self)
You will also need to forward UIWindowScene events from your UIWindowSceneDelegate to keep TVIUserInterfaceTracker up to date as the scene changes.
1// Forward UIWindowScene events2func windowScene(_ windowScene: UIWindowScene,3didUpdate previousCoordinateSpace: UICoordinateSpace,4interfaceOrientation previousInterfaceOrientation: UIInterfaceOrientation,5traitCollection previousTraitCollection: UITraitCollection) {6UserInterfaceTracker.sceneInterfaceOrientationDidChange(windowScene)7}
You can also manually control how orientation is tracked. For example, you might decide to use UIDevice instead of UIScene to determine the orientation of the camera. To do this, you would create your own implementation of TVICameraSourceOrientationTracker which invokes the - (void)trackerOrientationDidChange:(AVCaptureVideoOrientation)orientation callback method when the device's orientation changes.
VideoSources are real-time producers of content. Importantly, to optimize for low latency delivery of individual frames is not guaranteed. The video pipeline continuously monitors network and device conditions and may respond by:
- Reducing the number of bits allocated to the encoder.
- Downscaling the video to a smaller size.
- Dropping video frames at input.
- Cropping (minimal, to ensure pixel alignment).
If you would like to implement your own VideoSource, or learn about advanced usage of TVICameraSource then an excellent place to begin is with our sample code.