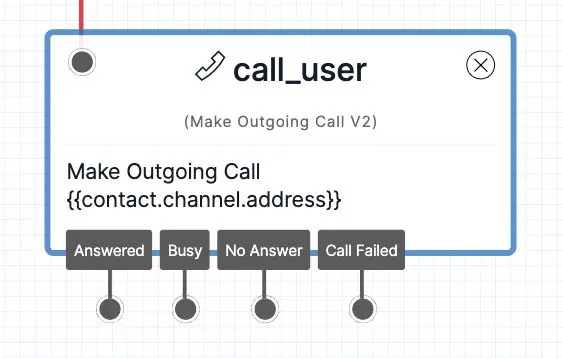
Make Outgoing Call widget
Studio widgets represent various parts of Twilio's functionality that you can combine in your Studio Flow to build out robust applications that don't require you to do any coding.
Info
New to Twilio Studio? Check out our Getting Started guide.
The Make Outgoing Call widget allows you to dial the phone number of the contact who reaches your Studio Flow. You can use this widget to reach your contact with an automated call or follow up by adding voice messages.
The Make Outgoing Call widget uses the Twilio Voice Calls API to make calls.
Warning
The Make Outgoing Call widget has been upgraded and now supports enhanced call recording options and Answering Machine Detection. Any existing Flows using v1 will continue to work as before and show the old functionality of the widget. But for any new instances of the widget added to a Flow, only v2 of the widget will be available. For Flows that still rely on v1, refer to Make Outgoing Call v1 documentation.
The Make Outgoing Call widget requires two pieces of information, Number to call and Number to make call from, to function properly.
Both of these required values are determined at runtime of your Studio Flow execution, and are set to the phone number that called or messaged your Studio Flow and the phone number connected to your Flow, respectively. Studio determines these numbers by the values provided in the REST API request to create the Execution and cannot be changed in the widget configuration.
Warning
When a Flow is triggered by an incoming message, if the phone number is already associated with a messaging service, you can't use the Make Outgoing Call widget.
| Name | Description | Default |
|---|---|---|
| Number to call | The phone number of the contact whose call or message reached your Studio Flow | {{contact.channel.address}} |
| Number to make call from | The phone number Studio will use as your caller ID when placing the call to your user. This is always the Twilio phone number connected to your Studio Flow | {{flow.channel.address}} |
The Make Outgoing Call widget also accepts a number of configuration options that you can use to customize the call that your Studio Flow makes to the user. These options allow you to record the call, detect an answering machine on the other end of the call, send digits, set a timeout on the call, and configure this widget for SIP calls.
If Record Call is set to On, you can also specify the number of recording channels, a recording status callback URL, and to trim silence on the call:
| Name | Description | Options | Default |
|---|---|---|---|
| Record call | Record the phone call and save as an mp3 | On, Off | Off |
| Recording channels | Specify whether Twilio should record the audio from the call in one channel (mono), or record each party on the call into a separate channel (dual) | Mono Channel, Dual Channel | Mono Channel |
| Recording status callback URL | The URL Twilio will call when the recording is ready to be accessed | Any valid URL | None |
| Trim silence | Trim any silence at the beginning and end of the call from the recording | On (trim silence), Off (do not trim) | Off |
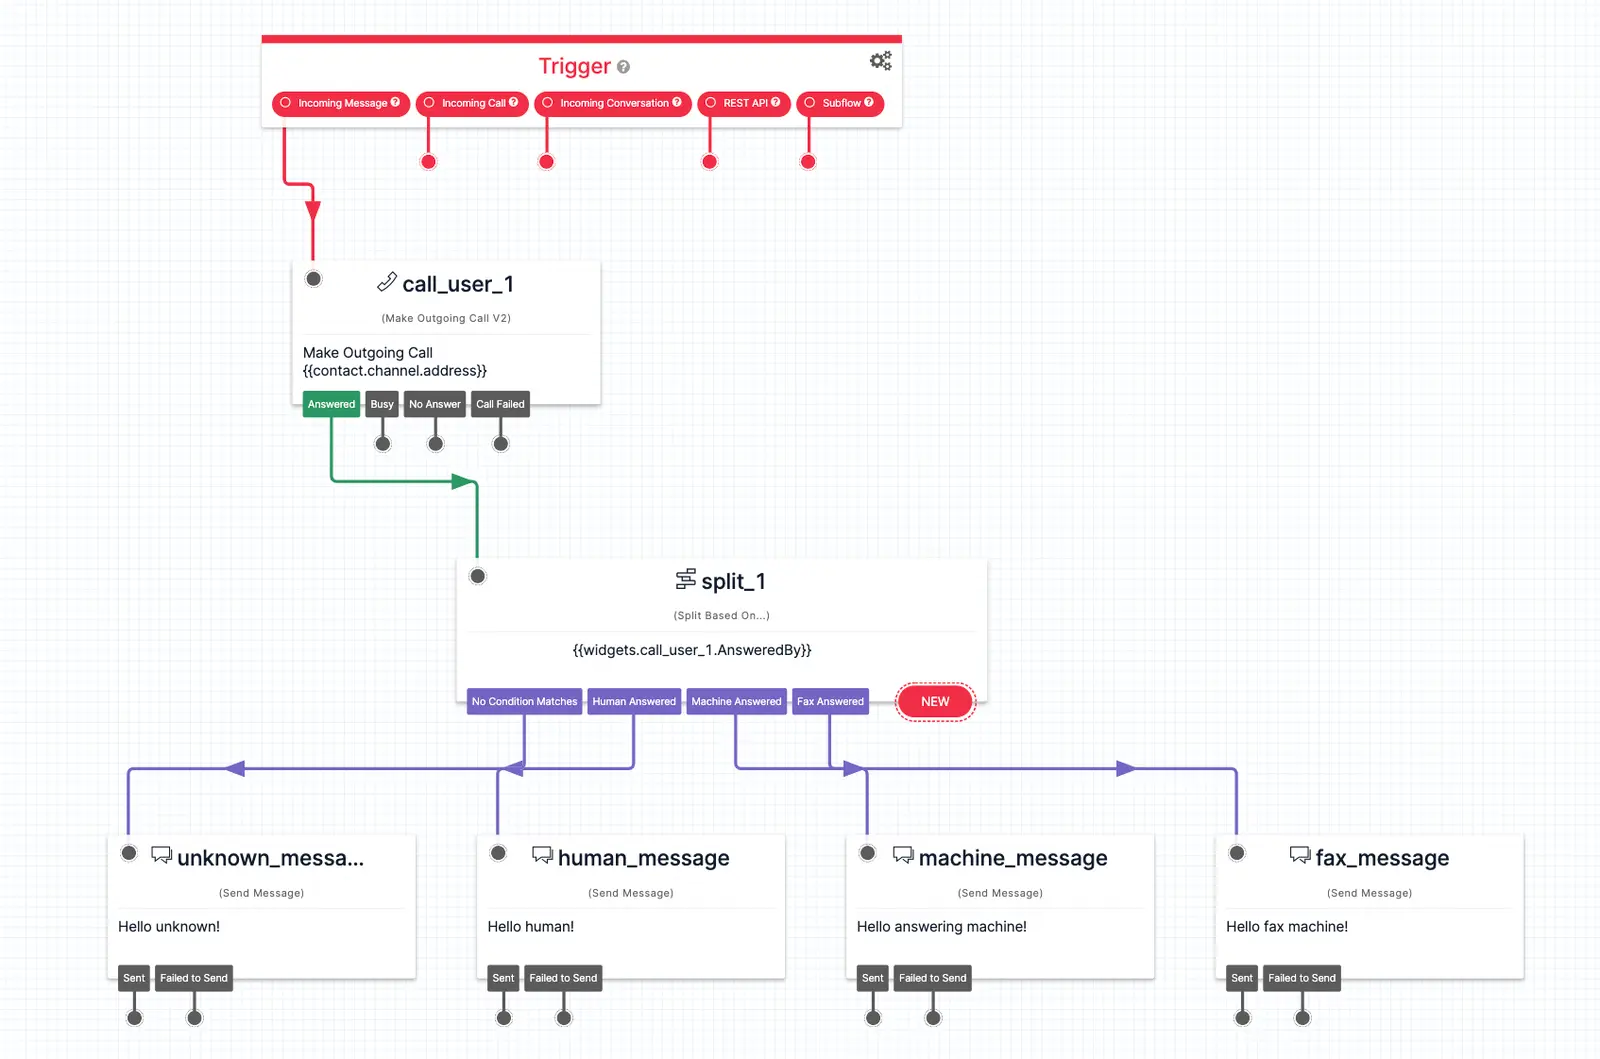
If you choose to enable Detect answering machine, Studio will detect if a human, answering machine, or fax machine has picked up the call. If you enable this feature, many other configuration options will become available to you.
| Name | Description | Possible Values | Default |
|---|---|---|---|
| Detect answering machine | Detect if a human, answering machine, or fax machine answers the phone call. | On, Off | Off |
| Machine detection | The mode in which answering machine detection should run. See note below for details on how these detection methods work. | Detect machine start, Detect machine end | Detect machine start |
| Machine detection timeout | The number of seconds that Twilio should attempt to perform answering machine detection before timing out and returning the AnsweredBy studio variable set to unknown. | 3 - 120 (seconds) | 30 (seconds) |
| Machine detection speech threshold | The number of milliseconds Twilio should use as the measuring stick for the length of the speech activity. Durations lower than this value will be interpreted as a human, while durations longer than this value will be interpreted as a machine. | 1000 - 6000 (milliseconds) | 2400 (milliseconds) |
| Machine detection speech end threshold | The number of milliseconds of silence after speech activity at which point the speech activity is considered complete. | 500 - 5000 (milliseconds) | 1200 (milliseconds) |
| Machine detection speech timeout | The number of milliseconds of initial silence after which an AnsweredBy result of unknown will be returned. | 2000 - 10000 (milliseconds) | 5000 (milliseconds) |
Note: Each of these configuration settings are only available to you only if you set Detect answering machine to On.
You can select which mode of answering machine detection you'd like Twilio to use when it makes this call and checks for a machine on the other end:
- Detect Machine Start will return a result as soon as the called party is identified. The
AnsweredByStudio variable will be one of the following:machine_start,human,fax, orunknown. - Detect Machine End will return whether the call is answered by a human or fax immediately, but when an answering machine is detected it will return this information only at the end of the greeting (usually indicated by a beep). With this mode, the
AnsweredBystudio variable will be one of the following:machine_end_beep,machine_end_silence,machine_end_other,human,fax, orunknown.
To specify what happens in your flow based on the values returned from Twilio's answering machine detection, you can use a Split Based On... widget next in your Studio Flow.
Info
To learn more about the various modes of Twilio's answering machine detection, and to understand how it works behind the scenes, see the Programmable Voice Answering Machine Detection API docs.
Beyond call recording and answering machine detection, there are a few more optional configurations you can set to customize your outgoing phone call:
| Name | Description | Possible values | Default |
|---|---|---|---|
| Send digits | A string of keys Twilio should dial after connecting to the contact's phone number. For example, if you connected to a company phone number and wanted to pause for one second, and then dial extension 1234 followed by the pound key, the value of this parameter should be W1234#. | Digits 0-9, A, B, C, D, W, w, #, and *. Use w in between digits to add a .5 second pause between tones and W to add a 1 second pause between DTMF tones. Do not include any spaces between digits. This field accepts a maximum of 32 digits. | None |
| Timeout | The number of seconds Twilio will wait for the phone to ring before assuming there is no answer. | 0 - 600 (seconds) | 60 (seconds) |
| SIP username | The username used to authenticate the caller making a SIP call. | A valid username that authenticates you to make a SIP call | None |
| SIP password | The password required to authenticate the user account specified in SIP username. | The password tied to your SIP authentication username | None |
These events trigger transitions from this widget to another widget in your Flow. For more information on working with Studio transitions, view Define Widget Transitions.
| Name | Description |
|---|---|
| Answered | The call was answered. If Detect Answering Machine is On and the call was answered, the AnsweredBy parameter will be available in your Studio Flow context as the variable {{widgets.WIDGET_NAME.AnsweredBy}}. You can inspect your AnsweredBy value in a Split Based On... widget to branch your Flow after this call is answered. |
| Busy | The line Twilio dialed was busy. |
| No answer | The call was not answered. |
| Call failed | The call failed to initiate. |
When the Make Outgoing Call widget executes, it will have stored the following variables for use throughout your Studio Flow (where MY_WIDGET_NAME is the name of your actual widget). For more information on working with variables in Studio, view Use Variables in your Studio Flow.
Find definitions and examples for these variables at the Call Resource page.
Info
If Detect Answering Machine is On and the call was answered, the Answered By value is set to values listed in machine detection modes.
| Name | Liquid template language | |
|---|---|---|
| Account SID | {{widgets.MY_WIDGET_NAME.AccountSid}} | |
| Answered By | {{widgets.MY_WIDGET_NAME.AnsweredBy}} | |
| Call SID | {{widgets.MY_WIDGET_NAME.CallSid}} | |
| Call Status | {{widgets.MY_WIDGET_NAME.CallStatus}} | |
| From | {{widgets.MY_WIDGET_NAME.From}} | |
| Machine Detection Duration | {{widgets.MY_WIDGET_NAME.MachineDetectionDuration}} | |
| To | {{widgets.MY_WIDGET_NAME.To}} |
This example shows how to branch your Studio Flow depending on who answered the call initiated by the Make Outgoing Call widget. This is useful when you want to perform different actions depending on if a human or machine answered.
Now that you know the basics of the Make Outgoing Call widget, why not learn more about calls in a Studio Flow? You can follow along with any of the following tutorials and resources:
- Learn more about call properties on the Call Resource page.
- Learn how to use the Incoming Call Trigger with the Build a phone call IVR with Studio tutorial.
Let's build something amazing.