Customize users' opt-in and opt-out experience with Advanced Opt-Out
In this tutorial, you'll set up opt-in, opt-out, and help keywords and confirmation messages by using the Advanced Opt-Out feature of Messaging Services. Configuring these keywords is an effective way to localize the experience for your customers and users worldwide.
By default, Twilio handles standard English-language reply messages—STOP, UNSUBSCRIBE, END, QUIT, STOPALL, REVOKE, OPTOUT, and CANCEL—for long code numbers in accordance with industry standards. For more information, see Twilio's support for opt-out keywords.
This guide covers customizing opt-in/opt-out keywords and messages for your Messaging Service using the Advanced Opt-Out feature.
Info
If you've already set up your Messaging Service, skip ahead to enabling Advanced Opt-Out for your Messaging Service.
Global opt-in and opt-out keywords are a feature of Twilio Messaging Services. A Messaging Service bundles messaging functionality around a common set of senders, features, and configuration.
If you haven't already done so, create a Messaging Service.
The following example shows how to create a Messaging Service:
1// Download the helper library from https://www.twilio.com/docs/node/install2const twilio = require("twilio"); // Or, for ESM: import twilio from "twilio";34// Find your Account SID and Auth Token at twilio.com/console5// and set the environment variables. See http://twil.io/secure6const accountSid = process.env.TWILIO_ACCOUNT_SID;7const authToken = process.env.TWILIO_AUTH_TOKEN;8const client = twilio(accountSid, authToken);910async function createService() {11const service = await client.messaging.v1.services.create({12friendlyName: "My First Messaging Service",13});1415console.log(service.sid);16}1718createService();
Response
1{2"account_sid": "ACaaaaaaaaaaaaaaaaaaaaaaaaaaaaaaaa",3"sid": "MGaaaaaaaaaaaaaaaaaaaaaaaaaaaaaaaa",4"date_created": "2015-07-30T20:12:31Z",5"date_updated": "2015-07-30T20:12:33Z",6"friendly_name": "My First Messaging Service",7"inbound_request_url": "https://www.example.com/",8"inbound_method": "POST",9"fallback_url": "https://www.example.com",10"fallback_method": "GET",11"status_callback": "https://www.example.com",12"sticky_sender": true,13"smart_encoding": false,14"mms_converter": true,15"fallback_to_long_code": true,16"scan_message_content": "inherit",17"area_code_geomatch": true,18"validity_period": 600,19"synchronous_validation": true,20"usecase": "marketing",21"us_app_to_person_registered": false,22"use_inbound_webhook_on_number": true,23"links": {24"phone_numbers": "https://messaging.twilio.com/v1/Services/MGaaaaaaaaaaaaaaaaaaaaaaaaaaaaaaaa/PhoneNumbers",25"short_codes": "https://messaging.twilio.com/v1/Services/MGaaaaaaaaaaaaaaaaaaaaaaaaaaaaaaaa/ShortCodes",26"alpha_senders": "https://messaging.twilio.com/v1/Services/MGaaaaaaaaaaaaaaaaaaaaaaaaaaaaaaaa/AlphaSenders",27"messages": "https://messaging.twilio.com/v1/Services/MGaaaaaaaaaaaaaaaaaaaaaaaaaaaaaaaa/Messages",28"us_app_to_person": "https://messaging.twilio.com/v1/Services/MGaaaaaaaaaaaaaaaaaaaaaaaaaaaaaaaa/Compliance/Usa2p",29"us_app_to_person_usecases": "https://messaging.twilio.com/v1/Services/MGaaaaaaaaaaaaaaaaaaaaaaaaaaaaaaaa/Compliance/Usa2p/Usecases",30"channel_senders": "https://messaging.twilio.com/v1/Services/MGaaaaaaaaaaaaaaaaaaaaaaaaaaaaaaaa/ChannelSenders",31"destination_alpha_senders": "https://messaging.twilio.com/v1/Services/MGaaaaaaaaaaaaaaaaaaaaaaaaaaaaaaaa/DestinationAlphaSenders"32},33"url": "https://messaging.twilio.com/v1/Services/MGaaaaaaaaaaaaaaaaaaaaaaaaaaaaaaaa"34}
Copy the Messaging Service SID (it starts with MGXXX). You'll need it in the next step when you associate a phone number with this Service.
Sending SMS messages requires an SMS capable phone number. You can search for and purchase available phone numbers in the Console. When you search, make sure that the number you choose is SMS capable. Check the appropriate box in the search UI to filter available numbers to those that are SMS capable.
Once you've purchased a SMS capable Twilio phone number, you can start sending messages to mobile devices.
Associate your SMS-enabled Twilio number with the Messaging Service you created.
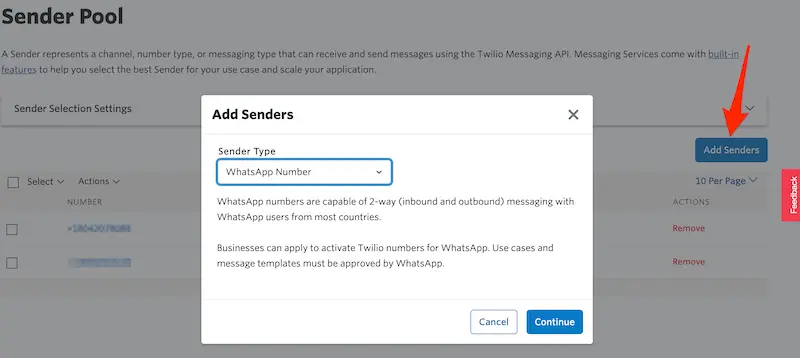
In the Twilio Console, open your Messaging Service and navigate to Senders. Click the Add Sender IDs button, select the Sender Type, and assign the senders to your Messaging Service. See below for instructions for adding WhatsApp-enabled numbers to your Sender Pool.
You can also use the Messaging Services REST API to add the Phone Number you purchased to your sender pool. To do this, you will need the Phone Number's unique SID, which starts with PNXXX. To find your phone number SID:
- Go to the Phone Numbers page in the Twilio Console.
- Click the phone number you want to add.
- The Phone Number SID (
PNXXX...) is displayed on the phone number's detail page.
Use the Phone Number's SID to attach to the Messaging Service that you created.
The following example shows how to add a number to your number pool:
1// Download the helper library from https://www.twilio.com/docs/node/install2const twilio = require("twilio"); // Or, for ESM: import twilio from "twilio";34// Find your Account SID and Auth Token at twilio.com/console5// and set the environment variables. See http://twil.io/secure6const accountSid = process.env.TWILIO_ACCOUNT_SID;7const authToken = process.env.TWILIO_AUTH_TOKEN;8const client = twilio(accountSid, authToken);910async function createPhoneNumber() {11const phoneNumber = await client.messaging.v112.services("MGXXXXXXXXXXXXXXXXXXXXXXXXXXXXXXXX")13.phoneNumbers.create({14phoneNumberSid: "PNXXXXXXXXXXXXXXXXXXXXXXXXXXXXXXXX",15});1617console.log(phoneNumber.sid);18}1920createPhoneNumber();
Response
1{2"sid": "PNaaaaaaaaaaaaaaaaaaaaaaaaaaaaaaaa",3"account_sid": "ACaaaaaaaaaaaaaaaaaaaaaaaaaaaaaaaa",4"service_sid": "MGXXXXXXXXXXXXXXXXXXXXXXXXXXXXXXXX",5"date_created": "2015-07-30T20:12:31Z",6"date_updated": "2015-07-30T20:12:33Z",7"phone_number": "+987654321",8"country_code": "US",9"capabilities": [10"MMS",11"SMS",12"Voice"13],14"url": "https://messaging.twilio.com/v1/Services/MGaaaaaaaaaaaaaaaaaaaaaaaaaaaaaaaa/PhoneNumbers/PNaaaaaaaaaaaaaaaaaaaaaaaaaaaaaaaa"15}
The Advanced Opt-Out feature of Messaging Service also works with WhatsApp-enabled senders (phone numbers). To add a WhatsApp-enabled number to your Messaging Service Sender Pool:
- In the Twilio Console, go to Messaging > Services.
- Select the Messaging Service that you want to edit.
- Click the Add Senders button to add your WhatsApp-enabled phone number to the Messaging Service.
Warning
Advanced Opt-Out currently does not support changing or reporting on blocked phone numbers via the Console or the REST API.
Danger
Advanced Opt-Out is disabled by default for your Messaging Service. After you enable Advanced Opt-Out, you can disable it only by contacting our support team.
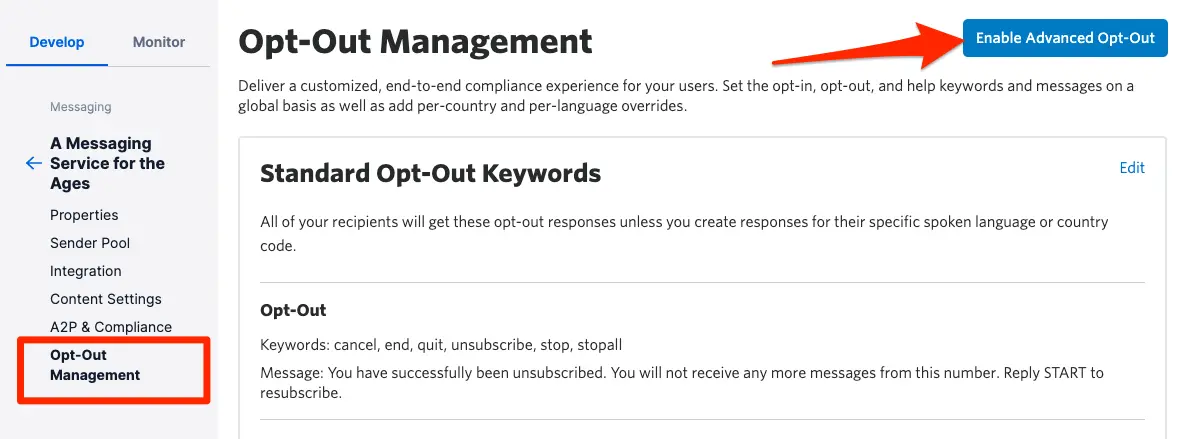
Now that you have your Messaging Service, locate the Opt-Out Management section for your Messaging Service. This is where you can enable and configure your Advanced Opt-Out preferences.
- In the Twilio Console, go to Products & Services > Messaging > Messaging services.
- Select your Messaging Service.
- Click the Opt-Out tab.
- On the Opt-out management page, click the Enable advanced opt-out button.
To stay compliant and give your customers the best possible experience, ensure that you've configured Advanced Opt-Out correctly before enabling it.
Before enabling Advanced Opt-Out for your Messaging Service, you can change the configuration, such as the keywords and responses, and save your changes. These changes do not take effect on your Messaging Service until you enable Advanced Opt-Out. However, the changes that you make to keywords and responses are saved and reflected in the console.
Be aware that as soon as you enable Advanced Opt-Out for your Messaging Service, the configuration applies to all senders (long codes, short codes, and toll-free numbers) in your sender pool.
If you have short codes in your Messaging Service's Sender Pool, it is a good idea to confirm that the keywords (opt-out, opt-in, and help) listed in the Advanced Opt-Out configuration exactly match the stop-words that you included in your application for the short code. In order to remain compliant per the requirements of your short code application, make sure that you are addressing the keywords the customers will use to opt in and out of your Messages.
Warning
Once you enable Advanced Opt-Out, the changes apply to all senders in your sender pool, including short codes. Your keywords and responses in Advanced Opt-Out take precedence over the settings for your short code, which can create a compliance risk.
We highly recommend verifying that the configuration in Advanced Opt-Out matches any keyword and confirmation message pairings that you may have previously set up in your application or that you specified when obtaining a short code.
You can edit keywords for your Messaging Service in three ways:
- Edit the Standard Opt-Out keywords
- Add language-specific Opt-Out keywords
- Add Country Code Opt-Out keywords
Standard Opt-Out keywords apply to messages in any country where you haven't specified keyword and confirmation-message pairs (covered in the next section). Since we have not added any country overrides yet, Advanced Opt-Out for your new Messaging Service currently handles all messages based on the Standard Keywords by default.
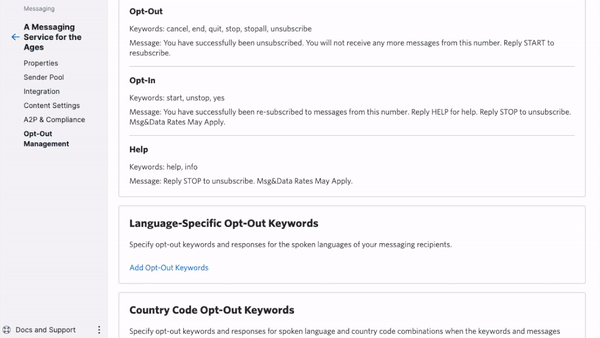
On the Opt-Out tab of your Messaging Service, the Standard Opt-Out Keywords section displays three categories: Opt-Out, Opt-In, and Help. Each category shows the current keywords and confirmation message.
To edit the keywords and messages:
- Click into your messaging service and navigate to the Opt-Out tab. Then, enable Advanced Opt-Out if you haven't already. After enabling, click the pencil. icon in the Standard Opt-Out Keywords section to edit the keywords and messages for your Messaging Service.
- In the Opt-Out section, add or remove keywords (for example:
cancel,end,quit,stop,stopall,unsubscribe) and update the confirmation message. - In the Opt-In section, add or remove keywords (for example:
start,unstop,yes) and update the confirmation message. - In the Help section, add or remove keywords (for example:
help,info) and update the confirmation message. - Click Save to apply your changes.

Twilio matches keywords in a case-insensitive way. "Stop" will be handled the same way as "STOP" or "stop".
Warning
When configuring Advanced Opt-Out, you should avoid including any personally identifiable information (PII) in opt-out response messages you send to customers.
When Twilio receives an Opt-out keyword from one of your users, it adds this phone number to a list of blocked numbers. Twilio checks this list before sending any future outgoing messages. Any subsequent outgoing messages from your account to this user will fail with Error Code 21610 asynchronously.
The reserved Opt-out keyword "stop" is non-removable. If your use case requires more keywords than Twilio recognizes by default, you can add them in the textbox, separated by commas.
You can specify which keywords Twilio will interpret as Opt-in keywords. When one of your users sends an Opt-in keyword, Twilio removes the blocked number entry containing the user's number (if it exists) and sends the confirmation message that you define. This confirmation message notifies the customer that they have opted back in. Any subsequent outgoing messages to this user from your account will not be blocked.
Warning
"Start" and "unstop" are reserved Opt-In keywords and non-removable.
With help keywords, you can give your end users more information as to who owns a particular number as well as what actions are available. When Twilio receives a help keyword from one of your users, there is no impact on the block list. However, if the user has opted out previously, they won't receive your defined help message in response.
Keep in mind that the keyword "help" is reserved and cannot be removed.
If your Messaging Service includes Toll-Free US numbers and you are sending to or receiving from the US or Canada, be aware of the following special behavior:
- Toll-Free US numbers always unsubscribe a user who replies STOP, so the Advanced Opt-out custom message will not display.
- Toll-Free US numbers always opt-in a user who replies START, UNSTOP, so both the carrier opt-in message and the Advanced Opt-out custom message will be returned.
- Only the keywords START and UNSTOP can fully undo the blocking. Twilio's supported keyword "YES" will not work to opt-in a previously unsubscribed user.
If using a Toll-Free US number to communicate with your users, make sure to communicate the STOP and START/UNSTOP keywords to them.
If you are communicating with customers in more than one language, you can specify pairs of keywords and confirmation messages in the target languages of your end users. When an end user sends a Message using one of your configured keywords, Advanced Opt-Out matches the keyword and returns the confirmation message that you specified.
For example, let's say that you plan to send Messages internationally to both English-speaking and Spanish-speaking users. You can create keyword and confirmation message pairs under the Language-specific Opt-Out Keywords section for Spanish, rather than setting country-specific Spanish keywords for each Spanish-speaking country in which you plan to send Messages.
On the Opt-Out tab of your Messaging Service, scroll down to the Language-Specific Opt-Out Keywords section. To add language-specific keywords:
- Click Add language.
- Select the target language from the dropdown.
- Add Opt-Out keywords and a confirmation message for that language.
- Add Opt-In keywords and a confirmation message.
- Add Help keywords and a confirmation message.
- Click Save to apply your changes.

Twilio supports the following spoken languages in opt-out keywords and responses:
- Afrikaans
- Arabic
- Bengali
- Chinese
- Croatian
- Czech
- Danish
- Dutch
- English
- Estonian
- Finnish
- French
- German
- Greek
- Hebrew
- Hindi
- Hungarian
- Italian
- Japanese
- Korean
- Latvian
- Lithuanian
- Malay
- Malaysian
- Norwegian
- Polish
- Portuguese
- Russian
- Slovak
- Slovene
- Spanish
- Southern Ndebele
- Southern Sotho
- Swati
- Swedish
- Tamil
- Tswana
- Tsonga
- Venda
- Xhosa
- Zulu
If you correspond with users in a country where you would like to provide a localized experience, you can do that by creating a country code pairing for keywords and confirmation messages.
Warning
A Country Override replaces the Standard Keywords in the specified country. Be sure to add all keywords and confirmation responses that you wish to support for this country. Twilio first checks the list of keywords for the specified country. If it finds a match with a country-specific keyword, it will return the matching confirmation message. If not, it will check the list of Standard Opt-Out keywords.
You can add these keywords in the Country Code Opt-Out Keywords section under Advanced Opt-Out Management.
On the Opt-Out tab of your Messaging Service, scroll down to the Country Code Opt-Out Keywords section. To add country-specific keywords:
- Click Add language under Country Code Opt-Out Keywords.
- Select the country code from the dropdown.
- Select at least one language to add keywords for that country.
- Add Opt-Out, Opt-In, and Help keywords and confirmation messages for each language.
- To add another language for the same country, click Add another language.
- Click Save to apply your changes.
When specifying Country Code keywords, you must select at least one language to add keywords. If you wish to localize the behavior further, you can add another language.
When receiving an incoming message from one of your users, Twilio matches the country code of your user's phone number with the configuration that you specified. It then attempts to match one of the keywords listed in the pre-defined languages. If there is a match, Twilio applies any necessary opt-out action then replies with the message in the language of your user's keyword.
Therefore, all keywords in a country, across all languages, need to be unique.
Note: It's up to the developer to handle localization of keywords for Country Overrides. Twilio doesn't perform translation; it will only handle the literal keywords as specified in the Country Code Keywords.
Warning
Be aware: the same keyword can't be entered in two different languages for the same country. If a word is entered in one language, the same keyword won't be accepted in another language.
With Advanced Opt-Out, you can keep track of the most up-to-date information about your users' opt-in and opt-out preferences. When an incoming message triggers one of your Opt-Out keywords, Twilio includes an OptOutType property in the request object sent to the webhook URL configured for your Messaging Service. The corresponding value is START, STOP, or HELP, depending on the incoming keyword.
If you see the OptOutType property in the Twilio request to your application, that indicates that Advanced Opt-Out has already matched one of your keywords and replied with the corresponding confirmation message. You may want to store this information, but because Twilio has already sent a confirmation message/reply to your end user, we don't recommend sending another Message back from your application to the end user. In the case of Opt-out keywords, for example, Twilio will not send any further Messages to the end user, failing with Error Code 21610.
Check out these other Messaging Service Resources to improve your users' experience: