Using Twilio Conversations with Studio
Twilio Conversations enables back-and-forth messaging across various communication channels. This means multiple users from different supported messaging platforms are able to seamlessly communicate with one another. Use Studio to handle interactions or logic for incoming Conversation messages and leverage the powerful capabilities of Conversations' cross-channel and multi-user support.
Conversations provides the ability to add or remove Participants that are interacting with a Flow's Execution, creating the opportunity to add support agents at any point to assist users with your Studio application. Additionally, the Conversations integration enables collaborative capabilities within your application as multiple Participants can provide input and move the same Flow Execution forward.
To connect a Twilio Conversation to your Studio Flow, check out the following tutorials:
- Using Twilio Studio and Conversations with SMS (Low-code approach)
- Connecting Twilio Studio to Conversations (Code approach)
A Studio Flow's Execution will start when a message is created in the Conversation that is connected to the Flow. Use the Incoming Conversation transition within the Trigger (Start) Widget. Once a message is sent in a Conversation, the Widget connected to the Incoming Conversation transition will be run.
Warning
If you are using Flex Conversations, remember to handle certain terminal TaskRouter events according to you application's needs, as conversations may stay orphaned with an open state.
See Conversations Best Practices for details.
You can modify Conversations Participants using the Run Function Widget along with a Twilio Function. A Twilio Function will run code that makes a request to the Conversations API to add or remove Participants.
In this example, customers will send the keyword "support" as a Conversation message. The Studio Flow will detect that the keyword was sent and add a Participant to the Conversation. The Participant will be the support agent in this case.
- Sign up for a Twilio account — you can create a free account if you don't have one already.
- Purchase a Twilio phone number. Learn how to purchase a phone number. The number purchasing process varies by region.
- Familiarity with Twilio Conversations.
- You have attached your Studio Flow to a Conversation. Use this guide to automatically attach a Studio Flow to a Conversation when a Conversation is auto-created.
- Familiarity with the Split Based On…, Run Function, and Send Message Widgets.
The Incoming Conversation transition from the Trigger (Start) Widget is used to detect and start the Studio Flow when a new message is sent in the Conversation the Studio Flow is connected to. All messages sent within the Studio Flow will be delivered to all Participants in the Conversation.
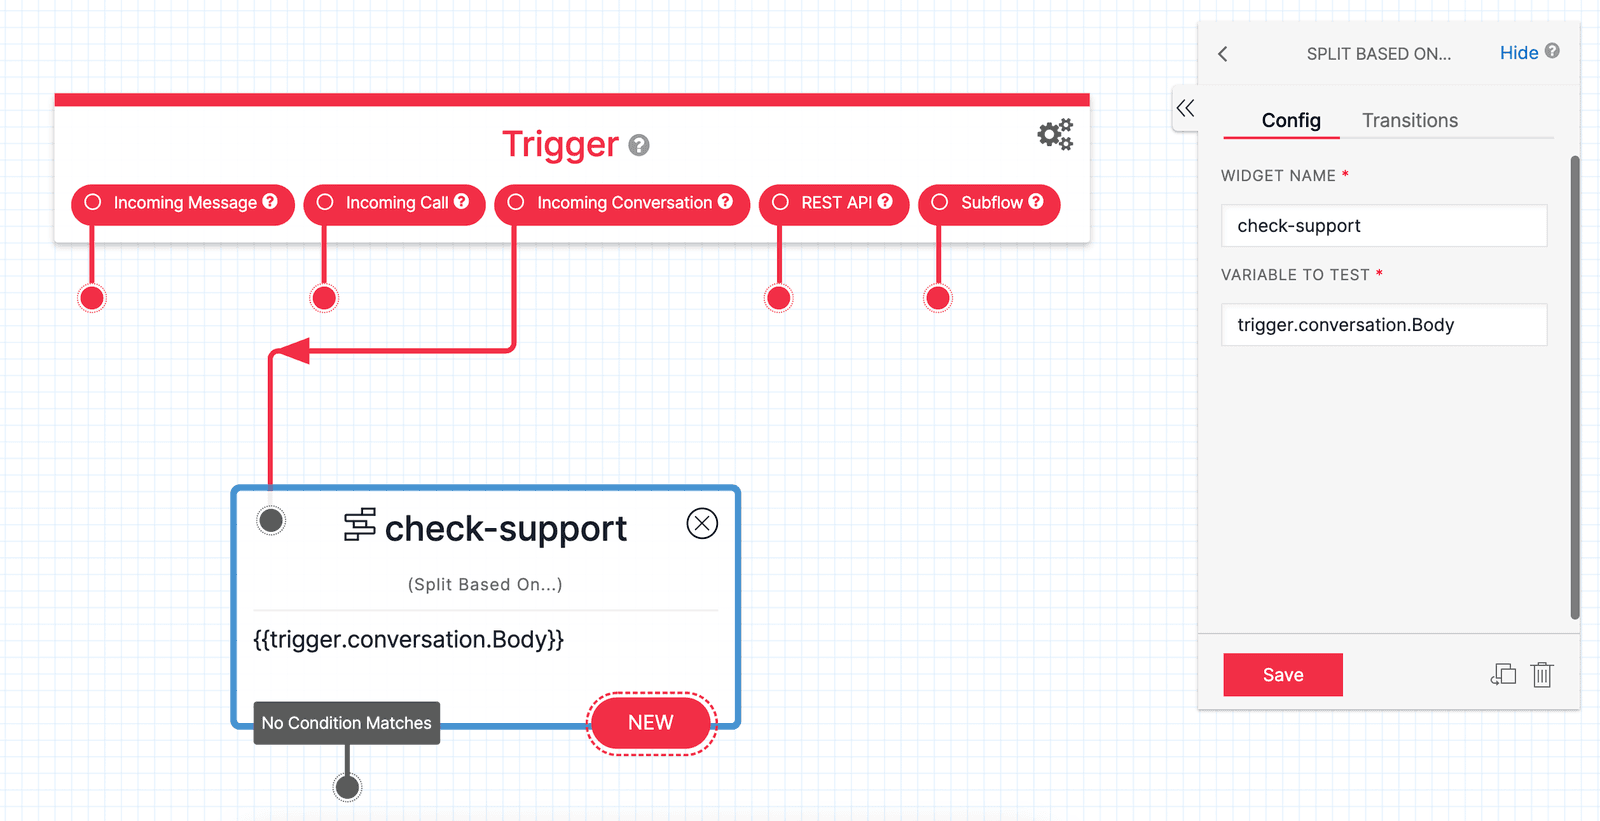
Add a Split Based On… Widget to the Canvas to check if the keyword "support" is sent within the Conversation. Rename the Widget to check-support. Liquid variables are values stored within a Studio Flow that can be used by your Widgets. When checking for the "support" keyword, the Split Based On… Widget evaluates the {{trigger.conversation.Body}} variable. This variable holds the message that was sent in the Conversation. In the Variable to Test field, enter {{trigger.conversation.Body}}.
Click on the Transitions tab and add a new condition by pressing the + button. Under Enter Value… for the condition, input "support" and make sure the predicate is set to "Equal To". When a Participant within the Conversation sends a message that is equal to "support", the condition you just created will be satisfied and any Widgets connected to the condition will be run.
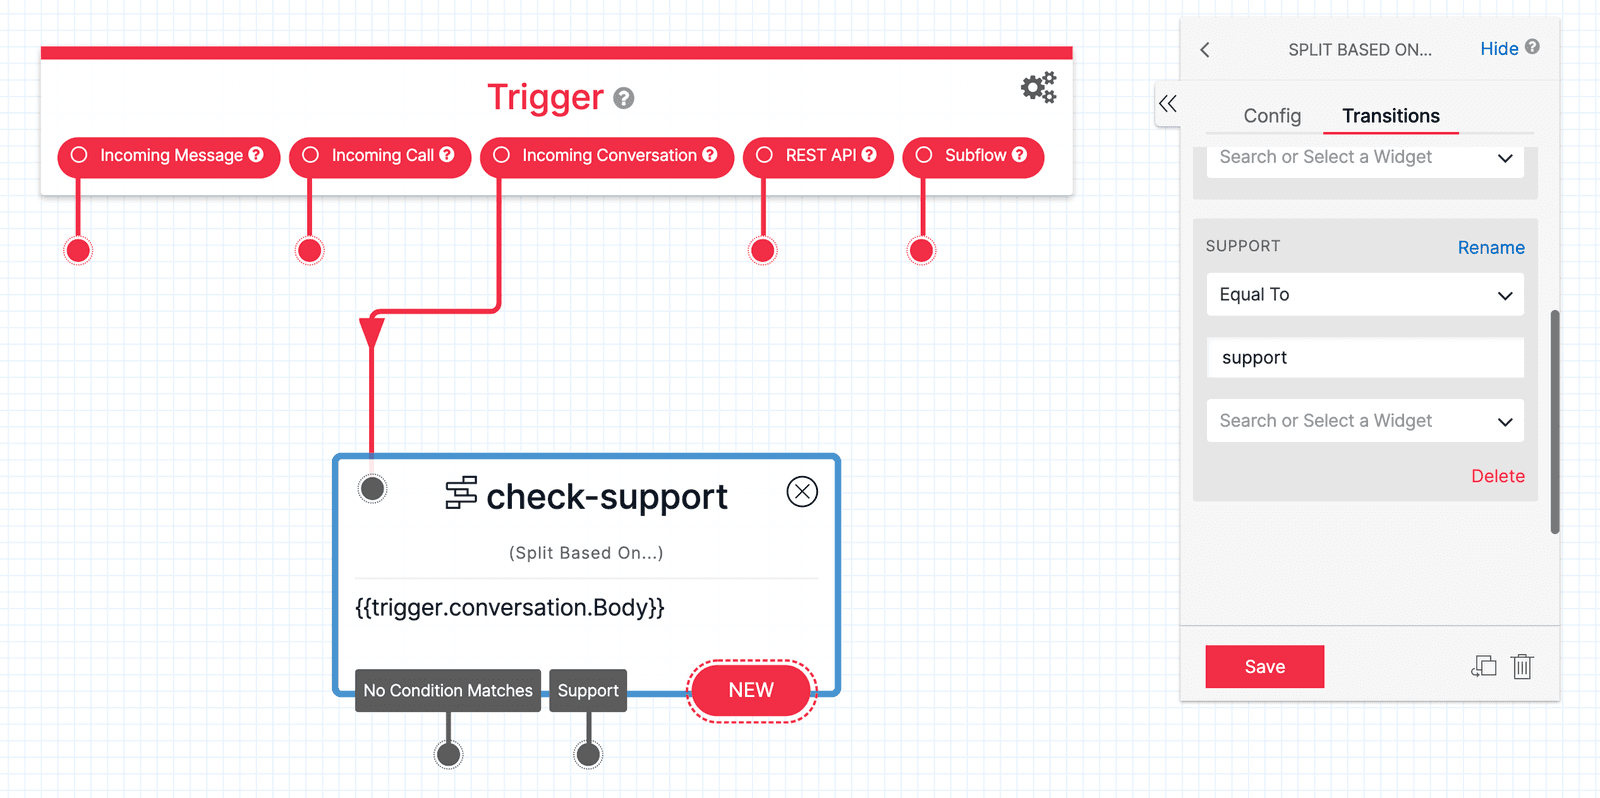
Rename the condition to Support by clicking Save and then clicking Rename within the condition. The transition should now be visible with a dangling dot on your check-support Widget. You will now need to create the Twilio Function that will add the support agent number to the Conversation.
A Twilio Function is a block of code hosted by Twilio. You can run this block of code using your Studio Flow to add the support agent.
-
If you do not have the Functions and Assets product pinned to your sidebar within the Twilio Console, click on Explore Products and find the product under Developer tools. If you have the Functions and Assets product pinned to your sidebar, navigate to Functions and Assets > Overview.
-
Create a new service that will hold the Function you want to create by clicking on Create Service. Name the service and click Next.
-
Click the Add + button and add a new Function. Rename the function path to
add-support-agent. -
Under Settings, click on Dependencies and add
twilioas a module. Enter3.73.1as the version number and click Add. The Conversations API is not available in some older versions, which is why it is being specified here.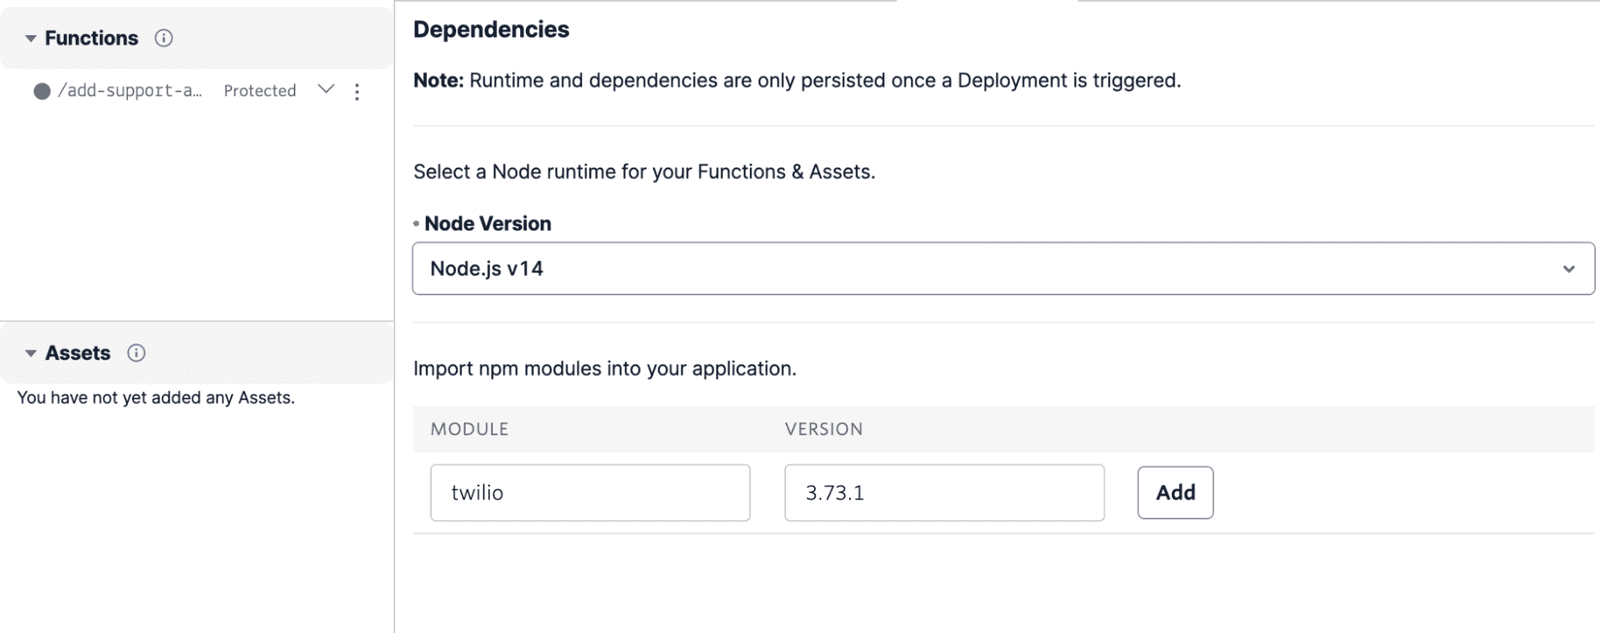
-
Click into the
add-support-agentFunction and copy and paste the code below these steps. -
Substitute the support agent's phone number and the Twilio phone number with your own values before clicking Save. The phone numbers that you set should be in E.164 format.
-
Click on Deploy All. The Function is now operational and will add the support agent number to the Conversation when called by your Studio Flow. You can now head back to your Studio Flow.
1exports.handler = function (context, event, callback) {2// get the Twilio client3const client = context.getTwilioClient();45// store the Conversation ID passed in from the Studio Flow6const conversationsSid = event.conversationID;78// add a participant to the Conversation9client.conversations10.conversations(conversationsSid)11.participants.create({12"messagingBinding.address": "enter-support-agent-phone-number",13"messagingBinding.proxyAddress": "enter-twilio-phone-number",14})15.then((participant) => {16console.log(participant.sid);17return callback(null, "Success");18})19.catch((err) => {20console.log(err);21callback(err);22});23};
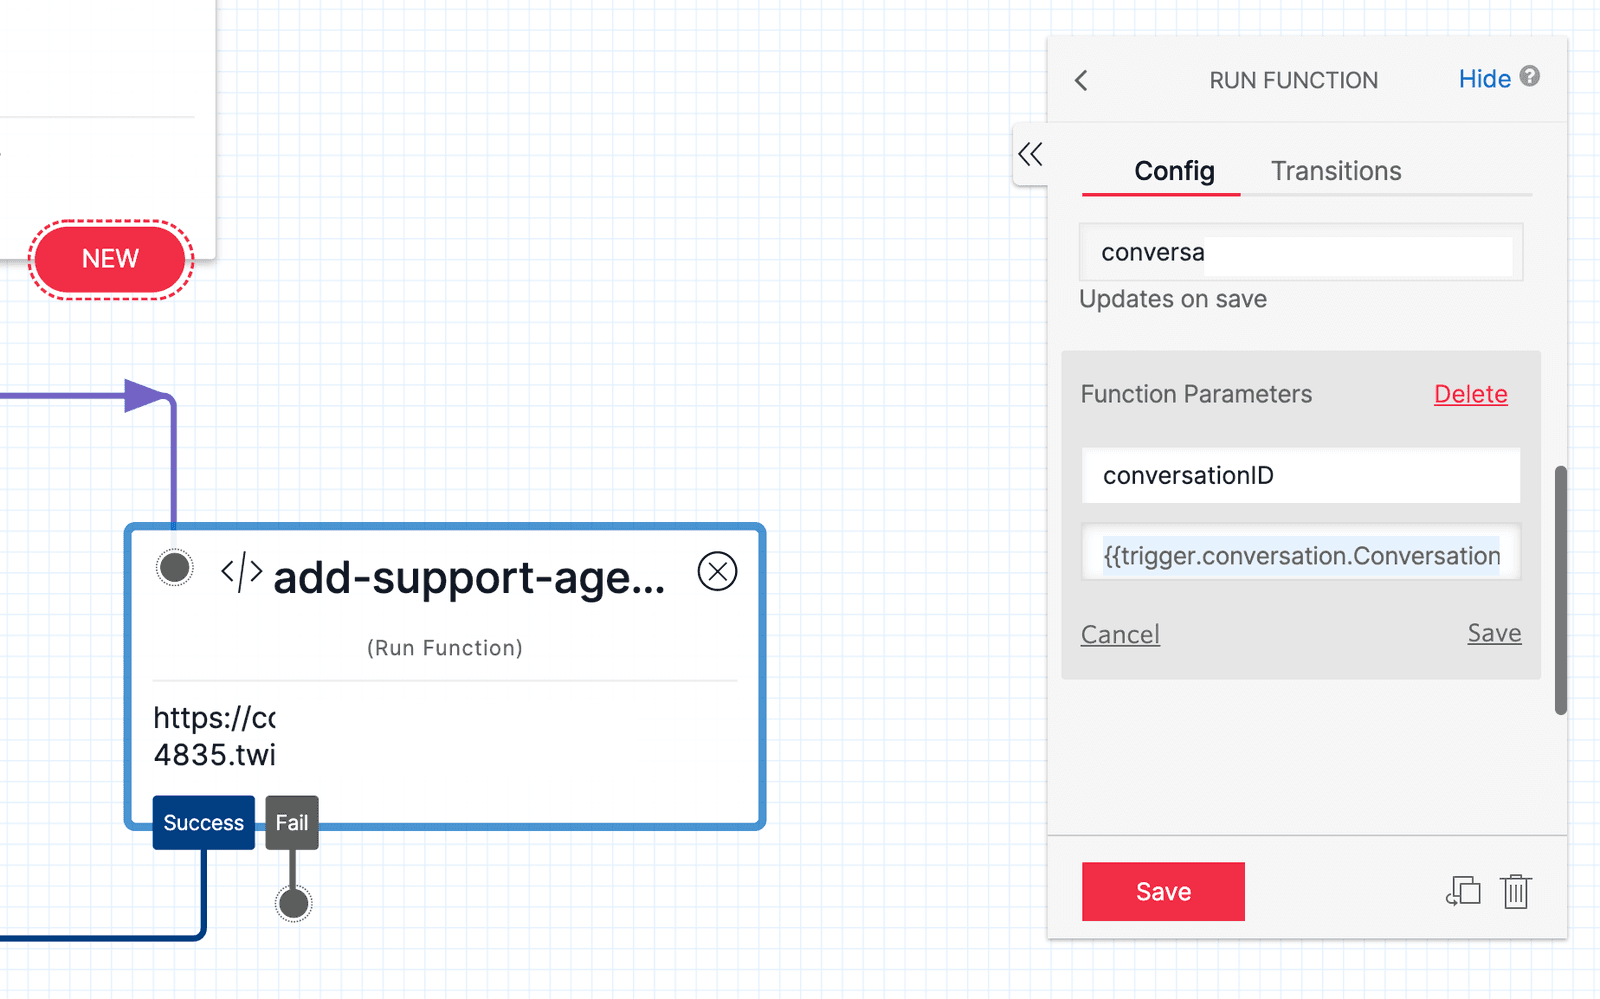
Add a Run Function Widget, which runs code you write in a Twilio Function, to the Canvas. Rename the Run Function Widget to add-support-agent. Connect the Support transition you created in the check-support Widget to this Widget by clicking the dangling dot under the Support transition and dragging it to the Run Function Widget before letting go.
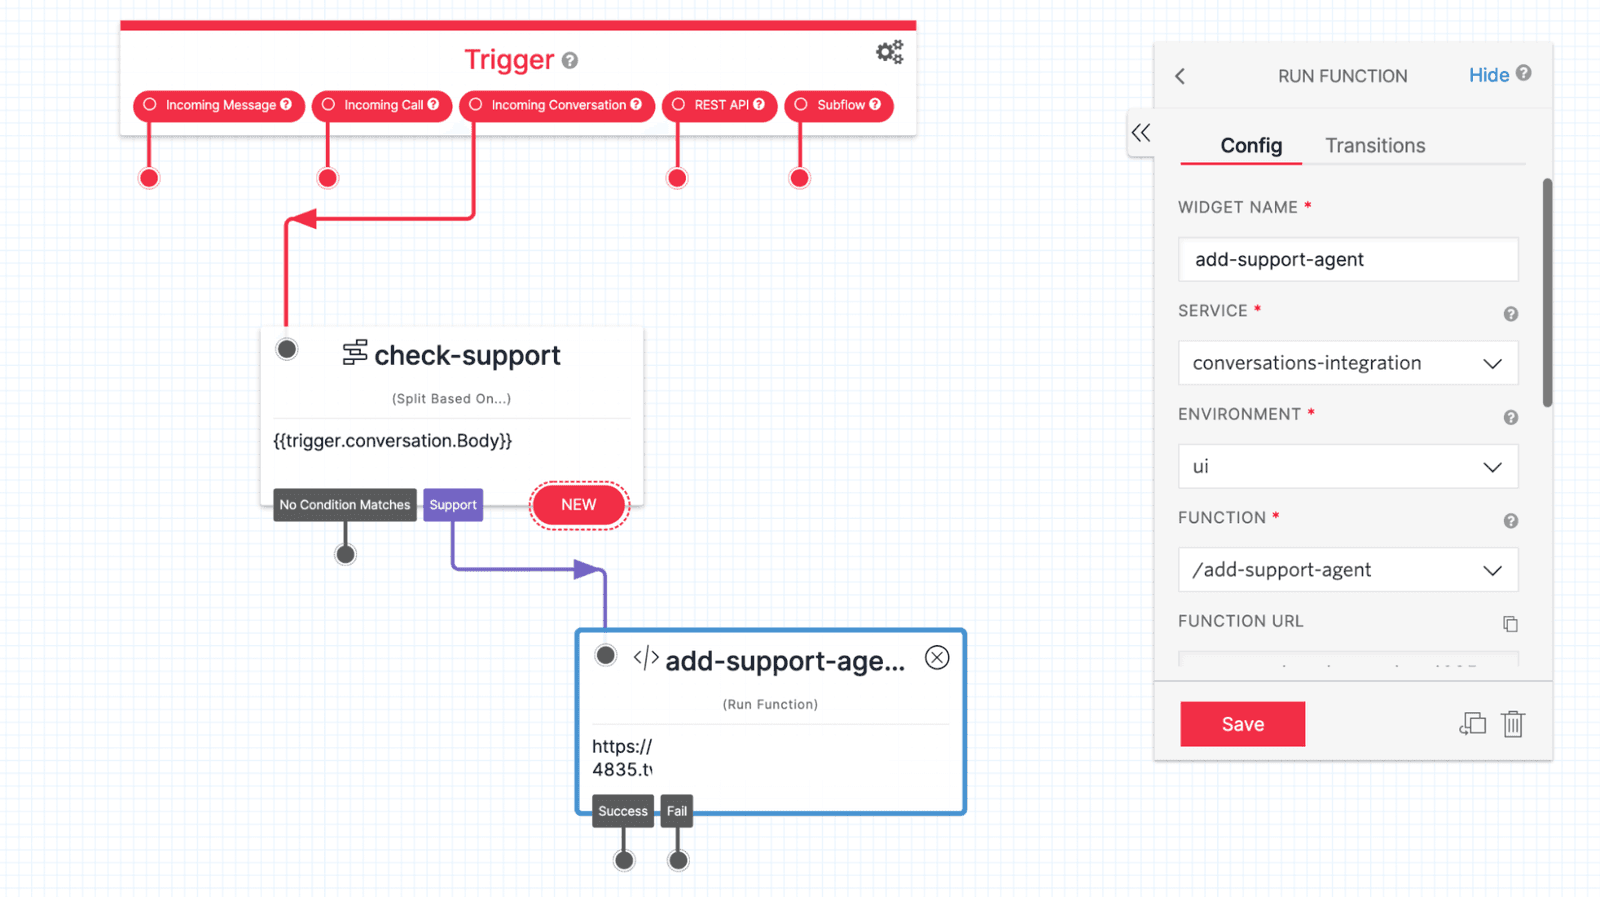
Configure the add-support-agent Widget to point to the Function you just deployed. Under Service, select the name of the Service you created. Under Environment, select ui. Under Function, select the Function you created. In this guide, /add-support-agent was selected.
You will need to pass the Conversation's SID, or identification, to the Twilio Function in order to access and manage Participants. The Studio Flow, if triggered by an incoming Conversation, holds the SID value in the {{trigger.conversation.ConversationSid}} Liquid variable.
To pass the Conversation's identification to the Function, add the value as a Function Parameter. Under Function Parameters in the add-support-agent Widget's configuration, add the Conversation's SID value to a variable that will be sent to the Function. Name the variable conversationID and set the value to be {{trigger.conversation.ConversationSid}}.
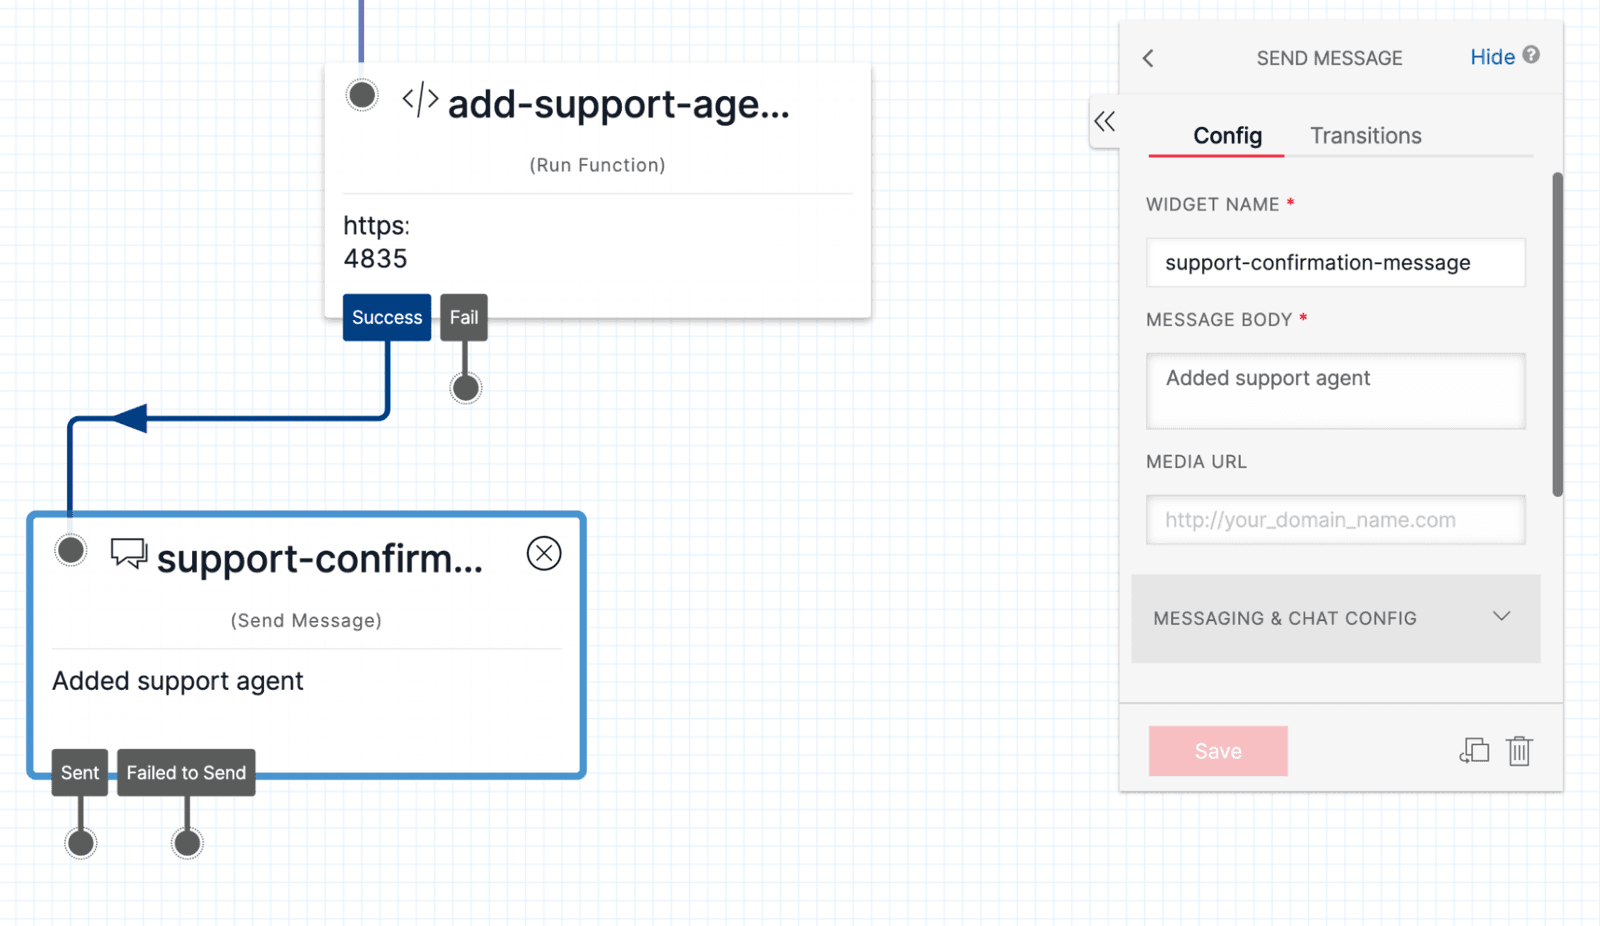
After adding the support agent to the Conversation using the Function you created and ran using the Run Function Widget, send a test message from the Flow as a confirmation. You can also use this as an indication to the support agent that a user is requesting for help.
All messages sent from the Studio Flow will be delivered to all Participants in the Conversation. The Send Message Widget should, therefore, deliver a message to the support agent number you just added to the Conversation.
- Add a new Send Message Widget to the Canvas and rename it to
support-confirmation-message. - Click on the Success transition dot from the
add-support-agentWidget and connect it to this Widget. - Click on the
support-confirmation-messageWidget to display the configuration panel. Add a confirmation message to the Message Body field. This guide will use "Added support agent" as the message. - Make sure to click Publish so your Flow is live and ready to be used.
Your Studio Flow will now add a support agent to the Conversation when a user sends the "support" keyword. Any messages sent from the Studio Flow or Conversation will now include the support agent. You are not limited to just adding users to the Studio Flow. You may also remove a participant from the Conversation at any point using another Run Function Widget.