Getting Started with the Event Webhook Security Features
To verify that incoming POST requests originate from Twilio SendGrid, secure the Event Webhook. The Event Webhook notifies a URL through HTTP POST with information about events that occur as Twilio SendGrid processes your mail.
For more information about working with the Event Webhook and the data it provides, see Getting Started with the Event Webhook and the Twilio SendGrid Event Webhook Overview.
Info
Twilio SendGrid provides two methods for securing the Event Webhook: cryptographic signing and OAuth 2.0. These two security methods are independent of one another and can be used simultaneously.
When using the Signed Event Webhook, Twilio SendGrid will generate a private and public key pair. The private key will be used to generate a signature that is posted to your HTTP webhook in the X-Twilio-Email-Event-Webhook-Signature header.
You can verify the signature with the public key provided. More information is provided in the Verification section of this page.
To enable signature verification and generate a key pair:
-
Navigate to Settings > Mail Settings in the sidebar navigation.
-
Under Webhook Settings, click Event Webhooks:
- If you have Webhooks set up already, you will see them displayed in a table. You can edit a Webhook by following the "Edit an Event Webhook" instructions in the Twilio SendGrid Event Webhook Overview.
- If you have not set up any Webhooks, you can create one by following the "Add an Event Webhook" instructions in the Getting Started with the Event Webhook documentation. For new Webhooks, you must enter mandatory information such as the Post URL and Actions to be posted before you can enable signature verification.
-
Once you have begun creating or editing a Webhook, you will manage its security features in the Security features section of the dialog that opens.
-
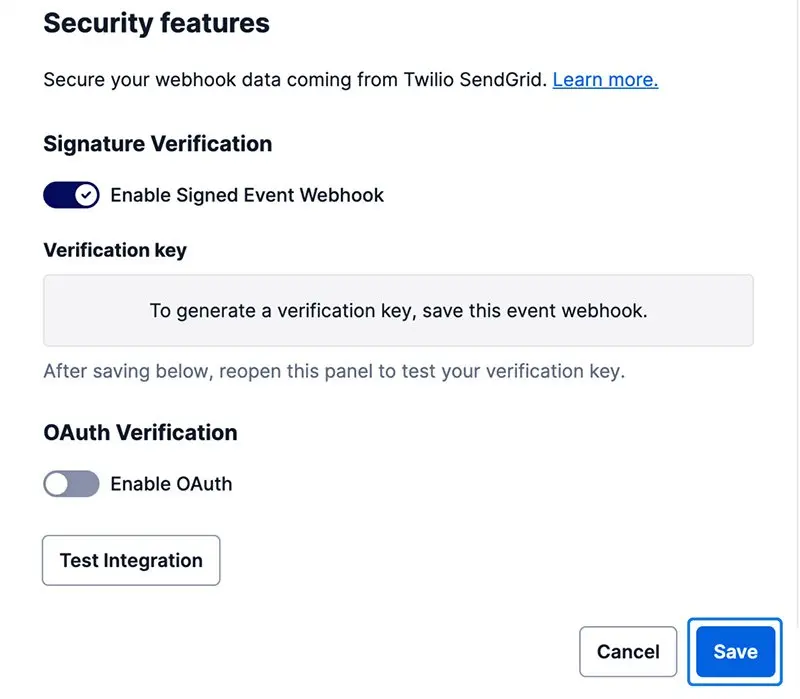
Scroll to Security features and toggle Enable Signed Event Webhook. You must click Save in order to generate a verification key and enable signature verification. If you click Test Integration before clicking Save, signature verification will not be tested because the key pair is only generated once the Webhook is saved.
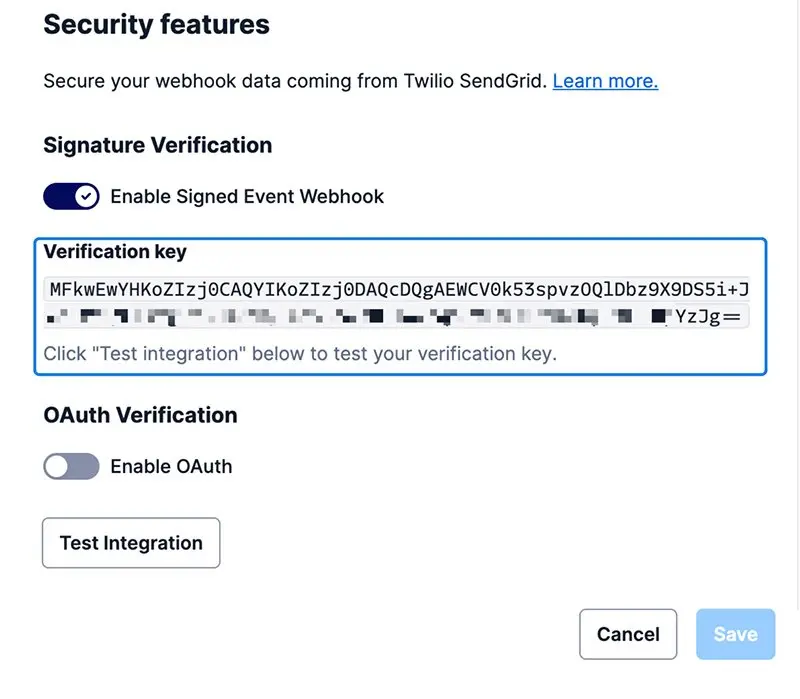
- Once you click Save, the dialog will close. To confirm that signature verification is enabled, navigate back to the dialog by clicking the cog and then clicking Edit. Now you will see the Signature verification setting is enabled and your public verification key is displayed.
- You can now copy the public key and use it to verify that requests are coming from Twilio SendGrid.

To disable signature verification, which will delete the Webhook's existing key pair:
- Edit the Webhook by following the "Edit an Event Webhook" instructions in the Twilio SendGrid Event Webhook Overview documentation.
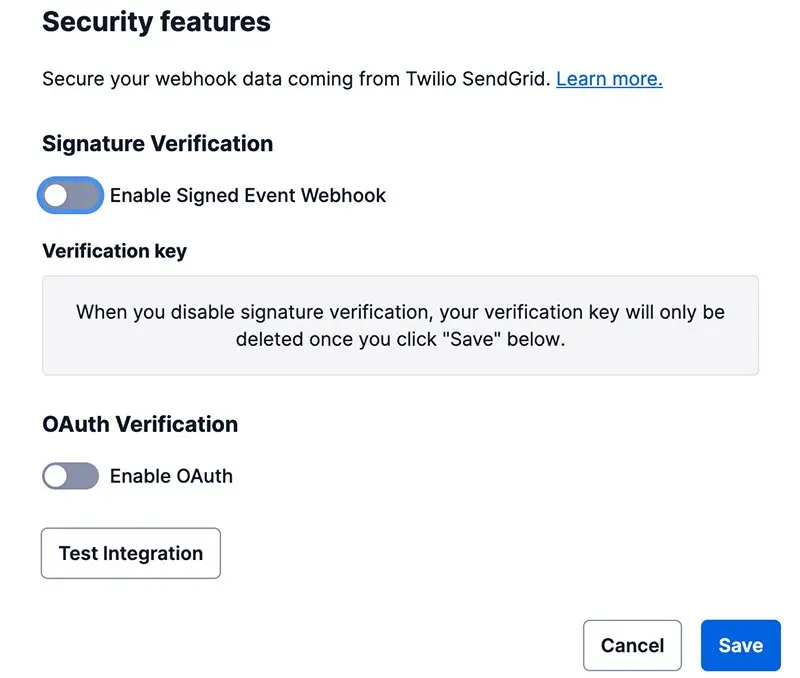
- When a signature exists, the Webhook's configuration dialog will show a toggle with Enable Signed Event Webhook as enabled (blue).
- Toggle Enable Signed Event Webhook to disable the feature (gray). Your key pair will not be deleted until you click Save.
- Click Save to delete your existing key pair for the Webhook.
You can also manage signature verification for the Event Webhook using SendGrid's API. See the Event Webhook API reference for more information.
Twilio SendGrid generates the private and public key pair using the Elliptic Curve Digital Signature Algorithm (ECDSA).
We recommend using a package or library suitable for your language to verify the signature. Libraries are listed below in the "Sample verification libraries" section of this page. The general steps required to verify a signature are outlined below with Go code samples.
Warning
When verifying the signature, be aware that we deliver a payload that must be used in its raw bytes form. Transformations from raw bytes to a JSON string may remove characters that were used as part of the generated signature.
- Initiate the
GETrequest by including the parameters listed (Headers and Responses) on the Get an Event Webhook documentation. - Get the signature from the
"X-Twilio-Email-Event-Webhook-Signature"HTTP header.
1// Golang Example2s := http.Request.Header.Get("X-Twilio-Email-Event-Webhook-Signature")
- Get the timestamp from the
"X-Twilio-Email-Event-Webhook-Timestamp"HTTP header.
1// Golang Example2ts := http.Request.Header.Get("X-Twilio-Email-Event-Webhook-Timestamp")
- Decode the Base64 encoded signature. Then perform an ASN.1 unmarshal of the decoded signature into a string. This string will be in the form of
{r value},{s value}.
1// Golang Example2signatureBytes, _ := base64.StdEncoding.DecodeString(s)3ecdsaSig := struct {4R *big.Int5S *big.Int6}78asn1.Unmarshal(signatureBytes, &ecdsaSig)
- Generate a sha256 hash of the timestamp + payload (use raw bytes).
1// Golang Example2tsBytes := []byte(ts)3payload, _ := ioutil.ReadAll(http.Request.Body)4h := sha256.New()5h.Write(tsBytes)6h.Write(payload)7hashedPayload := h.Sum(nil)
- Verify the signature.
1// Golang Example2// uses https://golang.org/pkg/crypto/ecdsa/ to perform the verification3ecdsa.Verify(publicKey, hashedPayload, ecdsaSig.R, ecdsaSig.S)
- The simplest way to verify the signature is to use a package or library that abstracts this process into a helper method or function.
The Twilio SendGrid API libraries contain helpers to assist you when verifying the ECDSA signature. The links below will take you to the Event Webhook helper in each library.
- C# Event Webhook Helper
- Go Event Webhook Helper
- Java Event Webhook Helper
- Node.js Event Webhook Helper
- PHP Event Webhook Helper
- Python Event Webhook Helper
- Ruby Event Webhook Helper
OAuth offers an additional and separate way of providing security controls for the Event Webhook. OAuth is an open authorization protocol used to share resources with applications. Rather than sharing your username and password with an application, granting total access to your account, OAuth enables scoped access to your resources. For more on OAuth and how it works, see the OAuth community site.
The Twilio SendGrid Event Webhook uses the Client Credentials OAuth grant type, which is an authorization workflow meant for machine-to-machine communication. This authorization method creates a token that Twilio SendGrid can pass to your app in an Authorization header, allowing you to verify that the request originated from Twilio SendGrid.
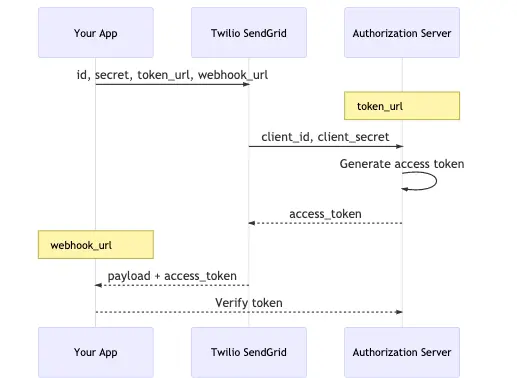
The OAuth setup flow works as follows.
- You, the customer, have an app that provides an HTTP webhook endpoint URL. You want the Twilio SendGrid Event Webhook to make
POSTrequests to this URL. To ensure that the requests you receive are actually from Twilio SendGrid, you implement OAuth. - This means you are responsible for generating a Client ID and Client Secret. You must also provide two URLs, the HTTP
POSTURL endpoint for your app and a URL to an authorization server or OAuth service. - When you give Twilio SendGrid all of this information, it will pass the Client ID and Client Secret to the Token URL (your authorization server/OAuth service). The authorization server will then use the Client ID and Client Secret to generate an access token. This token is sent back to Twilio SendGrid.
- The access token is meaningless to SendGrid. It acts only as a key to pass back to your app at the HTTP
POSTURL endpoint. This will be done in an Authorization header. - Because this access token is shared among only your app, the authorization server, and SendGrid, you can trust requests delivered with the token are from a trusted source.
- You can verify the access token is legitimate by checking with the authorization server that created it.
To enable OAuth 2.0:
-
Navigate to Settings > Mail Settings in the sidebar navigation.
-
Under Webhook Settings, click Event Webhooks:
- If you have Webhooks set up already, you will see them displayed in a table. You can edit a Webhook by following the "Edit an Event Webhook" instructions in the Twilio SendGrid Event Webhook Overview documentation.
- If you have not set up any Webhooks, you can create one by following the "Add an Event Webhook" instructions in the Getting Started with the Event Webhook documentation. For new Webhooks, you must enter mandatory information such as the Post URL and Actions to be posted before you can enable and configure OAuth verification.
-
Once you have begun creating or editing a Webhook, you will manage its security features in the Security features section of the dialog that opens. Unlike signature verification, OAuth verification can be completed without first saving the Webhook.
-
Scroll to Security features and toggle Enable OAuth to reveal Client ID, Secret Token, and Token URL fields.
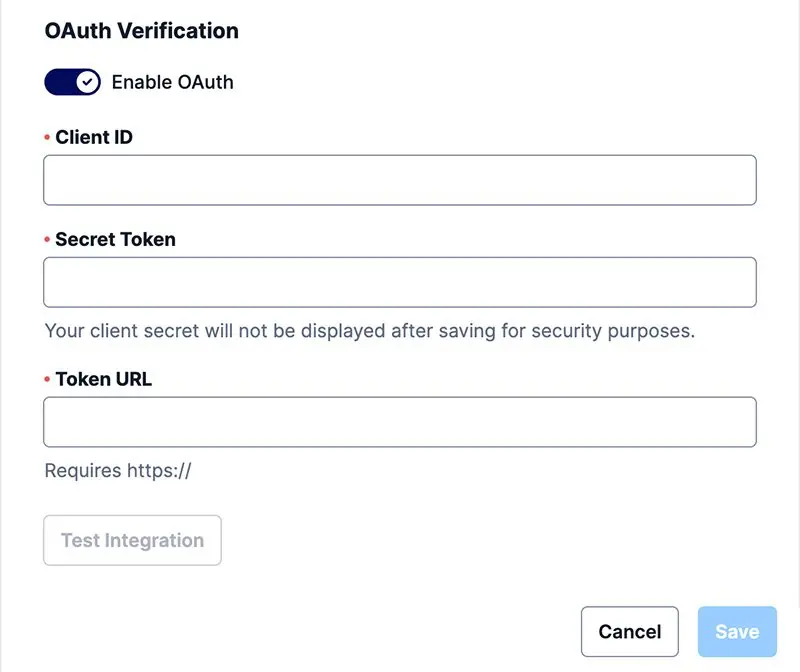
- Fill the OAuth configuration fields:
- Client ID: Required to generate an authorization token.
- Client Secret: Required to generate an authorization token. This secret is needed only once to create an access token. SendGrid will store this secret, allowing you to update your Client ID and Token URL without passing the secret to SendGrid again.
- Token URL: The URL where Twilio SendGrid should deliver the Client ID and Client Secret in order to create an access token. This URL should route to your own authorization server or an OAuth service such as Okta.
- With the above steps completed, requests to your Post URL by Twilio SendGrid will contain the access token in an Authorization header. You can now use this token to verify the requests using your OAuth service or authorization server.
Info
It is your responsibility to verify the access token used in requests to your
HTTP POST URL.
To disable OAuth 2.0:
- Edit the Webhook by following the "Edit an Event Webhook" instructions in the Twilio SendGrid Event Webhook Overview documentation.
- When OAuth is enabled, the Webhook's configuration dialog will show a toggle with Enable OAuth as enabled (blue).
- Toggle Enable OAuth to disable the feature (gray).
- Click Save.
- The requests to your HTTP
POSTURL by Twilio SendGrid will no longer contain an access token.
Twilio SendGrid lets you manage OAuth setup using the API. For more information, see the Event Webhook API reference.
Warning
Using the v2 Web API's eventnotify API call will overwrite any previously
configured Event Webhook notification settings, including OAuth 2.0. If your
OAuth 2.0 settings are overwritten, please configure them again using either
the Mail Settings page or
the SendGrid v3
API
Once you have established an OAuth Access Token per the above directions, SendGrid will cache that token so that it can be used in any further webhook requests without each time requesting that token again from your OAuth service.
Upon receiving a webhook request with an invalid or expired token, your webhook needs to return a status code of 4xx (typically 400, 401 or 403) and the body payload must contain one of the following strings:
"invalid_request", "invalid_token", "insufficient_scope".
More specifically, SendGrid follows RFC 6750, which defines the error codes as follows:
invalid_request
The request is missing a required parameter, includes an
unsupported parameter or parameter value, repeats the same
parameter, uses more than one method for including an access
token, or is otherwise malformed. The resource server SHOULD
respond with the HTTP 400 (Bad Request) status code.
invalid_token
The access token provided is expired, revoked, malformed, or
invalid for other reasons. The resource SHOULD respond with
the HTTP 401 (Unauthorized) status code.
insufficient_scope
The request requires higher privileges than provided by the
access token. The resource server SHOULD respond with the HTTP
403 (Forbidden) status code.
Upon receiving any of these error codes from your webhook, SendGrid will request a new OAuth token from your OAuth service and retry the webhook.
Now that you know how to secure the Event Webhook, you can begin using your event data to better understand your email. See the Event Webhook Reference for more information about the data it provides.