Develop IoT Applications for Microvisor
Microvisor Public Beta
Microvisor is in a pre-release phase and the information contained in this document is subject to change. Some features referenced below may not be fully available until Microvisor's General Availability (GA) release.
Microvisor works constantly to keep your IoT product safe from attacks. At the same time, it delivers advanced device and platform services to your application. But how do Microvisor and your code operate efficiently alongside each other on the same silicon? How are the host microcontroller's resources shared between them efficiently to ensure that Microvisor is able to protect the device while your code is simultaneously delivering your IoT product's functionality?
This overview will help you understand how your application code fits into Microvisor's architectural framework, and how your application and Microvisor interact. It will show you how Microvisor delivers an array of security measures without limiting the capabilities of your application code and the hardware it is built into.
Microvisor is currently in the early stages of its development, so you will not be able to build an application that closely integrates with it just yet. But the good news is that with this overview, you will quickly learn how you will soon be able to do so. In fact, you may find that it's not necessary to do so: almost any existing application can be ported to Microvisor's target microcontroller with minimal effort and will still benefit from Microvisor's security and service delivery.
To create a microcontroller-based embedded device, you typically develop an application that will run on the MCU's "bare metal". You may choose to build your application on top of a real-time operating system (RTOS) that provides advanced services such as threaded execution and multitasking. All of the device's functionality is enabled by these components, which may be home-grown, licensed third-party technology, or a mixture of the two.
And this is just how IoT product development continues to work in the Microvisor universe. You create the same application and use the same RTOS, but they now operate alongside and in partnership with Microvisor, rather than in isolation. Microvisor delivers to them a core set of features, some of which may be accessed directly by your application, and others operate independently but in support of your application:
- Secure boot and initialization.
- Over-the-air (OTA) updates for the application.
- A network software stack*.
- A full security stack*.
- Remote diagnostics and device management.
*If your application or RTOS does not provide one of its own
These features are available even if your application was not created with Microvisor in mind. It's entirely feasible for you to write an application that will run on a Microvisor-enabled microcontroller but never interact directly with Microvisor. Apart from minor latency brought to certain code flows by Microvisor's necessary interrupt prioritization, and access to certain MCU peripherals, neither the application nor its RTOS need not even be aware that they're running alongside Microvisor.
Microvisor is initially integrated into the STMicro STM32U585 microcontroller, a new MCU that supports the ARMv8-M architecture's TrustZone technology. TrustZone establishes two separate operating domains: the 'trusted' Secure World (SW) and the 'untrusted' Non-secure World (NSW). Microvisor operates within the privileged Secure World; the application in the Non-secure World. TrustZone keeps these two domains completely separate: each has its own Memory Protection Unit (MPU), Nested Vector Interrupt Controller (NVIC), and Direct Memory Access (DMA) controller.
Info
Although the applications is considered to be untrusted, this does not imply that it is implicitly insecure, just that it operates in a zone of restricted privileges.
This diagram shows how Microvisor and your application sit alongside each other on the same microcontroller:

Despite this deep separation, TrustZone nonetheless enables communication between the two worlds. Specifically, it allows the secure side — Microvisor — to make a set of functions available to non-secure code — the application. These Non-Secure Callable (NSC) functions are placed in a specially reserved area of memory and are the only way that application code can access guarded functionality. The NSC functions provided by the Microvisor are called the Microvisor System Calls. When the application needs to communicate with the Microvisor to request a protected operation, it calls one of these functions. For asynchronous tasks, Microvisor defines an interrupt-based notification system that the application can use so that it will be informed when requested actions have completed.
The STM32U585 MCU contains 2MB of internal flash. This is partitioned by Microvisor during the boot sequence as follows: the upper 1MB are reserved for Microvisor and the remaining 1MB are provided for the application.
The MCU's TrustZone engine virtualizes these spaces' memory maps, mapping the lower 1MB to the Non-Secure World address range of 0x08000000 to 0x080FFFFF. The space above this is inaccessible to the application. In practice, this means that the application has access to the same flash addresses, minus the top 1MB, that it would expect if it were running on an ordinary STM32U5.
Microvisor owns the MCU's BKPSRAM (2KB) and the top half (256KB) of SRAM3 (512KB total). The lower 256KB of SRAM3, and all of SRAM1 (192KB), SRAM2 (64KB), and SRAM4 (16KB), is available to the application.
The STM32U585 contains an NVIC overseeing each of the two TrustZone domains. This means that your application and its RTOS don't require any modification to work with the Microvisor: their interrupt service routines (ISRs) will be just the same as they would be if they were running in a non-Microvisor context.
Interrupts raised by an application-controlled peripheral such as a UART will be decoded, prioritized, and executed just as they would in a system without Microvisor. Your code is not permitted to use Microvisor System Calls from its interrupt handlers, so no Microvisor code is run in an application interrupt path.
However, Microvisor must be able to prevent bugs in the application, or compromised code, from rendering the device unrecoverable. Consequently, some Microvisor interrupts, listed below, have to take priority over application interrupts. To ensure that time-critical application operations are not impeded, Microvisor allows the application to mark certain interrupts as high priority. These will then be able to pre-empt Microvisor operation, provided that their ISRs follow strict specifications. This way, the application will always receive all the data coming in on high-speed peripheral and Microvisor can manage the execution flow.
The Microvisor's own interrupts are solely related to the upstream communications peripherals and to the Microvisor scheduler.
GTZCRTC_SRCC_SRNGTIM5OCTOSPI1LPUART1FLASH_SOTG_FS_U5
A key process which an application and its RTOS must cede to Microvisor is the boot sequence. At its most basic, this starts Microvisor, which prepares the application environment and launches your code. Typically, this will be your RTOS, which will initialize the resources it requires and then start your application.
Secure start-up is closely bound to another key Microvisor feature: secure OTA updates. So let's see how these components fit together. At this point, it's important to understand that Microvisor comprises four key components, which we'll discuss as they appear in the sequence.
- On power-up, i.e., on a cold boot, the STM32U585 jumps to the Microvisor Preboot. This exists solely to determine whether the boot sequence will follow a standard or an upgrade path. For the former, the Preboot jumps to the Microvisor Bootrom.
- The Bootrom's role is to verify the authenticity of the Microvisor Kernel. If the Kernel is good, the Bootrom's work is done: it jumps to the kernel — Microvisor proper is now running.
- Microvisor activates the STM32U585's secure hide protection (HDP) mechanism to block access to the Preboot and Bootrom storage area completely from executing code.
- Microvisor initializes the microcontroller's clocks and takes ownership of its reserved peripherals.
- Microvisor clears the memory allocated to the application code and then starts the application. Microvisor divides the internal flash into secure (1MB) and non-secure (1MB) areas (see above) and then branches to the non-secure software: the application and its RTOS. From this point on, the device is essentially in the application's hands.

What about the check in the verification phase? What happens if the Microvisor image fails verification? In this extremely unlikely case, which would only be seen if a hardware failure has occurred or a third-party has tampered with the installed Microvisor, the Bootrom will not proceed any further. The device cannot connect to the network and is effectively locked down. Potentially compromised code will not be run.
As we've seen, Microvisor's approach to interrupt management, memory allocation, device access, and networking oversight has been designed to allow you to port existing applications and foundation RTOS code with minimal effort. However, some changes will be required if your existing code and its setup routines touch upon Microvisor's areas of responsibility. If they don't you may not need to make any changes at all.
Because Microvisor initializes and starts the system clocks, the application's setup code will likely need to be changed. You may even be able to remove it altogether.
The application is not permitted to initiate a system reset directly. Instead, it must request a reset by making a Microvisor System Call. Again, if your application issues resets, it will need to be modified to do so through Microvisor. It will receive an error code if Microvisor is not able to issue a reset immediately — it may need to finish writing an application update to secure storage first.
Similarly, to initiate and switch between low-power states, the application must now request this behavior from Microvisor. It cannot trigger these state changes itself, and attempts to do so will be blocked.
If the application is going to connect to the Internet through a Microvisor virtual network interface, its connection instantiation and teardown code will require modification. However, these changes are likely to be small: you will change the target network interface through which the application connects.
In principle, you can use whatever language and toolchain you prefer to create applications which will work alongside Microvisor. Depending on the nature of your application, it may not need to communicate with Microvisor. It will still benefit from the functionality Microvisor provides, albeit indirectly. You can write your app, compile it for the ARM-v8 microarchitecture, and transfer it to development and production devices remotely.
In practice, however, your application may need to interact with Microvisor and to do so it will need to be able to make Microvisor System Calls. These are C functions which you will declare in your application using a standard C header file. Other embedded-centric languages may be supported in future too.
We also provide an SDK for Microvisor development.
Applications communicate with Microvisor through the Microvisor System Calls. Interaction with Microvisor is transactional: the application requests a specified action and, where required, configures the operation it would like Microvisor to perform on its behalf.
As such, the System Calls are designed for asynchronous operation and therefore use a notification mechanism to inform the application when requested tasks have been completed. Not all System Calls initiate actions — some request values. However, none of these calls return the requested value but write back the requested information at a memory location specified in the call. The System Calls themselves return immediately with either zero to indicate success, or an error value to indicate that the request could not be made and to express why. The application is then interrupted (non-secure) to signal that a notification has been posted.
The data store to which Microvisor writes notifications is always managed by the application. Microvisor treats such buffers as circular: if its write pointer moves beyond the end of a buffer, Microvisor immediately targets the buffer's first byte and continues writing from there. Microvisor notifications of a given type are always of the same size, and all notification types have the same basic data structure.
Similarly, all buffers used for external data transfer — for example, network RX and TX buffers — are maintained by the application, and Microvisor accesses them as required.
The Microvisor STM32U585 SDK comprises a number of components that are contained in a small set of public GitHub repositories. Some of these repos include others as submodules. The core components are:
- The Microvisor SDK — This incorporates:
- A header file declaring Microvisor's non-secure callable (NSC) System Calls and related data structures.
- An object file which contains the entry points for Microvisor's NSC functions.
- A linker script which maps the memory to which user applications have access.
- The Microvisor STM32U585 HAL — This provides a hardware abstraction layer that brings compatibility with ST Microelectronics' STM32CubeU5 HAL. It includes the SDK repo as a submodule.
- The Microvisor FreeRTOS Demo App — This includes FreeRTOS and a basic demo. It includes the SDK and HAL repos as submodules.
To find out more about the Microvisor SDK, please see How to Install the Microvisor SDK.
Remote debugging allows you to use your development computer to probe your application while it is running on a Microvisor-based device — and to do so across the Internet. Wherever your development device is situated, Microvisor remote debugging allows you to connect to it using the popular debugger GDB to set breakpoints, examine variables, view memory, and enumerate the call stack.
Debugging a Microvisor-enabled device remotely is functionally the same as working with the device connected directly to your development machine, and just as secure.
For more details, please see Microvisor Remote Debugging.
Microvisor provides a mechanism for delivering application log messages remotely. This feature is intentionally rudimentary. Issued log messages are not guaranteed to be received, and no claim is made as to the order in which they may be delivered. It is not expected to become the basis for a data-delivery mechanism, for example.
Application logging makes use of two System Calls: one to initiate logging, the other to post log messages. You provide a message store-and-formward buffer from which Microvisor will transmit messages to the Microvisor cloud while it is online. Messages will be added to the buff so long as there is room for them.
To view messages, you use the Twilio CLI tool and its Microvisor plugin. Messages are then relayed from the Microvisor cloud for a specified device. Messages are not retained, so you will only see those messages posted while they are being streamed to the plugin.
Compiled code is deployed to devices from the Microvisor cloud to which it its uploaded as a Microvisor application bundle. Bundles package code, data, and application metadata into a single unit. They are prepared using the Twilio CLI tool and its Microvisor plugin.
For more details, please see Applications and Bundles.
We provide a REST API which you use to manage your Microvisor applications — to upload new versions to the Microvisor cloud, for example — and to manage your Microvisor-enabled device, in particular to assign apps to those devices.
As development of Microvisor proceeds, we expect a number of functions to be made available through the Twilio CLI tool and the Twilio Console, but for the moment they are accessible only by making API calls.
Applications are represented in the API by App resources. When you upload code, you implicitly create a new App resource. This is the only way to create new App resources.
App resources are not semantically versioned and your choice how you map a specific version of your app to a specific App resource. Apps' SIDs are unique. If, for example, you update your application code from version 1.1.0 to 1.1.1, uploading the new code will generate a new App resource which you can then deploy to one or more devices.
Once an App has been created, you can retrieve its resource metadata, or delete the resource entirely.
Individual Microvisor-enabled devices are represented as in the API by Device resources. During the Microvisor Private Beta, development devices are automatically added to your Twilio account. Each one has an equivalent Device resource, generated for you.
You can use a device's Device resource to assign it a unique, friendly name, and to deploy to it an App resource. The latter centers on updating the resource with a new value for its app.target_sid property, set using the update operation's --target-app parameter.
In addition to the REST API, the Twilio Console provides a suite of App and Device management tools. These are located in the Internet of Things > Microvisor > Devices and Internet of Things > Microvisor > Application Bundles sections of the Console.
Due to the Public Beta nature of Console's Microvisor support, not all of the features or information you will see listed there as available is yet present.
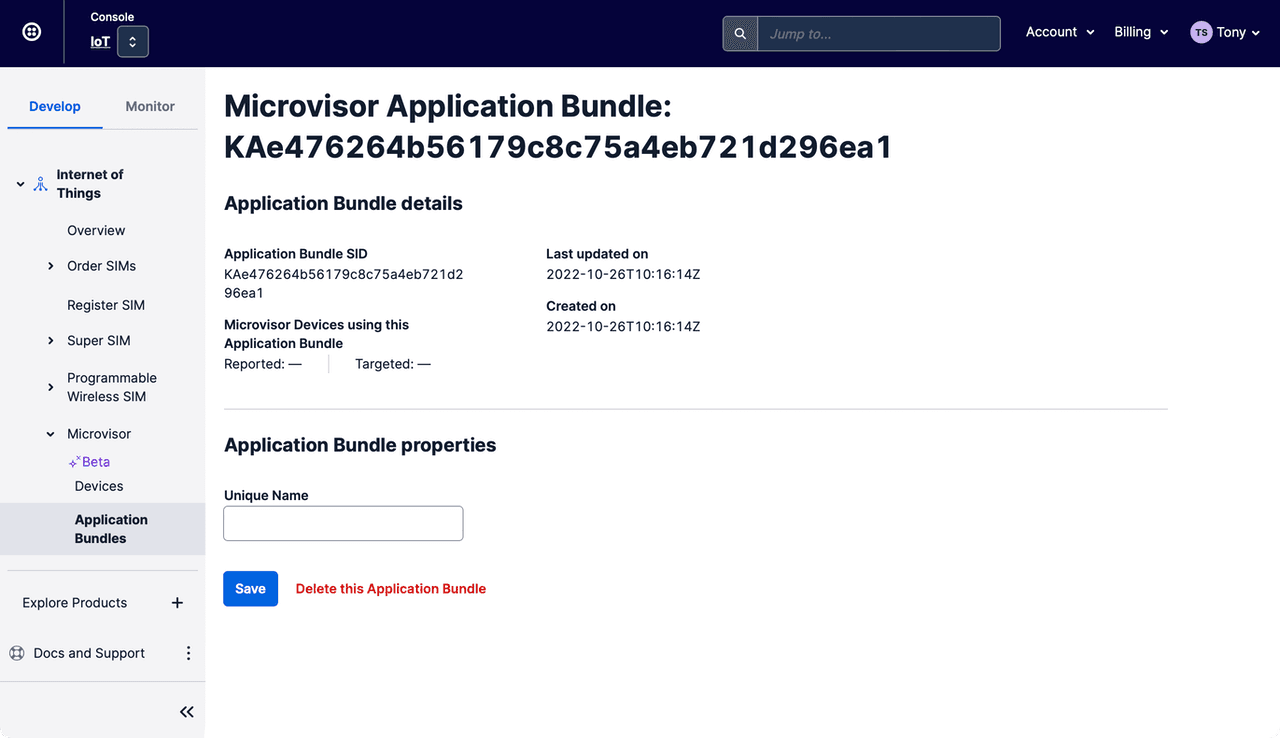
The Console's Application Bundles section provides a list of currently uploaded bundles. You can upload a locally bundled app or access the details of a specific App here.
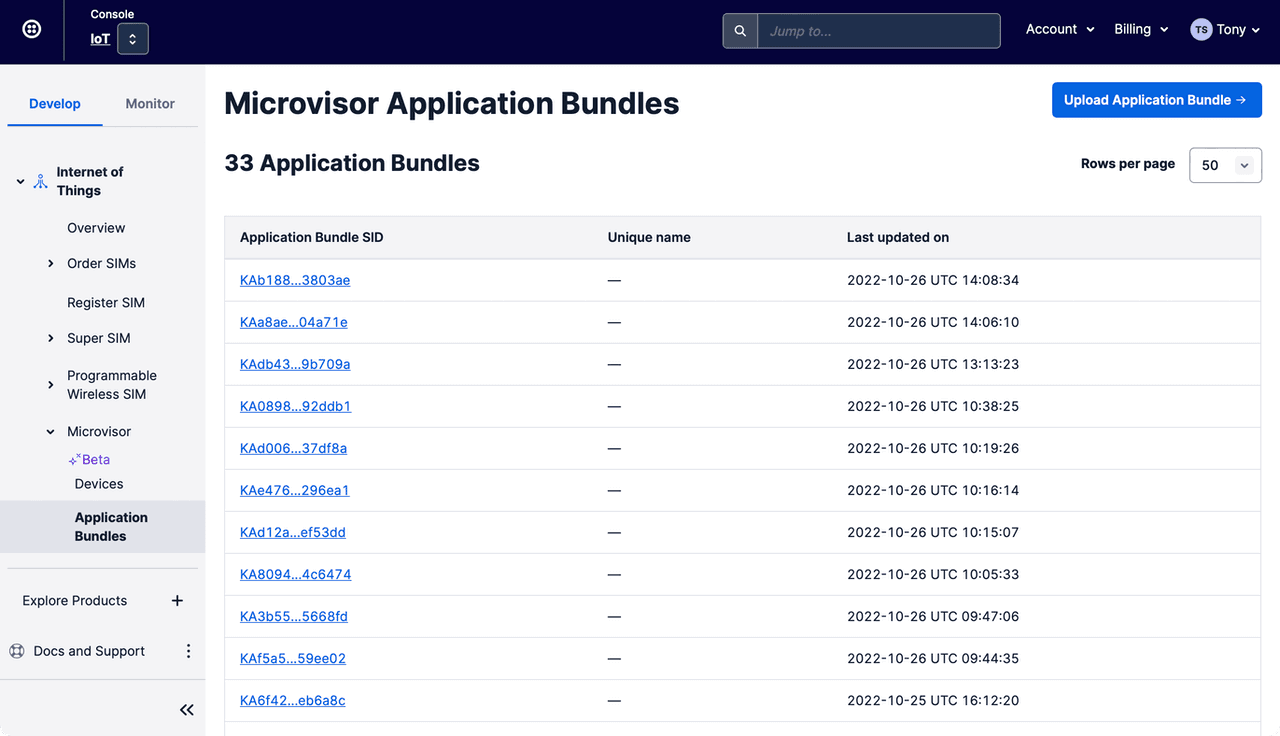
Select a specific App to view its details, set its unique, memorable name, or even delete it if it is no longer required.
The Console's Devices section lists your Microvisor-enabled devices:
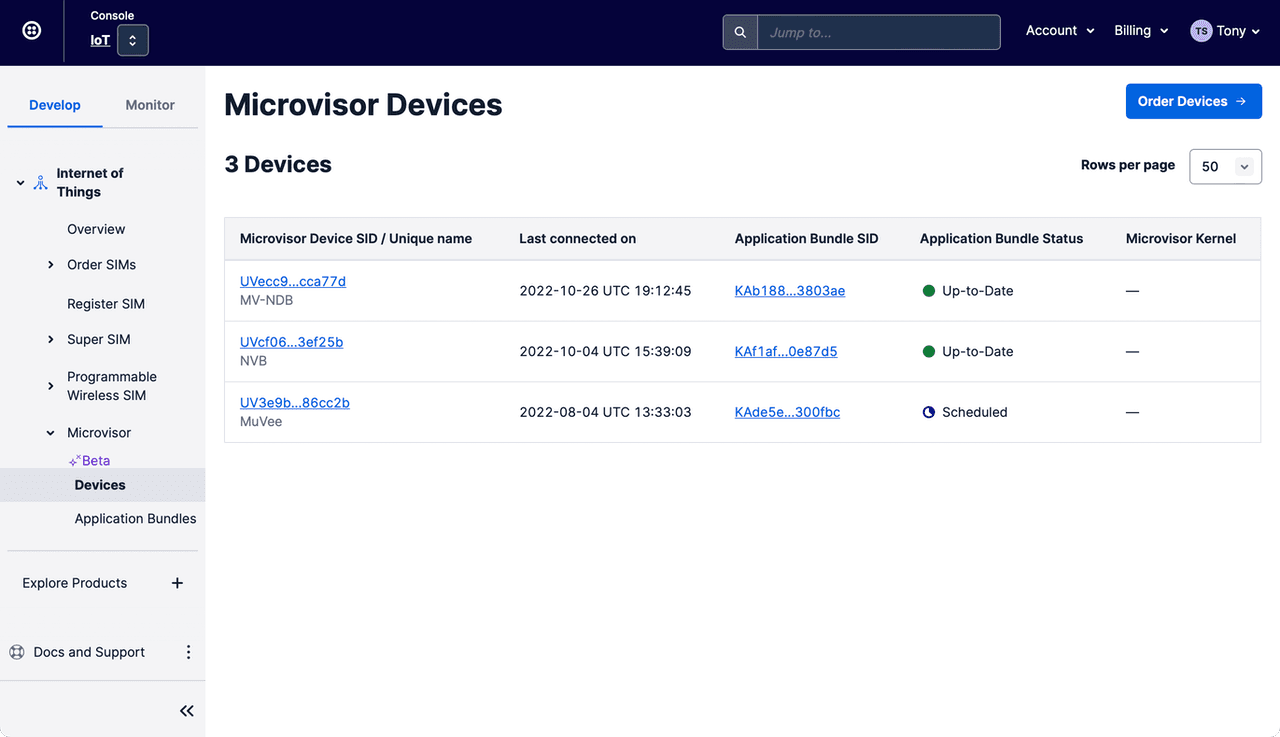
Select a specific Device to view its details, set its unique, memorable name, and deploy Apps to it:

- STMicro STM32U585 Datasheet (PDF)
- STMicro STM32U585 Reference Manual (PDF)
- STMicro STM32U585 HAL Manual (PDF)
Access to STMicro documentation may require signing in to the STMicro website.
Microvisor Help and Support
We welcome all inquiries you may have about Microvisor and its implementation, and any support questions that arise once you've begun developing with Microvisor. Please submit your queries via a KORE Wireless ticket: log in to the Kore console and click the Contact Support button in the left-hand navbar.