Notifications Framework
Flex UI provides a client-side API to manage notifications in Flex UI.
Info
The full reference for the Notification Manager and a list of standard notifications are available in the Autogenerated Flex UI Documentation.
A notification is an alert that tells the user what state change or error has occurred to a component or page when they are no longer viewing that component or page.
Users can be notified in Flex using a notification bar, browser notifications, or both.
- Register custom notifications including browser notifications
- Customize standard notifications
- Turn off standard UI notifications
- Override standard notifications per Task Channel Definition
- Customize how standard UI notifications are displayed
- Register your custom UI notifications and specify how to render them
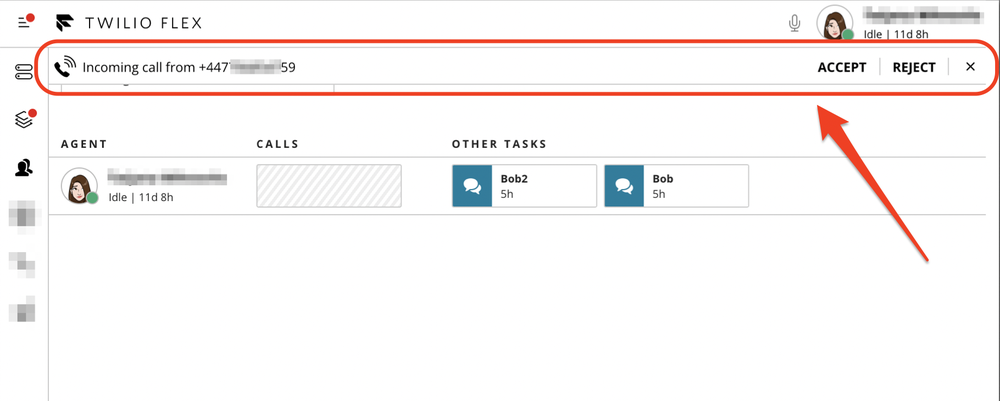
NotificationBar is an in-app way to alert user. NotificationBar has a variety of options like icon, actions, timeout. Learn more in Notification Object properties.

Flex uses the standard Browser Notification API as the basis for its browser notifications implementation. Browser notifications can be enabled in the Admin Dashboard of the Flex UI.
Browser notifications are shown if Flex is not in focus or is minimized.
Warning
Notifications in iframes
Due to security constraints across browsers, Browser Notifications are not supported when Flex is iframed within a cross-domain webpage. This includes the Salesforce and Zendesk integrations.
To start showing browser notifications, the user needs to first grant permissions. By default, Flex will request user for permissions if they are not granted or blocked.
If you want to add custom logic around requesting permissions, like request it based on some user action in the UI, then you can dispatch Notification.requestPermission() from your custom code.
A helper component NotificationBar.Action, that can be used for providing clickable action to notification definition.
_10interface NotificationBarActionProps {_10 label: React.ReactText; // Can be simple text string or a template string_10 onClick: NotificationBarActionCallback;_10 icon?: string;_10}
To display a browser notification, use the options key with a browser tag in it. The Autogenerated Documentation contains an exhaustive list of available properties. If no browser key is passed to options, Flex will not show any browser notifications.
_22Flex.Notifications.registerNotification({_22 id: "customNotification",_22 closeButton: true,_22 content: "Custom Notification",_22 timeout: 0,_22 type: NotificationType.warning,_22 actions: [_22 <NotificationBar.Action_22 onClick={(_, notification) => {_22 Flex.Notifications.dismissNotification(notification);_22 }}_22 label="Hello"_22 icon="Bell"_22 />_22 ],_22 options: {_22 browser: {_22 title: "Custom Notification",_22 body: "Hello World!"_22 }_22 }_22});
_10Flex.DefaultTaskChannels.Call.notifications.override.IncomingTask = () => {_10 Flex.Notifications.showNotification("customNotification");_10}
_10Flex.DefaultTaskChannels.Call.notifications.override.IncomingTask = (notification) => {_10 notification.content: "Hello, world!";_10};
_10Flex.DefaultTaskChannels.Call.notifications.override.NewChatMessage = (notification) => {_10 notification.content = "Hello, world!";_10};
_10MainContainer.defaultProps.showNotificationBar = false;
_10Notifications.registeredNotifications.delete("notification_id");
_10const notification = Notifications.registeredNotifications.get("notificationId");_10notification.content = "Display some text";
_10manager.strings.myNotification = "Current time: {{time}}"_10const notification = Notifications.registeredNotifications.get("notificationId");_10notification.content = "myNotification";_10Notifications.showNotification("notificationId", {time: Date.now()})
Read more about templates in Localization and UI templating
_10const notification = Notifications.registeredNotifications.get("notificationId");_10notification.content = <MyAwesomePopup/>;
_10const notification = Notifications.registeredNotifications.get("PendingReservationsOnActivityStateChange");_10notification.content = "Some text to display";_10notification.backgroundColor = "blue";_10notification.closeButton = false;
_10Notifications.registerNotification({_10id: "myNotificationId",_10content: "Custom content", // string_10type: NotificationType.error_10});
_10Notifications.registerNotification({_10id: "myNotificationId",_10content: "NotificationMessage", // template_10type: NotificationType.error_10});
Read more about templates in Localization and UI templating
_25interface CustomNotificationProps extends NotificationContentProps {_25 customProp?: string;_25 notificationContext?: any;_25}_25_25export class CustomNotificationElement extends React.Component<CustomNotificationProps, undefined> {_25 render() {_25 const { customProp, notificationContext } = this.props;_25 return(_25 <div>_25 {notificationContext.message}_25 <div />_25 {customProp}_25 </div>_25 );_25 }_25}_25_25_25Notifications.registerNotification({_25 id: "myNotificationId",_25 content: <CustomNotificationElement customProp="custom prop" />,_25 type: NotificationType.error_25 } _25);
_10Notifications.showNotification("myNotificationId", null);
_10Notifications.showNotification("myNotificationId", { message: "custom context" } );
_10import * as Flex from "@twilio/flex-ui";_10_10Flex.Notifications.addListener("beforeAddNotification", (payload) => {_10 console.log("<---beforeTransferTask Listener--->", payload);_10});