Google Dialogflow CX integration in Flex for virtual agents
Public Beta
This feature is currently available as a Public Beta product and information contained in this document is subject to change. This means that some of the features are not yet implemented and others may be changed before the product is declared as Generally Available. Public Beta products are not covered by a Twilio SLA.
Not a HIPAA Eligible Service
Virtual Agent for the Conversations channel is not a HIPAA Eligible Service and should not be used in Conversation or Flex workflows that are subject to HIPAA.
This guide outlines the native integration of Google Dialogflow CX with Flex. It uses the Twilio one-click integration for Google Dialogflow CX. With this integration, you can:
- Hand off Virtual Agent calls and conversations to agents in Flex.
- View call transcripts and message history between Virtual Agents and customers.
- Pass relevant information from the Virtual Agent to Flex for routing.
The supported Conversations channels are SMS, Webchat 3.x.x, WhatsApp, and Facebook Messenger.
-
For the Voice channel, an active Flex account with Flex UI 2.2.0 or later. For supported Conversations channels, an active Twilio account with Flex UI 2.5.0 or later.
-
For the Voice channel, Native Dialpad configured on your Flex application.
-
Completion of the Dialogflow CX Onboarding guide. To ensure that the Virtual Agent transcripts are captured accurately, enable interaction logging in the Logging Settings of the Google Dialogflow CX Console.

Warning
This feature is only available for Google Dialogflow CX and would not work as expected for Dialogflow ES.
If you would like to use the Voice channel or Conversations channels with the Connect Virtual Agent widget for Flex, contact our support team for help enabling this Beta feature.
Once the Dialogflow CX integration is complete, you can access the Connect Virtual Agent widget in Twilio Studio.
This widget connects Twilio Flex with Google's Dialogflow Virtual Agent. For an overview of transition events available for the Connect Virtual Agent widget, see Connect Virtual Agent for Flex (Public Beta).
Sensitive Data (PII and PHI)
Please do not include Sensitive Data (PII and PHI) as part of the Virtual Agent to ensure appropriate handling of the data in our systems.
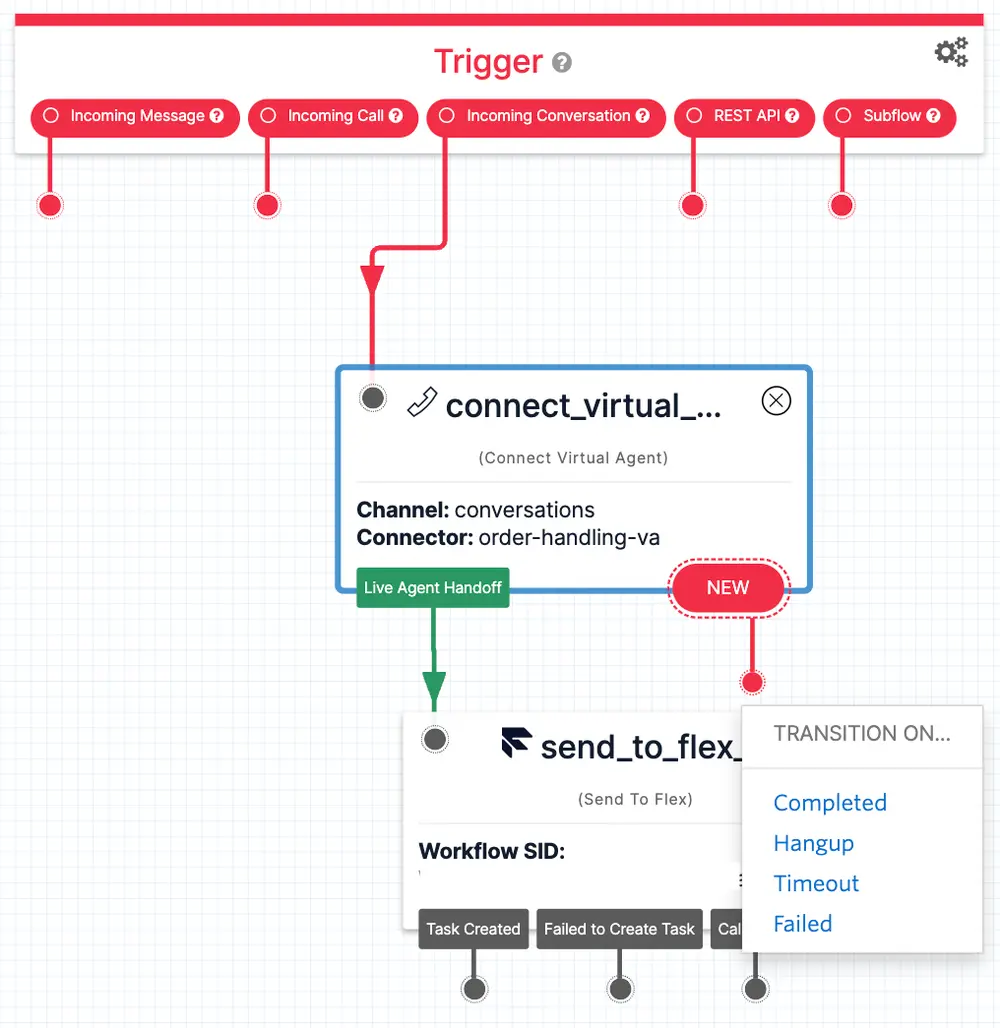
For agents in Flex to handle calls or conversations from the Virtual Agent, the Connect Virtual Agent widget needs to link to the Send to Flex widget using the Live Agent Handoff transition.
Follow these steps to integrate Flex with Google Dialogflow CX:
From the Google Dialogflow Console, ensure that the live agent handoff fulfillment is triggered by the Virtual Agent from the required flows to initiate the transition within Twilio Studio. This is the first step to ensure seamless routing of an ongoing call or conversation to an agent in Flex. For more details, check out Google's live agent handoff docs.
Info
In the Live agent handoff fulfillment section of the Google Dialogflow Console, it's not mandatory to enter a JSON object to ensure that the call is routed to Flex. In a later section, we'll look at how we share additional data from the virtual agent to Flex.
If the Virtual Agent is not able to fulfill the call or answer the conversation, Dialogflow CX allows you to escalate it to a live human agent.
If Google's Dialogflow CX Virtual Agent returns a live agent handoff response, it indicates that the call or conversation needs to be escalated to a human agent:
- If you are using Twilio Studio's Connect Virtual Agent widget, the Live Agent Handoff transition state is triggered.
- If you are using TwiML, the VirtualAgentStatus field in the request to your action URL is set to
live-agent-handoff.
Warning
If you are using the <Virtual Agent> TwiML noun for integrating with Flex instead of the Studio-based configurations, the Transcripts on the Flex UI would not be available.
Next, associate the Live Agent Handoff transition on the Connect Virtual Agent widget with the Send to Flex widget.
In the Send To Flex widget config, you need to select the appropriate workflow on the appropriate Task Channel to route conversations. For Voice, select Voice as the Task Channel to route calls. For Conversations channels, select your messaging channel, such as Webchat or SMS, as the Task Channel to route incoming messages.
In the Attributes field, specify an attribute to send to Flex. For example, you could use the VirtualAgentProviderData from the Connect Virtual Agent widget as follows:
{"escalation_type": "{{widgets.<connect_virtual_agent_widget-name>.VirtualAgentProviderData}}" }
This ensures that the transition for Live Agent Handoff is used to create a task and route it to an appropriate agent in Flex.
If you're using a Voice channel, see the Dialogflow CX Onboarding Guide to connect your phone number to the Studio flow that you created.
If you're using a Conversations channel, you need to connect your Conversations channel to the relevant Studio flow:
- In Twilio Console, from the Develop sidebar, select Flex > Channel management > Messaging.
- From the Conversations Addresses tab, select your address type from the Filter by Address type list. If you need to add a new Conversations address, see Overview of Address Management to configure a new address.
- Click the pencil icon next to the address to edit it.
- Under Flex integration, from the Studio Flow list, select the Studio flow that you created earlier when integrating with Dialogflow CX.
- Click Update Address.
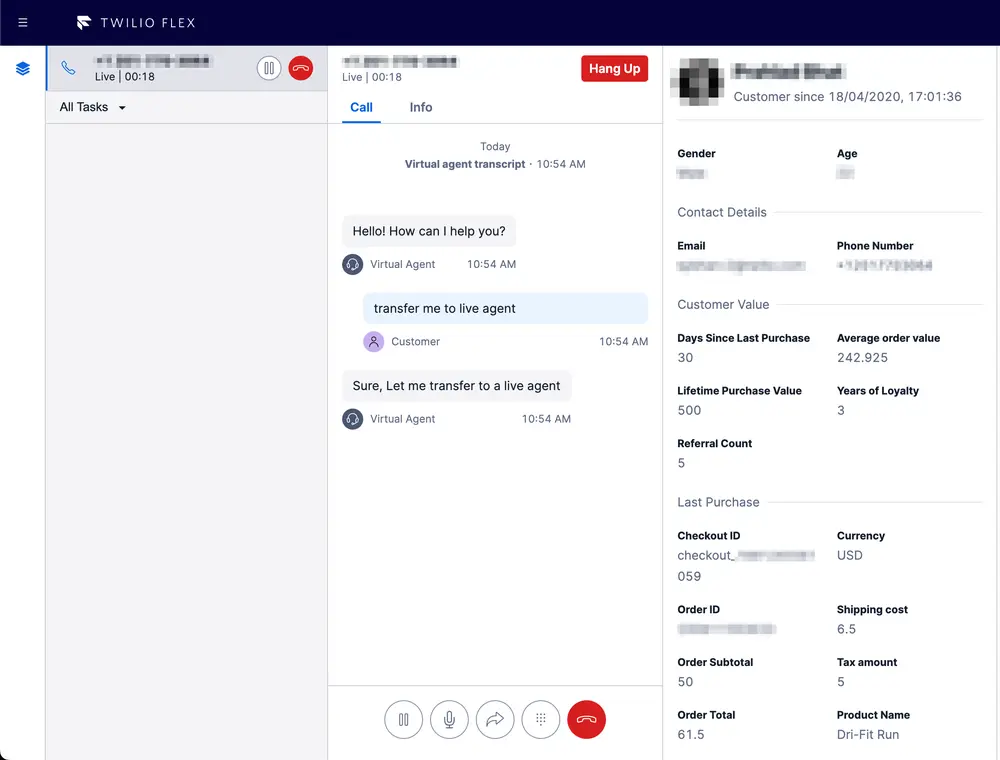
Once you complete the setup steps, Virtual Agent calls or conversations that are escalated to Flex also include call transcripts or message history. With this information, the agent is better equipped to help the customer, and the agent won't need to request information that's already been provided.
The call transcript or message history is only available for the portion of the call or conversation where the Dialogflow CX Virtual Agent is interacting with the customer. The transcript messages show both the Virtual Agent's responses and the customer's responses.
To send additional information from Dialogflow CX Virtual Agent during the Live Agent handoff process, you can use the optional data section of the Dialogflow Live agent handoff fulfillment.
The data shared at the fulfillment step is available as part of the VirtualAgentProviderData variable of the Connect Virtual Agent widget. Refer to Connect Virtual Agent widget for details on the other variables you can use. You can use these variables to populate the task attributes in the Send to Flex widget. They can be useful to route the incoming task accordingly or route to different workflows from Studio itself.
The above options allow for a lot of flexibility in terms of intelligent call and conversation routing that leverages the context provided by the Dialogflow CX Virtual Agent.