Configure Okta IdP with Flex
To set up Okta as your identity provider (IdP) for Flex, you need to create a SAML 2.0 integration in Okta and then configure Flex with those credentials.
Info
If you need to create a new Okta account to integrate with Flex, make sure you sign up for Okta's Workforce Identity Cloud.
Tip: If you can't finish your setup in one sitting, continue by navigating back to Applications > Applications in the Okta Admin Console and selecting your active application.
- Follow Okta's documentation to create a SAML app integration.
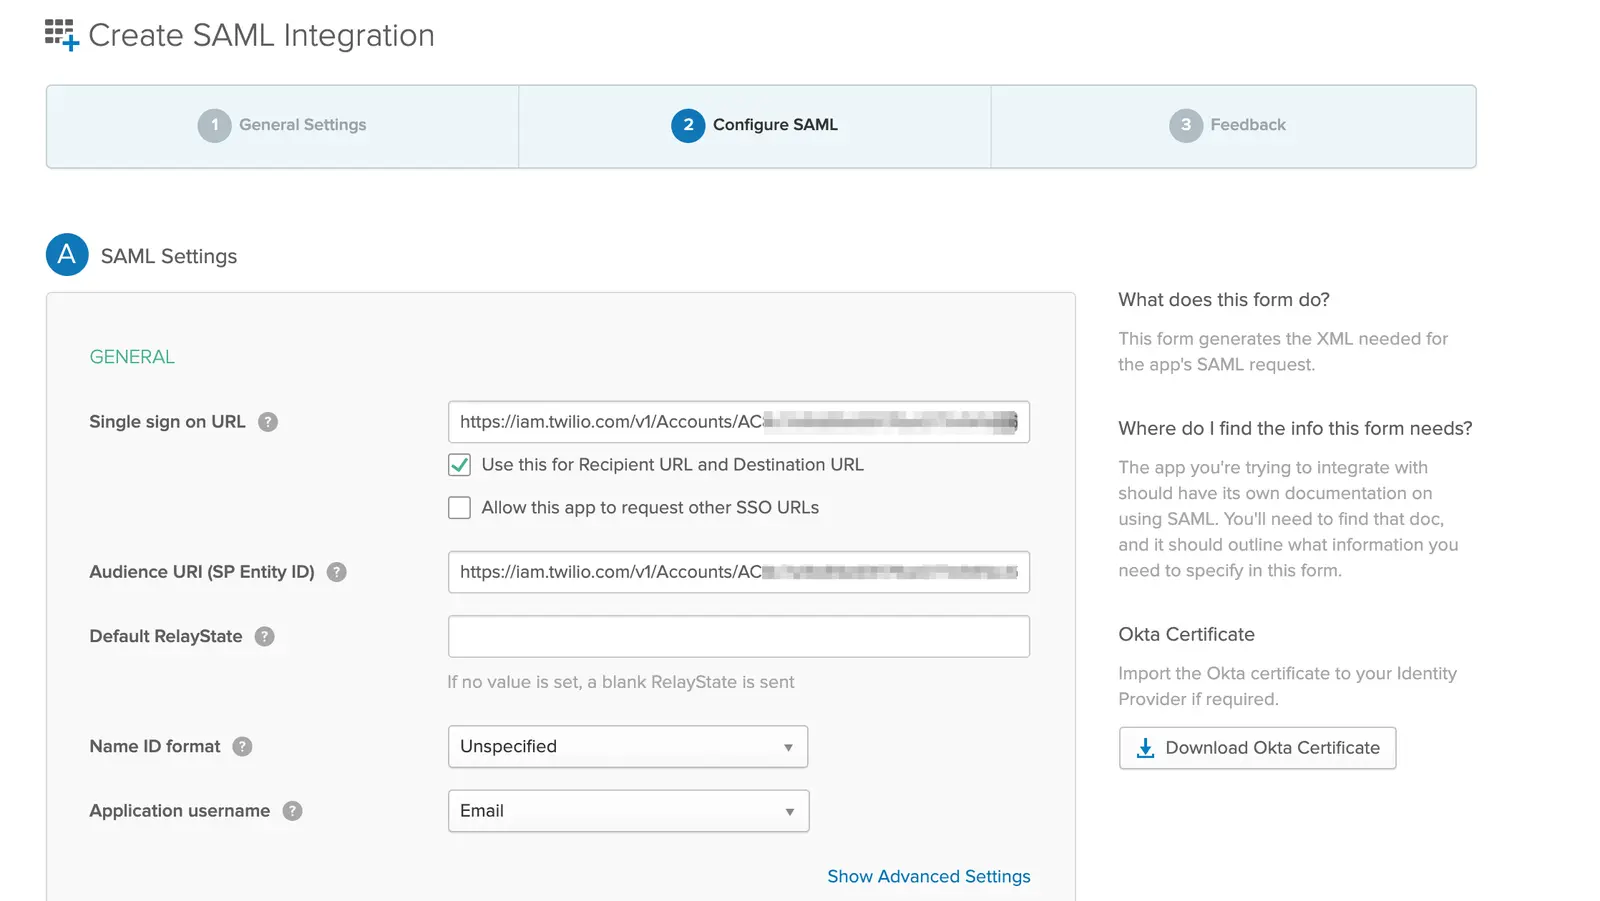
- On the Create SAML Integration page, enter the following general settings. Make sure to click Show Advanced Settings to access all the fields:
| General and advanced settings | Values |
|---|---|
| Single sign on URL | Enhanced SSO configuration: Copy this value from the Set up your identity provider page, which provides the specific value for your account. Your value will look similar to this: https://login.flex.us1.twilio.com/login/callback?connection=JQxxxxLegacy SSO configuration: Replace ACxxxx with your real Twilio Account SID. https://iam.twilio.com/v1/Accounts/ACxxxx/saml2 |
| Audience URI (SP Entity ID) | Enhanced SSO configuration: Copy this value from the Set up your identity provider page, which provides the specific value for your account. Your value will look similar to this: urn:flex:JQxxxxLegacy SSO configuration: Replace ACxxxx with your real Twilio Account SID. https://iam.twilio.com/v1/Accounts/ACxxxx/saml2/metadata |
| Default RelayState | Leave blank. |
| Name ID format | Leave Unspecified selected, unless you are working with a specific format. |
| Application username | This can be an email, Okta username, or another unique name. |
| Response | Click Show Advanced Settings and make sure Signed is selected. |
| Assertion Signature | Click Show Advanced Settings and make sure Signed is selected. |
| Signature Algorithm, Digest Algorithm | Leave the default selections. |
| Assertion Encryption | Select Unencrypted. Twilio doesn't support encryption. |
| Assertion Inline Hook, Authentication context class, Honor Force Authentication, SAML Issuer ID | Leave the default selections. |
Claims are key-value pairs that the identity provider asserts are true to the application. Flex uses these to determine the critical information about each Flex User.
Warning
All the information the identity provider supplies to Twilio is stored inside Twilio TaskRouter Worker Attributes. Consider local regulations for storing data and only provide data relevant for Flex usage. Learn more about Twilio's Privacy policy.
- In Okta, in the Attribute Statements section, add the following required claims. The values shown in the table below are only examples. Replace placeholders with values specific to your Okta implementation. Make sure the Okta user attribute you are using for the Flex roles is also populated.
| Name | Name format | Value |
|---|---|---|
| full_name | Basic | String.join(" ", user.firstName, user.lastName) OR ${user.firstName} ${user.lastName} |
| roles | Basic | user.userType |
| Basic | user.email |
You can optionally add the following attribute:
| Name | Name format | Value |
|---|---|---|
| image_url | URI Reference | user.profileUrl |
For a list of mandatory attributes and example values, see Configuring SSO and IdP in Flex.
With the setup described above, Okta passes the following attributes to Flex:
- full_name
- image_url (for use in the agent avatar)
- roles
Preview the SAML assertion generated and validate your SAML settings. In this example, the ACL URL and entity ID values are shown using the placeholders https://ACS_URL and https://entity_ID, respectively.
1<?xml version="1.0" encoding="UTF-8"?>2<saml2:Assertion ID="id5838987467318981535749982" IssueInstant="2021-08-26T15:19:53.544Z" Version="2.0"3xmlns:saml2="urn:oasis:names:tc:SAML:2.0:assertion">4<saml2:Issuer Format="urn:oasis:names:tc:SAML:2.0:nameid-format:entity">http://www.okta.com/Issuer</saml2:Issuer>5<saml2:Subject>6<saml2:NameID Format="urn:oasis:names:tc:SAML:1.1:nameid-format:unspecified">userName</saml2:NameID>7<saml2:SubjectConfirmation Method="urn:oasis:names:tc:SAML:2.0:cm:bearer">8<saml2:SubjectConfirmationData NotOnOrAfter="2021-08-26T15:24:53.549Z" Recipient="https://ACS_URL"/>9</saml2:SubjectConfirmation>10</saml2:Subject>11<saml2:Conditions NotBefore="2021-08-26T15:14:53.549Z" NotOnOrAfter="2021-08-26T15:24:53.549Z">12<saml2:AudienceRestriction>13<saml2:Audience>https://entity_ID</saml2:Audience>14</saml2:AudienceRestriction>15</saml2:Conditions>16<saml2:AuthnStatement AuthnInstant="2021-08-26T15:19:53.544Z">17<saml2:AuthnContext>18<saml2:AuthnContextClassRef>urn:oasis:names:tc:SAML:2.0:ac:classes:PasswordProtectedTransport</saml2:AuthnContextClassRef>19</saml2:AuthnContext>20</saml2:AuthnStatement>21<saml2:AttributeStatement>22<saml2:Attribute Name="roles" NameFormat="urn:oasis:names:tc:SAML:2.0:attrname-format:basic">23<saml2:AttributeValue24xmlns:xs="http://www.w3.org/2001/XMLSchema"25xmlns:xsi="http://www.w3.org/2001/XMLSchema-instance" xsi:type="xs:string">user.userType26</saml2:AttributeValue>27</saml2:Attribute>28<saml2:Attribute Name="email" NameFormat="urn:oasis:names:tc:SAML:2.0:attrname-format:basic">29<saml2:AttributeValue30xmlns:xs="http://www.w3.org/2001/XMLSchema"31xmlns:xsi="http://www.w3.org/2001/XMLSchema-instance" xsi:type="xs:string">user.email32</saml2:AttributeValue>33</saml2:Attribute>34<saml2:Attribute Name="image_url" NameFormat="urn:oasis:names:tc:SAML:2.0:attrname-format:uri">35<saml2:AttributeValue36xmlns:xs="http://www.w3.org/2001/XMLSchema"37xmlns:xsi="http://www.w3.org/2001/XMLSchema-instance" xsi:type="xs:string">user.profileUrl38</saml2:AttributeValue>39</saml2:Attribute>40<saml2:Attribute Name="full_name" NameFormat="urn:oasis:names:tc:SAML:2.0:attrname-format:basic">41<saml2:AttributeValue42xmlns:xs="http://www.w3.org/2001/XMLSchema"43xmlns:xsi="http://www.w3.org/2001/XMLSchema-instance" xsi:type="xs:string"/>44</saml2:Attribute>45</saml2:AttributeStatement>46</saml2:Assertion>
You need the details of your Okta application to configure Flex to use this application.
To locate your Okta application details, refer to Okta's documentation for managing signing certificates.
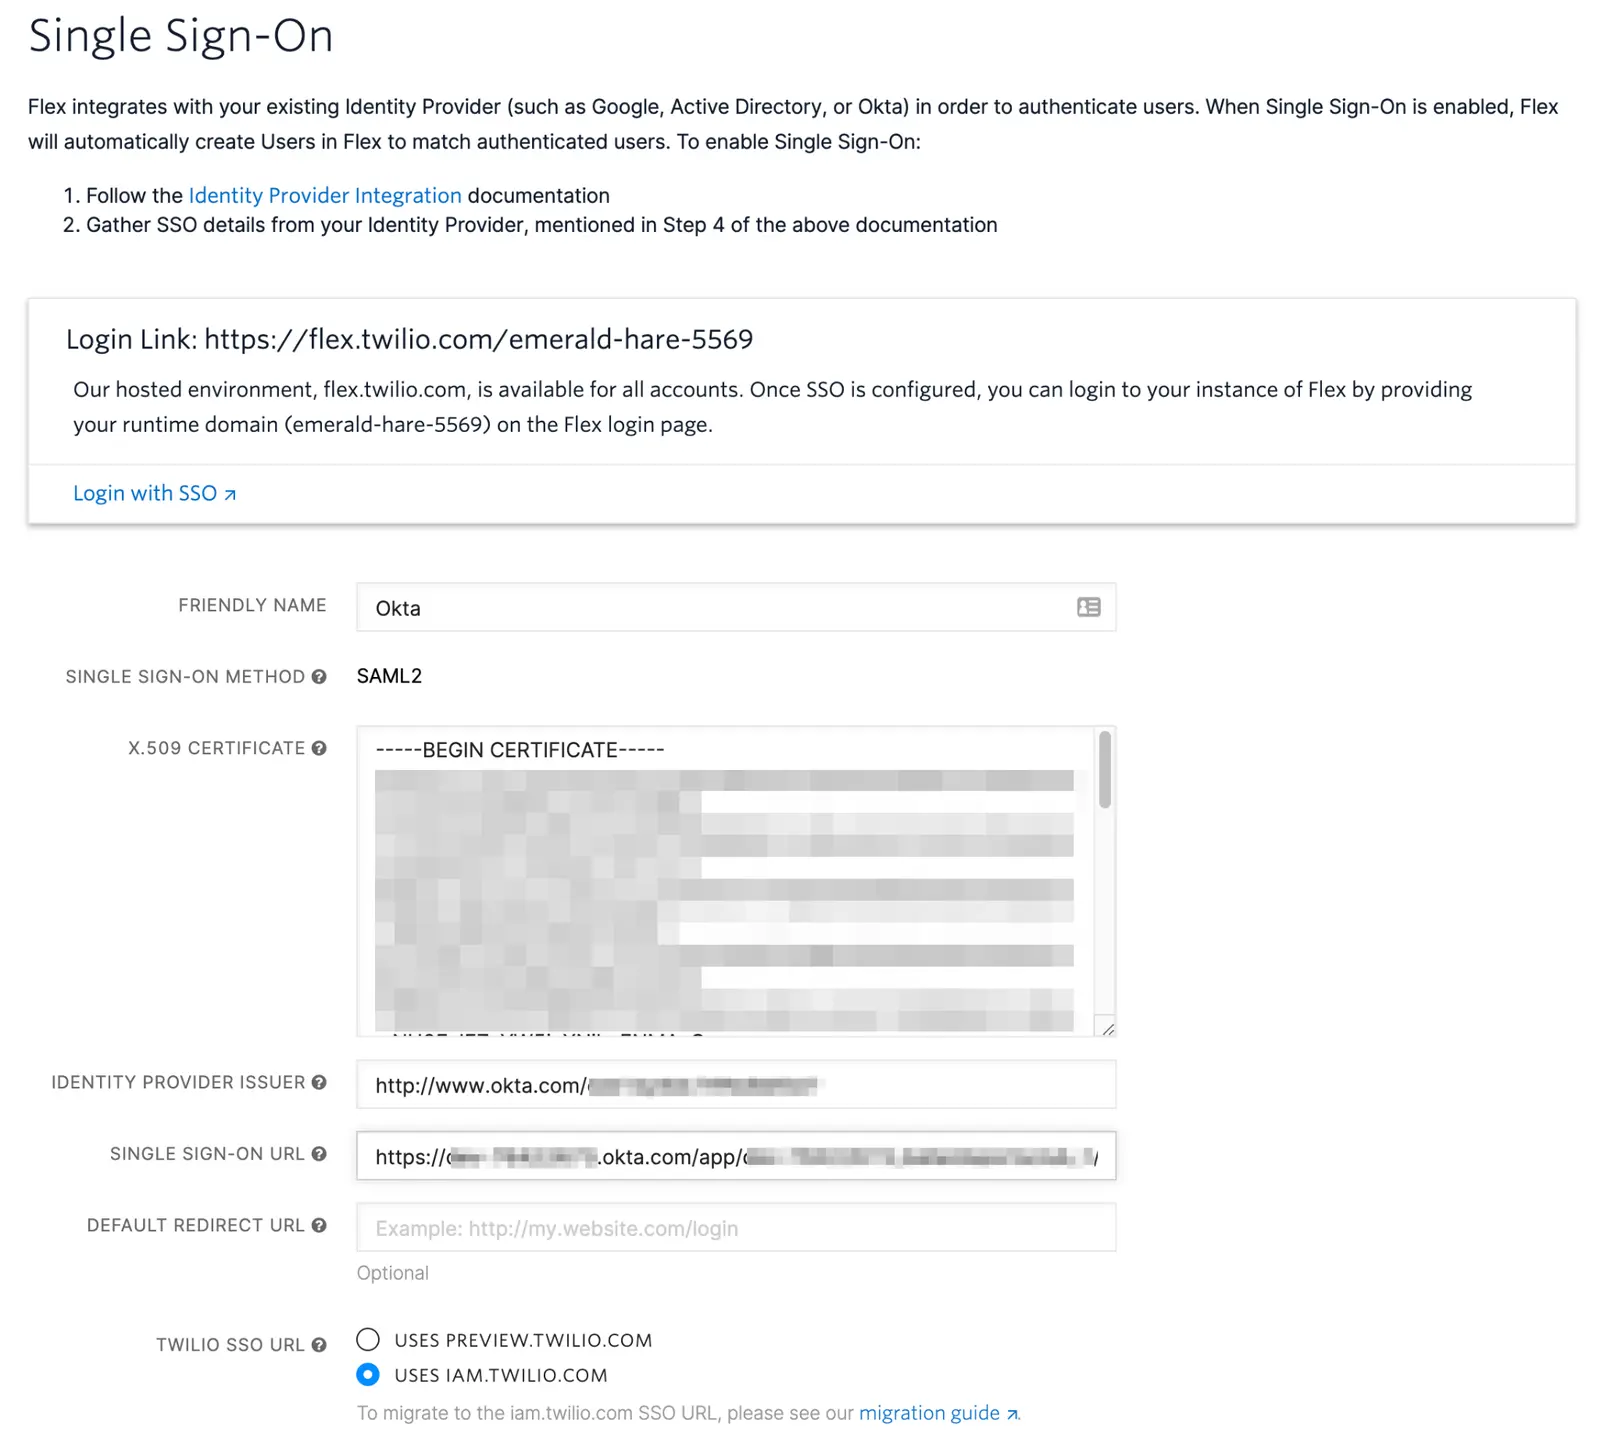
- In Twilio Console, go to Flex > Users and access > Single sign-on (SSO).
- Using the application details from the previous section, add the following information:
| Twilio SSO field | Okta field |
|---|---|
| X.509 Certificate | X.509 Certificate |
| Single Sign-on URL | Identity Provider Single Sign-On URL |
| Identity Provider Issuer | Identity Provider Issuer |
Follow Okta's documentation to add users manually, import users from an app, or import users from a CSV file.
Assign a Flex role to your Okta application users by leveraging the user attribute defined for the "roles" SAML claim.
Info
Want to learn more? See the documentation on Identity Attributes for further information about naming Attributes and other possible Worker attributes. To assign WFO roles for Flex Insights, see Flex Insights User Roles.
To assign a role:
- Navigate to Directory > People, select the user, and click the Profile tab.
- In Attributes, edit the User type attribute to specify the roles that you want to assign to your Flex user. Available Flex roles are
agent,admin, andsupervisor. To assign multiple roles, use a comma-separated list.
After you define the roles for a user, Flex updates the Worker attributes with each successful SSO authentication.
To assign users to your application in Okta, follow Okta's documentation to assign app integrations.
The message "Sorry, you can't access Twilio Flex because you are not assigned this app in Okta" can appear if a user isn't properly assigned to the Okta app you created for Flex. Revisit the steps above to add them to your application.
To test your SSO setup:
- Navigate to the Flex Console Single sign-on (SSO) page.
- Do one of the following:
- Click Login with SSO.
- Copy the login link and paste it into your browser address bar. This redirects you to the IdP login page.
- Log in using the credentials of the test user. Depending on the user settings, the IdP may ask you to set your password.
Once authentication completes, the IdP redirects you to the Flex UI. What you can see in the UI depends on the Flex roles set in the IdP user profile. - Validate the worker full name display in the Flex UI, or navigate to the Worker page in the TaskRouter Dashboard to review other attributes, like email and assigned roles.
See Configuring SSO to learn more about:
- Initiating login from your IdP
- Logging in to a self-hosted domain
- Defining attributes for each identity