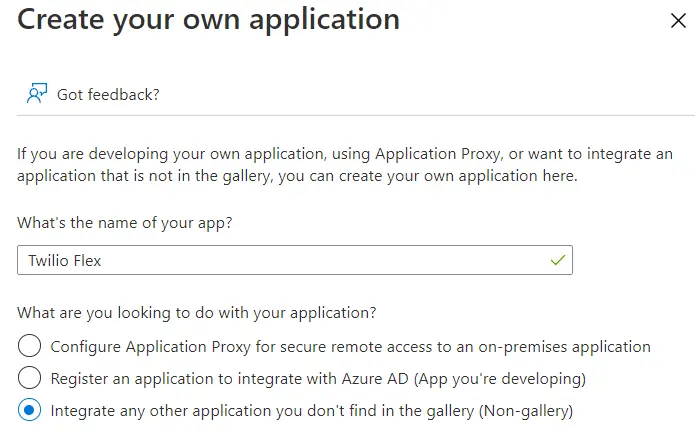
Configure Microsoft Entra ID with Flex
- Open the Microsoft Entra admin center.
- In the left navigation, click Applications, and then click Enterprise applications.
- Click New Application, and then click Create your own application.
- On the Create your own application page:
- Give your application a name.
- For the app's purpose, leave the Integrate any other application you don't find in the gallery (Non-gallery) option selected.
- Click Create.
- From your application's overview page, in the left navigation, click Single sign-on.
- For the single sign-on method, click SAML.
- In each section, click Edit, and then enter the following settings.
| SAML Section | Field | Values |
|---|---|---|
| Basic SAML Configuration | Reply URL (Assertion Consumer Service URL) | Enhanced SSO configuration: Copy this value from the Set up your identity provider page, which provides the specific value for your account. Your value will look similar to this: https://login.flex.us1.twilio.com/login/callback?connection=JQxxxxLegacy SSO configuration: Replace ACxxxx with your real Twilio Account SID. https://iam.twilio.com/v1/Accounts/ACxxxx/saml2 |
| Basic SAML Configuration | Identifier (Entity ID) | Enhanced SSO configuration: Copy this value from the Set up your identity provider page, which provides the specific value for your account. Your value will look similar to this: urn:flex:JQxxxxLegacy SSO configuration: Replace ACxxxx with your real Twilio Account SID. After adding your unique entity ID, remove Microsoft's default entry. https://iam.twilio.com/v1/Accounts/ACxxxx/saml2/metadata |
| Attributes & Claims | Twilio Flex required claims | See Configure claims section. |
| SAML Signing Certificate | Signing Option | Select "Sign SAML response and assertion". |
| SAML Signing Certificate | Signing Algorithm | Leave "SHA-256" selected. |
| SAML Signing Certificate | Notification Email Addresses | Enter email address(es) for receiving Entra ID notifications. |
Claims are key-value pairs that the identity provider asserts are true to the application. Flex uses these to determine the critical information about each Flex User.
Warning
All the information the identity provider supplies to Twilio is stored inside Twilio TaskRouter Worker Attributes. Consider local regulations for storing data and only provide data relevant for Flex usage. Learn more about Twilio's Privacy policy.
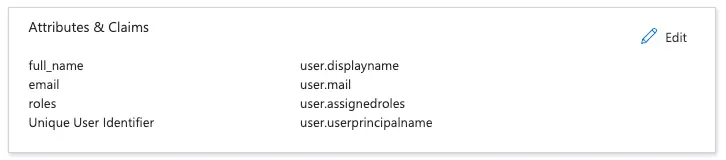
- From the SAML-based Sign-on page, in the Attributes & Claims section, click Edit.
- Under Required claims, update the required claim to use
user.mailas its value. - Add the following claims using a user attribute in the Source attribute field. Don't set a namespace for any of the claims.
Required claim Value email user.mailfull_name user.displaynameroles user.assignedroles - Under Additional claims, remove the default additional claims.
Your Attributes & Claims settings should look similar to this:
Make sure that the Flex SAML roles have a globally unique identifier (GUID). GUIDs are a long string of letters and numbers that Entra ID can use to identify each Flex roles.
- From the admin center left navigation, click Applications, and then click App registrations.
- Under All registrations, click on your app (for example, Twilio Flex).
- From the app registrations page for your application, in the left navigation, click App roles.
Twilio Flex requires the following roles:- admin
- supervisor
- agent
To create an app role:
- Click Create app role.
- Enter the required fields:
- Under Allowed member types, select Users/Groups.
- Leave the Do you want to enable this app role? box selected.
-
Click
Apply
. Your
App roles
page should look similar to this:
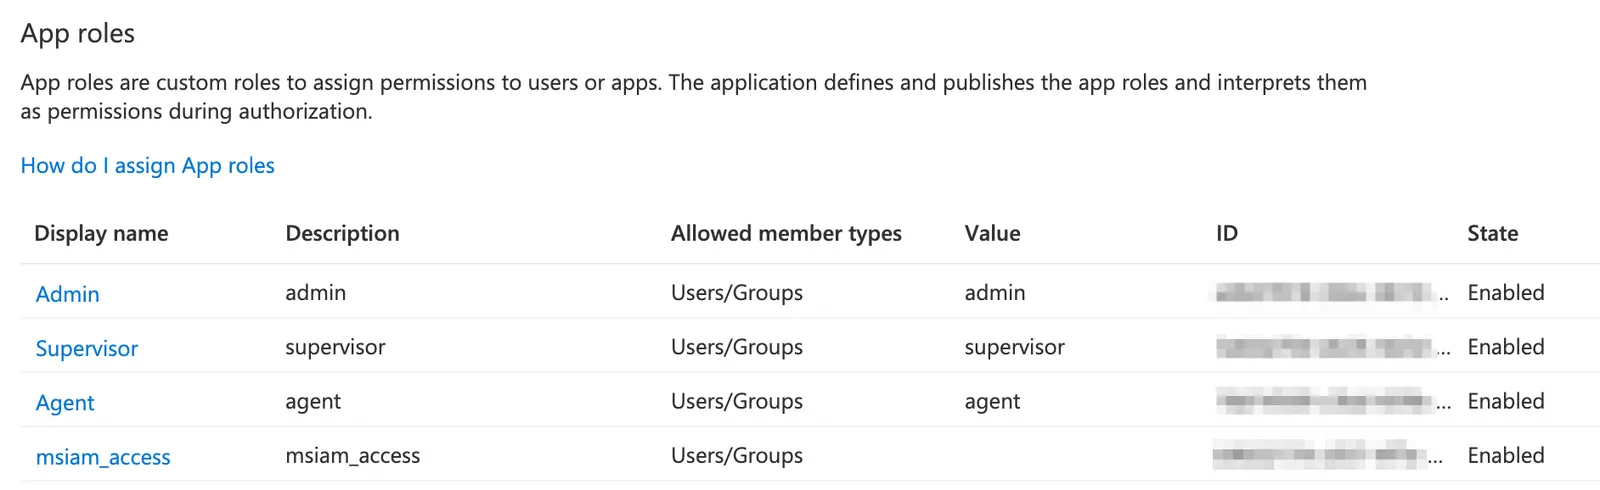
Note: If you use Flex Insights, you must create separate entries for each Insights role you expect to assign to your agents:

Danger
All the information the identity provider supplies to Twilio is stored inside Twilio TaskRouter Worker attributes. Consider local regulations for storing data, and only provide data relevant for Flex usage (see the Twilio Privacy policy for more information).
Info
Please see the Identity Attributes section of the SSO Configuration docs for more information about naming attributes and other possible Worker attributes.
- From Flex Console, configure SSO on the Single sign-on (SSO) page. You will need the following fields from the Entra SAML-based Sign-on page:
| Twilio SSO field | Entra ID field |
|---|---|
| X.509 Certificate | Certificate (Base64) |
| Identity Provider Issuer | Microsoft Entra Identifier |
| Single Sign-on URL | Login URL |
- Return to the admin center home page, and then go to your application's overview page.
-
From the left navigation, click
Users and Groups
.
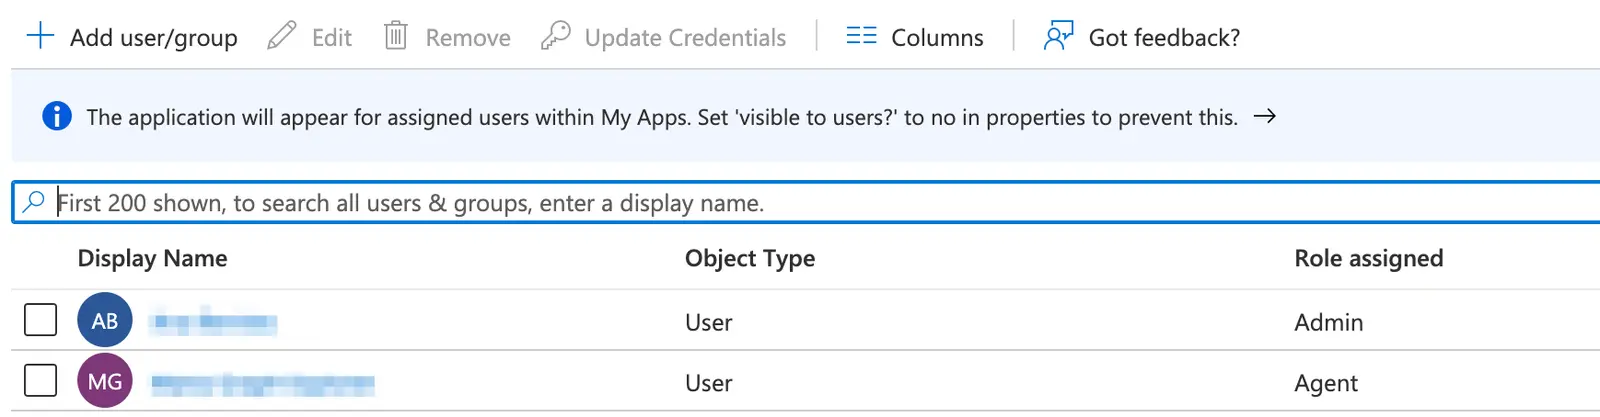
- Click Add user/group. You can assign one role to each user. Make sure that all users are assigned to your application.
Note: If you use Flex Insights, you must add each role you created previously as individual assignments for your agents.

See Configuring SSO for more details about the following topics:
- Initiating login from your identity provider
- Logging in to a self-hosted domain
- Attributes you can define for each identity
To test your SSO setup:
- Navigate to the Flex Console Single sign-on (SSO) page.
- Do one of the following:
- Click Login with SSO.
- Copy the login link and paste it into your browser address bar. This redirects you to the IdP login page.
- Log in using the credentials of the test user. Depending on the user settings, the IdP may ask you to set your password.
Once authentication completes, the IdP redirects you to the Flex UI. What you can see in the UI depends on the Flex roles set in the IdP user profile. - Validate the worker full name display in the Flex UI, or navigate to the Worker page in the TaskRouter Dashboard to review other attributes, like email and assigned roles.
If you need to pass custom attributes to your Flex users, refer to Pass Custom Azure AD Attributes as Twilio Flex SAML Claims.