Integrate Flex with Lionbridge Language Cloud
Lionbridge Language Cloud is a real-time language translation solution which enables your agents to send SMS, Chat or WhatsApp messages in their native language, and have consumers read them and send return messages in their native language. With Lionbridge for Flex, agents and consumers can always understand and communicate with one another, regardless of the languages they speak.
Using a database of over 110 languages, Lionbridge Language Cloud automatically detects customer's language and translates it to the agent's language based on the agent's profile in Flex.
Lionbridge's patented language consistency features allow control over brand, company, product and industry-related language. Potentially offensive language can be detected and excluded from translation. Lionbridge Language Cloud is also optimized for chat and customer support use cases.
- Customer-Controlled, On-Brand Translations. Incorporate all key company, brand, product and industry terms into translations to ensure effective, consistent, on-brand communications with foreign-language-speaking consumers, regardless of the language they speak.
- Privacy and security certifications (ISO 27001 and 27701, UK Cyber Essentials Plus, Tisax, Microsoft SSPA)
- Translated content is not stored
- Sensitive information - e.g., SS #'s, phone numbers, emails - identified, tokenized and not translated
- Redundant machine translation ("MT") systems to ensure "always on" real-time translation capability
In order to use the solution, first retrieve your ACCOUNT SID and AUTH TOKEN from the landing page of your Flex project in the Twilio Console.
Create a Plugin to store the Lionbridge integration:
1curl -X POST https://flex-api.twilio.com/v1/PluginService/Plugins \2--data-urlencode "FriendlyName=Lionbridge Language Cloud" \3--data-urlencode "Description=Real-time language translation provided by Lionbridge" \4--data-urlencode "UniqueName=lionbridge" \5-u $TWILIO_ACCOUNT_SID:$TWILIO_AUTH_TOKEN
Using the PluginSid (FPxx) provided in the response, add a Plugin Version that links to the plugin source:
1curl -X POST https://flex-api.twilio.com/v1/PluginService/Plugins/FPXXXXXXXXXXXXXXXXXXXXXXXXXXXXXXXX/Versions \2--data-urlencode "Private=True" \3--data-urlencode "Version=1.0.0" \4--data-urlencode "PluginUrl=https://developers.lionbridge.com/geofluent/plugin/plugin-geofluent.js" \5-u $TWILIO_ACCOUNT_SID:$TWILIO_AUTH_TOKEN
Next, use the Flex Plugins CLI to deploy the Lionbridge plugin alongside any other plugins you have active in your Flex application:
twilio flex:plugins:release --plugin lionbridge@1.0.0 --name "Lionbridge" --description "Adding Lionbridge integration"
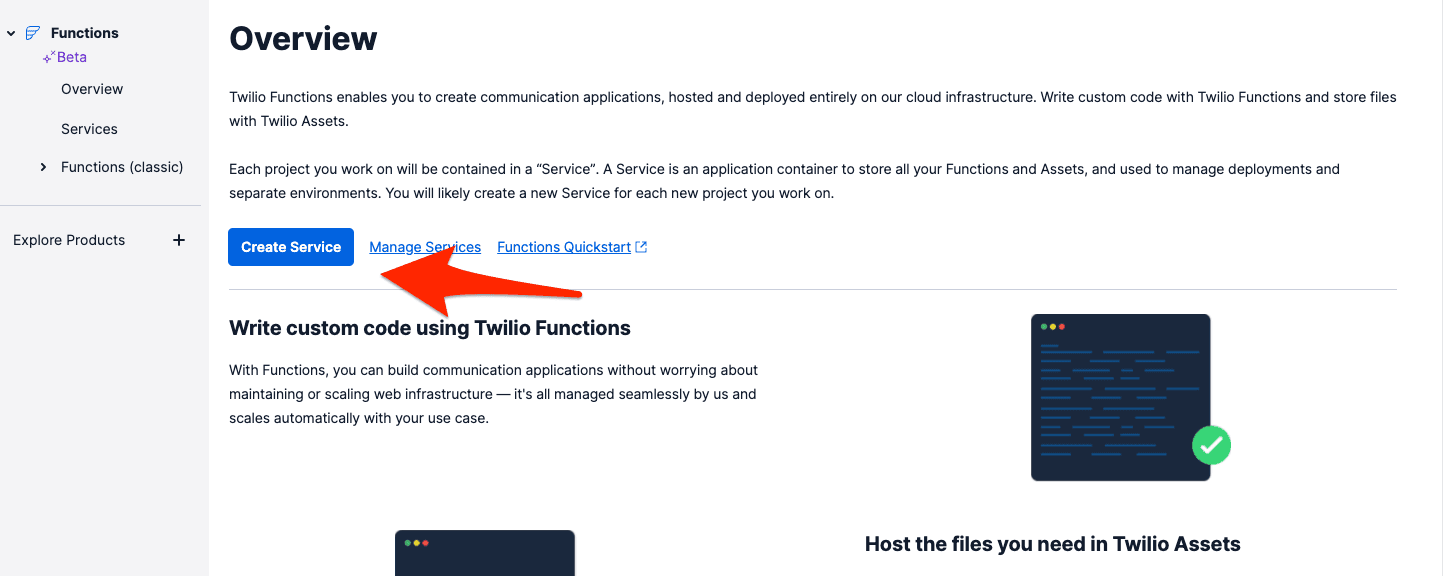
First, create a service to host your access credentials. You can do this from the Twilio Console in the Functions product. You can add the following function and environment variables to an existing Service if you have already created one for Flex.
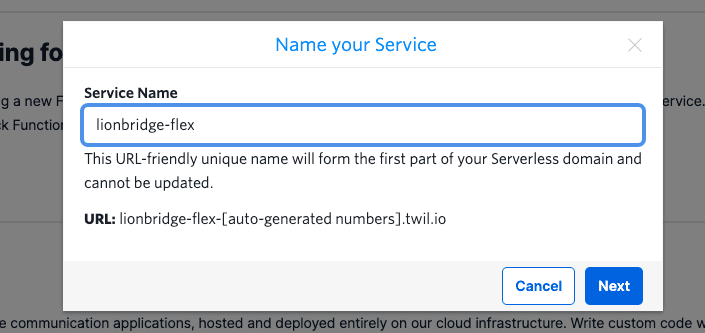
Name your service so that you'll be able to identify it later. This name will be used within the URL of the function you create.
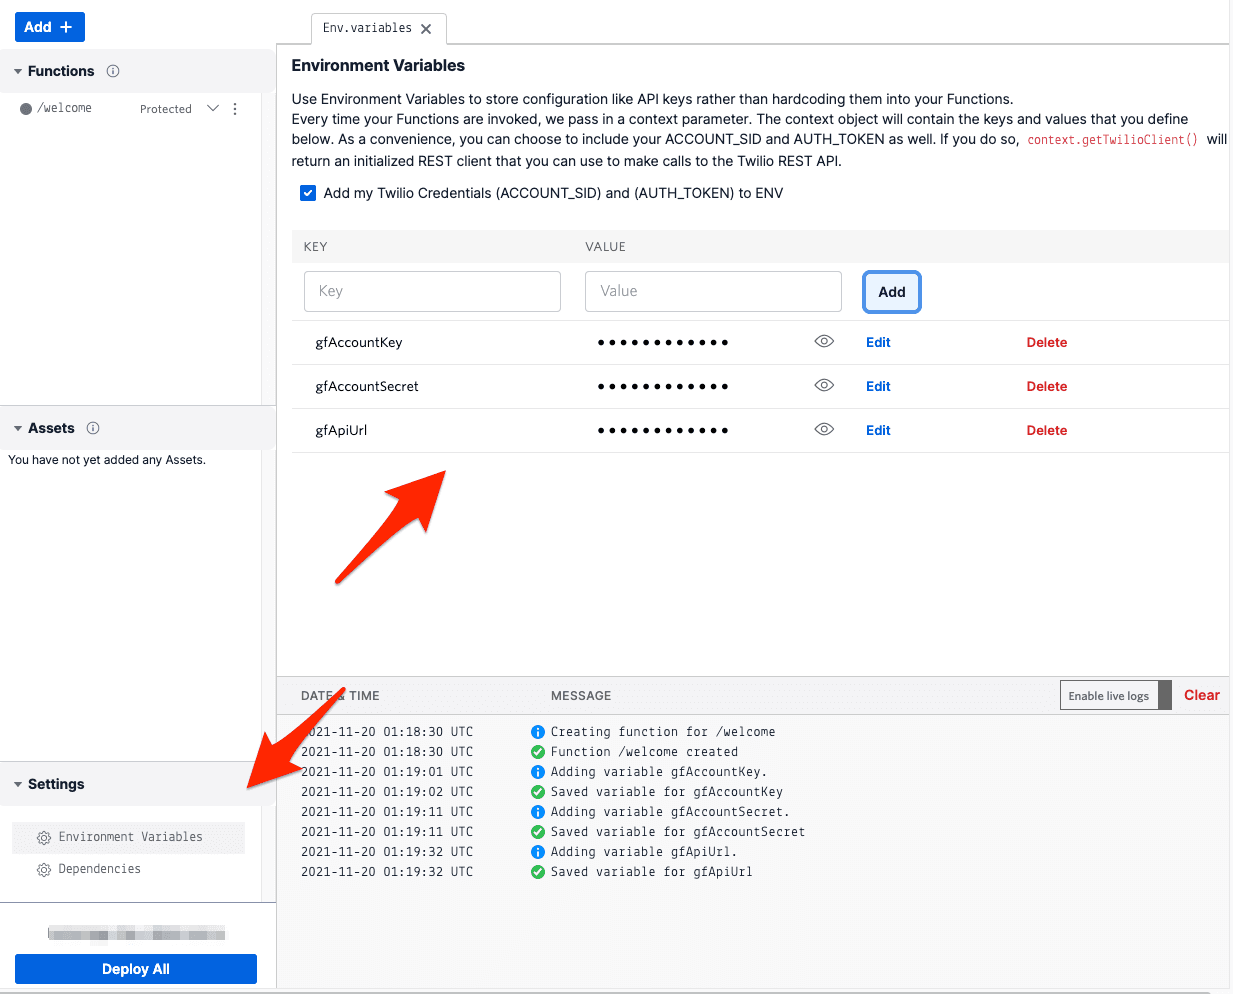
Add Environment Variables for gfAccountKey, gfAccountSecret, and gfApiUrl. These values will be provided based on your Lionbridge account.
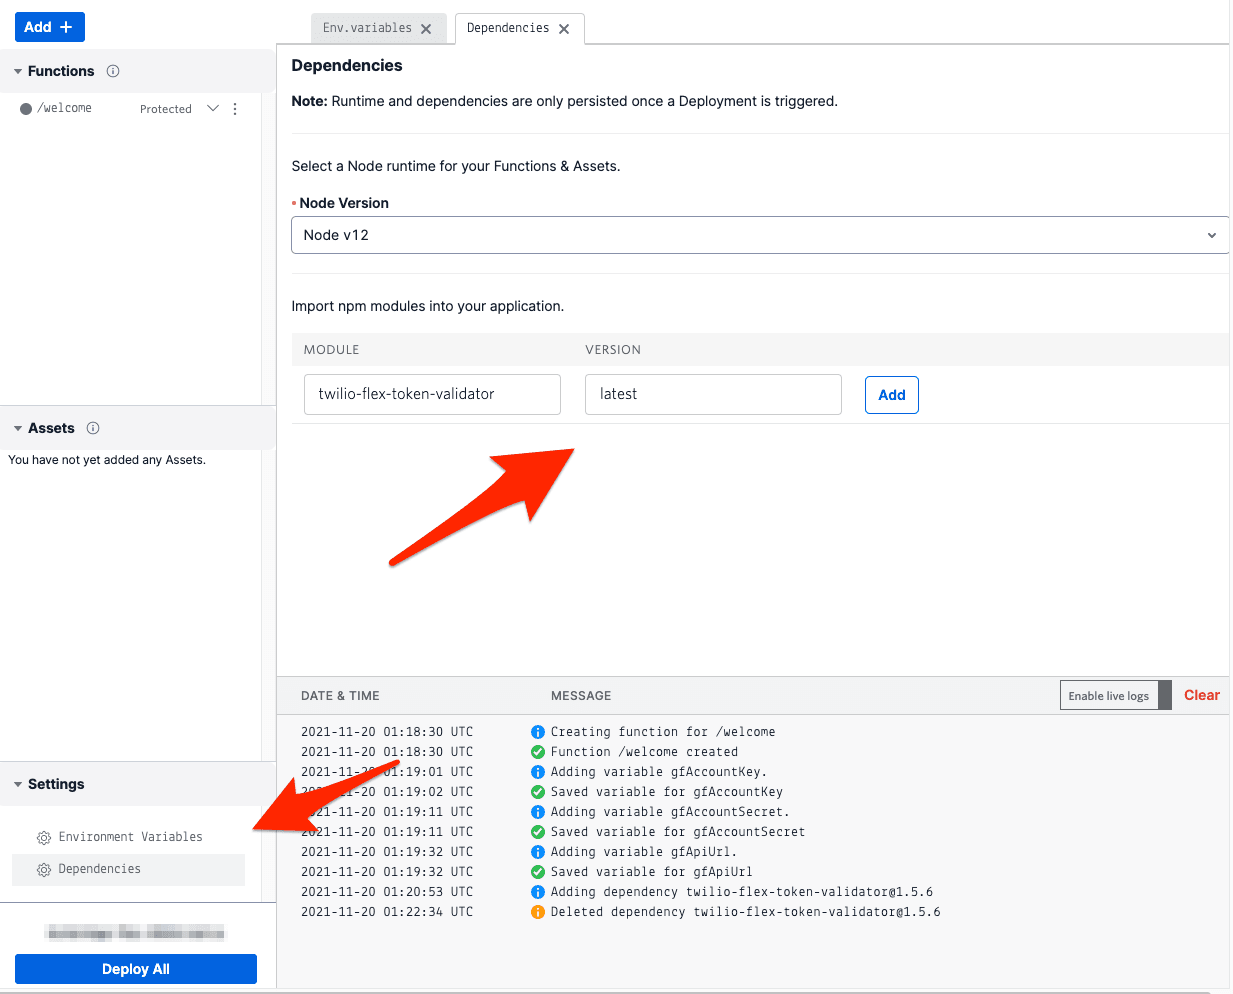
Next, add a Dependency for the twilio-flex-token-validator library and set the version as latest.
Last, add a function that will be used to access and return your environment variables. You should name your function "/get-credentials", convert the function to public access, and use the following function code. Although you are switching the function to public access, you'll be authenticating access using your Flex login credentials.
1const TokenValidator = require('twilio-flex-token-validator').functionValidator;23exports.handler = TokenValidator(function(context, event, callback) {4const accountKey = context.gfAccountKey;5const accountSecret = context.gfAccountSecret;6const apiUrl = context.gfApiUrl;78// Create a custom Twilio Response9// Set the CORS headers to allow Flex to make an HTTP request to the Twilio Function10const response = new Twilio.Response();11response.appendHeader('Access-Control-Allow-Origin', '*');12response.appendHeader('Access-Control-Allow-Methods', 'OPTIONS POST GET');13response.appendHeader('Access-Control-Allow-Headers', 'Content-Type');1415const data = {16gfAccountKey: accountKey,17gfAccountSecret: accountSecret,18gfApiUrl: apiUrl19};20response.appendHeader('Content-Type', 'application/json');21response.setBody(data);2223return callback(null, response)24});
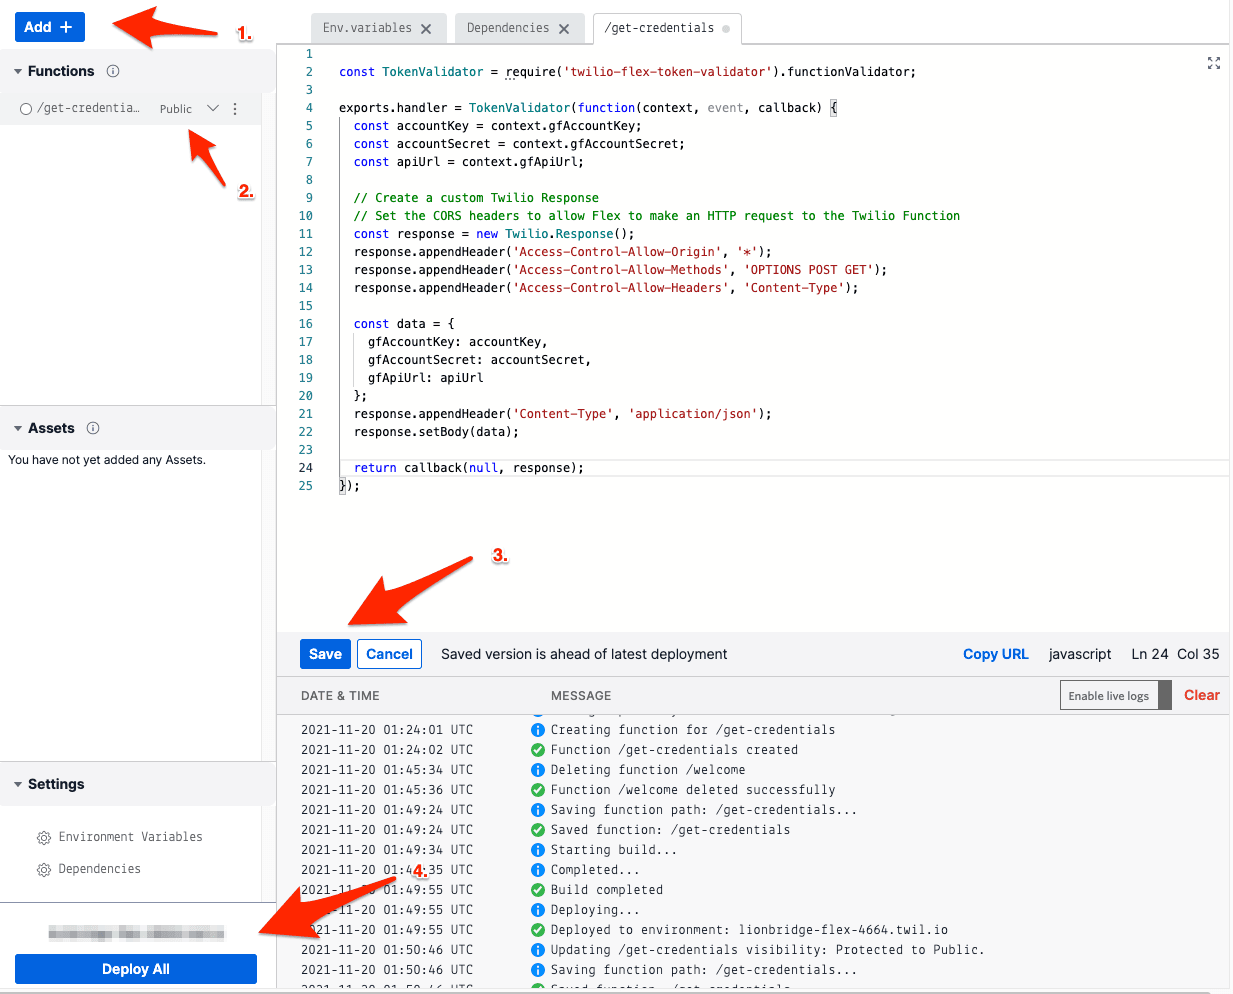
Save your function and Deploy All to publish everything to your Twilio account.
Now that you've set up your access function, the last step is to store a configuration variable that will let the Lionbridge plugin know where to find your access credentials. To execute the following command, you will need to have jq installed on your machine. In this command, make sure to replace each of the following parameters with your own account details:
- ACxxx - your Twilio AccountSid
- auth_token - your Twilio auth token
- ACxxx - your Twilio AccountSid (again)
- <your url> - the full URL of the function you deployed, for example:
https://lionbridge-flex-0000.twil.io/get-credentials - ACxxx - your Twilio AccountSid (again)
- auth_token - your Twilio auth token (again)
curl -s 'https://flex-api.twilio.com/v1/Configuration' -u ACxxx:auth_token | jq -r -c '{ attributes: .attributes } * { "account_sid": "ACxxx", "attributes": { "lionbridge": {"credentials": "<your url>"} }}' | curl -s -X POST 'https://flex-api.twilio.com/v1/Configuration' -u ACxxx:auth_token -H 'Content-Type: application/json' -d @-
-
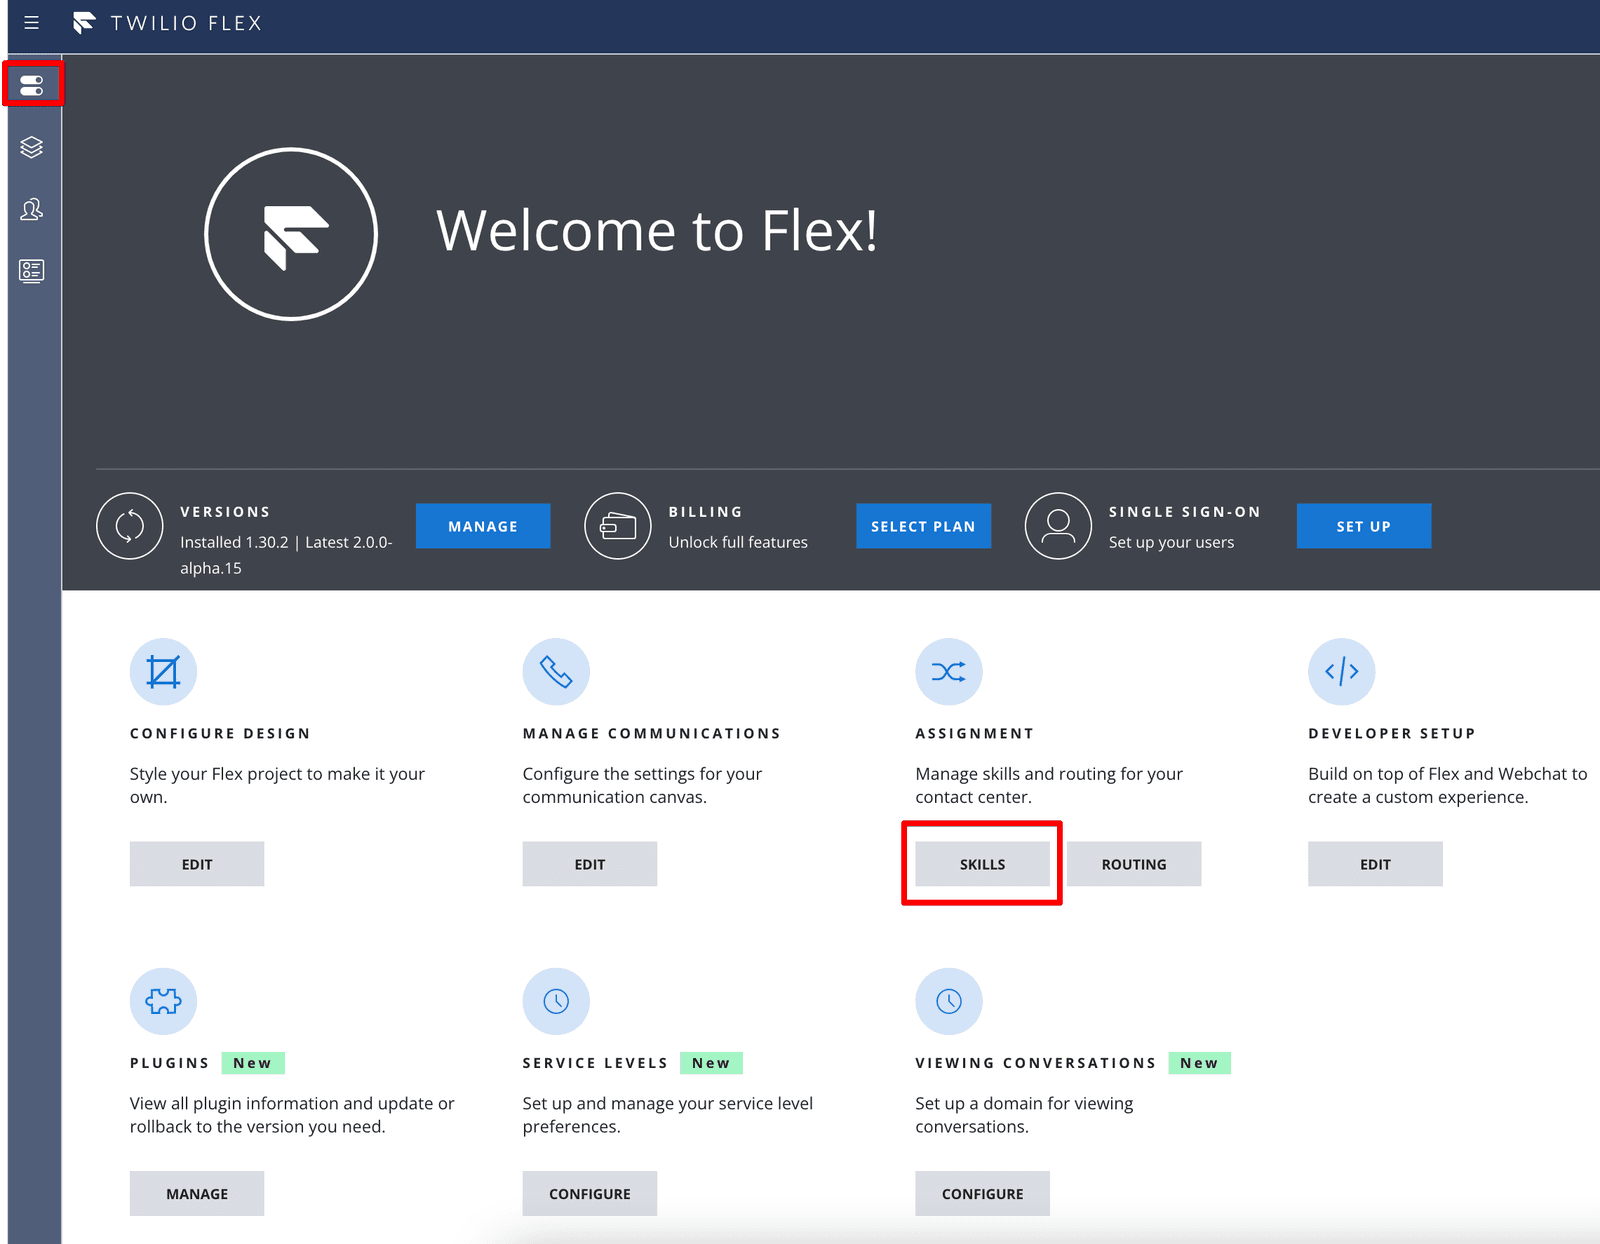
In the Flex Admin interface, go to the Assignment > Skills section.
-
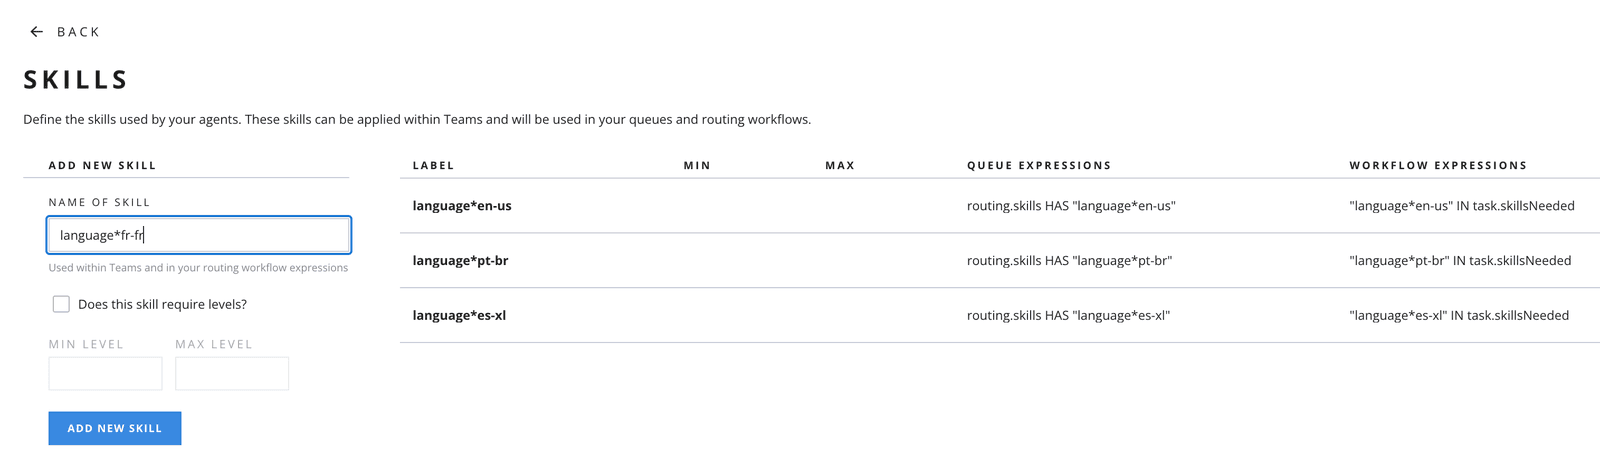
Enter the language pair in the NAME OF SKILL field in a Language*language code format (for example, language*fr-fr for French.)
-
Click ADD NEW SKILL to save the skill.
Once the language pair is added in the Skills section, Flex Admin must assign a language skill to each agent, as translations will not work without skill activation.
Info
It is recommended to assign only one language skill to an agent. All the incoming messages to the agent will be translated to the selected language.
-
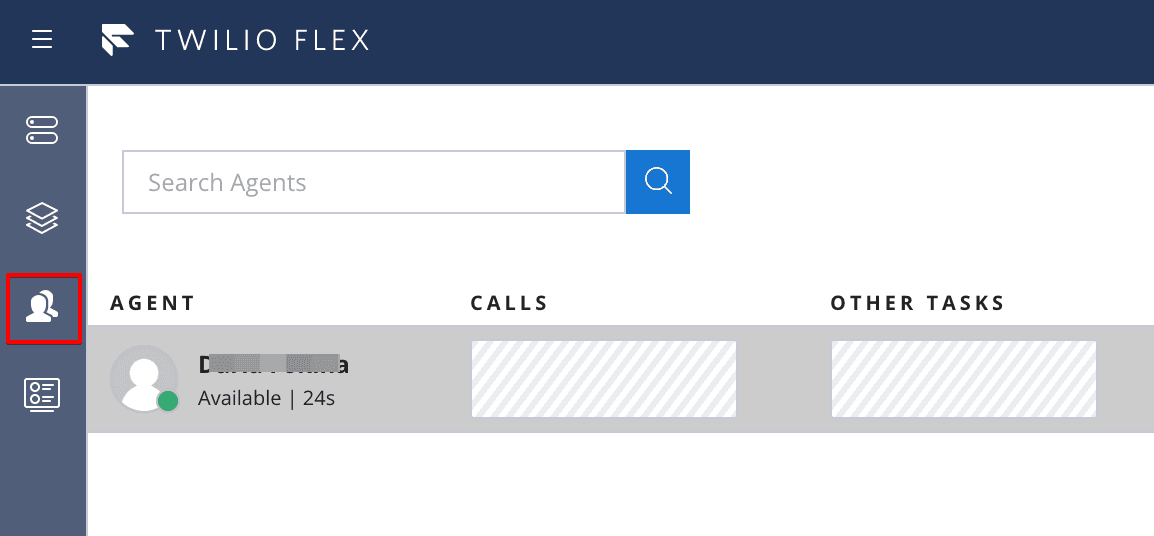
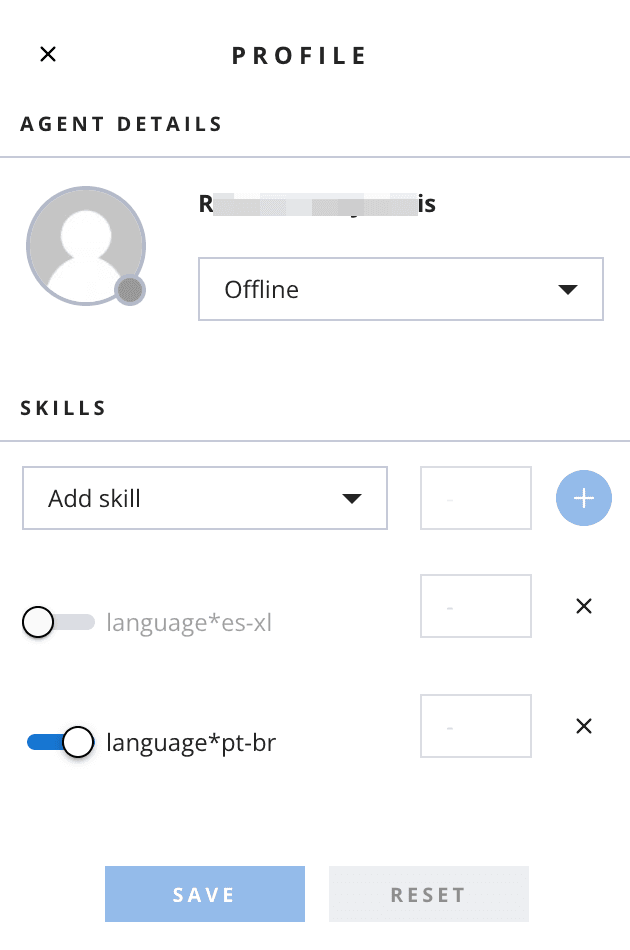
In Teams view, click on any agent to open their PROFILE pane.
-
In PROFILE pane:
- Select a skill from the Add skill drop-down list, then click plus icon to add selected skill to the agent.
- If an agent is an English speaker, enable the toggle language*en-us. This language code will then be disabled from the Add skill drop-down.
-
Click SAVE to save agent's profile, or RESET to clear the selections.
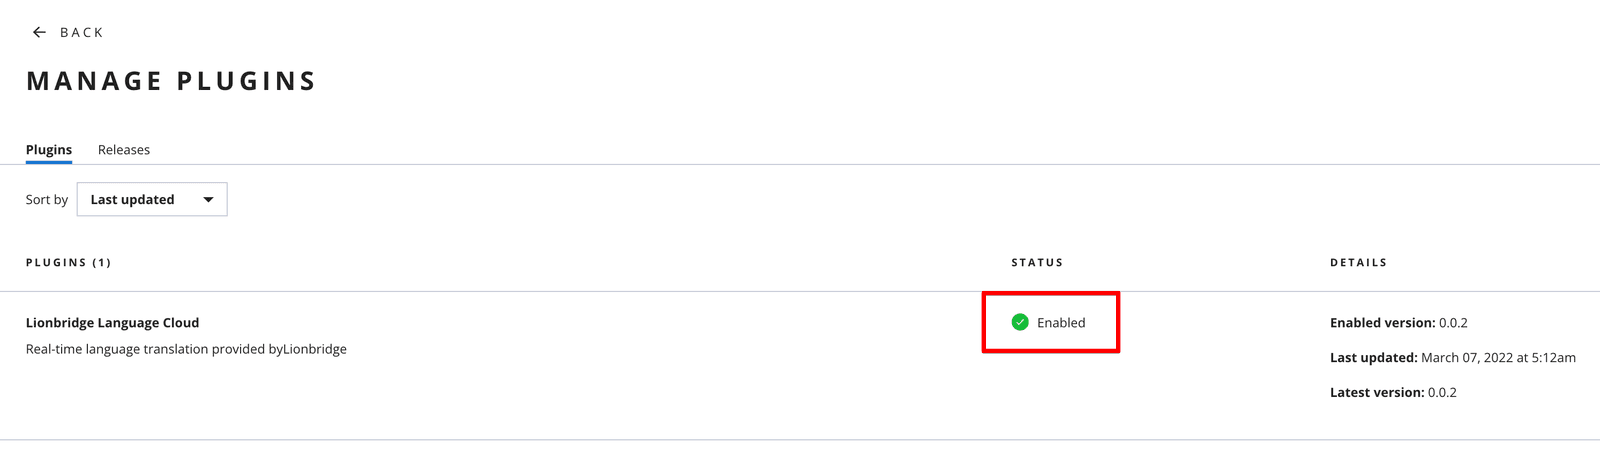
To test if the plugin was properly enabled, go to Plugins > Manage window from the Flex Admin dashboard. The Lionbridge Language Cloud plugin should have an "Enabled" status.
Additionally, you should be able to see a "Translations Powered by Lionbridge" banner at the bottom of an agent chat window (see below).
Lionbridge plugin will allow automatic translations for WebChat, SMS and WhatsApp channels.
Before initiating a translation, ensure that:
- Lionbridge plugin is enabled
- Language pairs are set up for the agent account
- Agent is assigned a language skill
- Agent activity status is Available
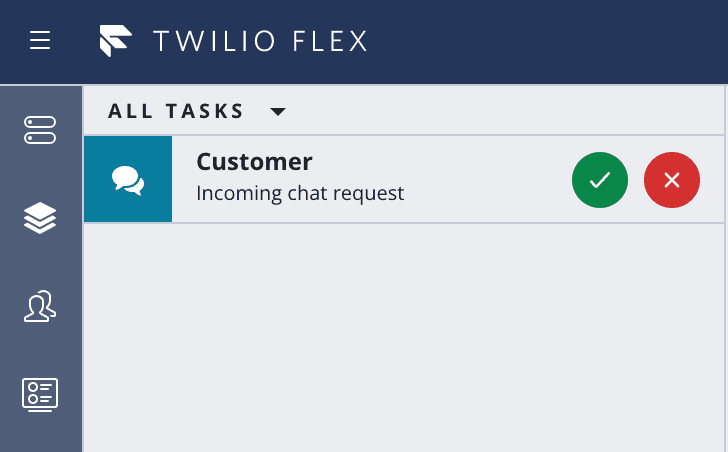
To test the translation, follow these steps:
-
Accept an incoming message request in Flex by clicking the green tick.
-
If the message is sent in a language other than the agent's language, the Lionbridge plugin automatically detects customer's language and translates it into the agent's language.
-
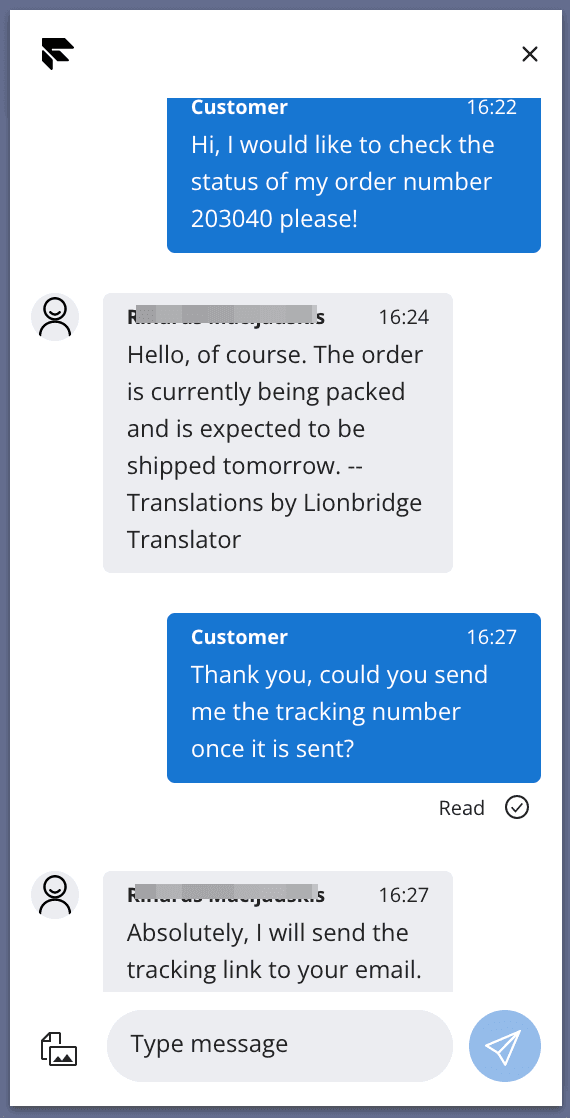
When the agent first responds to the customer, the message is translated into the customer's language and is displayed in Flex along with an attribution message that contains the MT provider name. The agent always sees both the source language and the translated message in Flex.
The customer receives the first translated message in their preferred language, along with the MT provider name. The customer only sees the messages in their preferred language.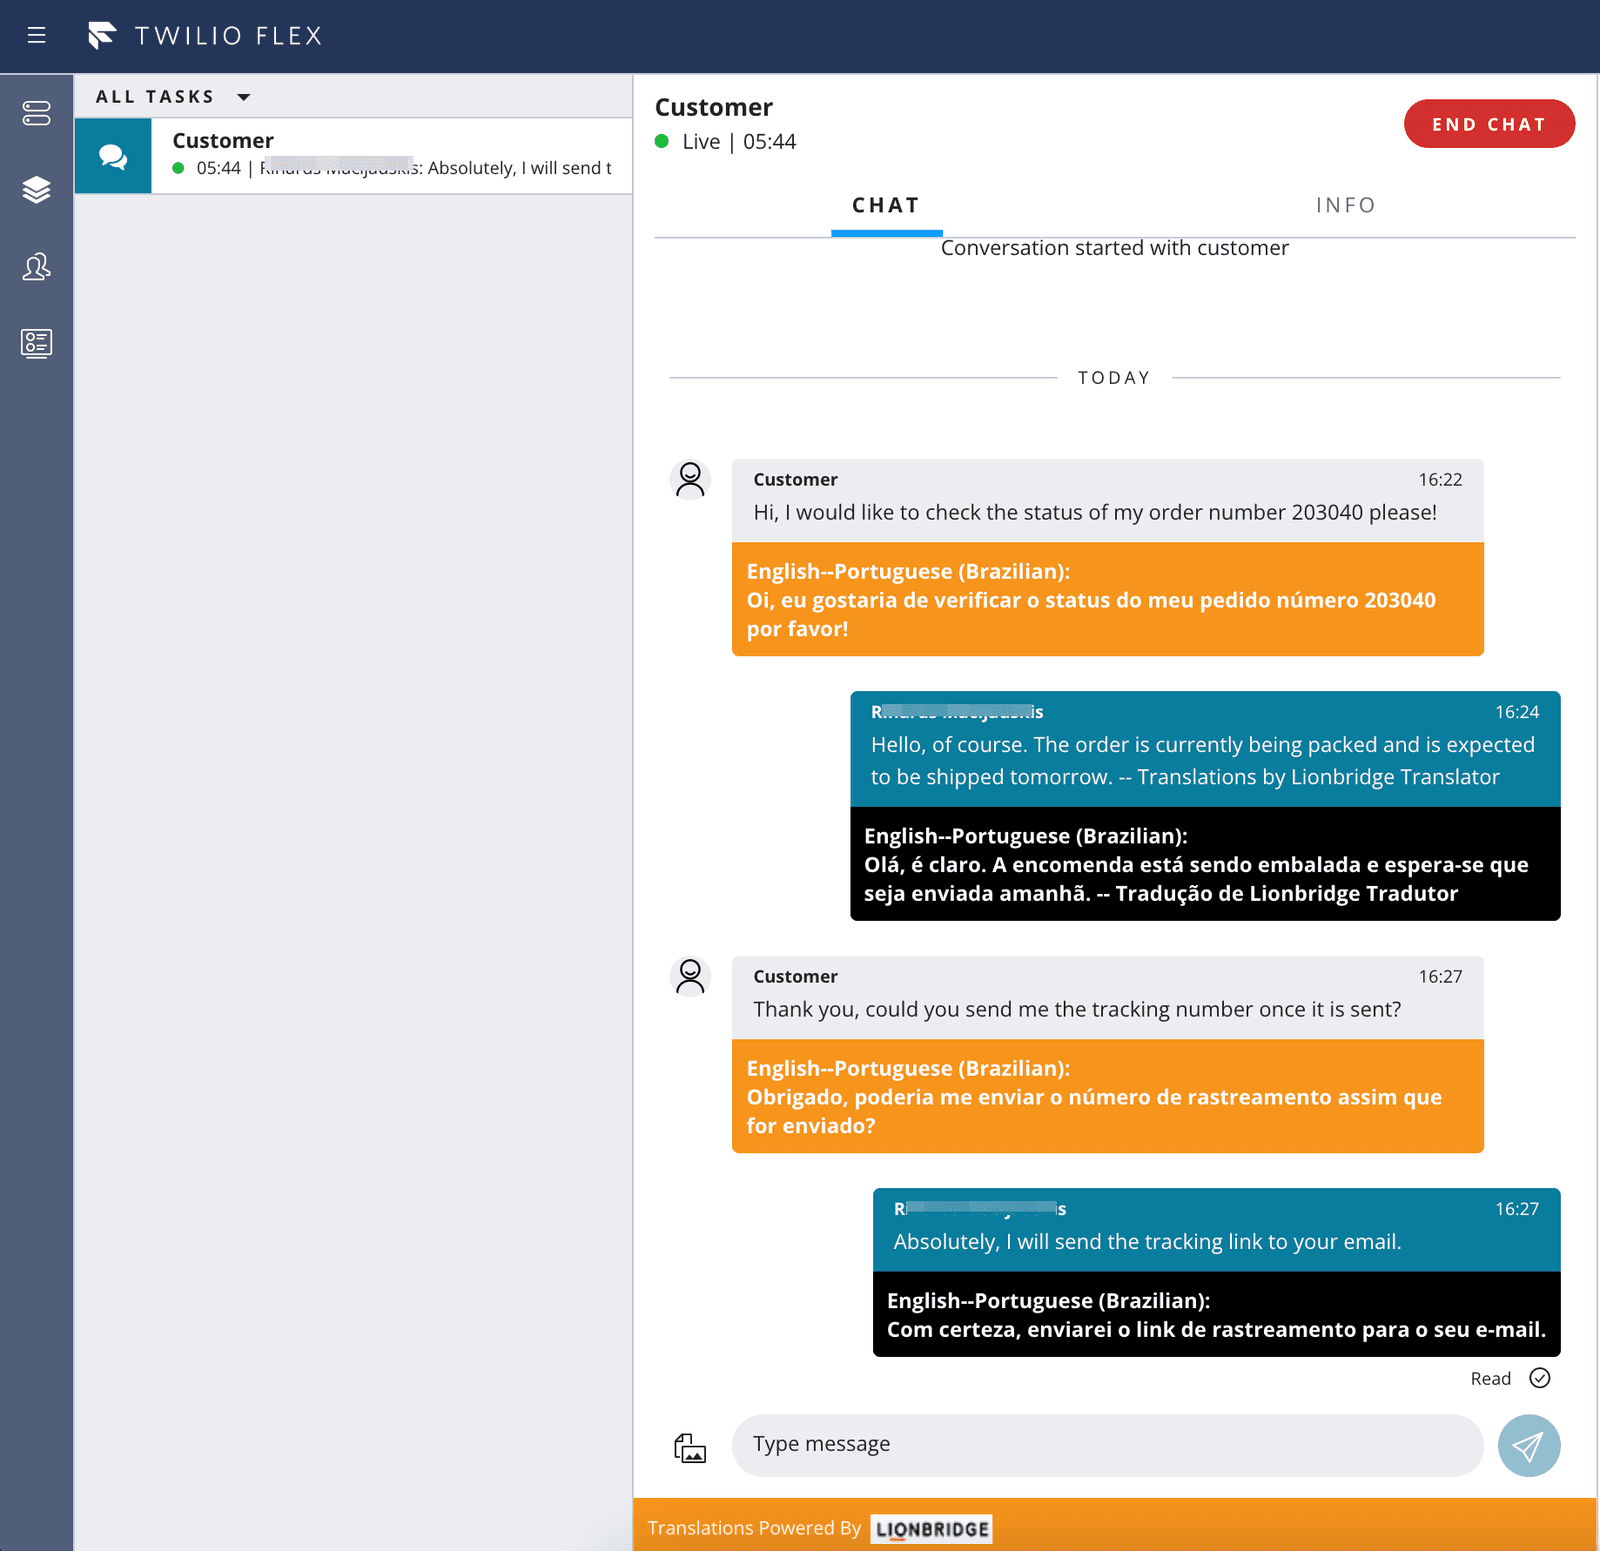
-
To end the interaction with the customer, the agent can click END CHAT to end the chat and COMPLETE to wrap up the interaction.
To learn more about the supported languages and how to get started, or to confirm the details of your Lionbridge account contact Lionbridge Sales at GeoFluent.Support@lionbridge.com