Pass custom Entra ID attributes as Twilio Flex SAML claims
To use Microsoft Entra ID extension properties as SAML claims in Twilio Flex, you need to customize claims using a policy that you create with Microsoft Graph API or PowerShell. This is because you can't add extension properties as claims using the Microsoft Entra ID admin center interface. Follow the Graph API example in this document to learn how you can:
- Create an Entra ID extension property.
- Create a claims mapping policy.
- Pass the property as a custom attribute for your Flex users.
- Open and log in to your Microsoft Entra ID admin center.
-
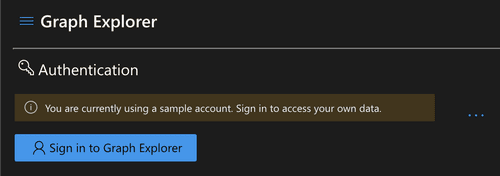
In a separate tab, open the
Microsoft Graph API Explorer
, click
Sign in to Graph Explorer
, and then select your Entra administrator account to use for Graph Explorer.
-
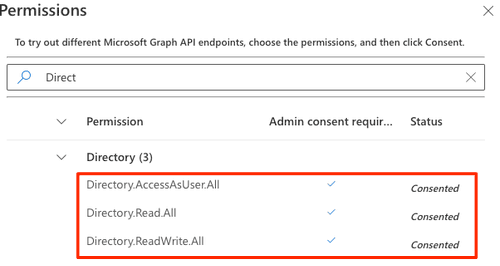
Make sure to
consent to the following permissions requirements
:
You'll need to retrieve these IDs for use in the next steps:
- Service Principal Entity ID
- Application Entity ID
Click the respective tab for detailed instructions:
Run the following Graph Explorer query to retrieve your Service Principal Entity ID. Make sure to:
- Replace with a portion of your enterprise application name on the URL field. For example, if your app name is Twilio Flex, you can enter
displayname:flexas the$searchquery parameter value. - Click the Request headers tab to add the key-value pair.
Example request
1HTTP method: GET2API version: v1.03Endpoint URL: https://graph.microsoft.com/v1.0/servicePrincipals?$search="displayName:<Your_App_Name>"4Request header key: ConsistencyLevel5Request header value: eventual
- Click Run query and in the JSON response, look for the array object whose
appDisplayNamevalue matches your enterprise application name. - Copy the
idvalue and paste it somewhere you can reference it.
Example response
1{2"@odata.context": "https://graph.microsoft.com/v1.0/$metadata#servicePrincipals",3"value": [4{5"id": "cdxxxxxx-xxxx-xxxx-xxxx-xxxxxxxxxxxx",6"deletedDateTime": null,7"accountEnabled": true,8"alternativeNames": [],9"appDisplayName": "Twilio Flex testing",10"appDescription": null,11"appId": "xxx",12"applicationTemplateId": "xxx",13"appOwnerOrganizationId": "xxx",14"appRoleAssignmentRequired": true,15"createdDateTime": "2021-11-24T18:17:10Z",16"description": null,17"disabledByMicrosoftStatus": null,18"displayName": "Twilio Flex testing",19"homepage": "https://account.activedirectory.windowsazure.com:444/applications/default.aspx?metadata=customappsso|ISV9.1|primary|z",20"loginUrl": null,21"logoutUrl": null,22"notes": null,23"notificationEmailAddresses": [24"user@userdomain.onmicrosoft.com"25],26"preferredSingleSignOnMode": "saml",27"preferredTokenSigningKeyThumbprint": "xxxx",28"replyUrls": [29"https://iam.twilio.com/v1/Accounts/ACXXXXXXXXXXXXXXXXXXXXXXXXXXXXXXXX/saml2/"30],31"servicePrincipalNames": [32"https://iam.twilio.com/v1/Accounts/ACXXXXXXXXXXXXXXXXXXXXXXXXXXXXXXXX/saml2/metadata",33"xxx"34],35"servicePrincipalType": "Application",36"signInAudience": "EntraIDMyOrg",37"tags": [38"WindowsEntraIDCustomSingleSignOnApplication",39"WindowsEntraIDIntegratedApp"40],41"tokenEncryptionKeyId": null,42"resourceSpecificApplicationPermissions": [],43"verifiedPublisher": {44"displayName": null,45"verifiedPublisherId": null,46"addedDateTime": null47},48"addIns": [],49"appRoles": [50{51"allowedMemberTypes": [52"User"53],54"description": "admin",55"displayName": "Admin",56"id": "yyy",57"isEnabled": true,58"origin": "Application",59"value": "admin"60},61{62"allowedMemberTypes": [63"User"64],65"description": "supervisor",66"displayName": "Supervisor",67"id": "zzz",68"isEnabled": true,69"origin": "Application",70"value": "supervisor"71},72{73"allowedMemberTypes": [74"User"75],76"description": "agent",77"displayName": "Agent",78"id": "aaa",79"isEnabled": true,80"origin": "Application",81"value": "agent"82},83{84"allowedMemberTypes": [85"User"86],87"description": "msiam_access",88"displayName": "msiam_access",89"id": "bbb",90"isEnabled": true,91"origin": "Application",92"value": null93}94],95"info": {96"logoUrl": null,97"marketingUrl": null,98"privacyStatementUrl": null,99"supportUrl": null,100"termsOfServiceUrl": null101},102"keyCredentials": [103{104"customKeyIdentifier": "xxx",105"displayName": "CN=Microsoft Entra Federated SSO Certificate",106"endDateTime": "2024-11-24T18:24:49Z",107"key": null,108"keyId": "xxx",109"startDateTime": "2021-11-24T18:24:49Z",110"type": "AsymmetricX509Cert",111"usage": "Verify"112},113{114"customKeyIdentifier": "xxx",115"displayName": "CN=Microsoft Entra Federated SSO Certificate",116"endDateTime": "2024-11-24T18:24:49Z",117"key": null,118"keyId": "xxx",119"startDateTime": "2021-11-24T18:24:49Z",120"type": "AsymmetricX509Cert",121"usage": "Sign"122}123],124"oauth2PermissionScopes": [125{126"adminConsentDescription": "Allow the application to access Twilio Flex testing on behalf of the signed-in user.",127"adminConsentDisplayName": "Access Twilio Flex testing",128"id": "xxx",129"isEnabled": true,130"type": "User",131"userConsentDescription": "Allow the application to access Twilio Flex testing on your behalf.",132"userConsentDisplayName": "Access Twilio Flex testing",133"value": "user_impersonation"134}135],136"passwordCredentials": [137{138"customKeyIdentifier": "xxx",139"displayName": "CN=Microsoft Entra Federated SSO Certificate",140"endDateTime": "2024-11-24T18:24:49Z",141"hint": null,142"keyId": "xxx",143"secretText": null,144"startDateTime": "2021-11-24T18:24:49Z"145}146],147"samlSingleSignOnSettings": {148"relayState": ""149}150}151]152}
In this section, you'll create an extended (custom) property for the enterprise application that you can then populate for your target Flex users.
Run the following Graph Explorer query. Make sure to:
- In the URL field, replace
<Application_Entity_ID>with the application entity ID you noted earlier. - Click the Request body tab to add the JSON in the Request body field. Replace
<Property_Name>with the name you want to use for the extension.
1HTTP method: POST2API version: v1.03Endpoint URL: https://graph.microsoft.com/v1.0/applications/<Application_Entity_ID>/extensionProperties4Request body:5{6"name": "<Property_Name>",7"dataType": "String",8"targetObjects": ["User"]9}
Click Run query and in the JSON response, copy and paste the name value of the new extension property for reference in later steps. It will be in the format extension\_\<App\_ID>\_\<Property\_Name>.
1{2"@odata.context": "https://graph.microsoft.com/v1.0/$metadata#applications('xxx')/extensionProperties/$entity",3"id": "xxx",4"deletedDateTime": null,5"appDisplayName": "Twilio Flex testing",6"dataType": "String",7"isSyncedFromOnPremises": false,8"name": "extension_xxx_language",9"targetObjects": [10"User"11]12}
Now that you've created an extension property created, add it to a user.
Run the following Graph Explorer query. Make sure to:
-
In the URL field, you can pass either the user ID or the user principal name (UPN). Replace
<ID \| UserPrincipalName>with either the object ID or the UPN of the Entra ID user you want to update. -
Click the Request body tab to add the JSON in the Request body field.
- Replace
<extension_<App_ID>_<Property_Name>with the name of the extension property created in the previous step. - Replace "My Custom Value" with the value you want to assign to this property.
- Replace
1HTTP method: PATCH2API version: v1.03Endpoint URL: https://graph.microsoft.com/v1.0/users/<ID | UserPrincipalName>4Request body:5{6"extension_<App_ID>_<Property_Name>": "My Custom Value"7}89
Click Run query.
204 {}
To confirm the user was updated successfully, run the following query.
1HTTP method: GET2API version: beta3Endpoint URL: https://graph.microsoft.com/beta/users/<ID | UserPrincipalName>4
In the JSON response, you should see the new extension property and assigned value in the user's properties.
1{2"@odata.context": "https://graph.microsoft.com/beta/$metadata#users/$entity",3"id": "xxxx",4"deletedDateTime": null,5"accountEnabled": true,6"ageGroup": null,7"businessPhones": [],8"city": null,9"createdDateTime": "2021-11-19T06:55:28Z",10"creationType": null,11"companyName": null,12"consentProvidedForMinor": null,13"country": null,14"department": null,15"displayName": "Test User",16"employeeId": null,17"employeeHireDate": null,18"employeeType": null,19"faxNumber": null,20"givenName": "Test",21"imAddresses": [],22"infoCatalogs": [],23"isManagementRestricted": null,24"isResourceAccount": null,25"jobTitle": null,26"legalAgeGroupClassification": null,27"mail": null,28"mailNickname": "testuser",29"mobilePhone": null,30"onPremisesDistinguishedName": null,31"officeLocation": null,32"onPremisesDomainName": null,33"onPremisesImmutableId": null,34"onPremisesLastSyncDateTime": null,35"onPremisesSecurityIdentifier": null,36"onPremisesSamAccountName": null,37"onPremisesSyncEnabled": null,38"onPremisesUserPrincipalName": null,39"otherMails": [],40"passwordPolicies": null,41"postalCode": null,42"preferredDataLocation": null,43"preferredLanguage": null,44"proxyAddresses": [],45"refreshTokensValidFromDateTime": "2021-11-24T19:10:02Z",46"showInAddressList": null,47"signInSessionsValidFromDateTime": "2021-11-24T19:10:02Z",48"state": null,49"streetAddress": null,50"surname": "User",51"usageLocation": null,52"userPrincipalName": "testuser@admintwilio.onmicrosoft.com",53"externalUserState": null,54"externalUserStateChangeDateTime": null,55"userType": "Member",56"extension_xxx_language": "Russian",57"employeeOrgData": null,58"passwordProfile": null,59"assignedLicenses": [],60"assignedPlans": [],61"deviceKeys": [],62"identities": [63{64"signInType": "userPrincipalName",65"issuer": "admintwilio.onmicrosoft.com",66"issuerAssignedId": "testuser@admintwilio.onmicrosoft.com"67}68],69"onPremisesExtensionAttributes": {70"extensionAttribute1": null,71"extensionAttribute2": null,72"extensionAttribute3": null,73"extensionAttribute4": null,74"extensionAttribute5": null,75"extensionAttribute6": null,76"extensionAttribute7": null,77"extensionAttribute8": null,78"extensionAttribute9": null,79"extensionAttribute10": null,80"extensionAttribute11": null,81"extensionAttribute12": null,82"extensionAttribute13": null,83"extensionAttribute14": null,84"extensionAttribute15": null85},86"onPremisesProvisioningErrors": [],87"provisionedPlans": []88}89
Warning
If you don't change the API version to beta, you'll only get a handful of user properties instead of the full list.
You can now create a claims mapping policy. For an example claim definition and a walkthrough of its key configuration properties, see Example claims policy definition.
Run the following Graph Explorer query. Make sure to:
-
Click the Request body tab and enter the JSON in the Request body field. Make the following changes:
- Replace the
<Claim_Policy_Name>with the name you want to use for this policy. - Replace the example escaped and minified JSON with your claims policy definition. On your definition, make sure to:
- Replace the
1HTTP method: POST2API version: v1.03Endpoint URL: https://graph.microsoft.com/v1.0/policies/claimsMappingPolicies4Request body:5{6"definition": [7"{\"ClaimsMappingPolicy\":{\"Version\":1,\"IncludeBasicClaimSet\":\"true\",\"ClaimsSchema\":[{\"Source\":\"user\",\"ID\":\"userprincipalname\",\"SamlClaimType\":\"http://schemas.xmlsoap.org/ws/2005/05/identity/claims/nameidentifier\"},{\"Source\":\"user\",\"ID\":\"displayname\",\"SamlClaimType\":\"full_name\"},{\"Source\":\"user\",\"ID\":\"assignedroles\",\"SamlClaimType\":\"roles\"},{\"Source\":\"user\",\"ID\":\"mail\",\"SamlClaimType\":\"email\"},{\"Source\":\"user\",\"ExtensionID\":\"extension_<App_ID>_<Property_Name>\",\"SamlClaimType\":\"<Claim_Attribute_Name>\"}]}}"8],9"displayName": "<Claim_Policy_Name>",10"isOrganizationDefault": false11}
Click Run query. In the JSON response, copy the claims mapping policy id value and paste it somewhere you can reference it.
1201 Created2{3"@odata.context": "https://graph.microsoft.com/v1.0/$metadata#policies/claimsMappingPolicies/$entity",4"id": "xxx",5"deletedDateTime": null,6"definition": [7"{\"ClaimsMappingPolicy\":{\"Version\":1,\"IncludeBasicClaimSet\":\"true\",\"ClaimsSchema\":[{\"Source\":\"user\",\"ID\":\"userprincipalname\",\"SamlClaimType\":\"http://schemas.xmlsoap.org/ws/2005/05/identity/claims/nameidentifier\"},{\"Source\":\"user\",\"ID\":\"displayname\",\"SamlClaimType\":\"full_name\"},{\"Source\":\"user\",\"ID\":\"assignedroles\",\"SamlClaimType\":\"roles\"},{\"Source\":\"user\",\"ID\":\"mail\",\"SamlClaimType\":\"email\"},{\"Source\":\"user\",\"ExtensionID\":\"extension_xxx_exampleproperty\",\"SamlClaimType\":\"exampleclaimattribute\"}]}}"8],9"displayName": "Example Claim Policy Name",10"isOrganizationDefault": false11}
Finally, assign the claims mapping policy you just created to your enterprise application.
Danger
Once you assign a claims mapping policy to an enterprise application using Graph API or PowerShell, you can no longer manage SAML claims in the Entra ID admin center. Accessing the SAML claims configuration page in the Entra ID admin center will result in the following error message:
"This configuration was overwritten by a claim mapping policy created via Graph/PowerShell."
Run the following Graph Explorer query. Make sure to:
-
Replace
<Service_Principal_Entity_ID>with your previously retrieved Service Principal Entity ID from the Gather supporting IDs section. -
Click the Request body tab to add the JSON in the Request body field.
- Replace
<Claims_Mapping_Policy_ID>with the ID you noted previously.
- Replace
1HTTP method: POST2API version: v1.03Endpoint URL: https://graph.microsoft.com/v1.0/servicePrincipals/<Service_Principal_Entity_ID>/claimsMappingPolicies/$ref4Request body:5{6"@odata.id": "https://graph.microsoft.com/v1.0/policies/claimsMappingPolicies/<Claims_Mapping_Policy_ID>"7}8
- Click Run query and in the JSON response, look for the array object whose
appDisplayNamevalue matches your enterprise application name. - Copy the
idvalue and paste it somewhere you can reference it.
204 {}
You can now log in to Flex and test the new claims mapping policy.
-
Navigate to the Flex Console Single sign-on (SSO) page.
-
When redirected to Entra ID for authentication, log in with the Entra user account you assigned the extension property to previously in this guide.
-
After logging in and the Flex UI has loaded, check the TaskRouter worker attributes in the Twilio Console ( TaskRouter > Workspace > Workers).
If you see all the expected attributes you've defined in the claims mapping policy, you've successfully configured your custom claims.
If any attributes are missing, examine the SAML response payload after authenticating to Entra ID. Ensure all the attributes are included, they have values, and that the
Nameparameter is correct for each of them.If the
Nameparameter on an attribute includes the namespace, it will be ignored. Double check your claims mapping policy definition and ensure theSamlClaimTypeis defined without a namespace for each claim you want to be captured as a TaskRouter worker attribute.
If you no longer need or want to pass custom extension properties as SAML claims and you'd like to manage claims in the Entra ID admin center, or you want to assign a different claims mapping policy to your Enterprise application, you will need to unassign the current claims mapping policy from the application.
Run the following Graph Explorer query. Make sure to:
- In the URL field, replace
<Service_Principal_Entity_ID>with your previously retrieved Service Principal Entity ID from the Gather supporting IDs section.
1HTTP method: DELETE2API version: v1.03Endpoint URL: https://graph.microsoft.com/v1.0/servicePrincipals/<Service_Principal_Entity_ID>/claimsMappingPolicies/<Claims_Mapping_Policy_ID>/$ref4
Click Run query.
204 {}
To verify there are no claims mapping policies assigned to your application, run the following query using the same Service Principal Entity ID.
1HTTP method: GET2API version: 1.03Endpoint URL: https://graph.microsoft.com/v1.0/servicePrincipals/<Service_Principal_Entity_ID>/claimsMappingPolicies4
In the JSON response, the value property should now show an empty array.
This example provides an example definition and some key configuration properties for the claim definition JSON object in Create a claims mapping policy.
Warning
This example shows an unminified and unescaped claims policy definition. When creating a claims policy in Graph Explorer, you need to minify and escape the JSON object before adding it to the "definition" array. This removes traces of offending characters that could prevent parsing.
1{2"ClaimsMappingPolicy": {3"Version": 1,4"IncludeBasicClaimSet": "true",5"ClaimsSchema": [6{7"Source": "user",8"ID": "userprincipalname",9"SamlClaimType": "http://schemas.xmlsoap.org/ws/2005/05/identity/claims/nameidentifier"10},11{12"Source": "user",13"ID": "displayname",14"SamlClaimType": "full_name"15},16{17"Source": "user",18"ID": "assignedroles",19"SamlClaimType": "roles"20},21{22"Source": "user",23"ID": "mail",24"SamlClaimType": "email"25}, {26"Source": "user",27"ExtensionID": "extension__",28"SamlClaimType": ""29}30]31}32}3334}
The following key properties appear in the example definition:
IncludeBasicClaimSet: Controls whether all claims in the basic claim set are included in the token generated by applications using this policy. For more details, see Entra's documentation.ClaimsSchema: Make sure to include the required attributes for Flex:email,full_name, androles. In the claims schema of our example definition, each item includes the following attributes:Source: The source AD object. In this example, all of the claims we're passing are coming from the "user" object.ID: For standard AD user properties, "ID" is the key and the value is the targeted user property. For example, to pass the display name of a user, you can use{ "Source": "user", "ID": "displayname" }, which tells the policy to use the `user.displayname property for this claim.ExtensionID: For extension properties, like the one you created earlier in this guide, "ExtensionID" is the key and the value is the extension property in the formatextension\_\<App\_ID>\_\<Property\_Name>.SamlClaimType: The value that will be passed in the "name" parameter of the claim attribute. This value is what Flex uses to populate the TaskRouter worker attribute. For Flex to process it as a worker attribute, it must be the name only, not preceded by a namespace. For example, to populate the "team_id" TaskRouter worker attribute with a custom extension property, use{ "Source": "user", "ExtensionID": "extension_<App_ID>_<Property_Name>", "SamlClaimType": "team_id" }, which tells the policy to pass a claim attribute with Name="team_id" populated with the value contained inuser.extension\_\<App\_ID>\_\<Property\_Name>.