How to Implement Click-to-Dial
While Flex offers its own Dialpad to allow you to insert touch-tone numbers and place calls from Flex, you may want users to be able to click a phone number in a system outside of Flex that launches a phone call using Flex.
You can implement this functionality using Flex's native outbound dialing capabilities. Read on to learn how to implement click-to-dial.
The StartOutboundCall Action allows you to define your own logic to trigger outbound calls, and will be key to implementing click-to-dial functionality. StartOutboundCall requires a destination phone number — we have to call somebody, after all — but it also includes additional parameters for defining details like custom Task attributes and the caller ID that should make the call.
Warning
Ensure a reservation has been created before updating the attributes of a StartOutboundCall task.
You've embedded your CRM by developing a React component. You want agents to be able to click on a phone number in the CRM Plugin to start an outbound call in Flex.
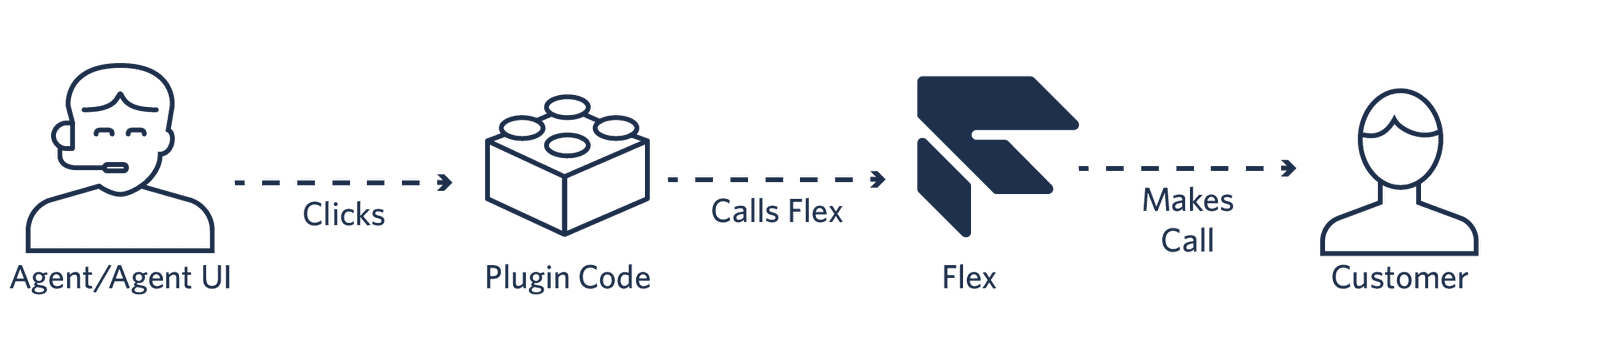
In your Flex Plugin code, you might write a function like this:
1function clickToDial(destinationNumber) {2Flex.Actions.invokeAction("StartOutboundCall", {3destination: destinationNumber4});5}
Your destinationNumber can either be an E.164 phone number or a SIP URI in this format: sip:<sip_uri>. Once you've defined how you want to invoke StartOutboundCall, you can set this function as the onClick attribute for any number, button, or other clickable element in your UI. For example, in your Plugin code, you might have a CustomerNumber component that takes the click-to-dial function:
1<CustomerNumber2number={props.customerNumber}3onClick={(e) => clickToDial(props.customerNumber, e)}4/>
When an agent clicks on the rendered CustomerNumber component, clickToDial will fire with the customer number, and Flex will invoke the StartOutboundCall action and initiate the call for you.
We can also use the Actions Framework to extend StartOutboundCall. For example, we might want to use a specific caller ID (from number) depending on the agent that is placing the call. Using replaceAction we can modify this for our custom click-to-dial button, as well as the Flex Dialpad component's call button:
1async init(flex, manager) {2flex.Actions.replaceAction("StartOutboundCall", (payload, original) => {3var newPayload = payload;4newPayload.callerId = manager.workerClient.attributes.phone_number;5original(newPayload);6});7}
Now that we have replaced StartOutboundCall, all calls will be made with the caller ID specified by the phone_number attribute on the agent's TaskRouter worker.
In this case, you've embedded Flex in your CRM. Agents should be able to click on a phone number in the CRM to launch Flex and make a call.

By default, most browsers can use the Window.postMessage() function to communicate between iframe elements. You can utilize the postMessage() to help Flex understand that something was clicked in your CRM and establish an outbound call. The flow might look like this:
- An agent clicks a UI element to start a call.
- This click event triggers a
postMessage()call that communicates with Flex through an iframe:
1// Store the Flex iframe element in a variable2const flexIframe = document.getElementById('flex').contentWindow;34function sendMessage(e) {5// Prevent any default browser behavior.6e.preventDefault();78// Send a message to the iframe with the phone number9flexIframe.postMessage(document.getElementById('phoneNumber').value, *);10}
Warning
Note that this code sample uses * (a wildcard) as the targetOrigin, meaning that any malicious site could read the contents of your message. Always use a specific URL in production to keep your data safe!
- Flex receives the message, along with the associated message payload:
1// Flex in an iFrame2if (window.self !== window.top) {3// Define a function for what to do when a message from postMessage() comes in4function receiveMessage(event) {5// Invoke the Flex Outbound Call Action6flex.Actions.invokeAction("StartOutboundCall", {destination: event.data});7}89// Add an event listener to associate the postMessage() data with the receiveMessage logic10window.addEventListener("message", receiveMessage, false);11}
- Flex initiates the outbound call.
Some CRM tools offer their own APIs for enabling click-to-dial that you can integrate with Flex. For example, Salesforce's OpenCTI API, for example, offers a series of functions for enabling outbound dialing.
| Software | Click-To-Dial Platform |
|---|---|
| Salesforce | OpenCTI |
| Zendesk | ZAF |
This list will continue to be updated as we learn about other software's click-to-dial platforms.
Now that you've got some ideas for how to implement click-to-dial, you may be curious about the details of building with Flex. Why not...
- Start building a click to call plugin.
- Learn more about the outbound dialer.
- Learn about other actions available in the Actions Framework.