SendGrid Single Sign-On
Twilio SendGrid Single Sign-On (SSO) uses the widely supported Security Assertion Markup Language (SAML 2.0) to integrate your Twilio SendGrid user authentication with identity and access management platforms such as Okta and Microsoft Azure Active Directory.
This documentation provides an overview of Twilio SendGrid's SSO offering and configuration steps to set up SSO for any IdP that supports SAML 2.0. We also provide the following IdP-specific configuration guides.
Single Sign-On (SSO) is available for Twilio SendGrid Email API Pro, Premier, and Marketing Campaigns Advanced plans only. See the Twilio SendGrid pricing page for a full list of Twilio SendGrid features available by plan.
-
Identity Provider (IdP)
- Services such as Okta, Azure Active Directory, and Duo.
-
Service Provider (SP)
- Twilio SendGrid is the SP in the SAML relationship.
SSO and SAML terminology is defined throughout this document. One IdP often uses different terminology from another to label the same required fields. This document attempts to clarify and call attention to the alternative terminology used by IdPs whenever possible.
Because terminology can vary among IdPs, you may find the following high-level overview helpful. There is also a table at the end of this document that maps different IdP terminology to the correct Twilio SendGrid fields.
Your IdP will usually require one value from Twilio SendGrid: the Single Sign-On URL. This URL tells your IdP where to send its SAML assertion. This URL is also the value set for the Audience URL (SP Entity ID).
Twilio SendGrid will need three values from your IdP: a SAML Issuer ID, a login URL, and an X509 certificate.
The SAML Issue ID is a string — usually a URL — that identifies the SP (Twilio SendGrid) to the IdP when making SSO requests. The login URL is your IdP's SAML endpoint — it receives the SSO requests. The X509 certificate is used to identify and verify requests from your IdP.
The Twilio SendGrid SSO settings menu allows you to configure integrations with your IdP(s). Managing users and permissions is covered in the user management section of this document.
Adding an SSO configuration requires some back-and-forth between the Service Provider (Twilio SendGrid) and your IdP. The Twilio SendGrid App will provide values required by your IdP. Likewise, your IdP will provide values required by Twilio SendGrid. This document will cover the exchange in sections, beginning from the Twilio SendGrid App.
To add, delete, or modify an SSO integration, log in to the top level of your Twilio SendGrid account using your administrator credentials.
-
Once logged in, go to Settings > SSO Settings. The SendGrid App will display a page with an Add Configuration button.
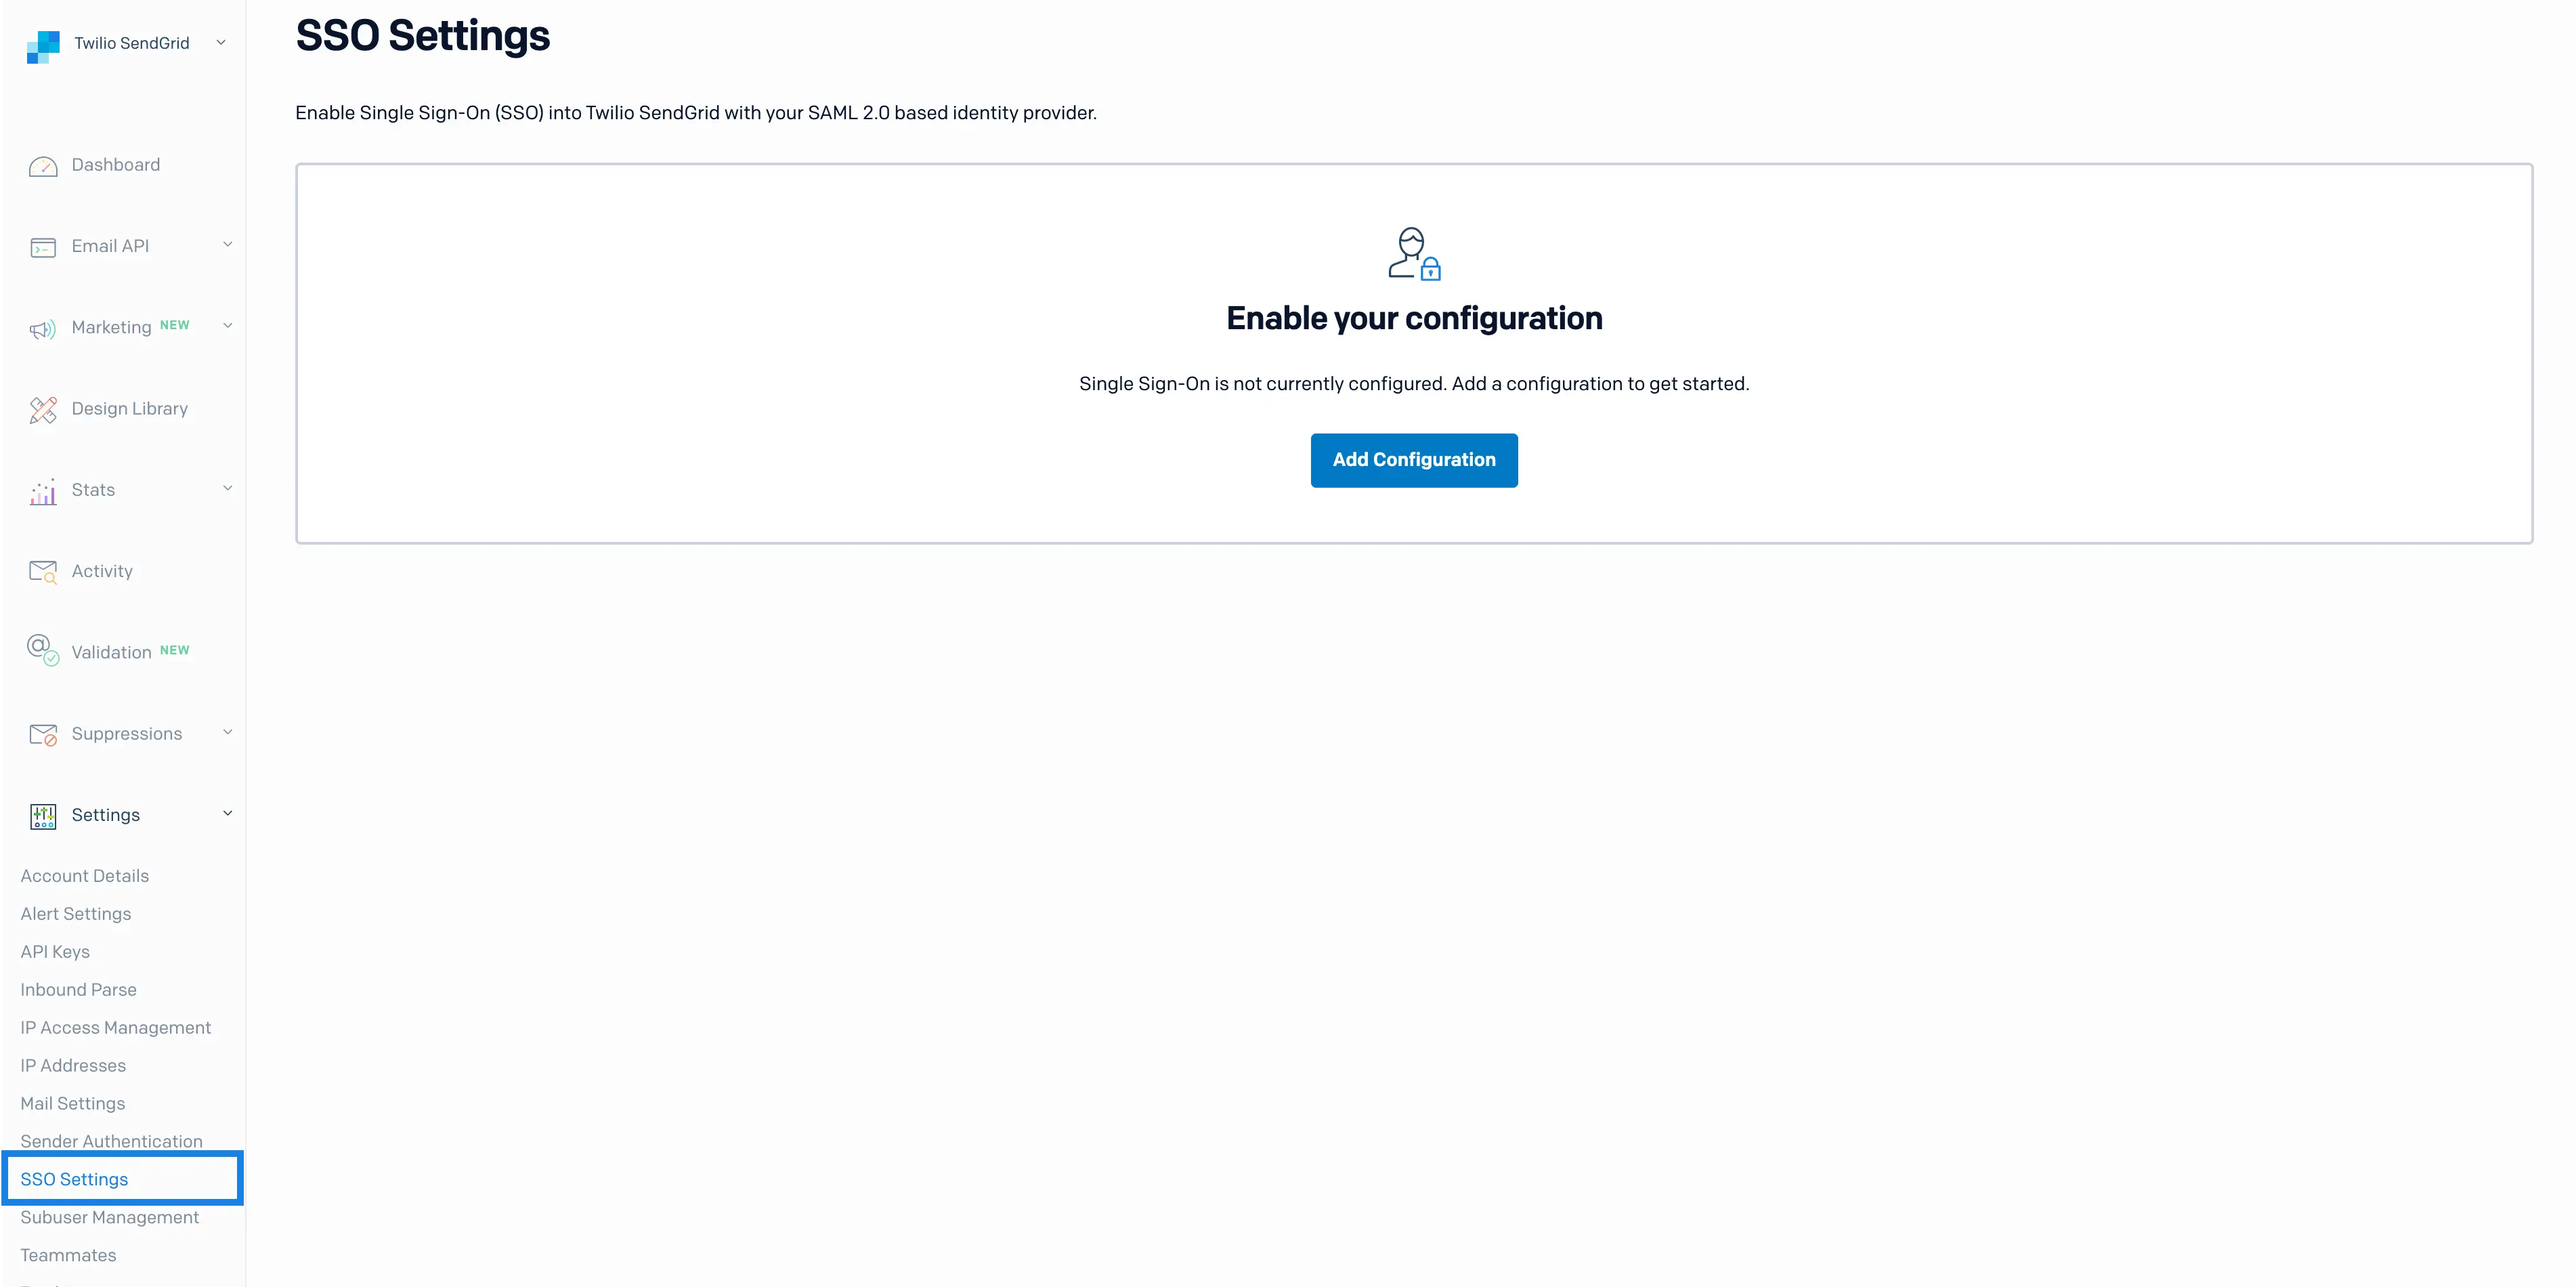
-
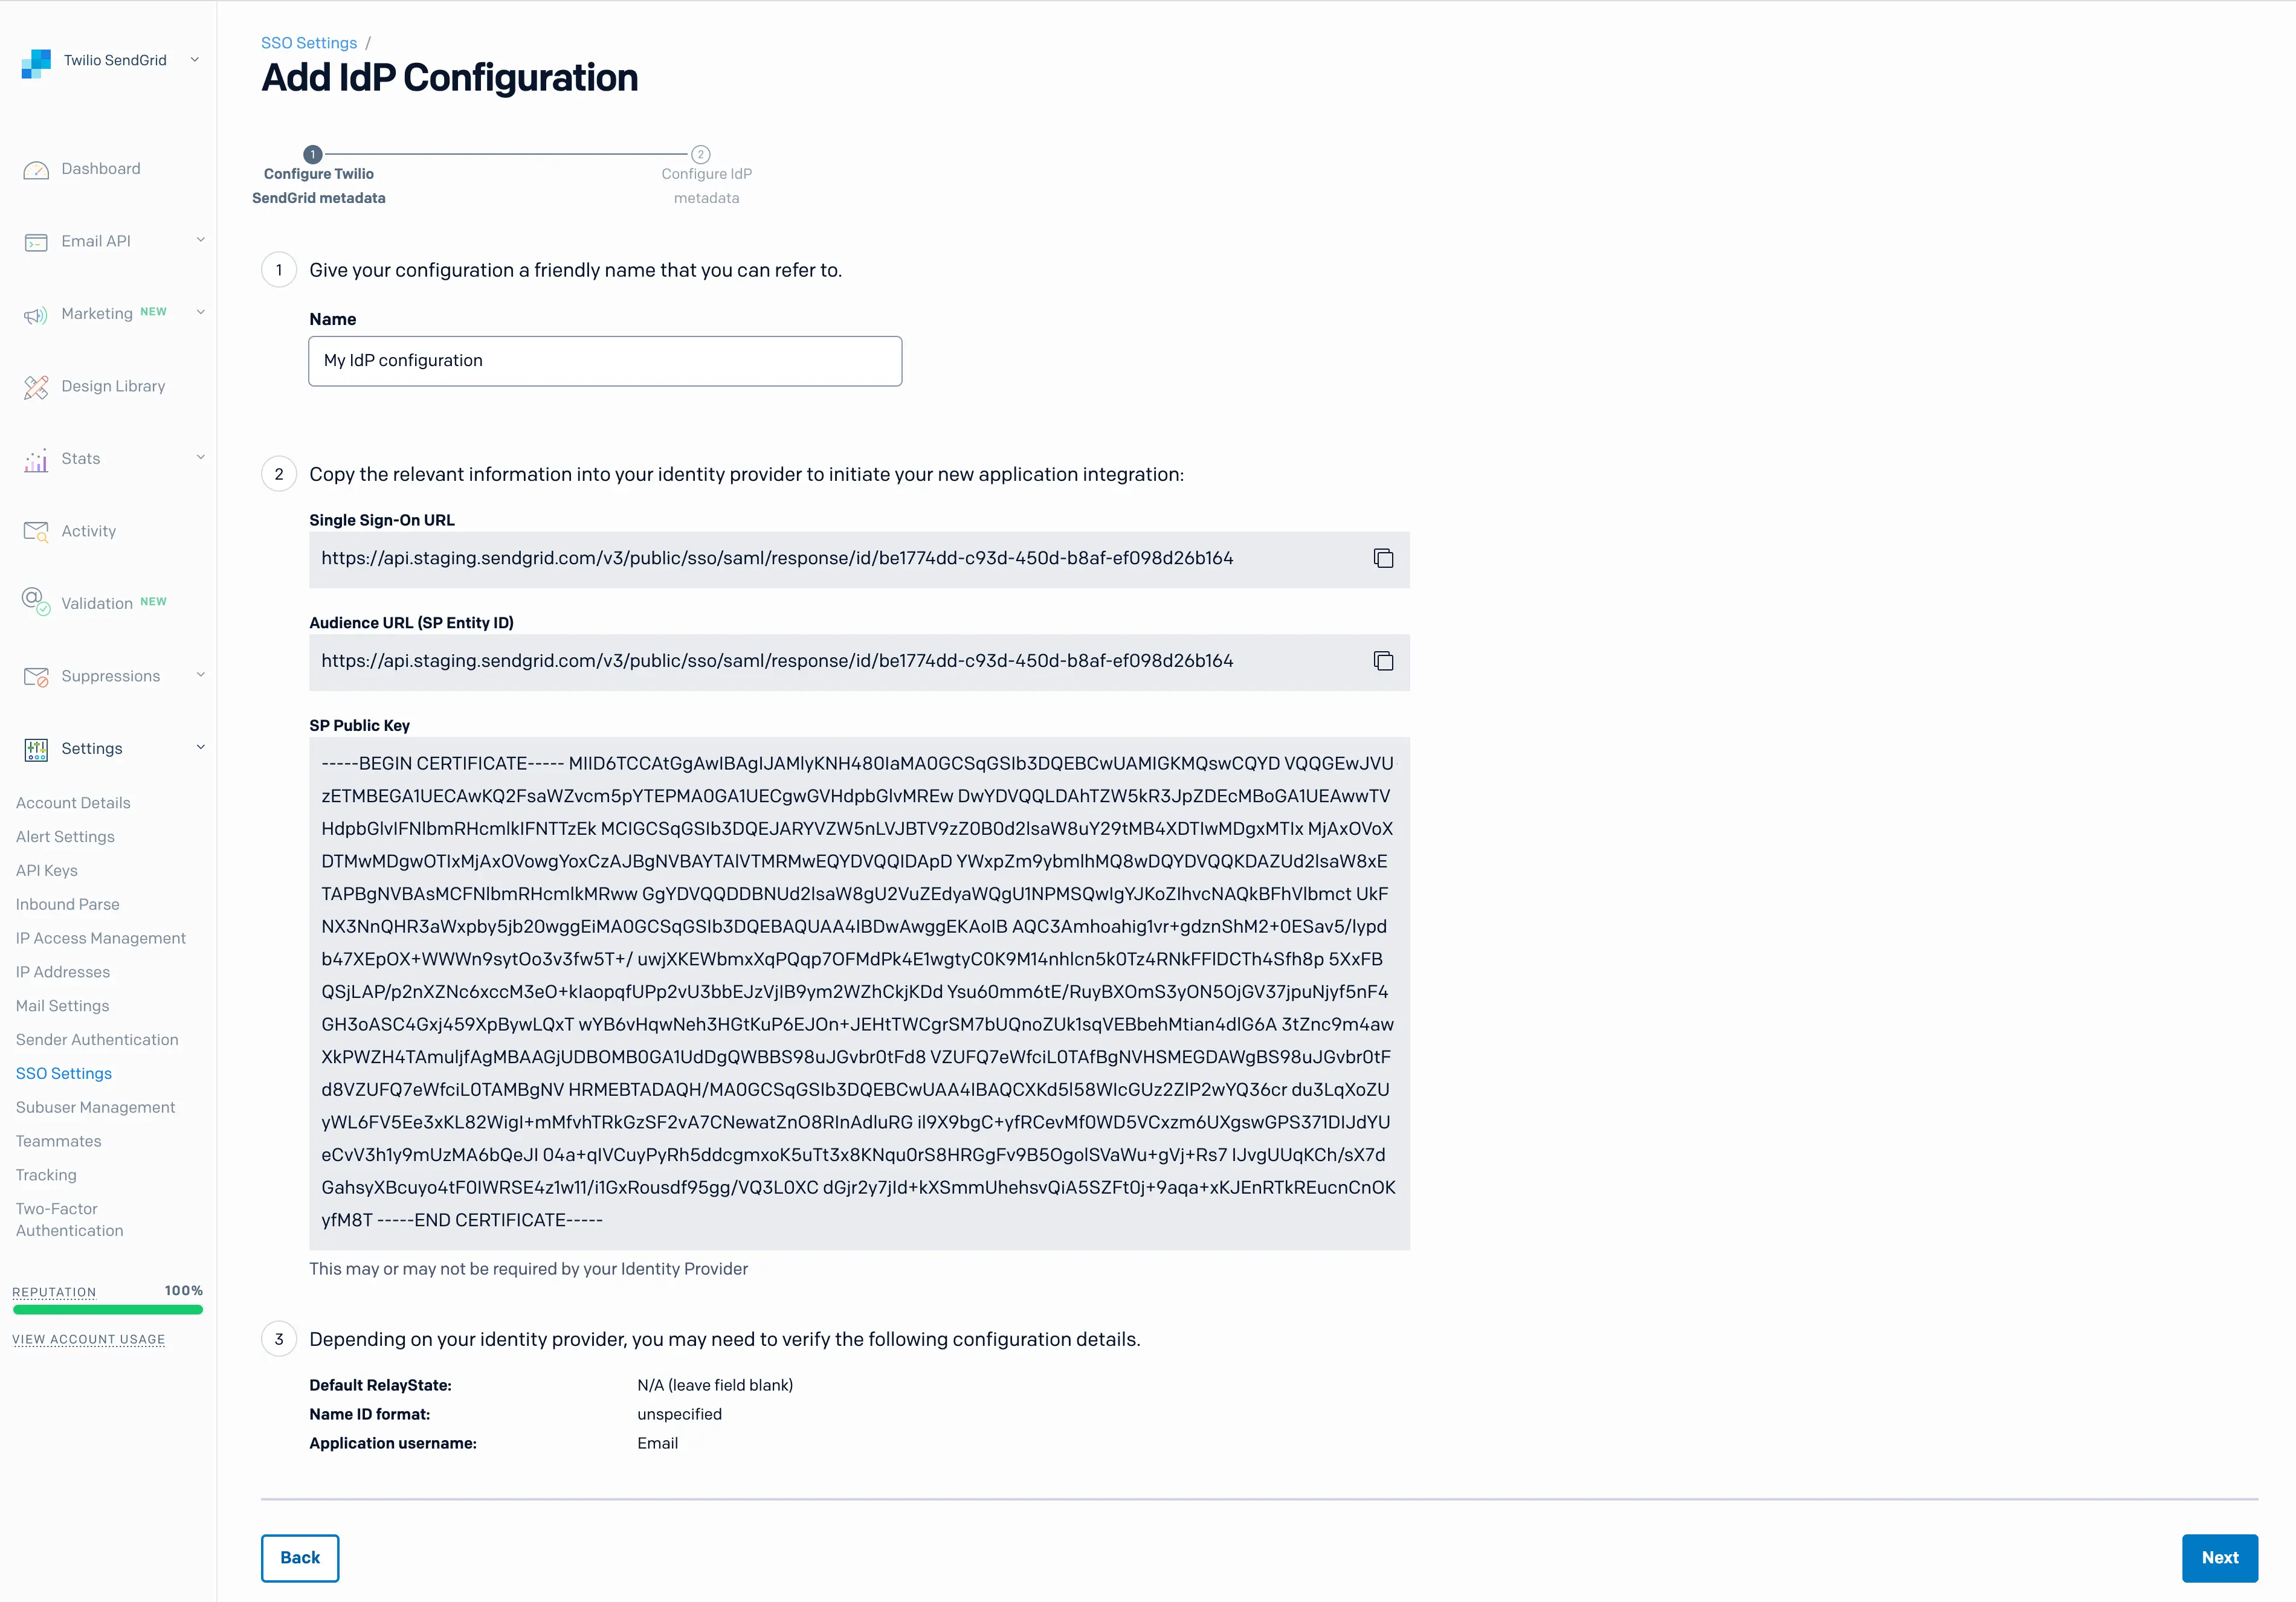
Click Add Configuration. A page will load and display the following configuration values needed by your IdP.
-
You will add the Single Sign-On URL to your IdP.
- Depending on your IdP, some of the other fields may be required. If you enable just-in-time (JIT) Provisioning, your IdP will also require FirstName and LastName attributes. See the JIT section of this page for JIT configuration details.
| Twilio SendGrid SSO Metadata Field | Description |
|---|---|
| Name | A friendly name for your SAML SSO configuration. |
| Single Sign-On URL | The Twilio SendGrid URL where your IdP should POST its SAML assertion. The Single Sign-On URL and the Audience URL are the same when using Twilio SendGrid. |
| Audience URL (SP Entity ID) | A string identifier that defines the intended audience for the SAML assertion. The Audience URL and the Single Sign-On URL are the same when using Twilio SendGrid. |
| SP Public Key | A public key used to verify that requests are coming from Twilio SendGrid. |
| Default RelayState | Identifies a specific SP resource that an IdP will direct the user to following successful authentication. |
| Name ID format | The format used by an IdP when identifying a user in the SAML assertion. |
| Application username | The default username used for the Service Provider's application. This is Email when using Twilio SendGrid. |
Once you have added the previous settings where appropriate in your IdP, your IdP will provide the values necessary to complete the setup in the Twilio SendGrid App.
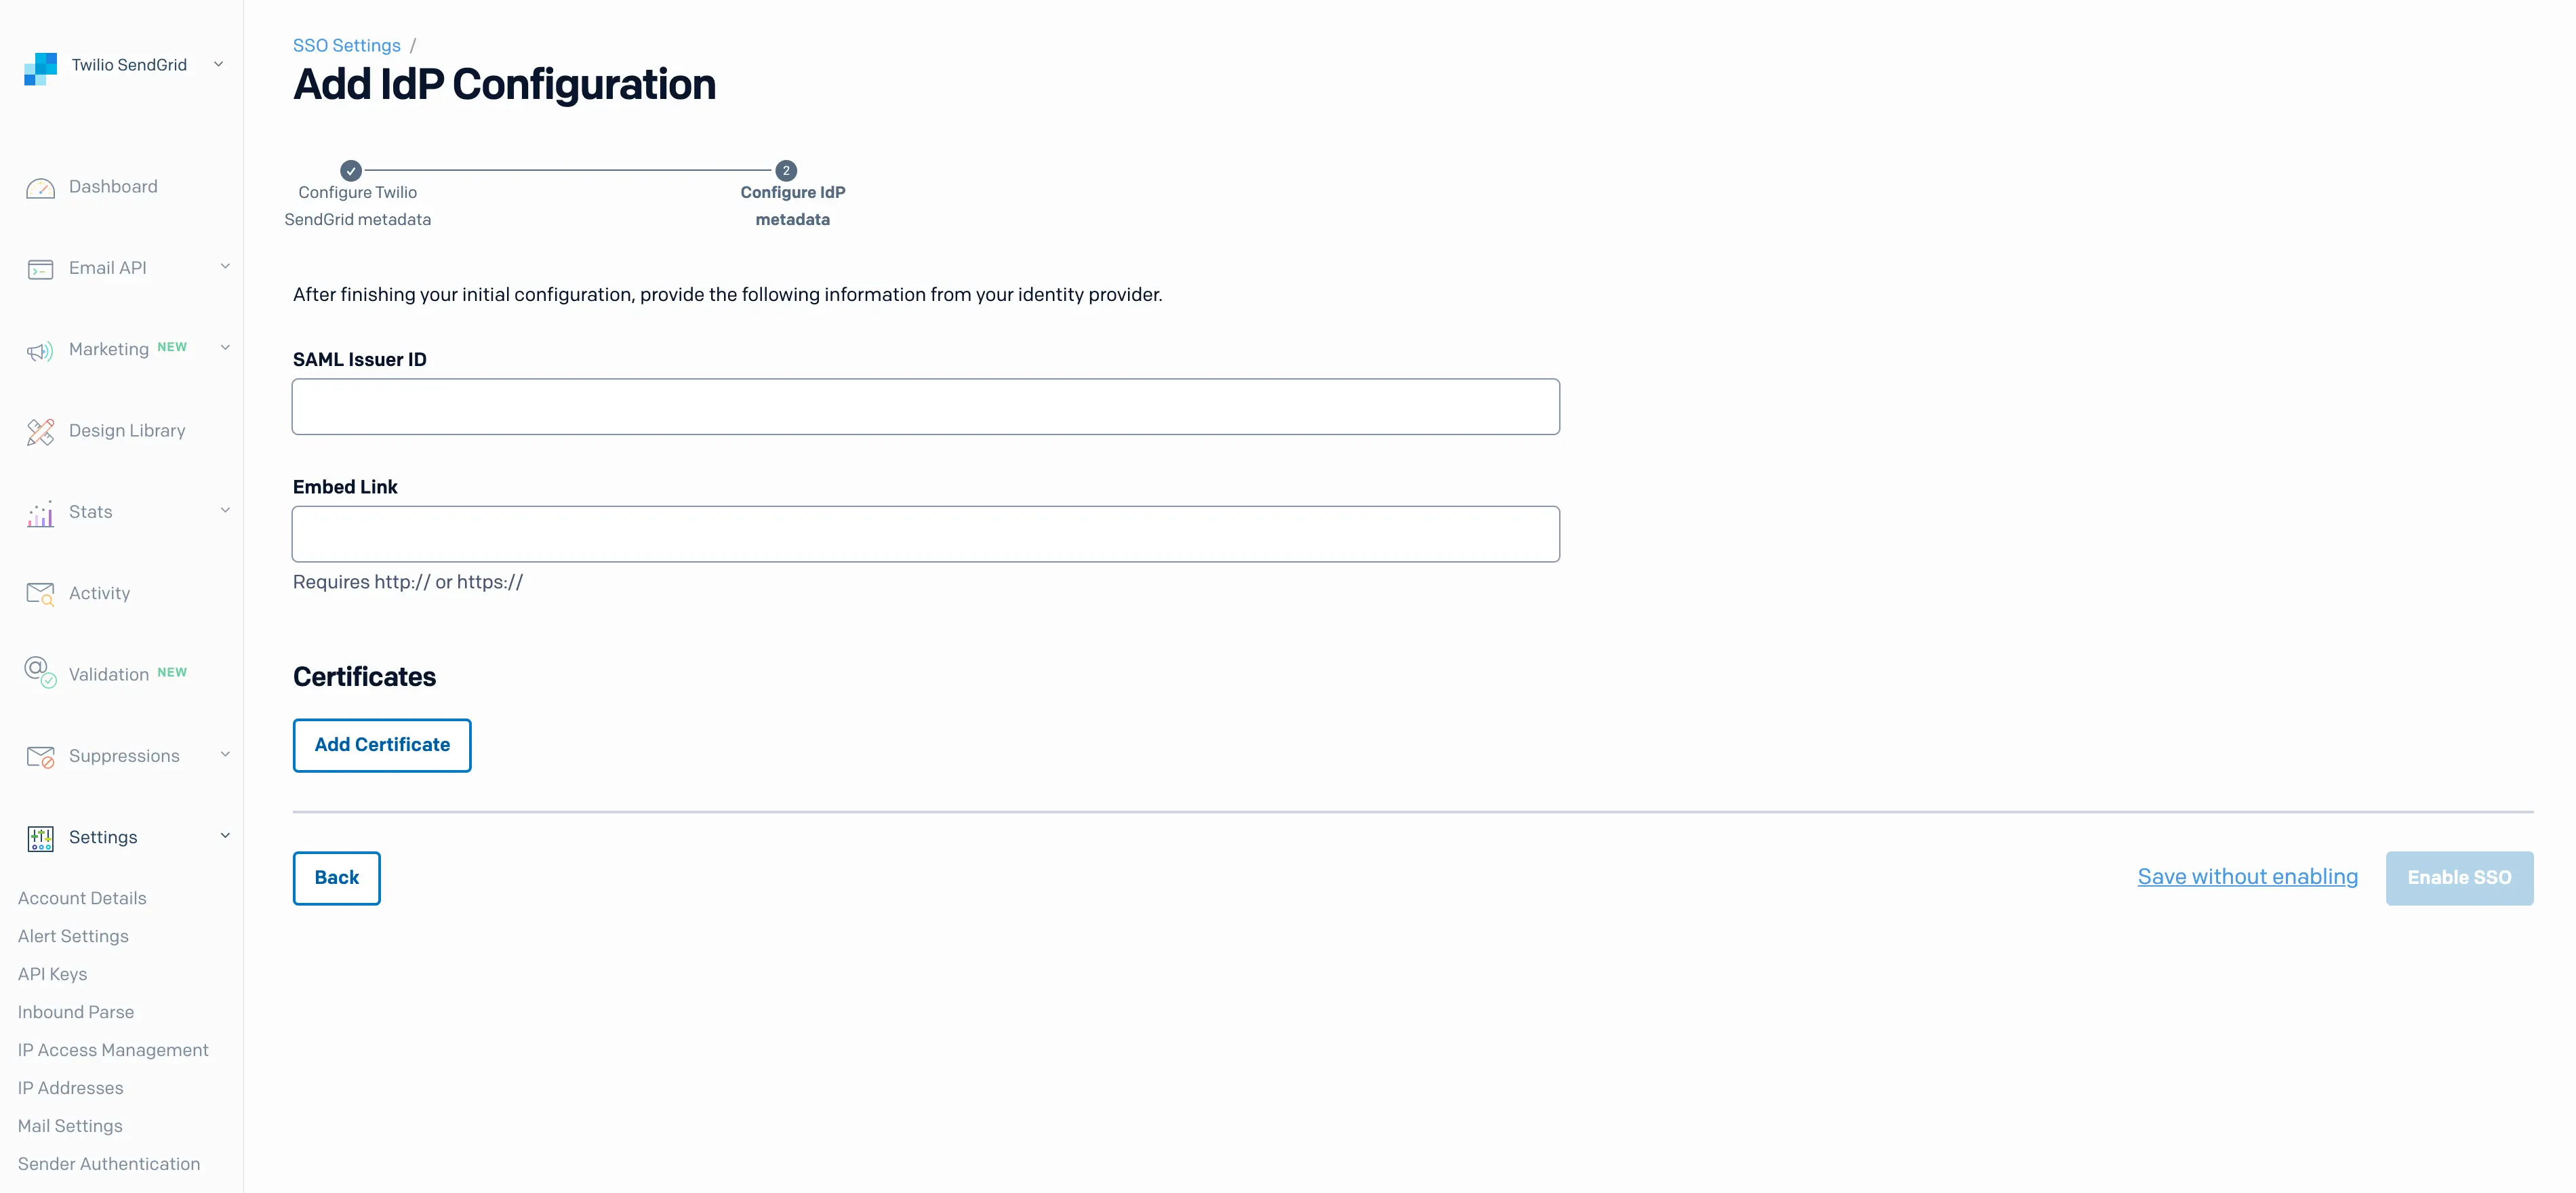
- From the page displaying your SendGrid SSO configuration, click Next. A page will load and display the following SAML fields.
| IdP Metadata Field | Description |
|---|---|
| SAML Issuer ID | An identifier — usually a URL — provided by your IdP to identify the Service Provider in the SAML interaction. Your IdP may call this an "Entity ID", "Identity Provider Issuer", "Azure AD Identifier", or other identifier. |
| Embed Link | The IdP's SAML POST endpoint. This endpoint should receive requests and initiate an SSO login flow. Your IdP may call this the "Identity Provider Single Sign-On URL", "Login URL", or some other authentication URL. |
| Certificates | This X509 certificate is used by Twilio SendGrid to verify that SAML requests are coming from an IdP it knows and trusts. |
-
Copy the values from your IdP to the appropriate fields in the Twilio SendGrid App.
-
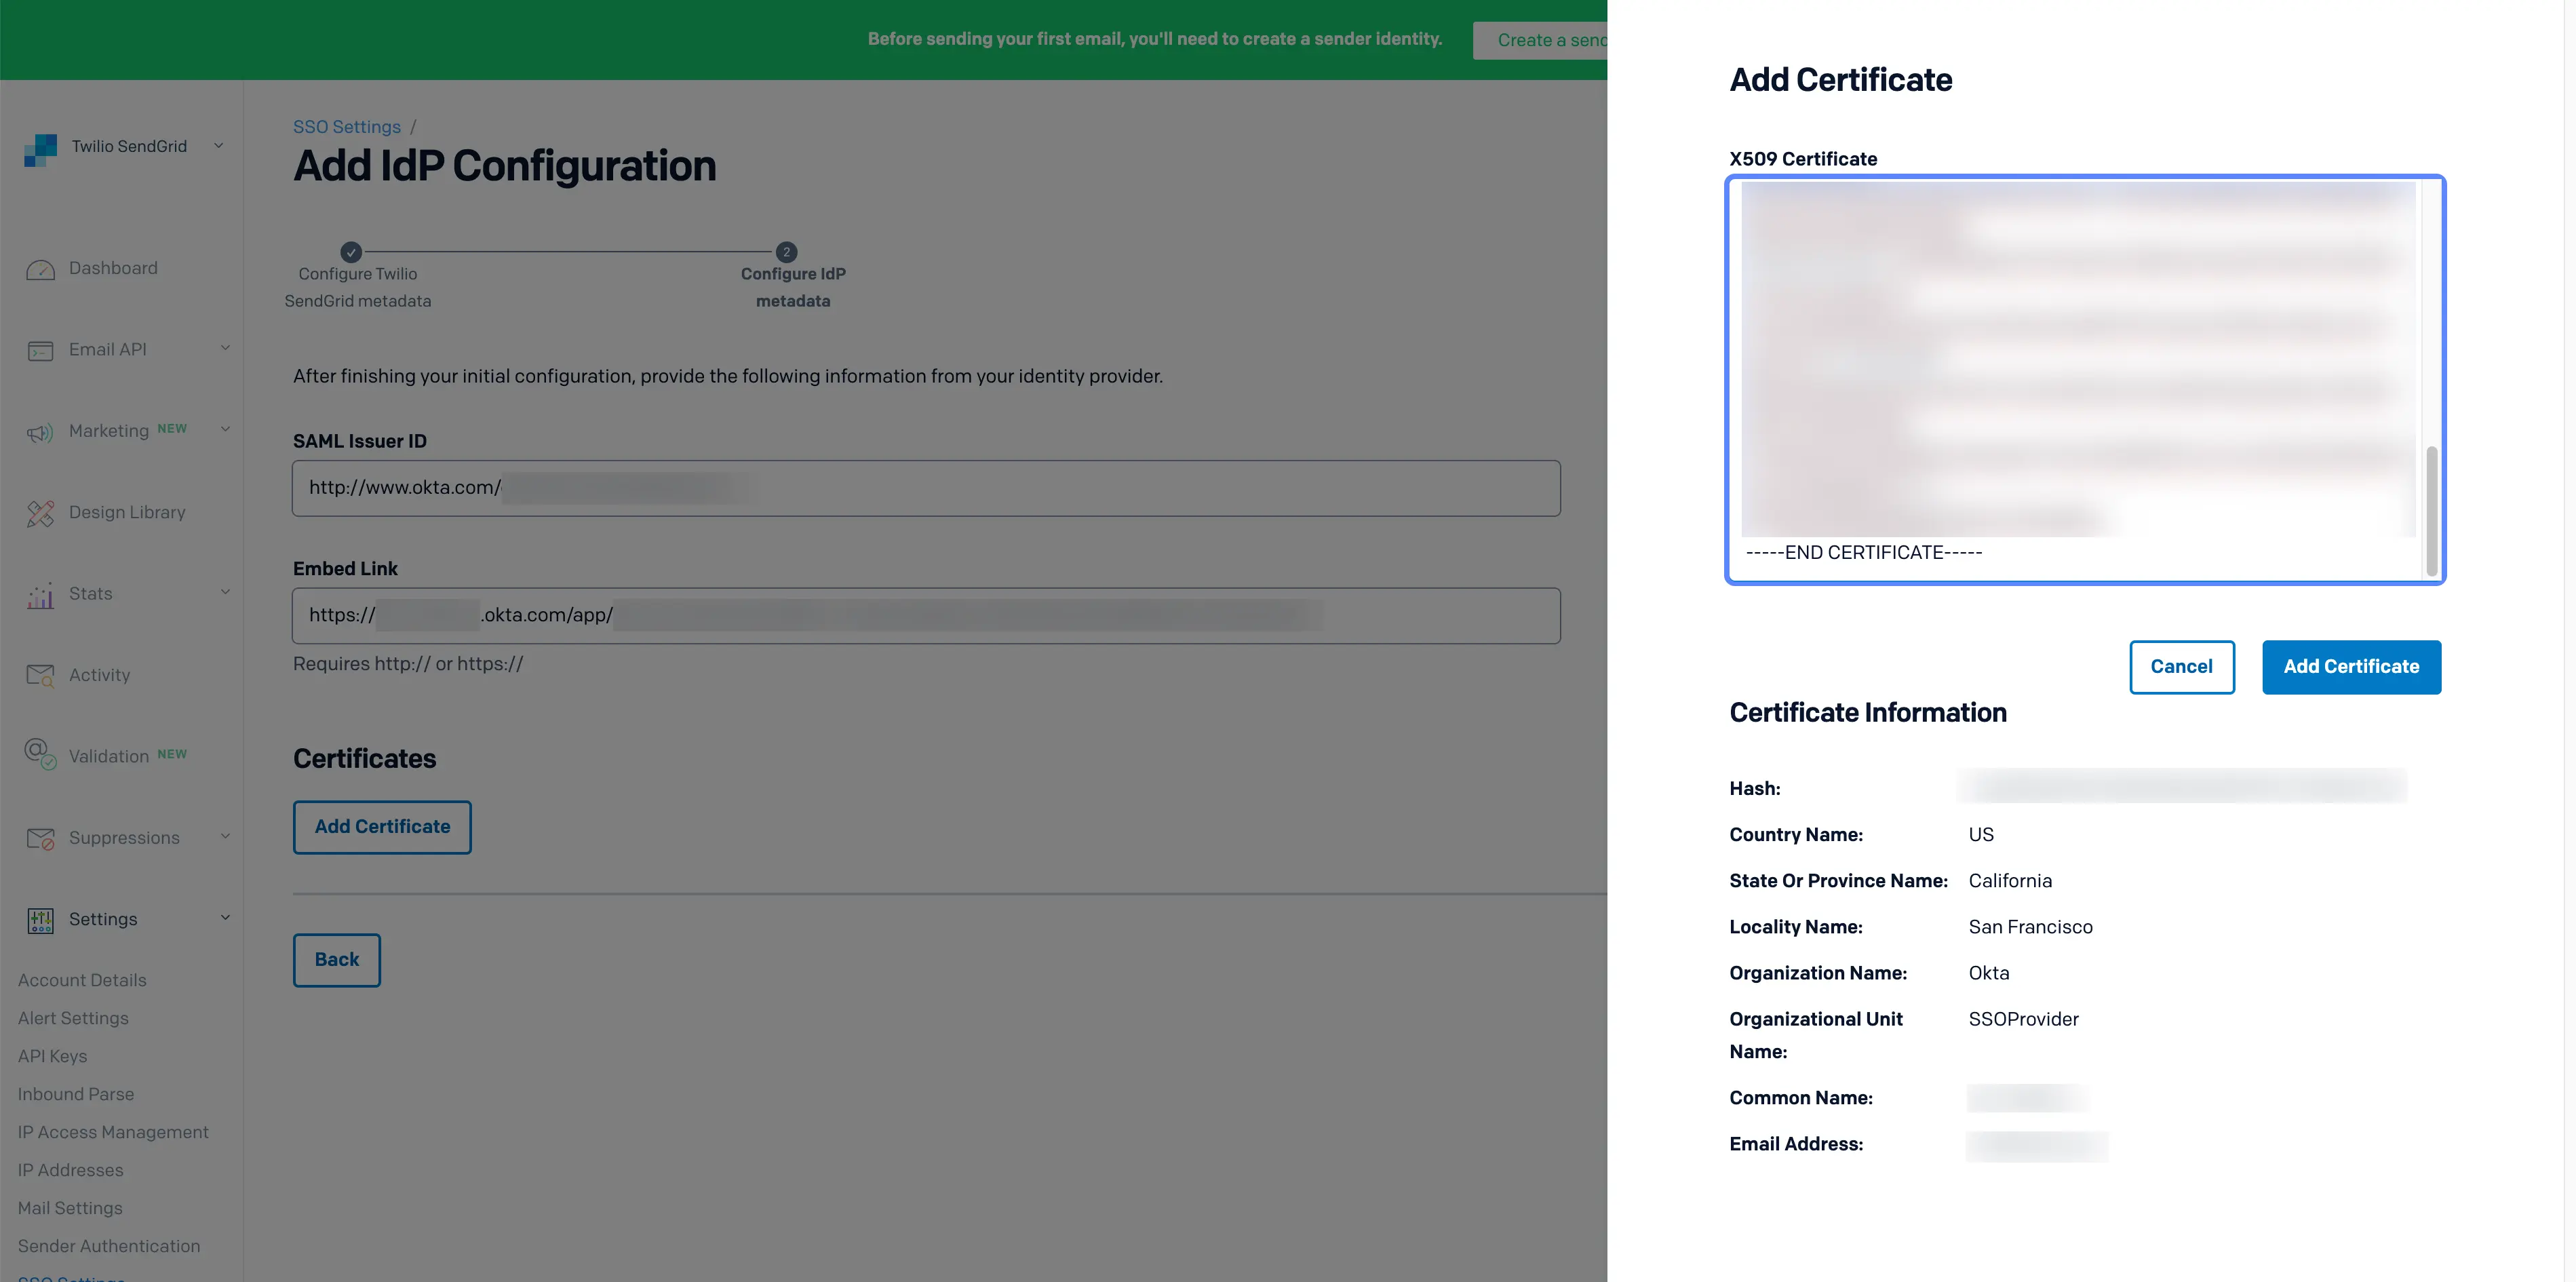
Click Add Certificates to load the configuration menu. The loaded modal will have one field labeled X509 Certificate.
-
Paste the certificate provided by your IdP into the X509 Certificate field and click Add Certificate. The modal will close after you click Add Certificate.
-
Select Enable SSO to complete the configuration. You can also Save without enabling.
Your SSO configuration should now be complete. You can follow the next steps in this document to edit or delete a configuration. You can also skip to the user management section to begin onboarding SSO users.
-
Toggle the state of a configuration by selecting Settings > SSO Settings from the left sidebar navigation of the Twilio SendGrid App. A page will load displaying all your existing IdP configurations.
-
Each configuration will have an action menu to the far right. Select this menu to display a dropdown where you can choose Edit or Disable.
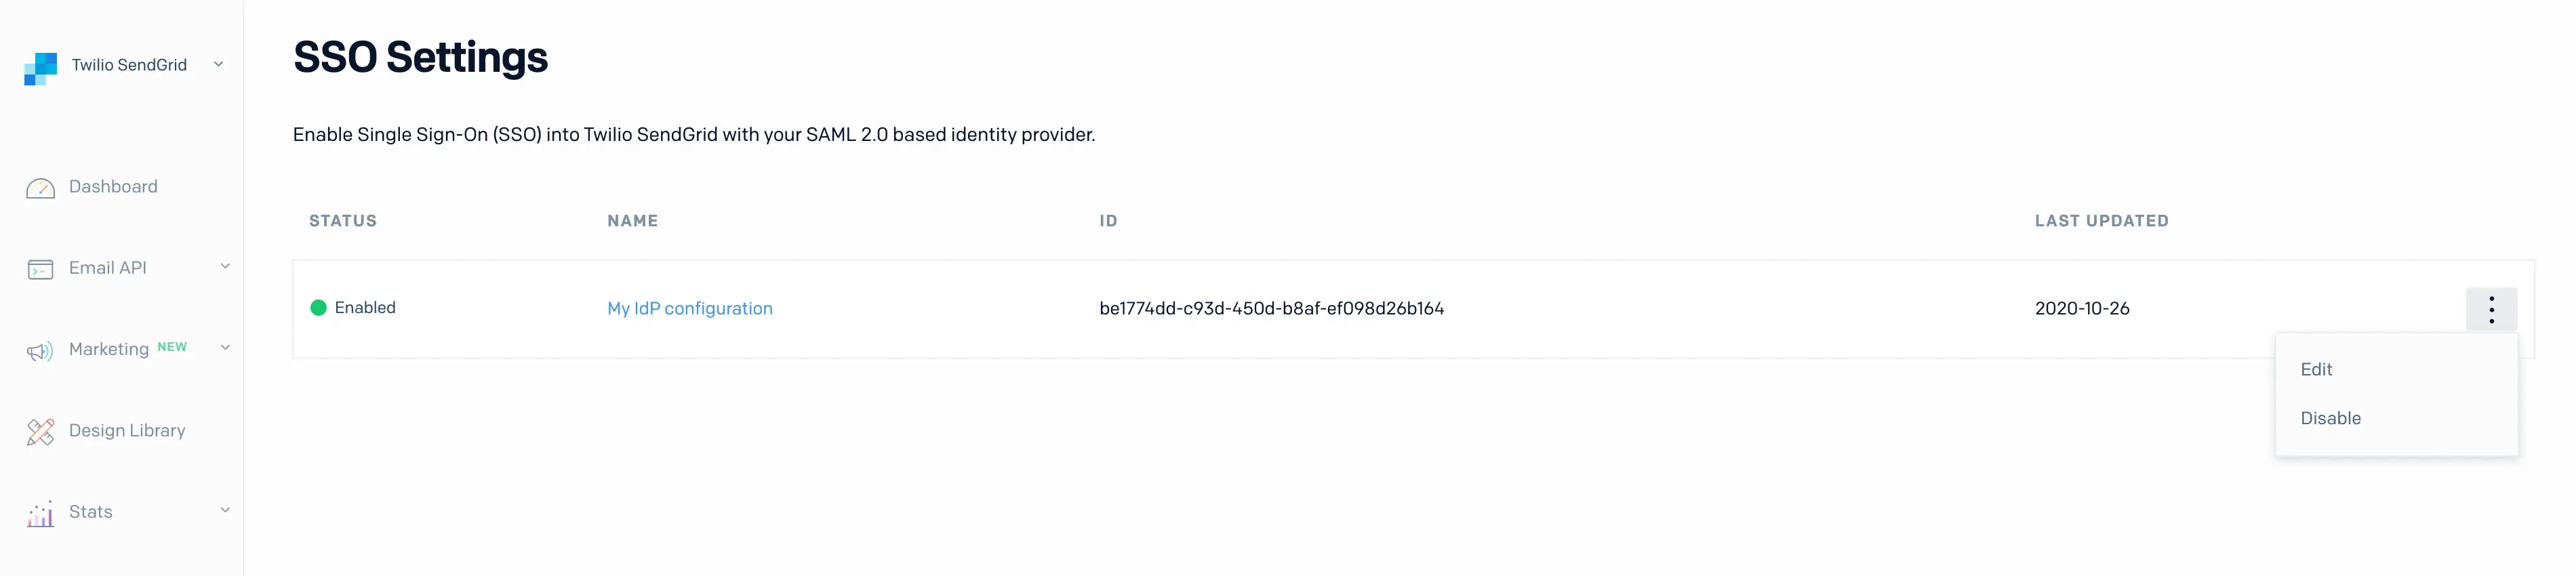
-
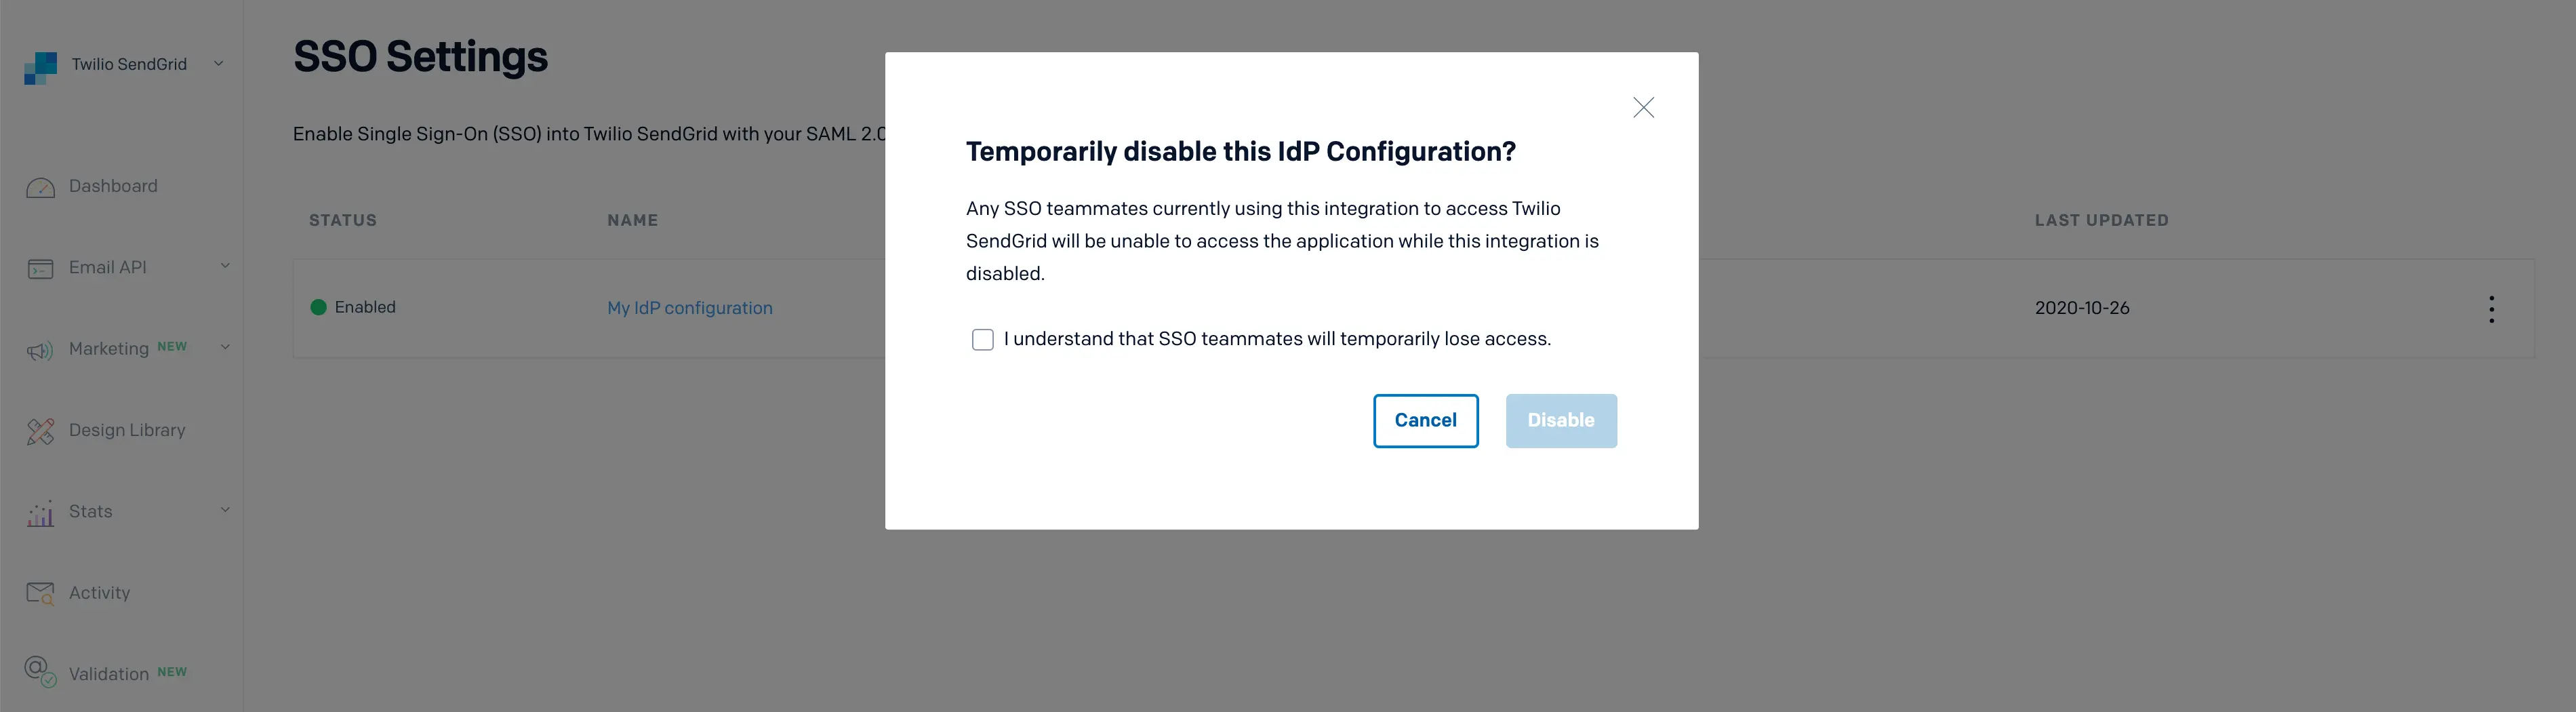
Selecting Disable will load a modal asking you to confirm your decision. Disabling a configuration will inactivate the configuration but will not delete it. Once disabled, any SSO users whose access is tied to the configuration will no longer be able to authenticate with Twilio SendGrid
-
To reenable a configuration, click the action menu. For any disabled configuration, you will see the options to Edit or Enable.
-
Selecting Enable will reactivate the configuration for any Teammates assigned to it.
-
Edit or delete a configuration by selecting Settings > SSO Settings from the left sidebar navigation. A page will load displaying all your existing IdP configurations.
-
Each configuration will have an action menu to the far right. Select this menu to display a dropdown where you can choose Edit or Disable.
-
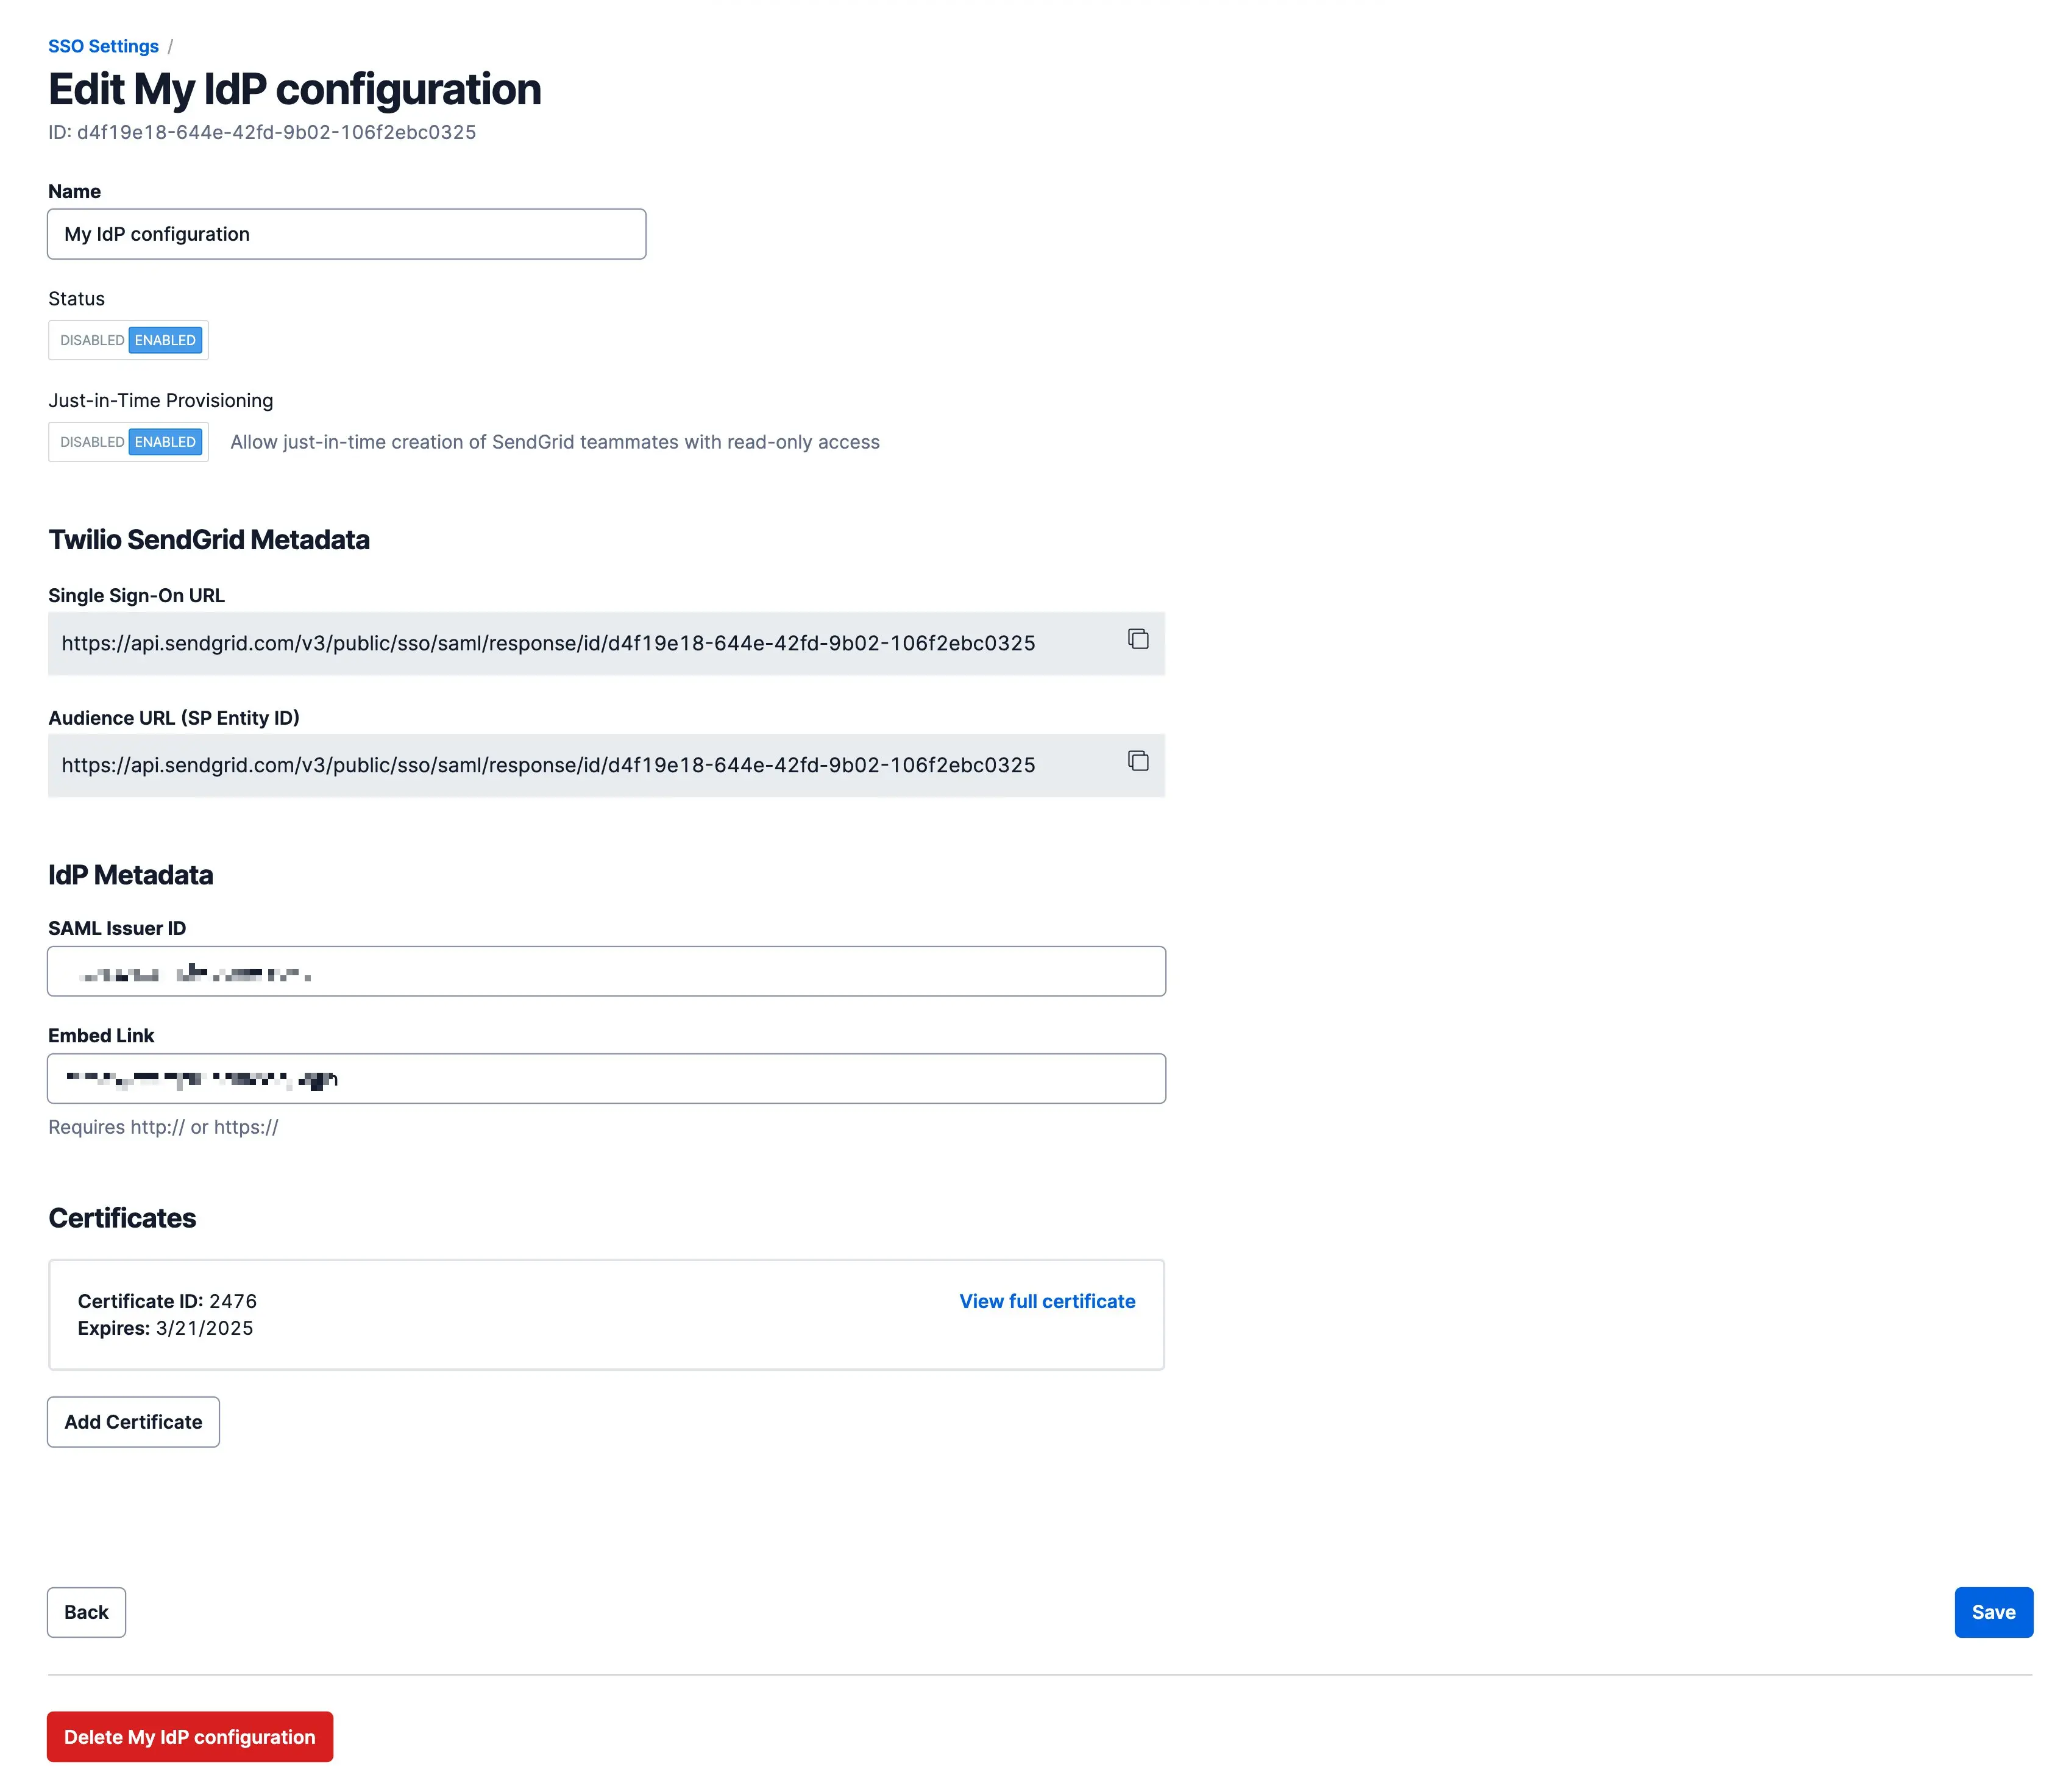
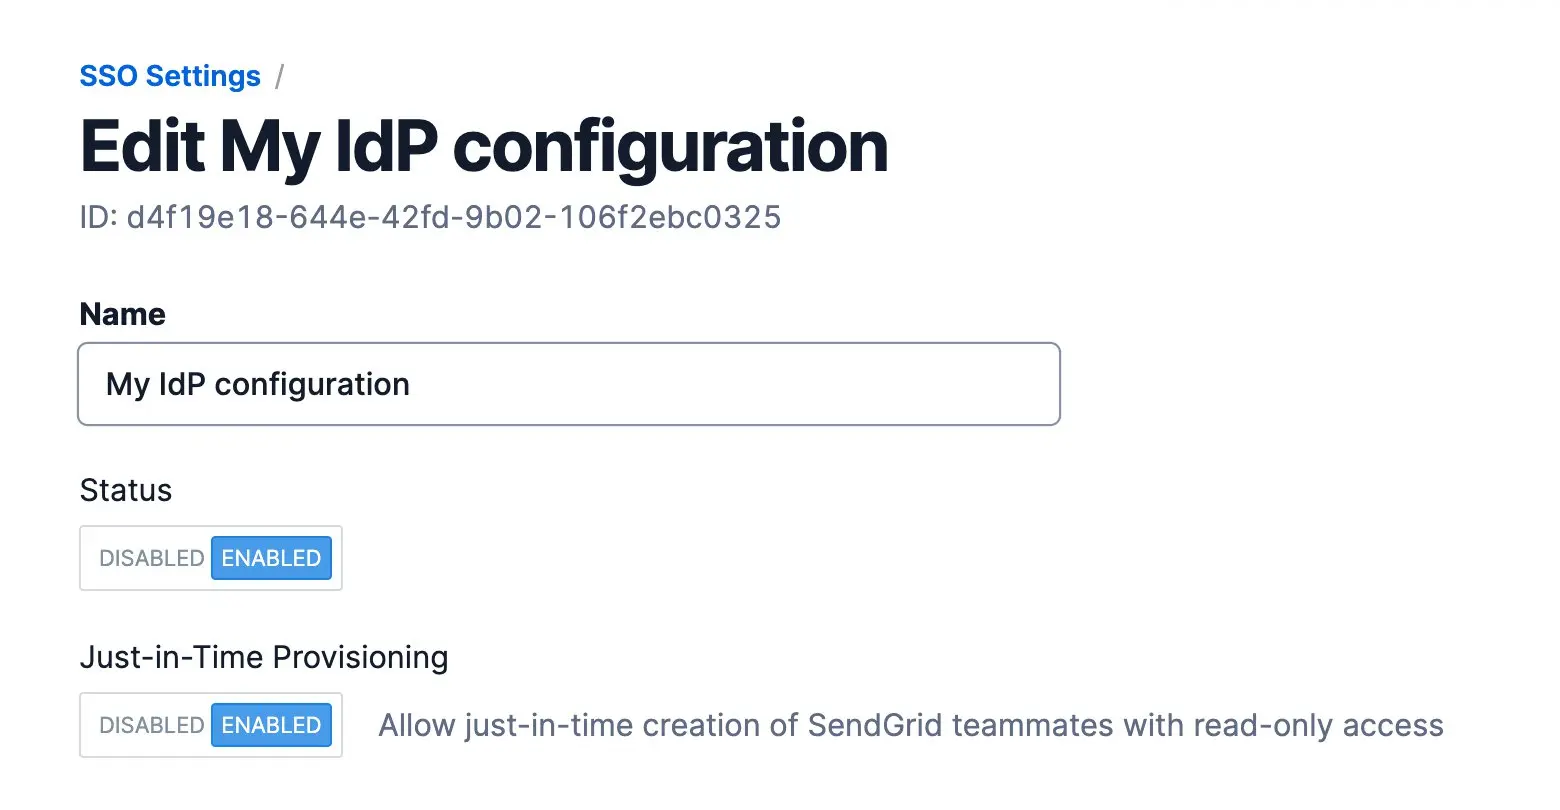
Select Edit from the action menu. A page will load that allows you to modify or complete an unfinished SSO integration. In addition to the fields available during initial setup, you will have Status and Just-in-Time Provisioning toggles.
| Twilio SendGrid SSO Metadata Field | Description |
|---|---|
| Status | A toggle where you can enable or disable the SSO configuration. |
| Just-in-Time Provisioning | A toggle to enable or disable just-in-time (JIT) provisioning. When JIT is enabled, you can auto provision users with read-only permissions. See the just-in-time provisioning section of this doc for more information. |
-
After modifying any of the fields in your configuration, select Save at the bottom of the page.
-
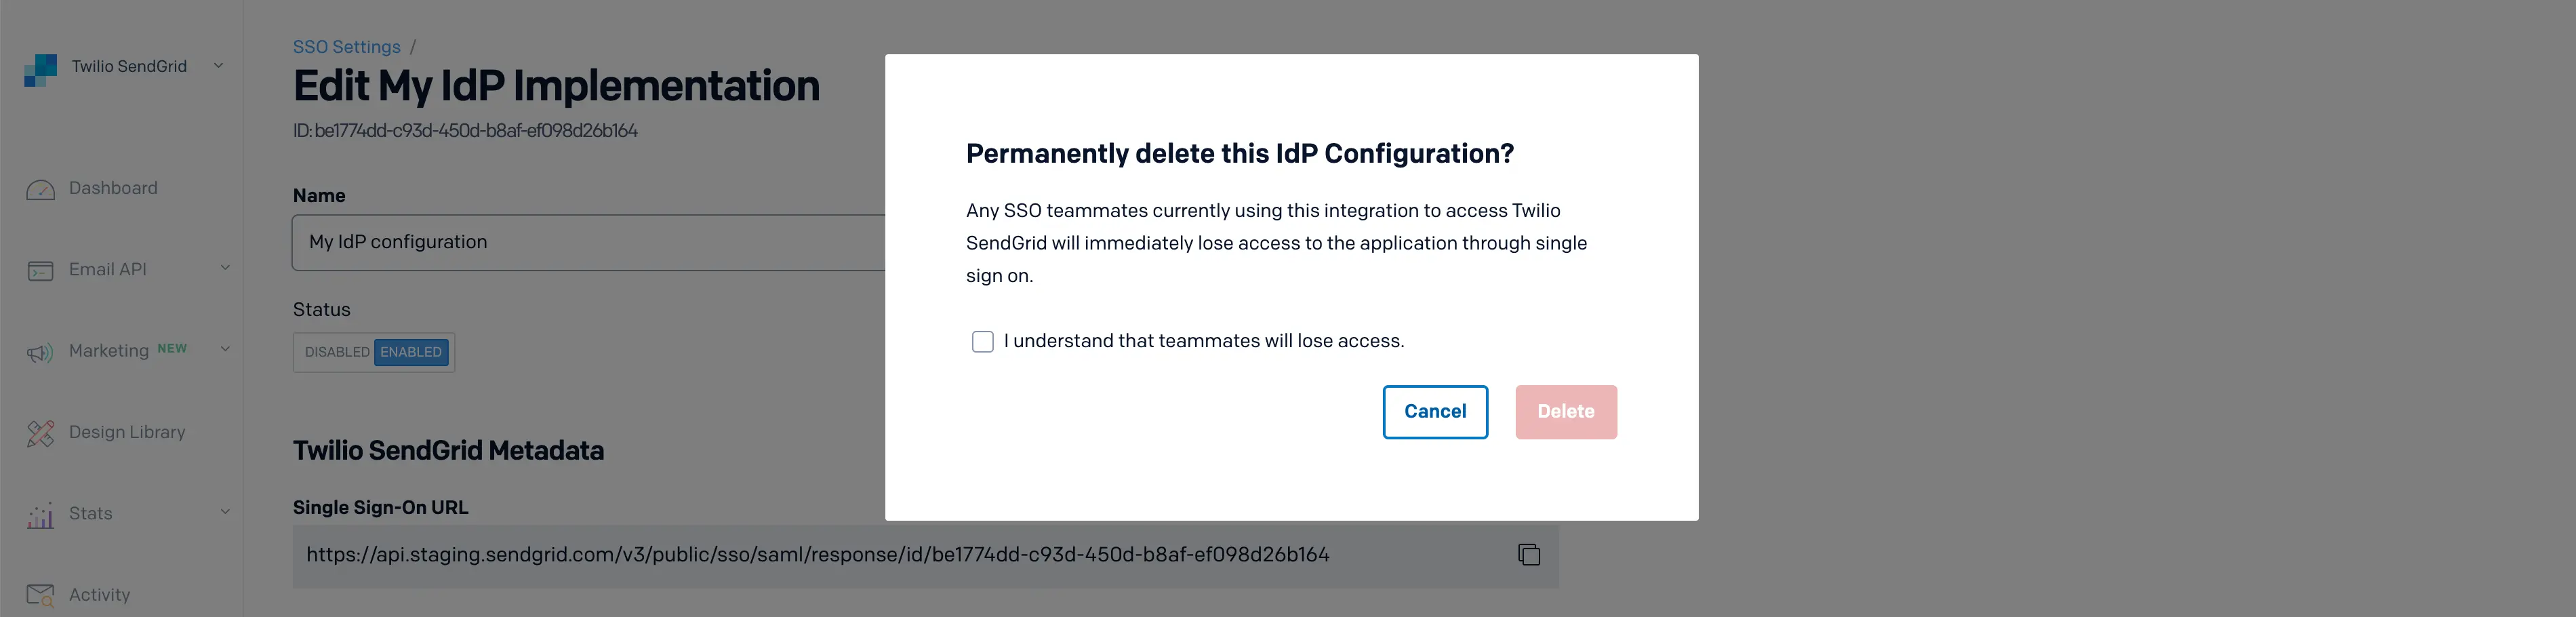
To delete the configuration, select Delete My IdP configuration.
-
Selecting Delete My IdP configuration will load a modal asking you to confirm the deletion. Check the confirmation box and select Delete.
Info
If you change your SSO IDP connection or configuration, you don't need to delete and recreate SSO teammates.
Once you have successfully enabled an SSO IdP configuration, you will need to add SSO users to the account. Twilio SendGrid calls these users Teammates.
An account administrator can add two types of Teammates to an account: SSO Teammates and Password Teammates.
Password Teammates will log in with a username, password, and Twilio SendGrid 2FA. This documentation covers the SSO Teammate setup only. To learn more about our Teammates feature, see the dedicated Teammates documentation.
Warning
A Teammate can either be a Password Teammate or an SSO Teammate but not both.
Twilio SendGrid doesn't offer a migration tool that will convert existing Teammates to SSO Teammates. You must manually delete a Password Teammate and add them back as an SSO Teammate.
Info
Twilio SendGrid requires Two-factor Authentication (2FA) to access its services. Configuring 2FA for SSO Teammates should not be done in the Twilio SendGrid App. You will manage any 2FA requirements for your SSO Teammates in your IdP. For example, the Okta or Duo apps may be configured to send Push or SMS notifications.
As an administrator of a parent Twilio SendGrid account, you can assign SSO Teammates to the parent account or to specific Subusers. Additionally, you can grant these Teammates restricted access to specific Subusers accounts and define their individual permissions.
Info
Only administrators on a Twilio SendGrid parent account can access both the Twilio SendGrid parent account and its Subusers.
Think of Subusers as separate Twilio SendGrid sub-accounts that are tied to a single parent account. Each Subuser can have its own authenticated domains, IP addresses, and Teammates. However, all billing for the Subusers will roll up to their parent Twilio SendGrid account. Subusers are helpful for several use-cases. For example, a parent account may create one Subuser for transactional email and another for marketing email. A service integrator may create a Subuser for each client they serve.
Think of Teammates like users on a single Twilio SendGrid parent or Subuser account. When adding Teammates to your parent account, which is configured with your SSO IdP, you will elect to give the Teammate access to the parent account or a selection of Subusers.
See the Subusers documentation to learn more about Twilio SendGrid Subusers and how to manage them.
If you enable just-in-time (JIT) provisioning for your SSO configuration, you need only to assign users to the Twilio SendGrid App in your IdP. Assigned users will be created as SSO Teammates when they log in to Twilio SendGrid for the first time.
Info
JIT provisioning will assign Teammates to the Twilio SendGrid parent account. It's not possible to assign JIT provisioned Teammates to Subusers.
Info
JIT provisioning is only possible from an IdP-initiated sign-on flow. When assigning users to your Twilio SendGrid App, you may want to instruct them to log in from your IdP the first time.
To enable JIT provisioning for your SSO configuration, you must edit the SAML configuration from the SSO settings page in the Twilio SendGrid App.
-
Edit a configuration by selecting Settings > SSO Settings from the left sidebar navigation. A page will load displaying all your existing IdP configurations.
-
Each configuration will have an action menu to the far right. Select this menu to display a dropdown where you can choose Edit or Disable.
-
Select Edit from the action menu. A page will load that allows you to modify or complete an unfinished SSO integration. In addition to the fields available during initial setup, you will have Status and Just-in-Time Provisioning toggles.
| Twilio SendGrid SSO Metadata Field | Description |
|---|---|
| Status | A toggle where you can enable or disable the SSO configuration. |
| Just-in-Time Provisioning | A toggle to enable or disable just-in-time (JIT) provisioning. When JIT is enabled, you can auto provision users with read-only permissions. See the just-in-time provisioning section of this doc for more information. |
-
Click the Just-in-Time Provisioning toggle so that Enabled is shown in blue. Then, click Save at the bottom of the page.
The Twilio SendGrid SAML integration supports FirstName and LastName entity attributes — be sure to include them. Without the first and last name attributes, Twilio SendGrid will assign the name Unknown to both. These attributes will have the values "user.firstName" and "user.lastName", "user.givenname" and "user.surname", or something similar depending on your IdP.
You can modify a Teammate's first and last names as an administrator in the Twilio SendGrid App, but we recommend that you include the appropriate name values initially.
JIT provisioned Teammates will be given a Restricted Access account with permissions that correspond to Read-Only access. An administrator can modify a Teammate's permissions in the Twilio SendGrid App. See the Teammates documentation for more about Teammate scopes.
A Teammate can be added to a parent account, a single Subuser, or multiple Subusers.
- To add a Teammate, navigate to Settings > Teammates. A page will load displaying any existing Teammates. If there are no existing Teammates, you will see a "Get started creating teammates" message.
- Click Add Teammate > Add SSO teammate.
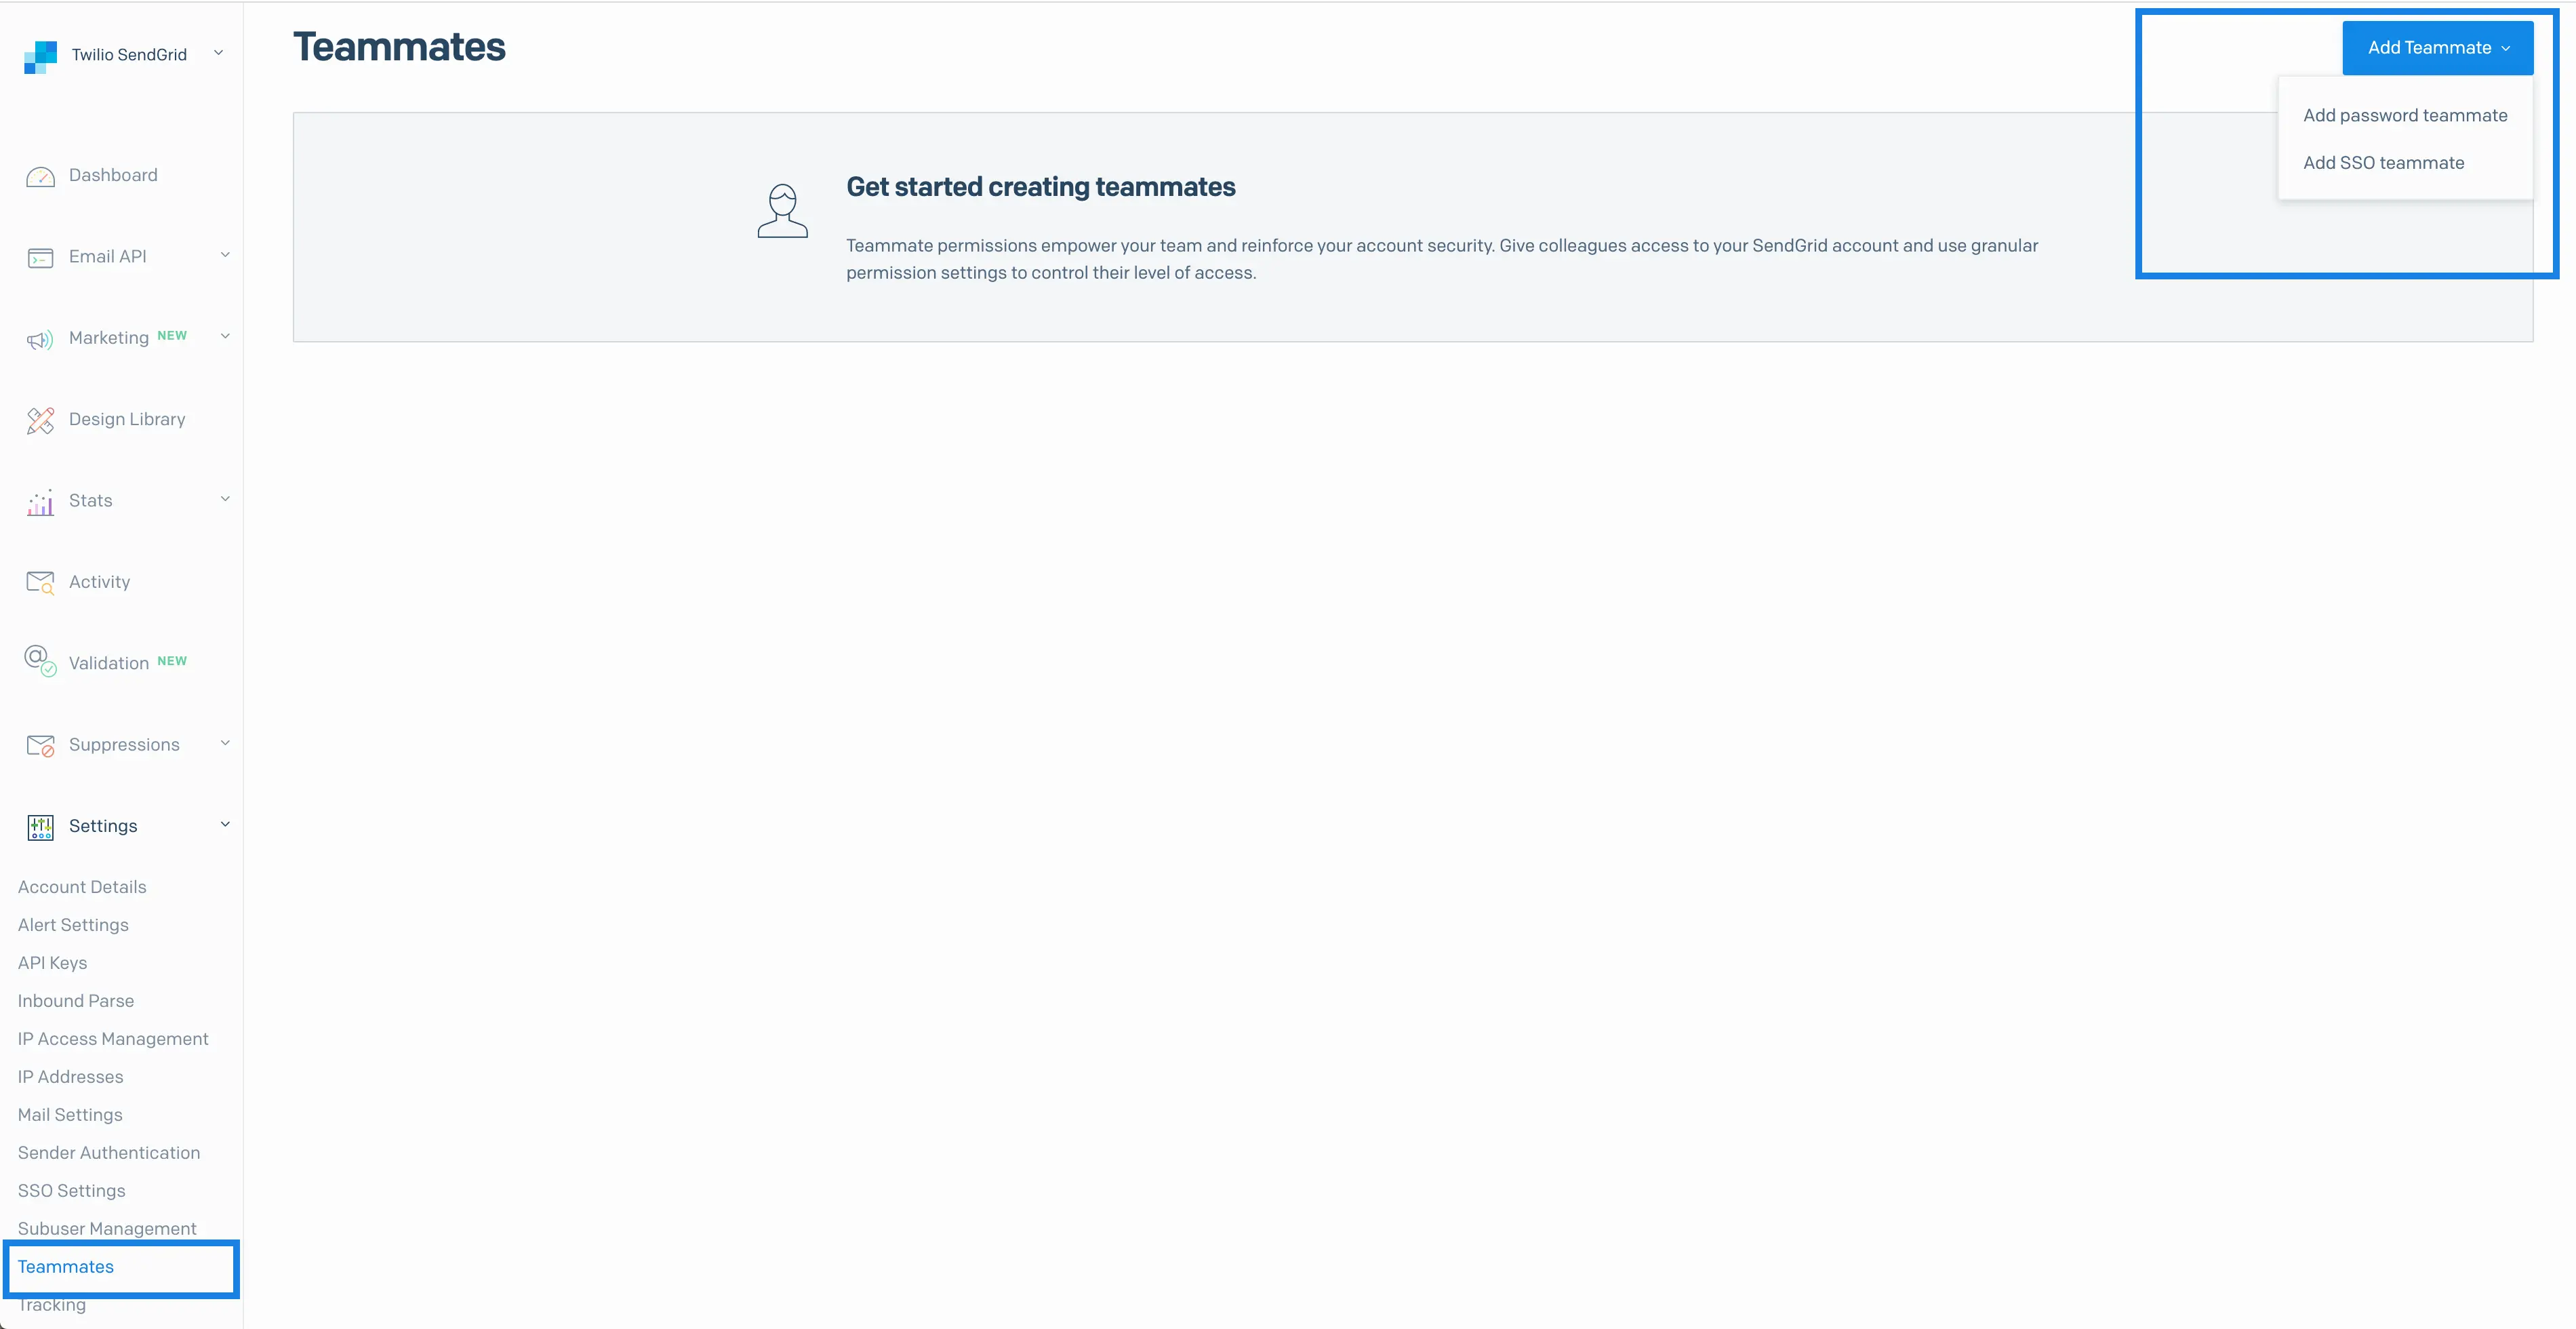
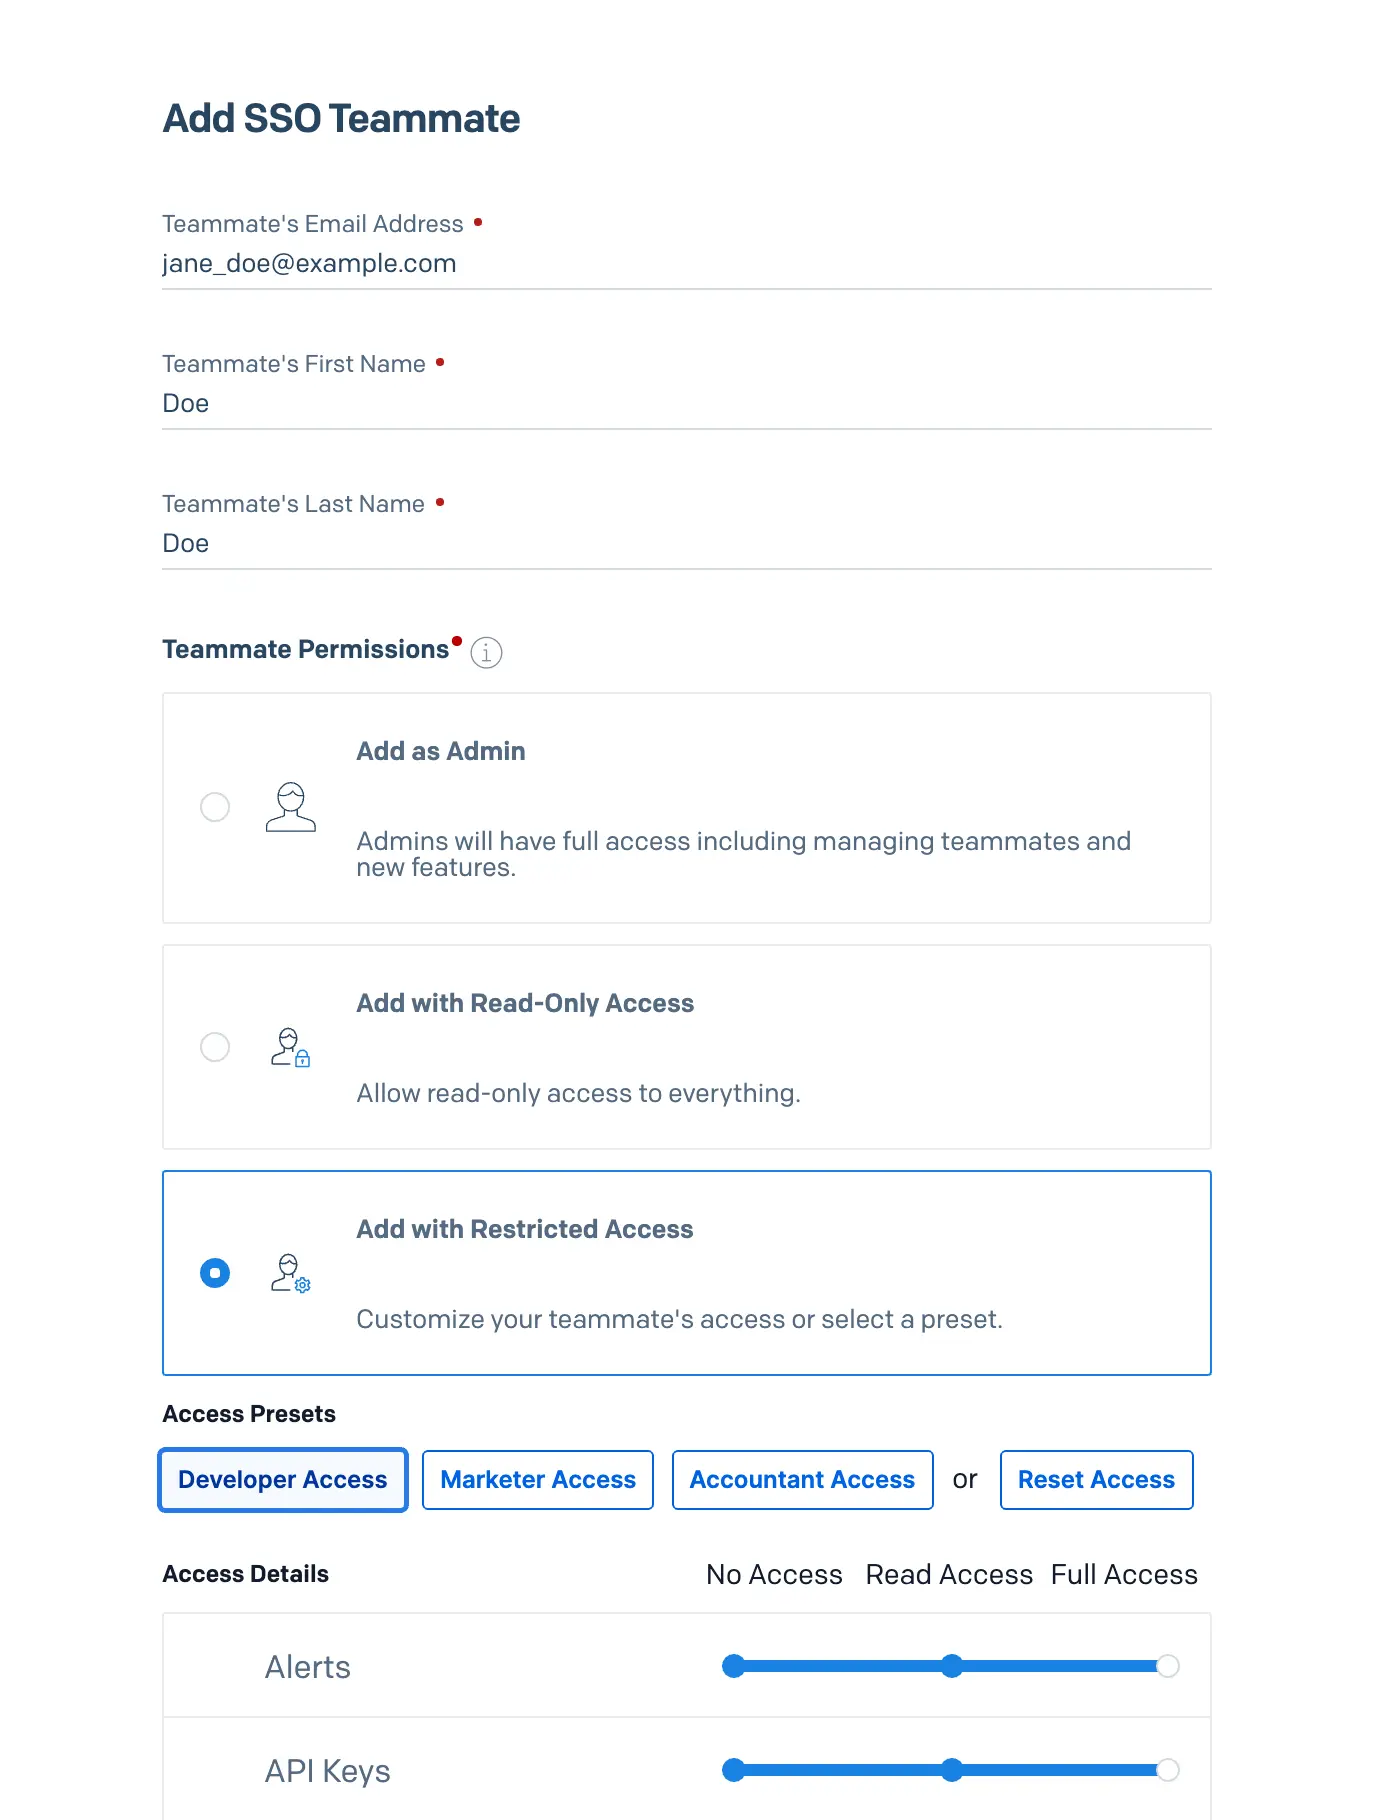
- A menu will load and display the following fields required to create the Teammate.
| Teammate Configuration Field | Description |
|---|---|
| Teammate's Email Address | Twilio SendGrid will use this email address as the primary identifier when authenticating the SSO user. For this reason, a Teammate's email address must match the address you assign it in your IdP, and the address cannot be changed after you create it. If a single user must access multiple accounts, you will need to configure your IdP to pass through a unique email address for each account+user pair; these unique email addresses must be added as SSO Teammates in the Twilio SendGrid App. |
| Teammate's First Name | The Teammate's first name. |
| Teammate's Last Name | The Teammate's last name. |
- At this point, you must select whether your Teammate should be granted access to the parent account or a selection of Subusers. To grant the Teammate access to the parent account, select Add to this parent account and select Next.
- When granting an SSO Teammate access to the parent account, you will be taken to a second menu where you can give the Teammate admin, read-only, or restricted access permissions. See the Teammates documentation for more about Teammate scopes.
You may give a Teammate access to multiple Subusers from the parent account. When adding a Teammate to multiple Subusers from the parent account with the SendGrid application user interface (UI), they will be given administrator access to each Subuser. If you prefer to give a Teammate restricted access to multiple Subusers, you can do so with the Single Sign-On Teammates API.
To add a Teammate to multiple Subusers from the parent account, follow steps 1 through 3 in Add a Teammate to a parent account section above. Then, proceed with the instructions below.
- At this point, you must select whether your Teammate should be granted access to the parent account or a selection of Subusers. To grant the Teammate access to a selection of Subusers, select Add to specific subuser account and select Next.
- Select the specific Subusers you want to make available.
- Click Save to finish creating the Teammate.
To add a Teammate to multiple Subusers with restricted access, see the Single Sign-On Teammates operations for details. General steps are provided below.
- When creating or editing a Teammate, set the
has_restricted_subuser_accessBoolean property totrue. - In the
subuser_accessarray, define an object for each Subuser the Teammate should have access to. - In each object:
- Include a Subuser ID in the
idproperty to grant the Teammate access to that Subuser. - Set the
permission_typeproperty torestricted. - Provide a persona or the individual permissions the Teammate should be granted in the
scopesarray.
- Include a Subuser ID in the
See Teammate Permissions for more information about the personas and scopes that may be given to a Teammate. See the Single Sign-On Teammates API reference for detailed API information.
To grant restricted permissions to a single Subuser account using the SendGrid application UI, you can add an SSO Teammate to the specific Subuser after switching into the desired Subuser's account.
- Click your account user at the top left of the navigation sidebar to display a dialog. Click Change Account in the dialog.
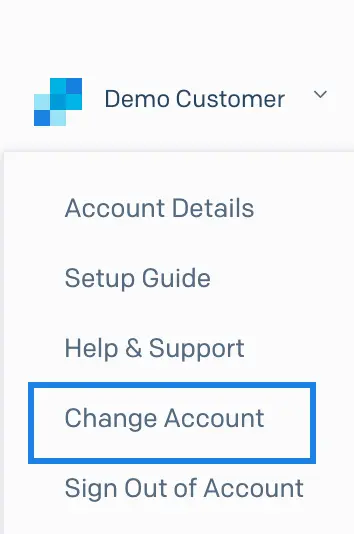
- A page will load displaying any existing Subusers.
- Click Log In beside the Subuser to which you want to add the Teammate. You will then be logged in to the SendGrid Subuser's account.
- You can now add a Teammate to the specific Subuser. The process follows the same steps listed in the "Add a Teammate to a parent account" section of this page.
- Because you are adding the Teammate directly from the context of the Subuser's account, you can assign the Teammate admin, read-only, or restricted access permissions for the Subuser. See the Teammates documentation for more about Teammate scopes.
Existing Teammates can be edited from the Settings > Teammates page of the Twilio SendGrid App.
-
On the Teammates management page, each Teammate will have an action menu on the far right. Click the action menu to reveal Edit and Delete options.

-
Selecting Edit from the action menu will load a sidebar modal with the same fields that were present when adding the Teammate. You can edit any of the fields except the Teammate's email address, which cannot be changed after the Teammate is created.
Existing Teammates can be deleted from the Settings > Teammates page of the Twilio SendGrid App.
-
On the Teammates management page, each Teammate will have an action menu on the far right. Click the action menu to reveal Edit and Delete options.
-
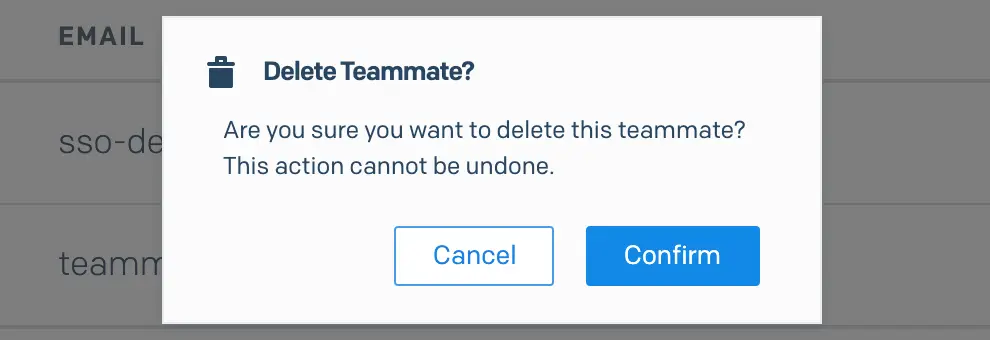
Select Delete from the action menu to load a modal asking you to confirm the deletion. Click Confirm.
User authentication can be initiated in two ways: from the Service Provider or from the IdP. We call these SP-initiated and IdP-initiated authentication flows, respectively.
The SP-initiated flow occurs when a user authenticates directly with the Twilio SendGrid App.
When a user enters their email address, Twilio SendGrid performs a check and redirects any email address associated with an SSO account to the SSO login page. Users will then authenticate by entering their IdP credentials.
The IdP-initiated flow occurs when a user authenticates with their IdP. For example, a user may click on the SendGrid app tile from Okta. This flow will authenticate the user and redirect them to the Twilio SendGrid App.
JIT provisioning is only possible from an IdP-initiated sign-on flow. When assigning users to your Twilio SendGrid App, you may want to instruct them to log in from your IdP the first time if you have enabled JIT.
Because SAML values are often labeled differently from one IdP to another, the following table attempts to map IdP-specific labels to the Twilio SendGrid labels for common IdPs. Note that the Twilio SendGrid Single Sign-On URL and Audience URL (SP Entity ID) are the same URL.
| Azure IdP Label | Twilio SendGrid Label |
|---|---|
| Reply URL (Assertion Consumer Service URL) | Single Sign-On URL |
| Identifier (Entity ID) | Audience URL (SP Entity ID) |
| Azure AD Identifier | SAML Issuer ID |
| Login URL | Embed Link |
Does Twilio SendGrid encrypt the SAML assertion?
Twilio SendGrid doesn't encrypt the SAML assertion itself. However, all information is sent over HTTPS.
Can a user be both an SSO Teammate and a Password Teammate?
A Teammate can't be both a Password and SSO Teammate. They must be added as one or the other. If you want to change the way a Teammate accesses Twilio SendGrid, you must delete them and add them back as the other type of Teammate.
- When configuring your IdP integration, you can set the Name ID Format to "emailAddress" if leaving it unspecified causes an error.
- When enabling just-in-time provisioning, you should give the IdP FirstName and LastName entity attributes to properly set up the Teammate's first and last names. These will have the values "user.firstName" and "user.lastName", "user.givenname" and "user.surname", or something similar depending on your IdP.