Segmenting your Contacts
Info
The content on this page describes the experience in the current version of Marketing Campaigns. If you're using the legacy version of Marketing Campaigns, your experience may be different. To explore Marketing Campaigns plans and upgrade, see Marketing Campaigns pricing.
Segments are similar to contact lists, except they update dynamically over time as information stored about your contacts or the criteria used to define your segments changes. When you segment your audience, you are able to create personalized Automation emails and Single Sends that directly address the wants and needs of your particular audience.
Info
Marketing Campaigns supports up to 200 segments per user.
Custom fields, reserved fields, and engagement data like opens and clicks, provide unique information you can use to identify contacts for different segments. As your contacts' traits change or you add more contacts that meet the criteria of your segment, your segments will update to reflect these changes. For example, a segment populated using the criteria, "lives in Denver" or, "is under 30 years old" will change as your contacts age or their addresses change.
Segments can pull from All Contacts or any of your more narrowly defined lists.
Segments are created by comparing your contacts against criteria you define. If a contact matches the specified criteria, they will be included in your segment. Engagement data such as "opened" or "clicked" will add contacts who have engaged in this behavior with one of your messages. Whether or not a contact meets your defined criteria is evaluated using the combination of conditions you create. Each condition consists of three parts: fields, operators, and values.
Fields
The first part of the condition, the field, is the data field you want to filter your contacts by. Fields include traits such as "First Name," "Email," or "City" and engagement data such as "Last Clicked." For a full list of available fields, see the Segmentation fields and types tables.
Operators
Operators are the second part of the expression, and they define how your contacts should be evaluated. All fields have a data type assigned to them (text, number, date, Single Send, Automation); this type will determine which operators are available. For example, "Last Clicked" is a date field, and it has date operators such as "is after" and "is before" available. For a full list of operators available by field type, see the Operators available by field type section.
Values
The last part of the expression is a value. The value is compared to the field using the operator. For example, you may select the field, "City." City is a text-type field, so you can then choose "is" from the available operators for that field type. You can then add the value, "Denver." This expression will check your contacts for entries who live in Denver and include all who do in your segment.
You can build precisely targeted segments by using multiple conditions to filter your contacts. The previous example is among the simplest segments possible using Marketing Campaigns.
To create a segment, login to the Twilio SendGrid App and complete the following steps.
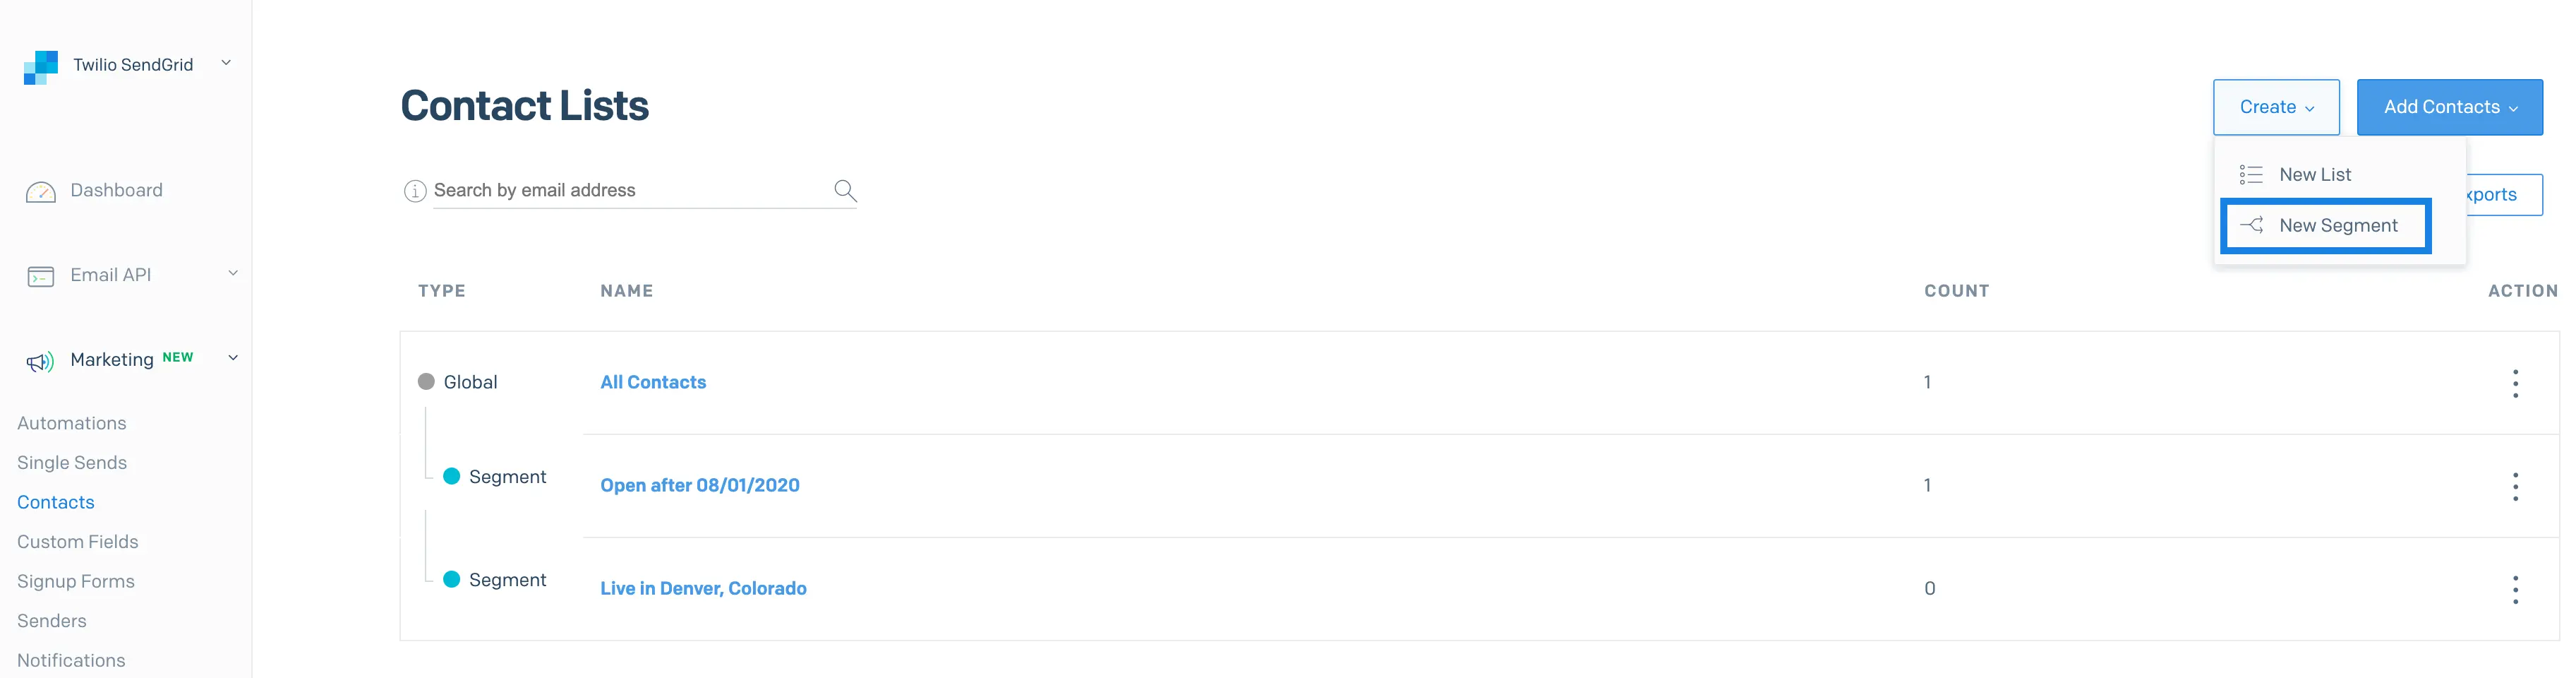
- Navigate to Marketing and then select Contacts.
- Click on the Create dropdown button, and then the New Segment option.
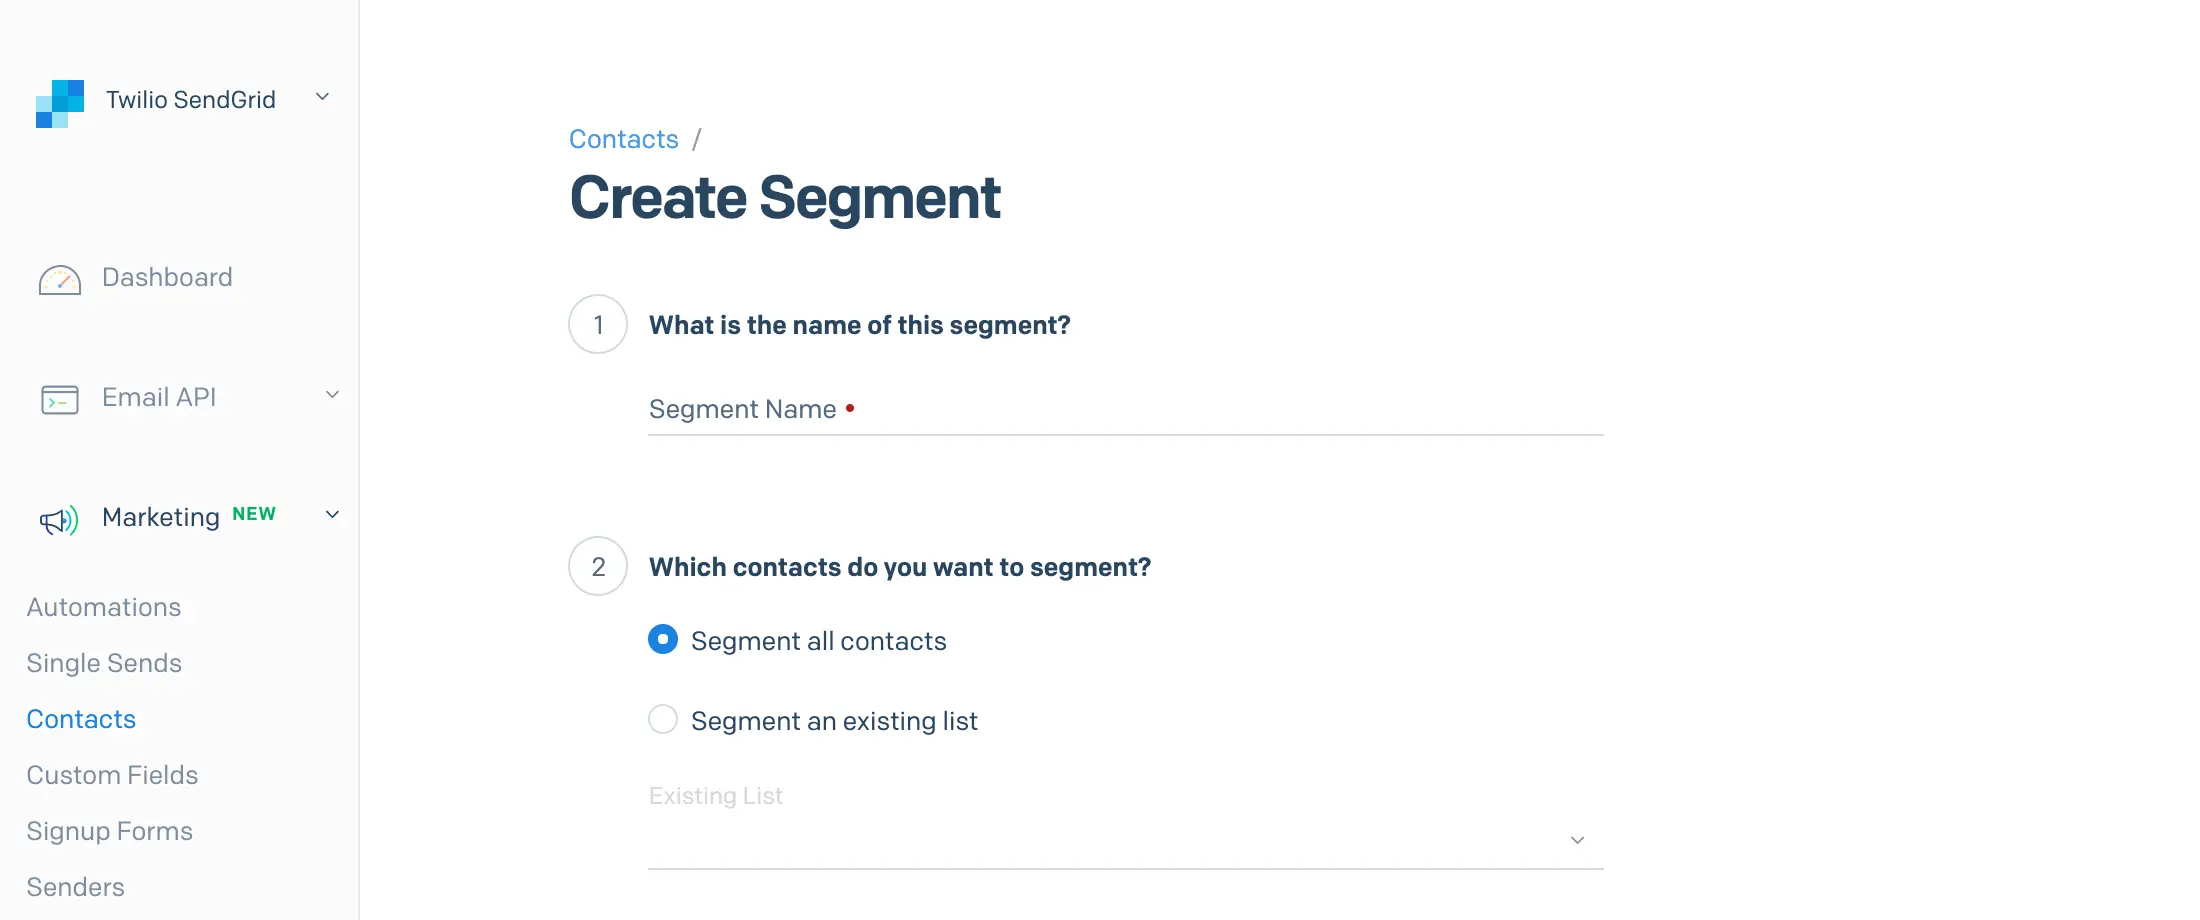
- Enter a Segment Name.
- Choose Segment all contacts or Segment an existing list.
Info
If you're segmenting an existing list, you can click the action menu to the right of the list name from the Contacts page and select "Create Segment" directly.
- To segment an existing list, select a list from the Existing List drop-down.
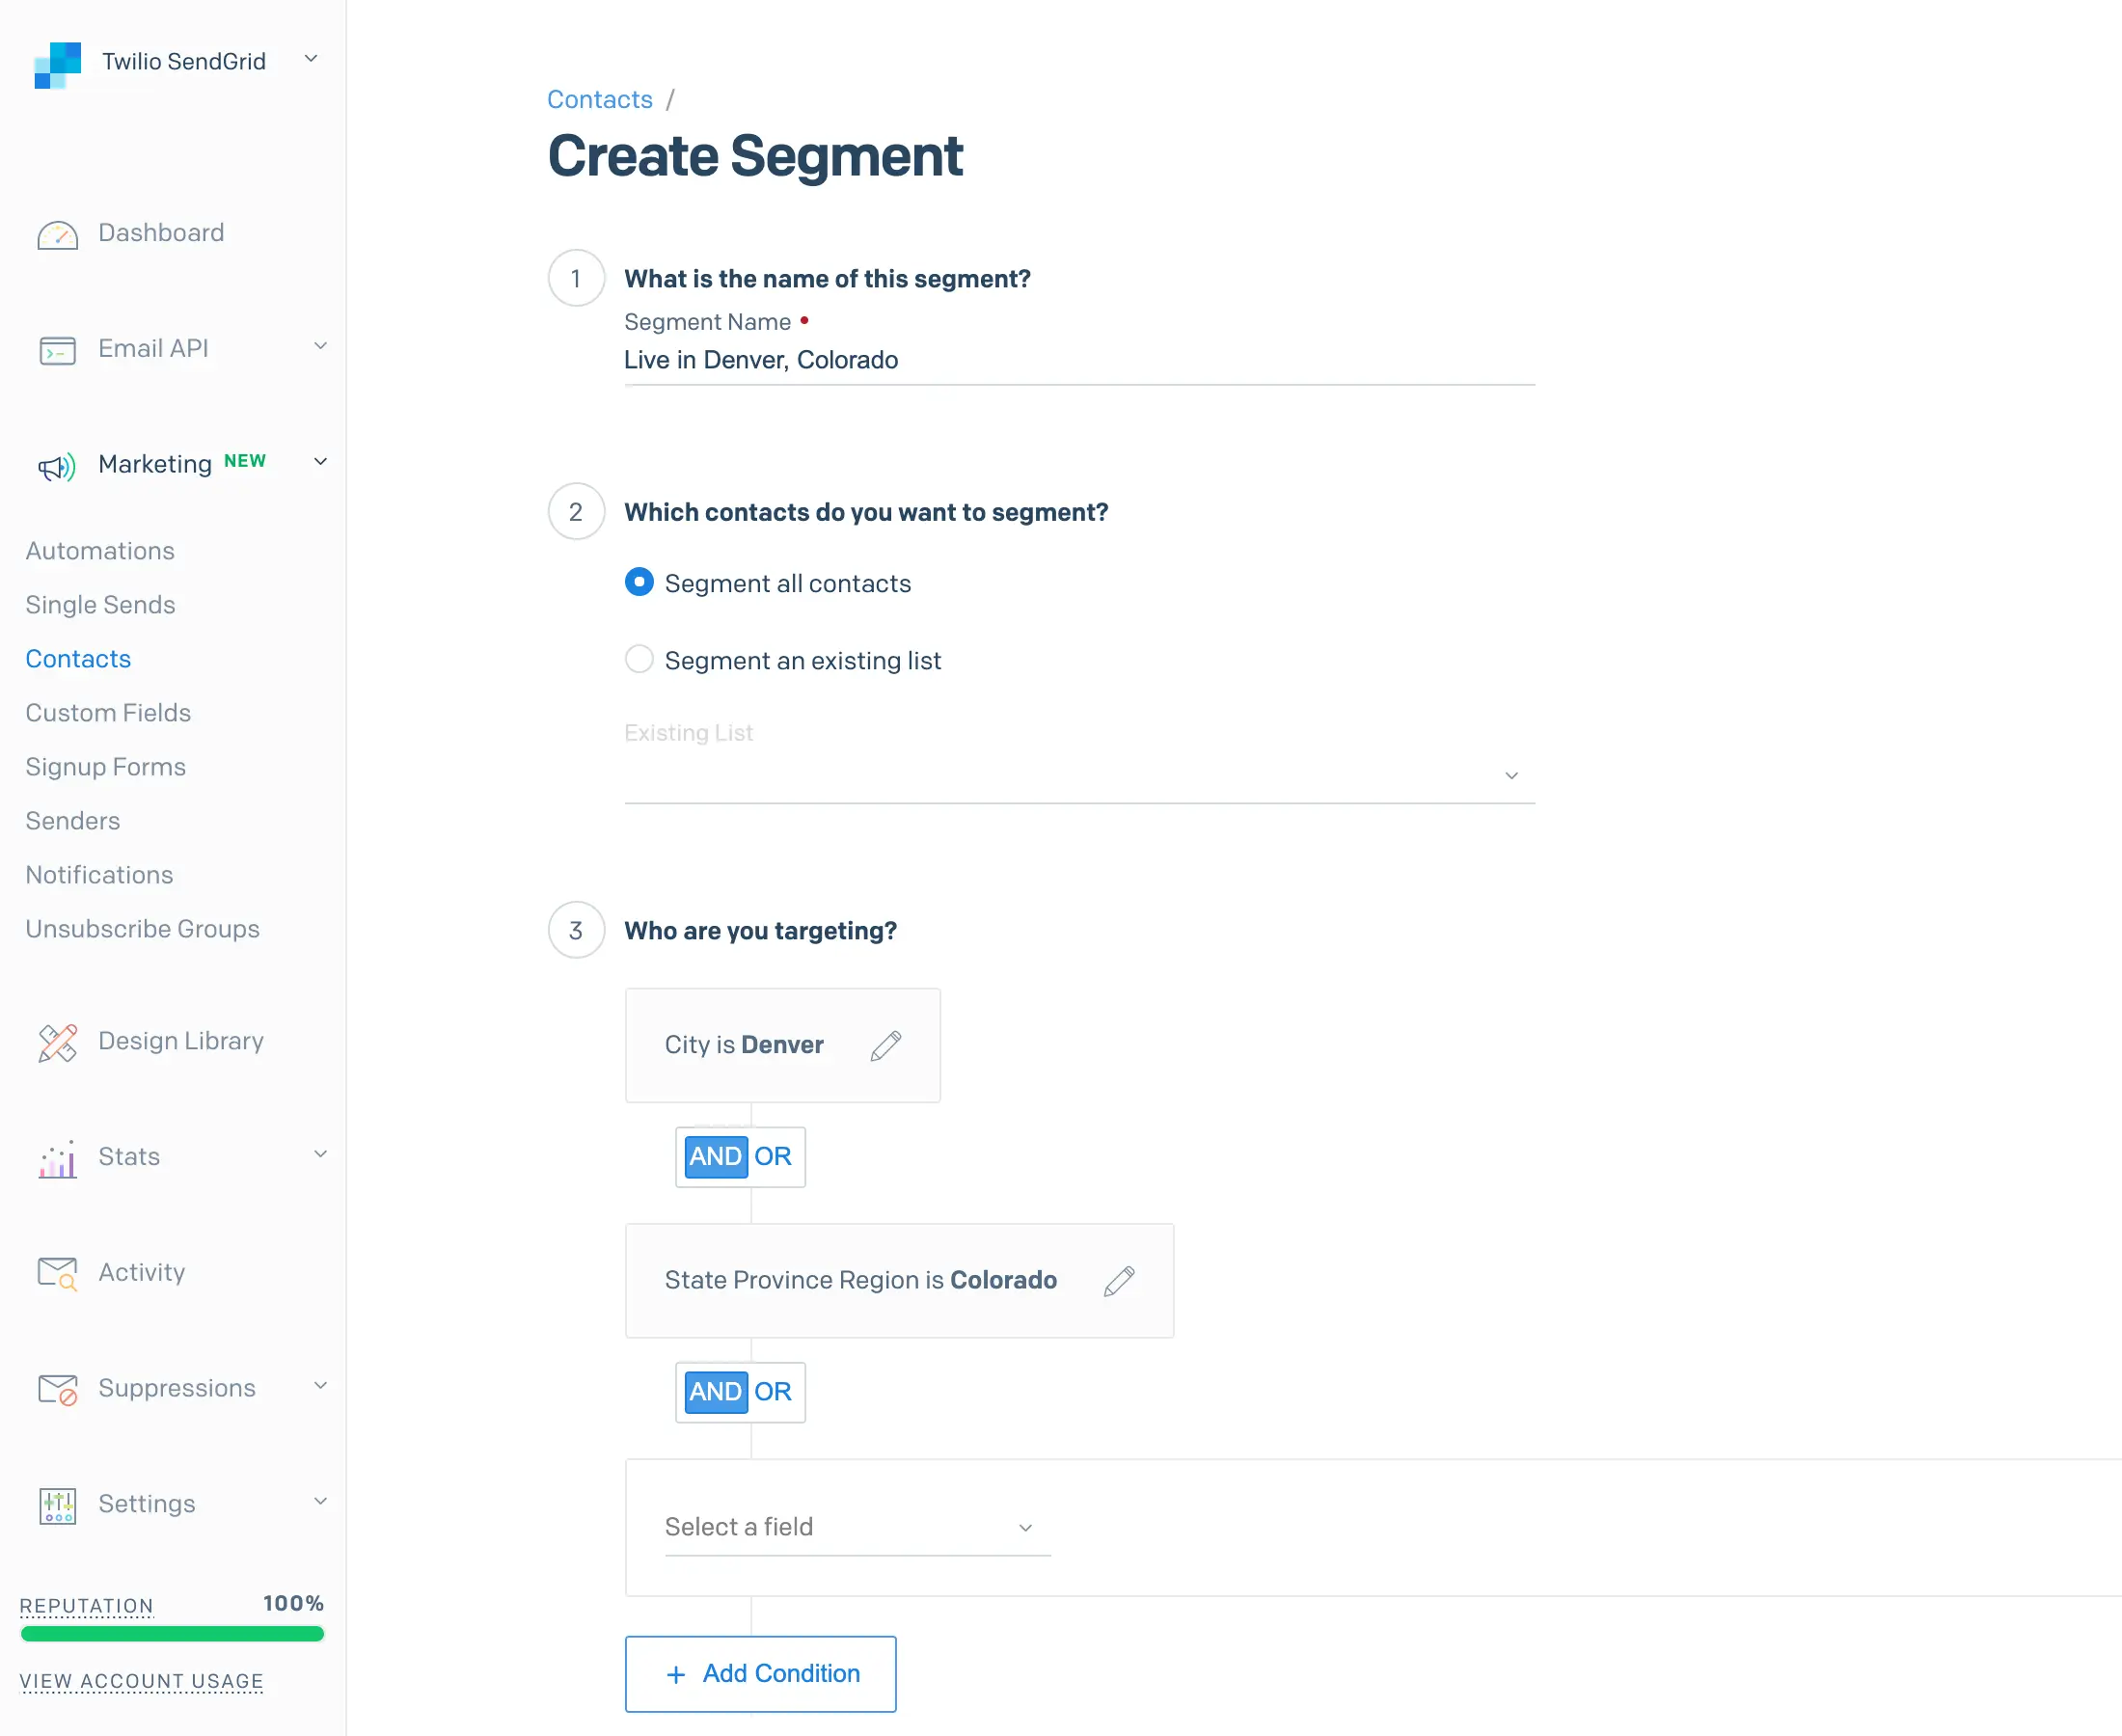
- In the Who are you targeting? section, start building your first condition by choosing a field from the drop-down.
- Choose from the list of available operators.
- Enter the desired value you want to segment by.
- You can add multiple conditions and choose to join them with AND or OR. AND will require both conditions to be true; OR will qualify a contact for whom either condition is true. This functionality allows you to further refine your segments to target your audience with precision.
Info
Segments can have any combination of custom field, reserved field, Email Activity, Single Send, or Automation conditions.
- Once you are finished adding conditions, click Save Segment.
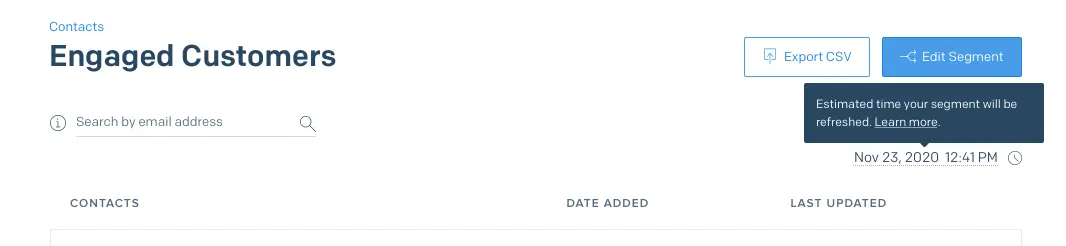
Once your segment is processed, you will see a count of all contacts who meet your segment conditions, as well as a sample of these 50 contacts. To see all contacts included in your segment, click Export CSV to download a complete file.
Info
Segments built using engagement data such as "was sent" or "clicked" will take approximately 30 minutes to begin populating.
Contacts will be added to or removed from your segment as they meet or no longer meet the conditions of your segment. This can be driven by:
- New contacts being added to or updated within Marketing Campaigns, whether via CSV upload, API integration, Signup Forms, or manual changes.
- Contact engagement behavior, such as opening or clicking an email in a way that's relevant to your segment conditions.
- A change you make to the conditions that define your segment.
Typically, existing contacts who meet your criteria will begin to appear in your segment searches within 15 minutes. You can see all contacts who are included in the segment at any given time by clicking Export CSV. Segments are pulled at the time of an export; this means that an exported CSV will reflect a near-real-time segment population. To check for a specific contact, you can search by one of the contact's identifiers: email, phone_number_id, external_id, or anonymous_id.
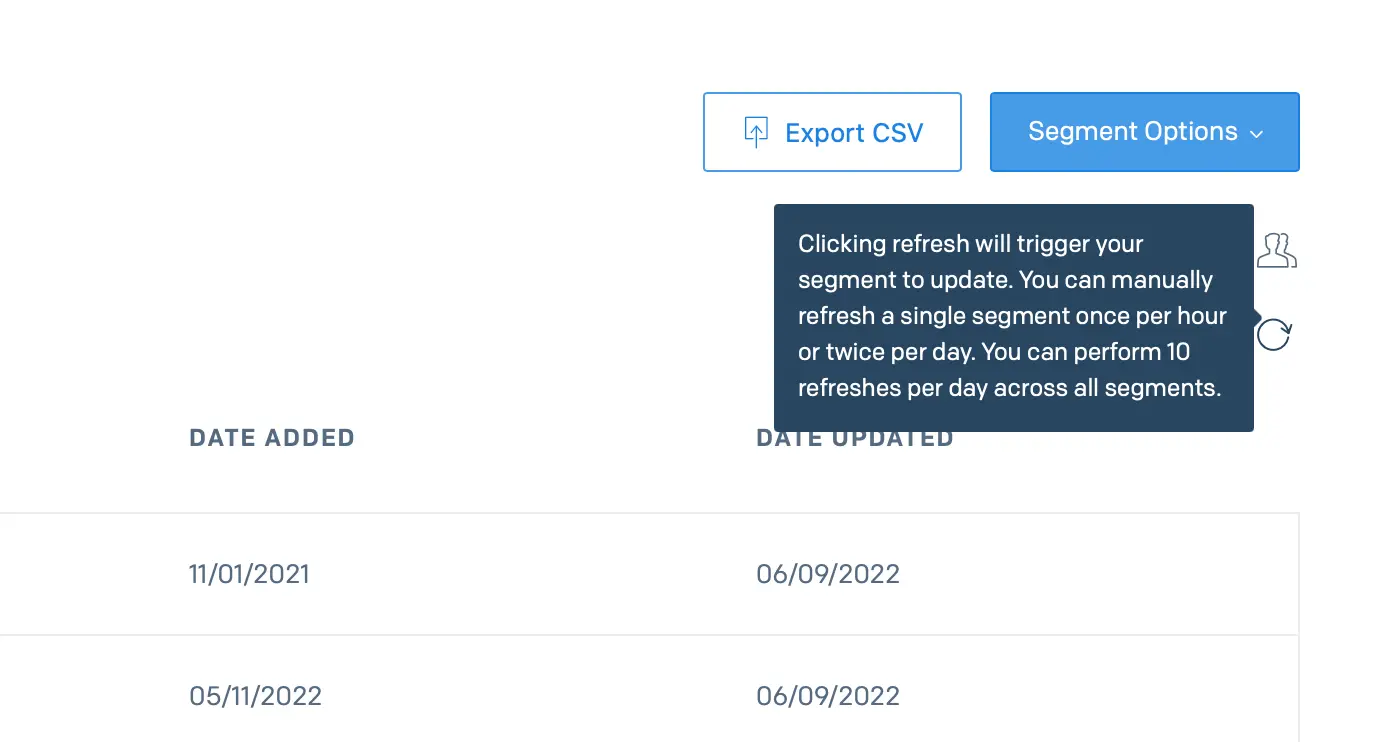
Segment samples and counts refresh on a schedule that ranges from 1 to 24 hours. Segments with active automations or that are used as exclusion lists for scheduled Single Sends refresh every hour. Segments that aren't actively used refresh less frequently, up to every 24 hours, to optimize processing resources. Samples and counts displayed in the UI don't update immediately when segment criteria are modified or when contacts are added or updated. Instead, they update according to the segment's refresh schedule.
You can see an estimate of the next scheduled segment refresh on the Contacts page as well as on the detail page of your segment.

Automations with entry criteria of a contact entering a segment will be triggered according to the same schedule as the segment sample refresh cadence described above.
However, when you send a Single Send to a segment, Marketing Campaigns will pull the segment at the time of send, reflecting the near-real-time segment population.
Customers on Marketing Campaigns basic and advanced plans can manually refresh a segment outside of the regular refresh cadence. This allows you to control when a segment is processed.
Manual segment refreshes are limited to:
- One refresh per hour per segment. The clock resets at the time of the refresh, allowing a new refresh one hour later.
- Two refreshes per segment per day. The clock resets at midnight in the user's stored time.
- Ten refreshes per day across all segments. The clock resets at midnight in UTC time.
To manually refresh a segment
- Navigate to a segment's detail page and click the manual refresh icon (a ring with an arrow-shaped cap)
The following tables list the available reserved fields and the fields' data types. Reserved fields are present in your account by default. Your account will also include any Custom Fields you add. The operators available for each type are included in the section following these field tables.
| Field Name | Field Type |
|---|---|
| First Name | Text |
| Last Name | Text |
| Text | |
| Phone Number ID | Text |
| External ID | Text |
| Anonymous ID | Text |
| Address Line 1 | Text |
| Address Line 2 | Text |
| City | Text |
| State Province Region | Text |
| Postal Code | Text |
| Country | Text |
| Date Added | Date |
| Last Updated | Date |
| Field Name | Field Type |
|---|---|
| Last Clicked | Email Activity* |
| Last Opened | Email Activity* |
| Last Emailed | Email Activity* |
| Field Name | Field Type |
|---|---|
| Single Send Activity | Single Send** |
| Field Name | Field Type |
|---|---|
| Automation Activity | Automation** |
* Email Activity fields have their own Email Activity type. After selecting one of the operators available for this type, you'll define the time period in which the engagement occurred.
** Single Send Activity and Automation Activity fields have their own Single Send and Automation types. After selecting one of the operators available for these types, you'll choose whether the operator applies to any Single Send or Automation or to a specific Single Send or Automation. You will then define the time period in which the engagement occurred.
The operators available on a field depend on the field type (Text, Date, Number).
Conditions using Date field operators will filter contacts based on the contact field compared with the datetime value provided in the condition.
| Operator Name | Description |
|---|---|
| is | Matches contacts that have the datetime value for the field |
| is not | Matches contacts that do not have the datetime value for the field |
| is blank | No value is set for the field |
| is not blank | Any value is set for the field |
| is after | Matches the datetime value that occurs after the provided value for the field |
| is at or after | Matches the datetime value that matches or is after the provided value for the field |
| is before | Matches the datetime value that occurs before the provided value for the field |
| is at or before | Matches the datetime value that matches or is before the provided value for the field |
| between | Matches the datetime value that occurs on or after the start date and on or before the end date for the provided value for the field |
| not between | Matches the datetime value that occurs before the start date and after the end date for the provided value of that field |
| is within | Matches the datetime value that occurs between the date and time in the past based on the duration and the current datetime. Duration can be selected in days, months or years |
| is not within | Matches the datetime value that occurs before the date and time in the past based on the duration and the current datetime. Duration can be selected in days, months or years |
| on | Matches the datetime value that occurs at any time on the date provided |
| not on | Matches the datetime value that does not fall at any time on the date provided |
Conditions using Number Field operators will filter contacts based on the contact field compared with the numeric value provided in the condition.
| Operator Name | Description |
|---|---|
| is | Matches contacts that have the numeric value for the field |
| is not | Matches contacts that do not have the numeric value for the field |
| is blank | No value is set for the field |
| is not blank | Any value is set for the field |
| is greater than | Matches any numeric value that is greater than the provided value for the field |
| is less than | Matches any numeric value that is less than the provided value for the field |
| is equal or greater than | Matches any numeric value that matches or is greater than the provided value for the field |
| is equal or less than | Matches any numeric value that matches or is less than the provided value for the field |
| is between | Matches any numeric value that matches or is greater than the minimum value and matches or is less than the maximum value for the field |
| is not between | Matches any numeric value that is less than the minimum value and is greater than the maximum value for the field |
Conditions using Text Field operators will filter contacts based on the contact field compared with the string value provided in the condition.
| Operator Name | Description |
|---|---|
| is | Matches contacts that have the provided value for the field |
| is not | Matches contacts that do not have the provided value for the field |
| is blank | No value is set for the field |
| is not blank | Any value is set for the field |
| contains | Matches any value that may include other text as part of the value |
| does not contain | Matches any value that does not include the provided value |
| starts with | Matches any value that begins with the provided value |
| does not start with | Matches any value that does not begin with the provided value |
| ends with | Matches any value that ends with the provided value |
| does not end with | Matches any value that does not end with the provided value |
Operators available on an Email Activity field are similar to Date fields with some exceptions—"is blank" and "is not blank" are not included on Email Activity fields. Email Activity conditions will filter contacts who have engaged with a Single Send or Automation based on the constraints of the condition.
| Operator Name | Description |
|---|---|
| is | Matches contacts that have the datetime value for the field |
| is not | Matches contacts that do not have the datetime value for the field |
| is after | Matches the datetime value that occurs after the provided value for the field |
| is at or after | Matches the datetime value that matches or is after the provided value for the field |
| is before | Matches the datetime value that occurs before the provided value for the field |
| is at or before | Matches the datetime value that matches or is before the provided value for the field |
| between | Matches the datetime value that occurs on or after the start date and on or before the end date for the provided value for the field |
| not between | Matches the datetime value that occurs before the start date and after the end date for the provided value of that field |
| is within | Matches the datetime value that occurs between the date and time in the past based on the duration and the current datetime. Duration can be selected in days, months or years |
| is not within | Matches the datetime value that occurs before the date and time in the past based on the duration and the current datetime. Duration can be selected in days, months or years |
| on | Matches the datetime value that occurs at any time on the date provided |
| not on | Matches the datetime value that does not fall at any time on the date provided |
Single Send conditions will filter contacts who have engaged with a particular Single Send or any Single Send based on the constraints of the condition.
| Operator Name | Description |
|---|---|
| was sent | Any contacts who were sent any Single Send or a specific Single Send in the specified time range |
| has clicked | Any contact who has clicked any Single Send or a specific Single Send in the specified time range |
| has opened | Any contact who has opened any Single Send or a specific Single Send in the specified time range |
| was not sent | Any contacts who were not sent any Single Send or a specific Single Send in the specified time range |
| has not clicked | Any contact who has not clicked any Single Send or a specific Single Send in the specified time range |
| has not opened | Any contact who has not opened any Single Send or a specific Single Send in the specified time range |
Automation conditions will filter contacts who have engaged with a particular Automation or any Automation based on the constraints of the condition.
| Operator Name | Description |
|---|---|
| was sent | Any contacts who were sent any Automation or a specific Automation in the specified time range |
| has clicked | Any contacts who has clicked any Automation or a specific Automation in the specified time range |
| has opened | Any contacts who has opened any Automation or a specific Automation in the specified time range |
| was not sent | Any contacts who were not sent any Automation or a specific Automation in the specified time range |
| has not clicked | Any contact who has not clicked any Automation or a specific Automation in the specified time range |
| has not opened | Any contact who has not opened any Automation or a specific Automation in the specified time range |
When using more than one condition to segment your contacts, you can select AND or OR as options, where AND requires both conditions to be true and OR requires either condition to be true. Once you've selected the field, operator, and value, you can layer additional conditions in the segment to narrow the results to a more targeted audience.
Warning
Segments can combine more than one engagement activity condition using AND or OR. Segments created prior to October 2021 used API version 1 and do not support more than one engagement activity condition. Please duplicate or create a new Segment to leverage all of the features available for engagement activity.
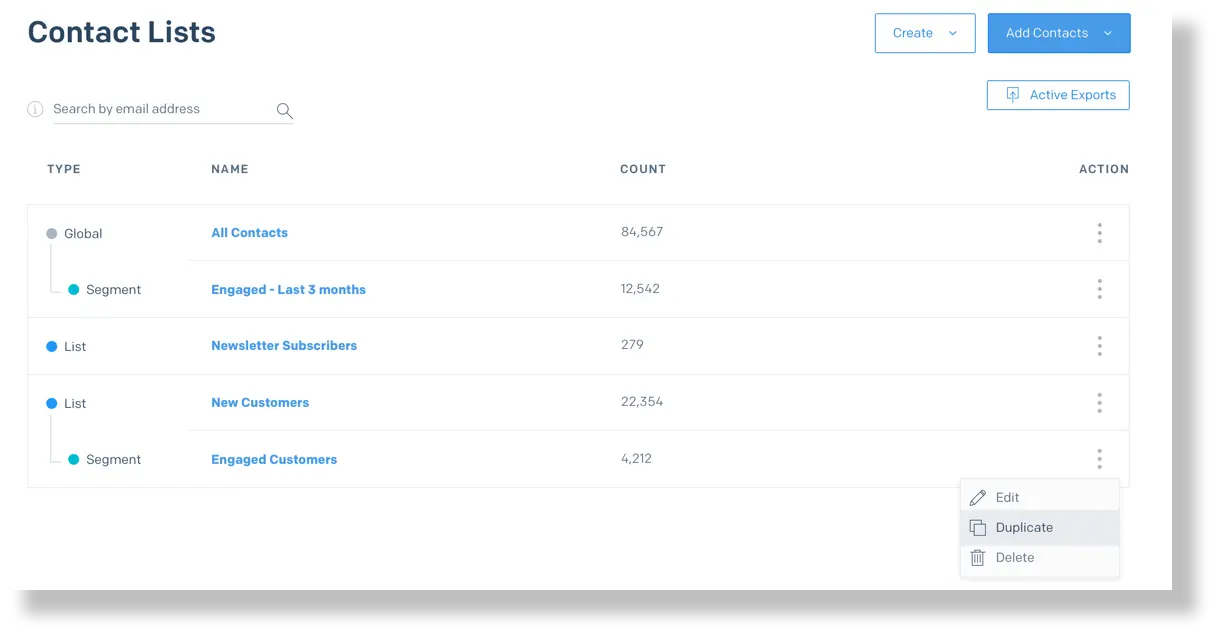
Duplicating a segment eliminates the time and effort needed to recreate a complex segment from scratch in order to make a few changes or tweaks to reach a different audience. Follow these steps to create a copy of an existing segment.
To duplicate a segment:
- From the Contact Lists page, click the Action Menu next to the name of the segment you wish to duplicate.
- Select Duplicate.
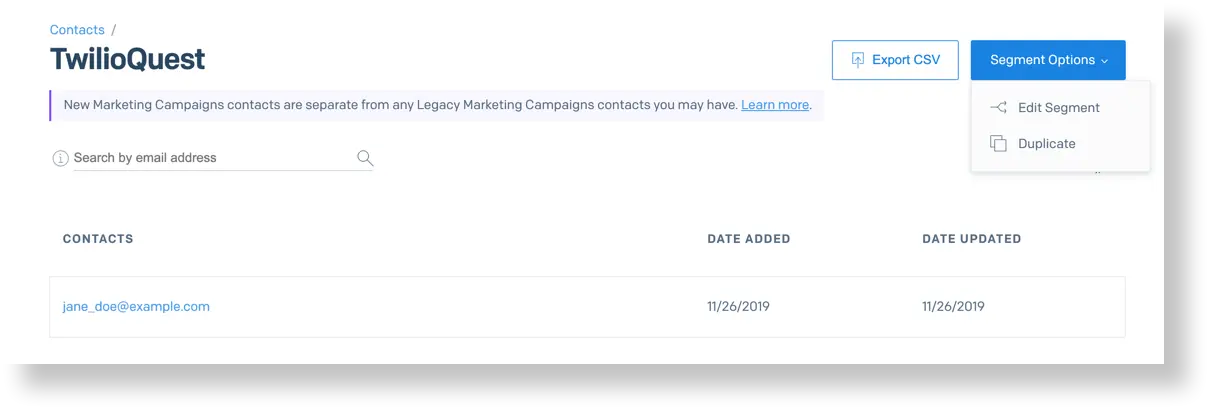
To export a segment from the segment details page:
- Click Segment Options to open the drop-down menu.
- Select Duplicate.
To export a segment from the Contact List Page:
- Click the Action Menu next to the name of the segment you wish to export.
- Select Export.
To export a segment from the segment details page:
- Click Segment Options to open the drop-down menu.
- Select Export.
This triggers Twilio SendGrid to send an email to the primary email address on the account. The email includes a link to download the CSV of all the contacts in the list and their associated custom field values.
Info
The download link for your CSV export will be valid for 12 hours.
When you delete a segment by following the instructions in this section, the contacts associated with that segment will remain in your account. If you want to remove the contacts associated with a segment from your All Contacts list, see the Delete a segment's contacts from your account section.
- Navigate to Marketing > Contacts in the Twilio SendGrid application.
- Click the action menu (three dots) to the right of your segment.
- Click Delete This Segment from the menu that appears.
- A dialog will then load. Click the Delete This Segment button to delete your segment.
- The dialog will close and the segment be removed.
Scheduled Single Sends
Before deleting a segment, make sure that the segment isn't associated with a scheduled Single Send. If a Single Send is triggered after you delete an associated segment, the contacts assigned to that segment may not receive the Single Send.
To permanently remove the contacts associated with a segment from your All Contacts list, you will first export the contacts to a CSV. The CSV can then be used to create a contact list whose contacts can be removed from your account. The process is detailed in the following steps.
- Navigate to Marketing > Contacts in the Twilio SendGrid application.
- Click the action menu (three dots) to the right of your segment.
- Click Export from the menu that appears.
- The Active Exports contacts page will load. Click Download CSV for the segment you exported.
- Return to the Marketing > Contacts page in the Twilio SendGrid App.
- Click the Add Contacts button at the top of the page and select Upload a CSV from the menu that appears.
- The Upload CSV page will load. Select Add Contacts to a new list and name your new list. It may be helpful to name the list something that stands out such as "Delete Me."
- Drag and drop your downloaded CSV or select it using your system dialog by clicking select a CSV file to upload.
- Click Next: Review CSV Upload.
- A new page will load where you may be asked to map any unmapped contact fields. You can select Skip Unmapped at the top of the page because these contacts will be deleted.
- Click the Next: Add Contacts button at the top or bottom of the page (it appears in both places).
- Allow time for the upload to complete, usually around 30 minutes after receiving the successful upload confirmation email.
- Once the contact list populates with the expected number of contacts, you may delete the list and its associated contacts.
- Return to Marketing > Contacts in the Twilio SendGrid application.
- Click the action menu (three dots) to the right of your now populated list.
- Click Delete This List from the menu that appears.
- A dialog will then load asking if you want to delete the list only or the list and its associated contacts.
- To delete the list and permanently delete its associated contacts from your All Contacts list, check the box labeled Delete this list and permanently delete all <number> contacts associate with this list from my account.
- You will see a delete button labeled Delete This List and All <number> Contacts. Click this delete button.
- The dialog will close and the list and its associated contacts will be removed.