Adding Dynamic Content with Handlebars in Marketing Campaigns
Marketing Campaigns allows you to insert substitution tags into your email content or subject lines. The tags you insert will dynamically populate the custom field data for that field on a per-recipient basis.
You can go beyond simple custom field replacement, using dynamic content and Handlebars to meet your goals.
To understand how to add tags to your Marketing Campaigns designs, see our Editor documentation. The Editor documentation also explains how to preview your message with sample data.
This page provides several example use cases to show you how to modify the dynamic content in your designs with Handlebars. For a full reference of all available helpers, see Using Handlebars. First, we'll outline how to handle default values when using handlebars in Marketing Campaigns.
When you copy a tag from the Tags tab in the Marketing Campaigns editors, pasting the tag into your design will add a "default" automatically. The tag will look like the following example — the tag name followed by a pipe character and the word "default." You can think of the pipe as the word "or." This means the tag will be your recipient's first_name or the word "default."
{{ first_name | default }}
The default is meant to provide a fallback value for the tag in the event that it cannot be populated with real data. For example, if you replace the word "default" with "Valued Customer," your message will be delivered with the recipient's first_name or the phrase "Valued Customer" when data for first_name is not available. This is usually preferable to a failing tag, which will display no text.
{{first_name | Valued Customer}}
The insert keyword and default values cannot be added to a tag when using another Handlebars helper to achieve more complex functionality. For example, you cannot format a date with the formatDate helper and provide a fallback or default value for that formatted date in a single tag. The following example will break.
Broken example
{{insert formatDate due_date "MM/DD/YYYY" 'default=30 days after signup'}}
Because tags copied from the Tags tab are pasted with a default placeholder automatically, you must delete the | default portion of the tag when using other Handlebars helpers. If your helper is not working as expected, be sure that the tag did not save with insert and 'default=default' inside.
To achieve fallback behavior when using other helpers, you can use conditional statements. For example, to a create a fallback for formatDate, you could wrap the tag in {{#if}} {{else}} tags as shown in the following example.
Working example
1{{#if due_date}}2{{formatDate due_date "MM/DD/YYYY"}}3{{else}}430 days after signup5{{/if}}
For more on conditional statements, see our Using Handlebars page.
You can dynamically populate the URLs in your templates' links using Handlebars. This means you can set button links, image links, and any other links without manually updating your design template each time your URL changes.
Imagine you have a summer sale coming up, and you've created a landing page for the event at https://example.com/events/celebrate-summer-2022. In your template, you want this URL to show up as a clickable button with the text "Summer Deals." The underlying HTML to make that link appear will look like the following code block.
<a href="https://example.com/events/celebrate-summer-2022">Celebrate with us!</a>
To add the link dynamically, your Handlebars code will look similar to the HTML, but you'll replace the URL with Handlebars. Assuming your URL is stored in a field called "url", the code will look like the following block.
<a href="{{url}}">Celebrate with us!</a>
Warning
Handlebars will escape HTML unless the value is placed in triple brackets. If your link is not rendered properly, you may need to place the value in triple brackets (e.g., {{{ url }}}).
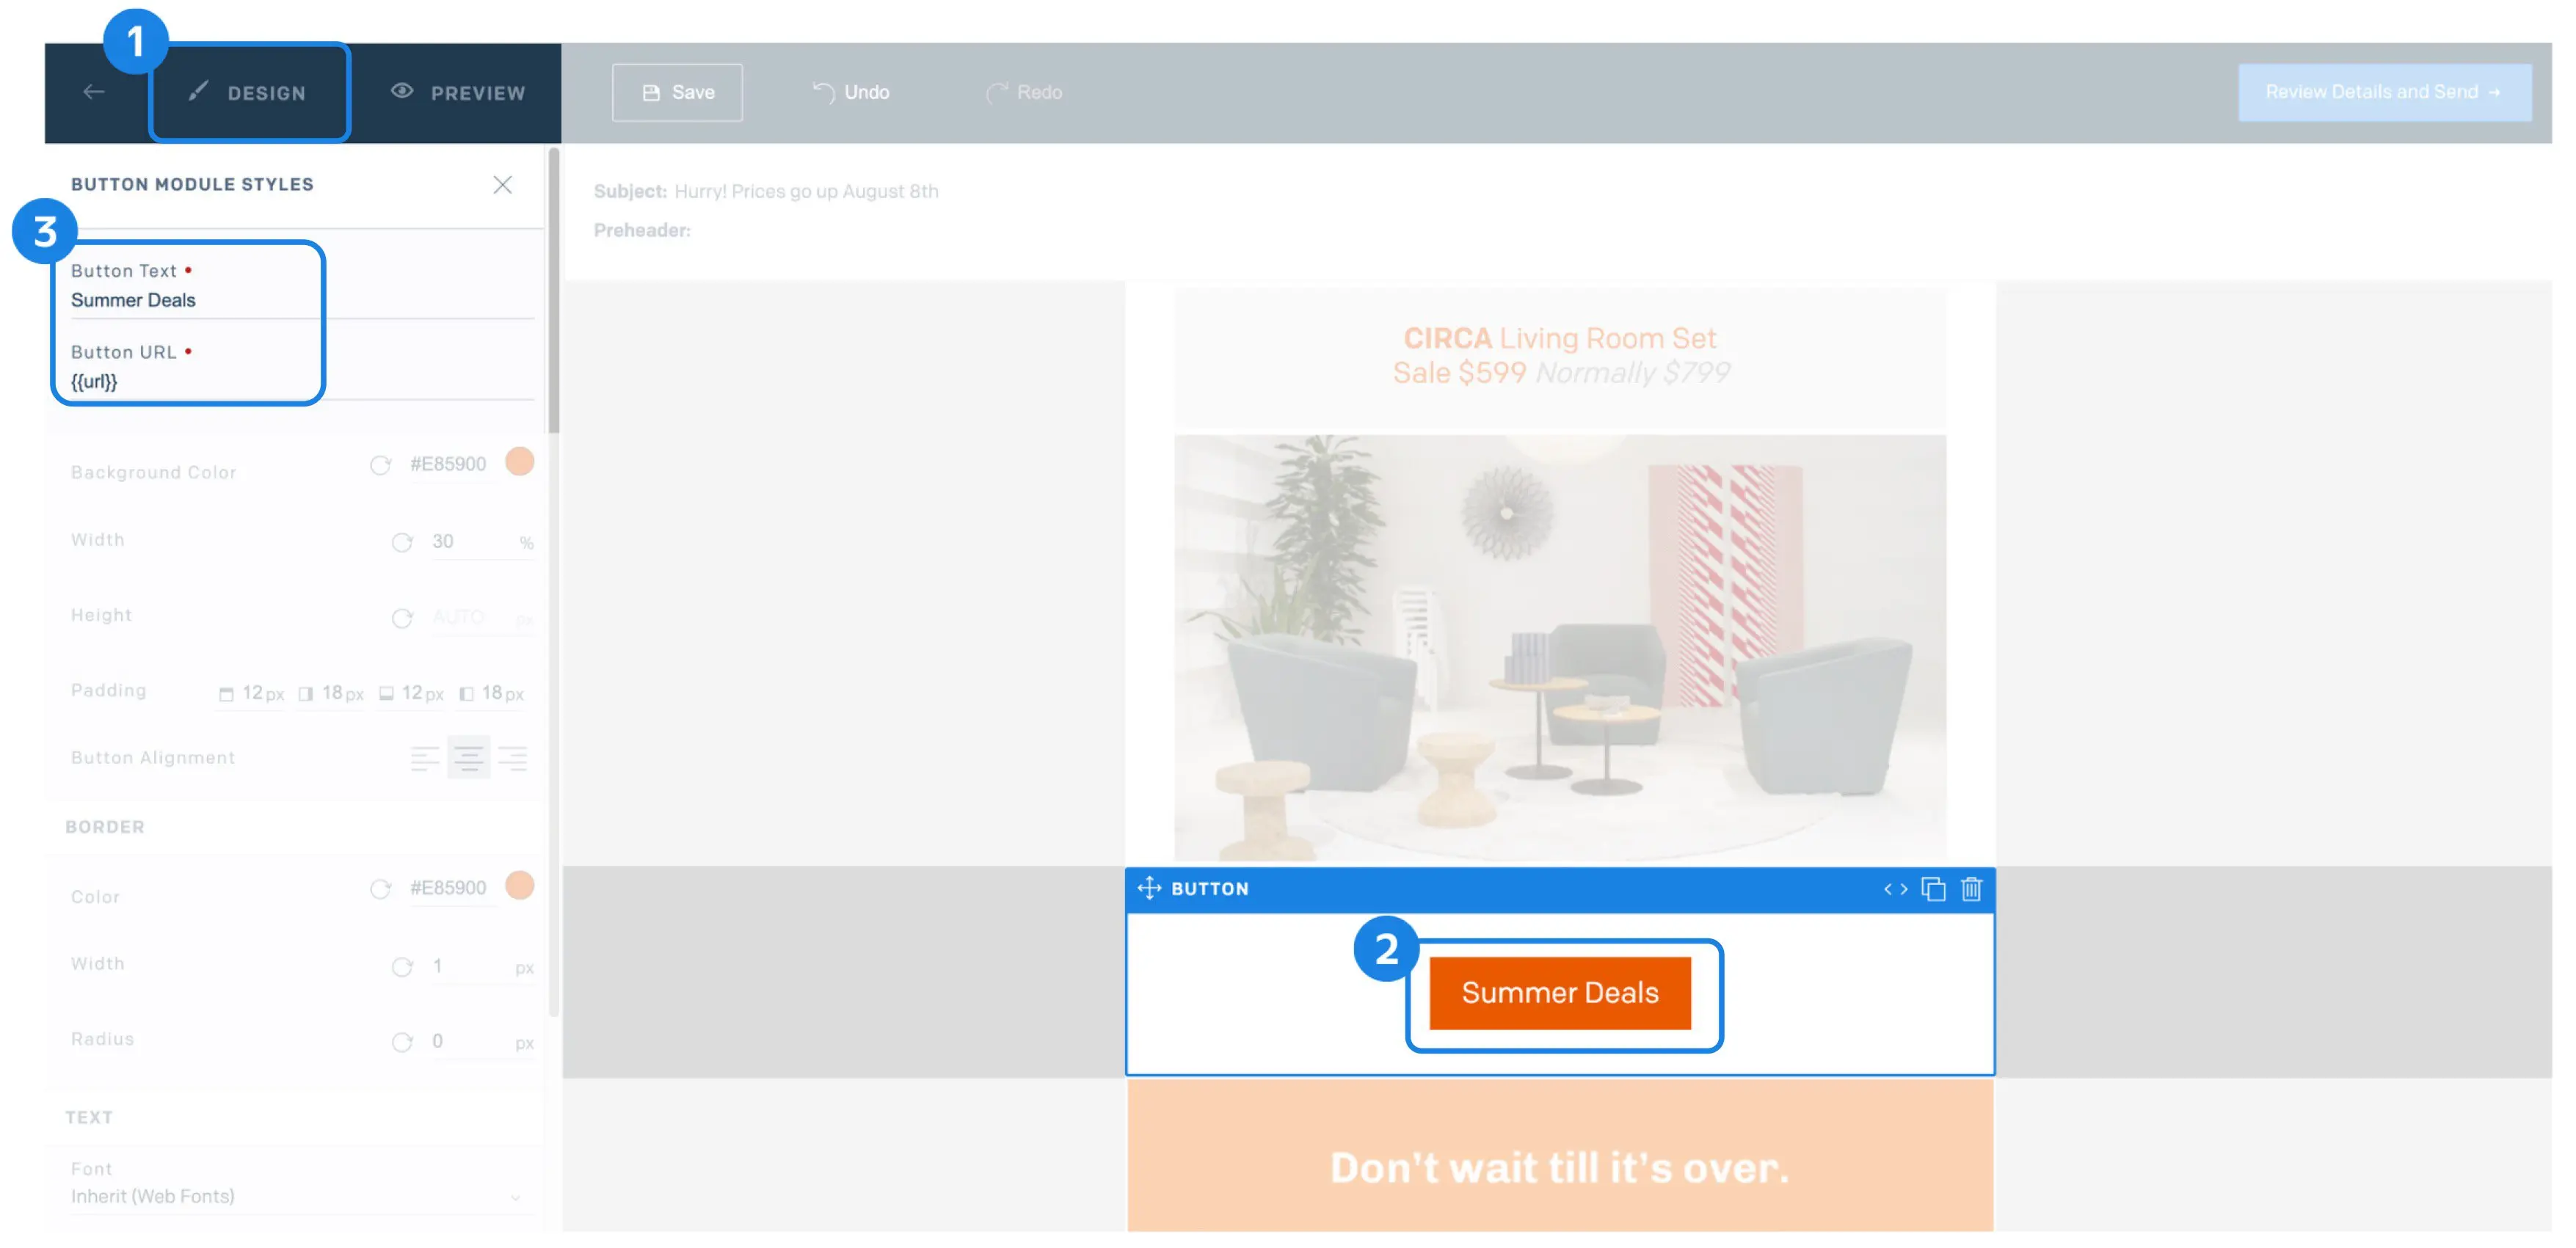
When working with the Design Editor in Marketing Campaigns, there are multiple modules that can be used to link to other content, including buttons, images, and text. To add the URL dynamically, you can type the Handlebars directly into the module's URL field. For example, to add a dynamic link to a button, open a Single Send or Automation template in the Design editor and take the following steps.
- Start with the template's Design tab open.
- Click a button element in the template. This will open the Button Module Styles menu for that button.
- You can then add Handlebars to the Button URL field. In this example, the URL your button will link to is stored in a field called
url.
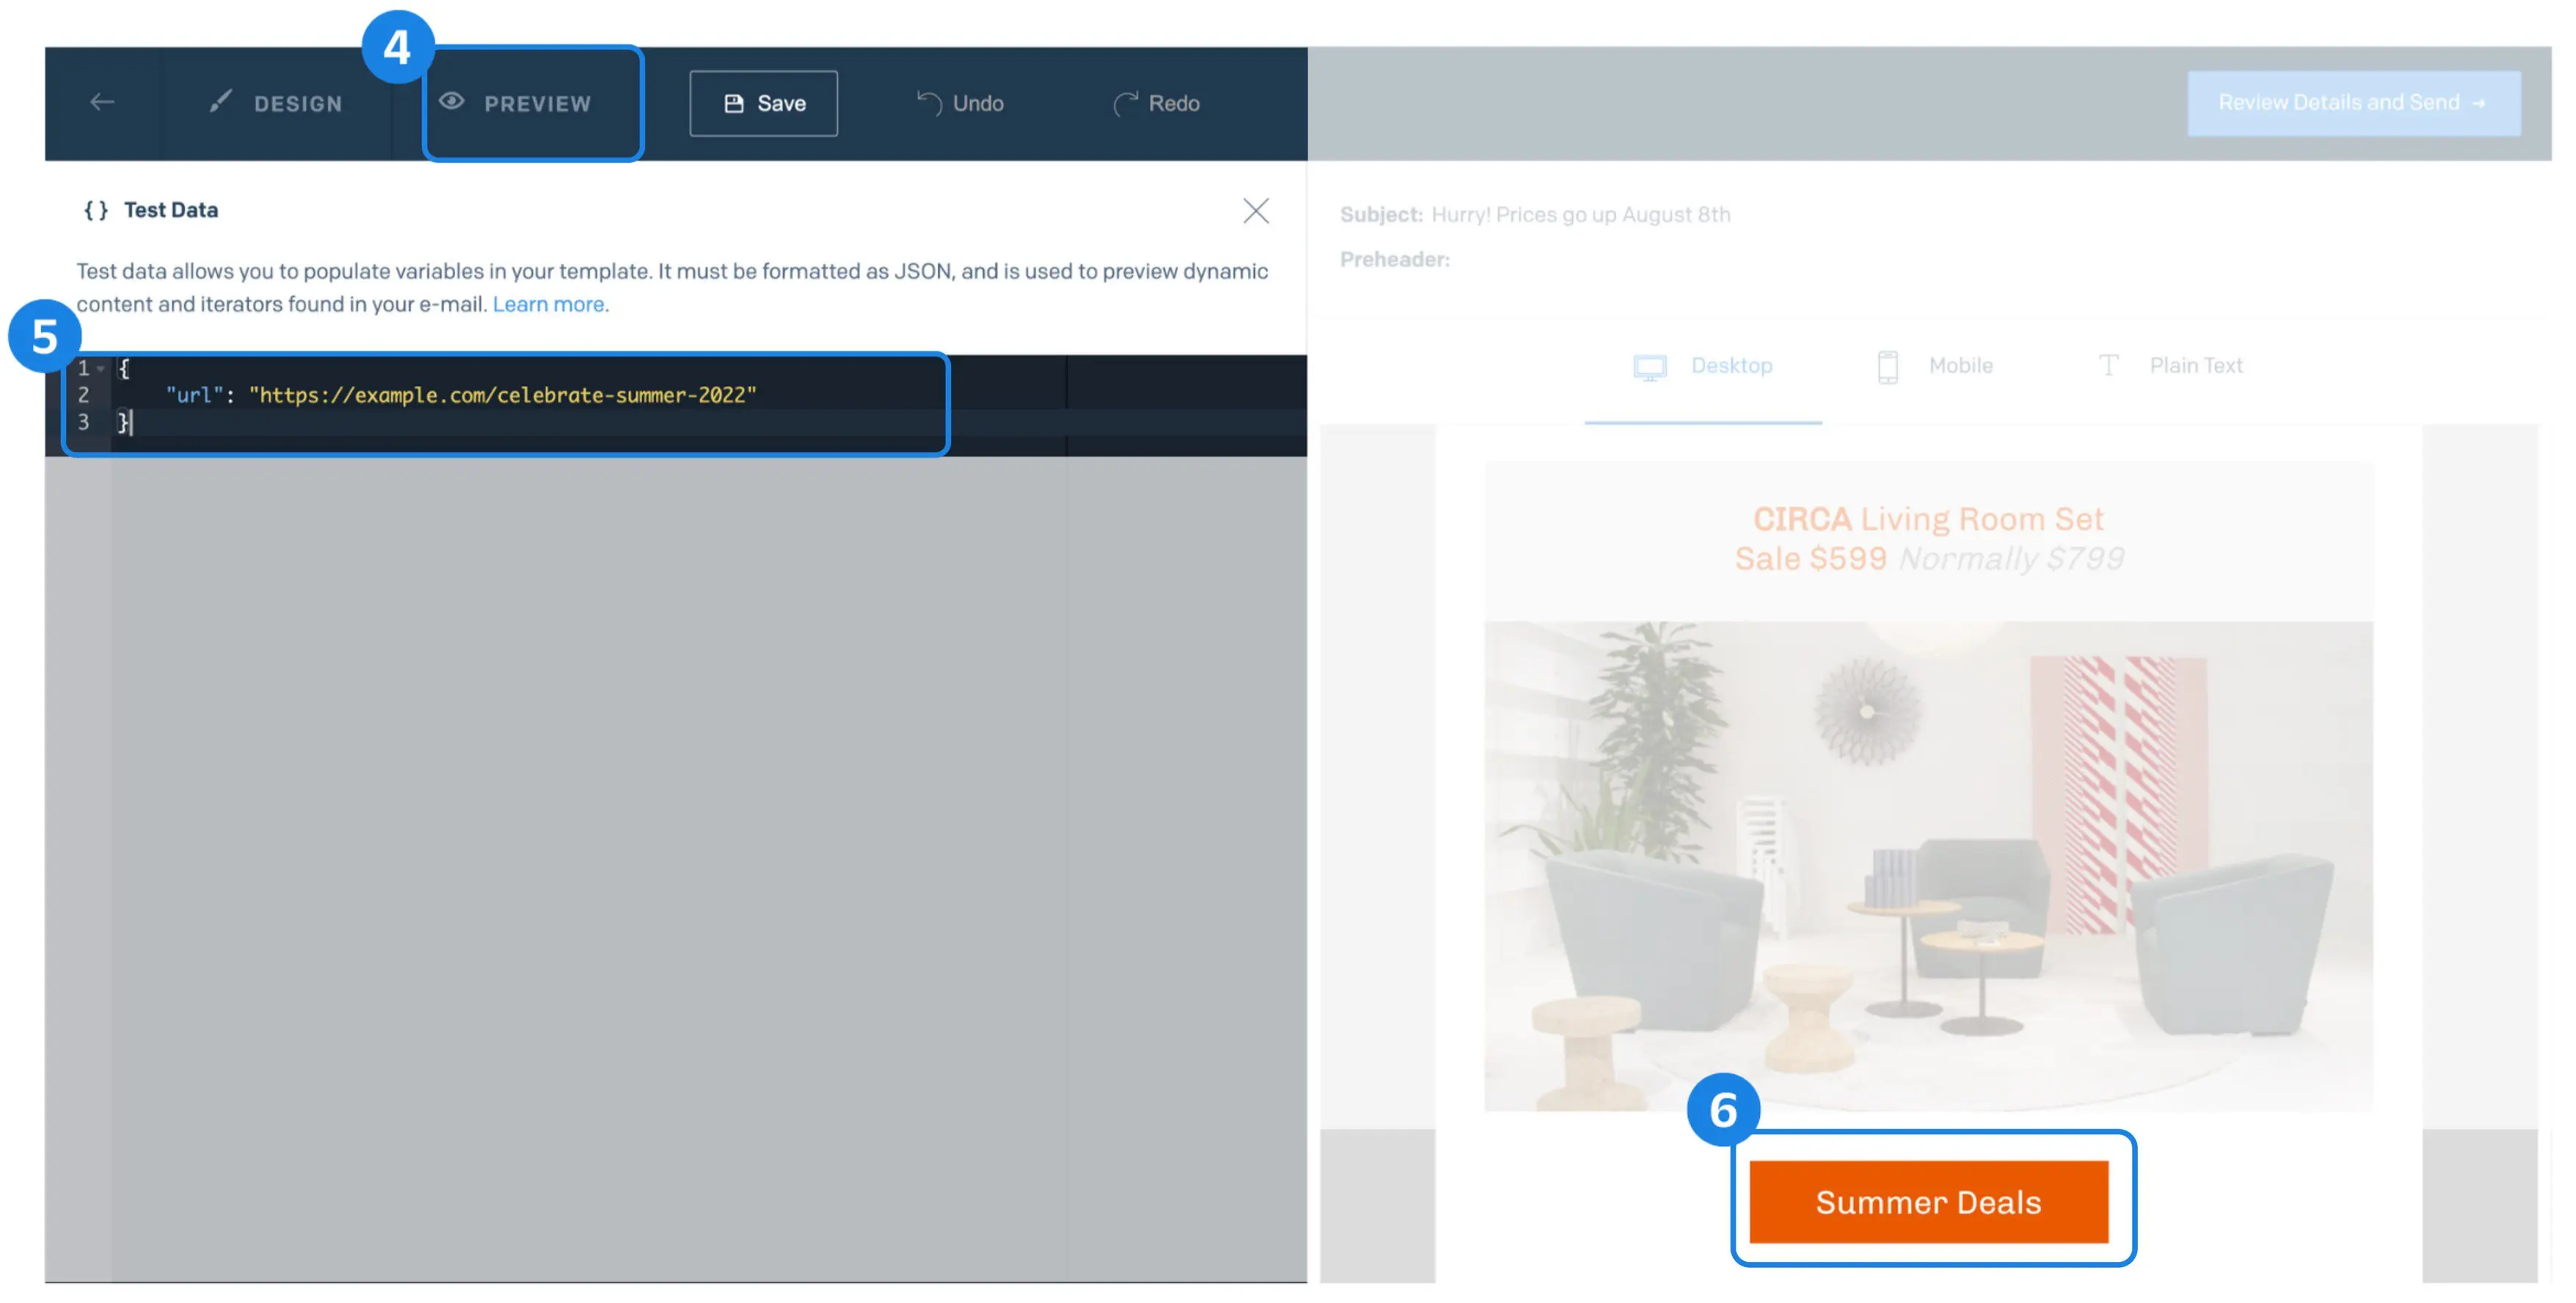
You can add test data to see how the button will look in your final email as well.
- Click the editor's Preview tab and select Show Test Data to open a test data window where you can add sample data.
- Assuming your URL is stored in a field called
"url", your test data will look like the following code block — you can name your field whatever makes sense for you.
1{2"url": "https://example.com/celebrate-summer-2022"3}
- You can now preview the template and see that the button is clickable with the URL from the test data assigned. When sending your message, you can assign any URL you need to the
urlfield (or whichever field name you choose) to dynamically populate the link in your button.
You can follow this same process for any element that supports links.
Twilio SendGrid stores dates in ISO 8601 date format. This standard date format helps ensure that we handle dates and times correctly. However, ISO 8601 date format isn't what recipients usually expect in the text of an email. For this reason, we provide the formatDate Handlebars helper to convert dates from ISO 8601 to a friendlier date format such as MM/DD/YYYY.
In Marketing Campaigns, you can use this helper to change how a date tag displays within your subject line or email content. For context, the tag options you see within the Marketing Campaigns editor are automatically created based on your custom fields.
The following example assumes you have a custom date tag called offer_expiration. You want to use this date tag to display the end of a promotion, prompting customers to take action before they miss out.
Within the Marketing Campaigns editor, your email copy looks like this (after removing the default value for your date field):
1Happy Cake or Pie Anniversary {{ first_name | to you }}!23It's hard to believe, but you joined the Cake or Pie Delicious Delivery service a year ago. We appreciate loyal customers like you, which is why we're sending you a little anniversary gift offer.45You'll receive 15% off all orders placed during your anniversary month. That's 15% off all orders placed before {{ offer_expiration }}!67Thanks for being a customer,89The Cake or Pie Team
As is, this email copy would display the offer_expiration in the ISO 8601 format (for example, 2020-05-08T17:06:24Z). To change how this displays, you'll use the formatDate helper.
Inside the Handlebars, {{ }}, add the name of the helper, formatDate, before the name of your tag. This tells Twilio SendGrid that you want to format the date for the offer_expiration tag. Keep a space before and after formatDate.
{{ formatDate offer_expiration }}
You must then place the format you want to display in your email following the name of the tag. The formatting should be placed in quotation marks. Keep a space before and after your quotation marks.
{{ formatDate offer_expiration "MM/DD/YYYY" }}
To change the displayed format for any date tag, you will always follow this pattern:
{{ formatDate <date tag> "<desired format>" }}.
Info
To see which format tokens (eg. YYYY, dddd, MM) are available to display different date formats, see the full reference for the formatDate helper in our Handlebars documentation.
Handlebars makes it possible to change the content of a message based on customer attributes that may not lend themselves to a segment. For example, you may want to deliver different messages based on customers' ZIP codes or spoken languages.
In this example, you will see how to conditionally change a message based on a recipient's proximity to a store location, allowing you to deliver the sales most relevant to them.
To achieve this, you can maintain a custom field called nearest_zip_code that holds the store nearest each customer. You will automatically have this custom field available to you on the Tag tab in the Marketing Campaigns editors.
To change your message using this tag, your Handlebars code might look like the following example.
1{{#equals nearest_zip_code 1234}}220% off all paperback books!3{{else}}4Amazing savings!5{{/equals}}
This example uses the equals helper to check the value of nearest_zip_code for each recipient. If the recipient's nearest ZIP code equals 1234, they will see "20% off all paperback books." If they are anywhere else, they will see "Amazing savings!"
This type of conditional may be helpful, but you will likely want to check for more than a single ZIP code. In this case, it's also possible to add multiple equals checks chained onto else checks. At the end of your Handlebars block, be sure to add the closing equals tag, {{/equals}}, for each opening equals tag, {{#equals}}. To check for three ZIP codes, your Handlebars might look like the following example.
1{{#equals nearest_zip_code 12345}}220% off all paperback books!3{{else}}{{#equals nearest_zip_code 23456}}410% off all historical fiction5{{else}}{{#equals nearest_zip_code 34567}}6Amazing savings!7{{/equals}}{{/equals}}{{/equals}}
Notice the three closing {{/equals}} tags, one for each {{#equals}} check.
Danger
Be sure to test more complex uses of Handlebars before sending a message to one of your lists. Not all complex Handlebars can be previewed accurately using the Preview tab in Marketing Campaigns at this time.
You could use a similar approach to check for the preferred language of your customers and provide text in that language. Using equals would make it possible to store a single language custom field and check its value as shown in the following example.
1{{#equals language "english"}}2Hello, World!3{{else}}{{#equals language "español"}}4¡Hola Mundo!5{{else}}{{#equals language "français"}}6Bonjour le monde!7{{/equals}}{{/equals}}{{/equals}}
You can use the greaterThan helper to display text based on checks against number fields. For example, you might store the number of purchases a customer makes in a custom field called total_purchases. You might have another field where you store the current purchase goal for your customers called purchase_goal. If you wanted to deliver a message to either reward those who had exceeded your purchase_goal or encourage engagement from those who hadn't, your Handlebars might look like the following example.
1{{#greaterThan total_purchases purchase_goal}}2Thank you for being a loyal customer. To show our appreciation, please enjoy an additional 15% off your next purchase.3{{else}}4We appreciate new customers like you. That's why we're offering 10% off your next purchase.5{{/greaterThan}}
For recipients whose total_purchases are greater than your purchase_goal, the message will display, "Thank you for being a loyal customer. To show our appreciation, please enjoy an additional 15% off your next purchase." For those whose total_purchases is equal to or less than your purchase_goal, the message will display, "We appreciate new customers like you. That's why we're offering 10% off your next purchase."
You could use a similar strategy with the lessThan helper.