How to call Twilio Functions from a Flex plugin
This is a guide on how to securely call a Twilio Function from a Flex Plugin. This tutorial builds off of the Plugin from the Plugin Development Quickstart.
Flex provides some common SDK endpoints that you can use, but it doesn't make every Twilio API available to you. Fortunately, you can use Twilio Functions to decide exactly which Twilio APIs you need, make requests to them, and return the results to Flex.
This tutorial requires that you have an existing Flex Plugin. You'll write a Twilio Function that gets the cumulative statistics of all workers in a workspace and passes that data to your Flex Plugin.
Warning
Currently, Flex Plugins can only make application/x-www-form-urlencoded requests to Twilio Functions. Nested objects are not supported.
First, you'll need to write a Twilio Function. The Function below returns cumulative statistics from a TaskRouter Workspace using the NodeJS SDK.
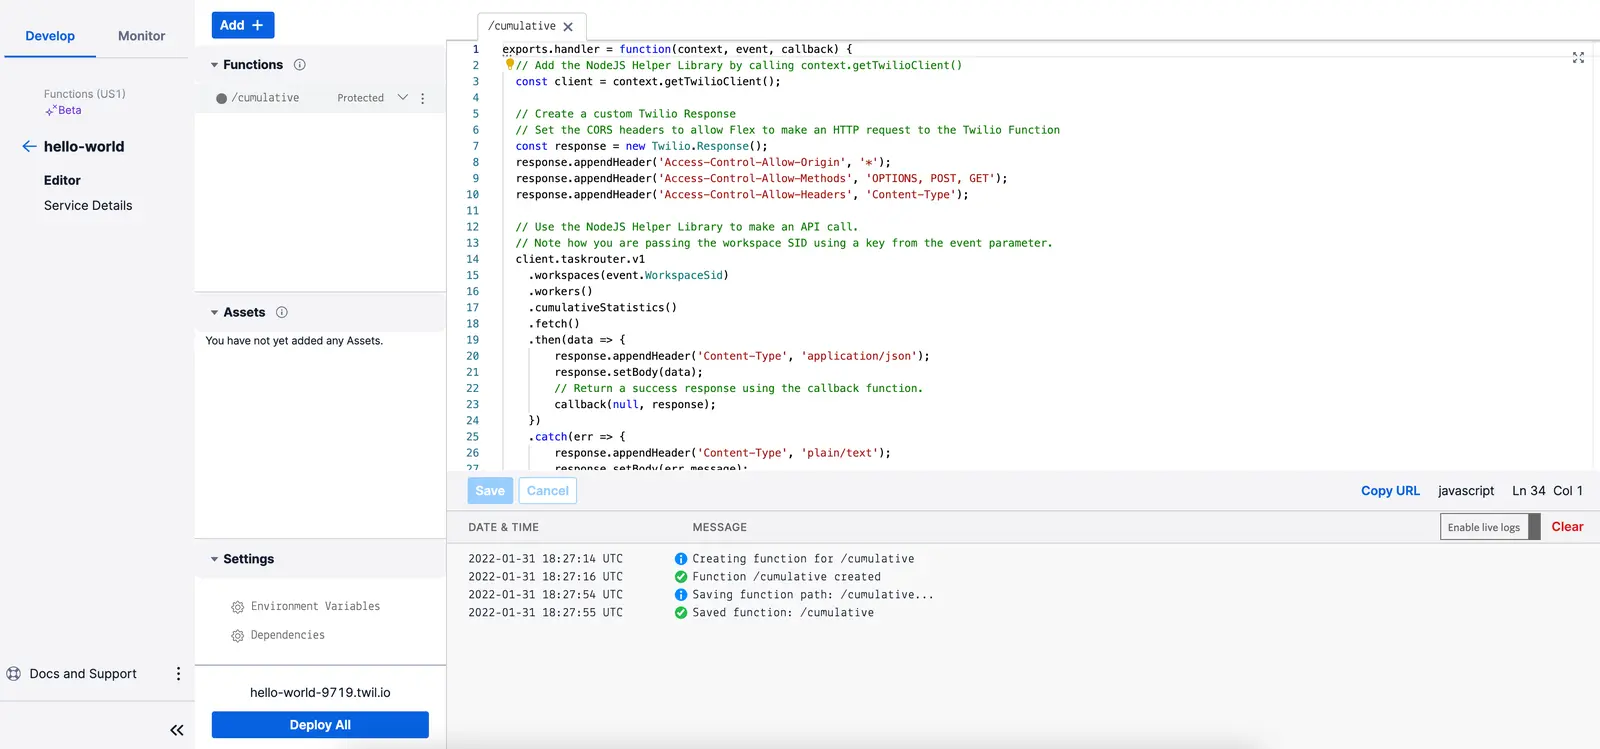
Head over to Twilio Functions Console page. You can create a new Service, or use an existing Service that you already have. Add a Function, and paste the following code into it:
1exports.handler = function(context, event, callback) {2// Add the NodeJS SDK by calling context.getTwilioClient()3const client = context.getTwilioClient();45// Create a custom Twilio Response6// Set the CORS headers to allow Flex to make an HTTP request to the Twilio Function7const response = new Twilio.Response();8response.appendHeader('Access-Control-Allow-Origin', '*');9response.appendHeader('Access-Control-Allow-Methods', 'OPTIONS, POST, GET');10response.appendHeader('Access-Control-Allow-Headers', 'Content-Type');1112// Use the NodeJS SDK to make an API call.13// Note how you are passing the workspace SID using a key from the event parameter.14client.taskrouter.v115.workspaces(event.WorkspaceSid)16.workers()17.cumulativeStatistics()18.fetch()19.then(data => {20response.appendHeader('Content-Type', 'application/json');21response.setBody(data);22// Return a success response using the callback function.23callback(null, response);24})25.catch(err => {26response.appendHeader('Content-Type', 'plain/text');27response.setBody(err.message);28response.setStatusCode(500);29// If there's an error, send an error response30// Keep using the response object for CORS purposes31callback(null, response);32});33};34
Name your Function something meaningful like Cumulative Report and give it the URI of /cumulative. Before saving, make sure the checkbox Check for valid Twilio signature is unchecked; we'll come back on how to secure your Function later on. Now save your Function and wait for it to deploy.
Visit the Functions Configuration Page and ensure that the Enable ACCOUNT_SID and AUTH_TOKEN option is checked. Enabling this checkbox allows context.getTwilioClient(); to generate a new Twilio client using your account credentials. Save the page.
Now, try testing your Function. Your domain will be a hyphenated string of random words and numbers and can be found at the top of the Function Editor. You can find your Workspace SID by visiting TaskRouter Workspaces page.
Visit the Function URL using the browser of your choice. Add the query parameter ?WorkspaceSid=WSxxx and the browser should make a GET request to your Function. For example, visiting
https://YOUR_DOMAIN.twil.io/cumulative?WorkspaceSid=WSxxx
should yield:
1{2...3"activityDurations": [{4"avg": 900,5"min": 900,6"max": 900,7"friendly_name": "Available",8"sid": "WAxxx",9"total": 90010},11...12]13"reservationsCreated": 0,14"reservationsAccepted": 0,15"reservationsRejected": 0,16"reservationsTimedOut": 0,17"reservationsCanceled": 0,18"reservationsRescinded": 019...20}
To get this data into Flex, you'll need to modify your Plugin code using the Plugin Builder. In your text editor of choice, open the folder that contains your Plugin.
Info
To learn how to build your first Plugin, see the Twilio Flex Quickstart (Advanced): Getting Started with React Plugin Development.
Somewhere in your Plugin, you'll need to make a call to your Function. You can use the native fetch Web API to make a request to your function.
For our Plugin, we're going to change the GET request to a POST request. Even though we're ultimately going to retrieve data about our TaskRouter Workspace, the Plugin is invoking a Function, not retrieving the data directly. Given that we might want to send a lot of data at some point, using a POST request scales better, as well. Finally, POST request bodies are easier to work with than query parameters.
For a Plugin called YourPlugin, here's what YourPlugin.js might look like:
1import { FlexPlugin } from 'flex-plugin';2import React from 'react';34const PLUGIN_NAME = 'YourPlugin';56export default class YourPlugin extends FlexPlugin {7constructor() {8super(PLUGIN_NAME);9}1011/**12* This code is run when your plugin is being started13* Use this to modify any UI components or attach to the actions framework14*15* @param flex { typeof import('@twilio/flex-ui') }16* @param manager { import('@twilio/flex-ui').Manager }17*/1819init(flex, manager) {20// Describe the body of your request21const body = { WorkspaceSid: 'WSxxx' };2223// Set up the HTTP options for your request24const options = {25method: 'POST',26body: new URLSearchParams(body),27headers: {28'Content-Type': 'application/x-www-form-urlencoded;charset=UTF-8'29}30};3132// Make the network request using the Fetch API33fetch('https://YOUR_DOMAIN.twil.io/cumulative', options)34.then(resp => resp.json())35.then(data => console.log(data));36}37}38
When you run your Plugin, you should see the API response logged to the browser console!
Your Function currently is publicly accessible, so anyone on the internet can invoke it! No need to fear, though: you can secure it by using the JSON Web Token (JWT) from your Flex instance and then validating the token inside your Function.
Update the fetch code to also include the JWT in the request body:
1import { FlexPlugin } from 'flex-plugin';2import React from 'react';34const PLUGIN_NAME = 'YourPlugin';56export default class YourPlugin extends FlexPlugin {7constructor() {8super(PLUGIN_NAME);9}1011/**12* This code is run when your plugin is being started13* Use this to modify any UI components or attach to the actions framework14*15* @param flex { typeof import('@twilio/flex-ui') }16* @param manager { import('@twilio/flex-ui').Manager }17*/1819init(flex, manager) {20// Add the Token using the Flex manager21const body = {22WorkspaceSid: 'WSxxx',23Token: manager.store.getState().flex.session.ssoTokenPayload.token24};2526const options = {27method: 'POST',28body: new URLSearchParams(body),29headers: {30'Content-Type': 'application/x-www-form-urlencoded;charset=UTF-8'31}32};3334fetch('https://YOUR_DOMAIN.twil.io/cumulative', options)35.then(resp => resp.json())36.then(data => console.log(data));37}38}39
Note the only thing changed here is the addition of the Token key to the body parameter.
Now, you can update your Function so that it can verify this token. Visit the Functions Configuration page, and scroll to the bottom of the page. Visit the twilio-flex-token-validator package page on the npm registry to find the current version of the package. Once you know the version, add twilio-flex-token-validator and its current version to your Dependencies. Save the page.
Return to your cumulative Function and import functionValidator from the twilio-flex-token-validator module. Then, wrap your Function with it:
1const TokenValidator = require('twilio-flex-token-validator').functionValidator;23exports.handler = TokenValidator(function(context, event, callback) {4// Add the NodeJS SDK by calling context.getTwilioClient()5const client = context.getTwilioClient();67// Create a custom Twilio Response8// Set the CORS headers to allow Flex to make an HTTP request to the Twilio Function9const response = new Twilio.Response();10response.appendHeader('Access-Control-Allow-Origin', '*');11response.appendHeader('Access-Control-Allow-Methods', 'OPTIONS POST GET');12response.appendHeader('Access-Control-Allow-Headers', 'Content-Type');1314// Use the NodeJS SDK to make an API call.15// Note how you are passing the workspace SID using a key from the event parameter.16client.taskrouter.v117.workspaces(event.WorkspaceSid)18.workers()19.cumulativeStatistics()20.fetch()21.then(data => {22response.appendHeader('Content-Type', 'application/json');23response.setBody(data);24// Return a success response using the callback function.25callback(null, response);26})27.catch(err => {28response.appendHeader('Content-Type', 'plain/text');29response.setBody(err.message);30response.setStatusCode(500);31// If there's an error, send an error response32// Keep using the response object for CORS purposes33callback(null, response);34});35});
The TokenValidator reads the Token parameter and validates it. If the token is invalid, the validator will respond with a 403. If the token is valid, then your code will execute.
Congratulations, you now have a secure Function that you can invoke from your Flex Plugin!