Integrate a Custom Chat Client with Flex
Info
Flex Conversations requires Flex UI 2.0.x. If you are on Flex UI 1.x.x, refer to the Messaging in Flex pages.
You may have already built a custom chat experience with Twilio Conversations or you are looking to build from scratch. You can integrate these chat experiences with Flex and hand off incoming Conversation messages to your agents.
Info
We have an open source demo chat application available to get you started. Refer to the README file for more information about the features offered in that example application and how it works.
The following diagram illustrates one potential way of integrating your Chat application with Flex:
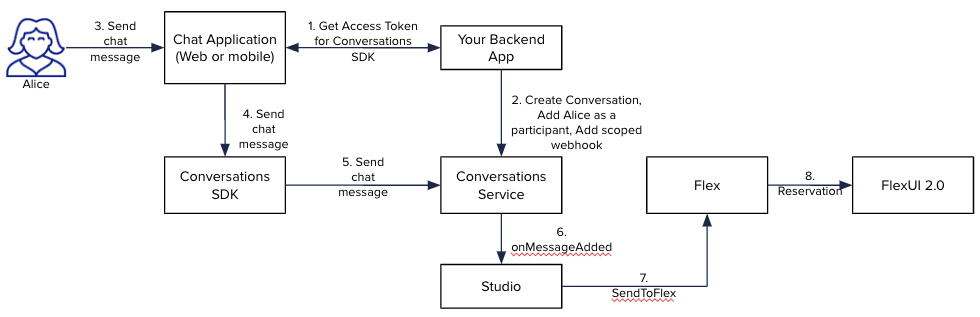
-
Your application needs to initialize the Twilio Conversations SDK with an Access Token and a Conversation SID. These should be obtained from your backend. This is outside the scope of this guide and you can get more information from the Twilio Conversations client applications' quickstart.
-
Your backend will typically use the Twilio server-side SDK but for the purposes of this guide, we will utilize curl for our Conversations API requests:
-
Create a Conversation using the Twilio Conversations API.
1curl -X POST https://conversations.twilio.com/v1/Conversations \2--data-urlencode "MessagingServiceSid=MGXXXXXXXXXXXXXXXXXXXXXXXXXXXXXXXX" \3--data-urlencode "FriendlyName=My First Custom Chat Conversation" \4-u $TWILIO_ACCOUNT_SID:$TWILIO_AUTH_TOKEN1SID Chat Service SID Friendly Name Date Created2CH1cbf85a0e7c844fca4cb4d2fad880196 IScf002bd40e59480bb62024d8fa161dbb My First Custom Chat Conversation Feb 17 2022 17:01:06 GMT-0800 -
Add a participant to the conversation. Use the SID of the conversation that you created in the previous step. Make sure the identity uniquely identifies your end user and avoid using personally identifiable information (PII) like names.
1twilio api:conversations:v1:conversations:participants:create \2--conversation-sid=CH1cbf85a0e7c844fca4cb4d2fad880196 \3--identity=customer1SID Messaging Binding2MBb3469eabc7d040dbadc89a7876eb263f null -
Add a scoped webhook with "studio" as the target using the Conversations Webhook endpoint. With a scoped webhook set to Studio and the configuration filter set to "onMessageAdded", any message that is added to the conversation will invoke the "Incoming Conversation" trigger on the specified Studio flow.
twilio api:conversations:v1:conversations:webhooks:create --target=studio --configuration.flow-sid=FWd945421fea3b172bb9c5889a22d2f410 --configuration.filters='onMessageAdded' --conversation-sid=CH1cbf85a0e7c844fca4cb4d2fad8801961SID Target2WH3bd00957227d499991c9a4ce5cd303e9 studio
-
-
Now the Conversations SDK is initialized. Your participant can send a message.
-
Your app makes use of the Conversations SDK to send the message. For the purposes of this guide, we will use the Twilio CLI to send a message on behalf of your participant. It's important to specify the
x-twilio-webhook-enabledproperty to ensure any scoped or service webhooks are invoked.twilio api:conversations:v1:conversations:messages:create --author=customer --body=hello --conversation-sid=CH1cbf85a0e7c844fca4cb4d2fad880196 --x-twilio-webhook-enabled=true -
When the first message is sent, it will trigger the Studio Flow you set in step 2.3.
-
The Conversations Service will find your conversation and send an "onMessageAdded" event to your Studio Flow.
-
In your flow, you need to use the Send To Flex widget to route your participant, "customer" in this case, to an agent on Flex. Under the hood, the Send To Flex widget invokes the Interactions API to create a task and have it routed. Here's an example Interactions API
POSTrequest that Send To Flex makes (you don't need to do this since Studio does it on your behalf when you set Studio as the target for "onMessageAdded"):1CHANNEL=$(cat << EOF2{3"type": "web",4"initiated_by": "Customer",5"properties": {6"media_channel_sid": "CHXXX"7}8}9EOF10)1112ROUTING=$(cat << EOF13{14"type": "TaskRouter",15"properties": {16"workspace_sid": "WSXXX",17"workflow_sid": "WWXXX",18"attributes": {19"channelType": "web",20"from": "customer"21}22}23}24EOF25)2627curl -X POST "https://flex-api.twilio.com/v1/Interactions" \28--data-urlencode "Channel=$CHANNEL" \29--data-urlencode "Routing=$ROUTING" \30-u $TWILIO_ACCOUNT_SID:$TWILIO_AUTH_TOKEN -
The Flex agent will get a task reservation and when they accept it, they will get added to the same conversation.