Generic Pay Connector
This reference page provides the architecture, transaction flows, request/response schemas, and configuration settings for the Twilio Generic Pay Connector. See Related how-to documentation to learn the steps to use the info on this page.
Twilio's Generic Pay Connector allows you to accept payments securely over the phone via self-service (with the <Pay> verb) or agent assistance without having to become PCI Compliant. Unlike Twilio's other branded Pay Connectors, the Generic Pay Connector allows you to connect to the payment processor of your choice. To learn about the pricing of Pay Connectors, visit the pricing page.
The Generic Pay Connector acts as a bridge between you and the payment processor. Your payment processor is responsible for processing the transaction and reporting the result back to Twilio.
You should use Twilio's Generic Pay Connector if your payment processor of choice is not included in Twilio's list of branded Pay Connectors (Stripe, CardConnect, Base Commerce, Chase Paymentech, Braintree or Adyen).
This page will show you:
- how the Generic Pay Connector works with Twilio and your payment processor to handle payment transactions
- how to set up a Generic Pay Connector to capture payments
- the shape of the request and response objects expected by Twilio when communicating with your payment processor
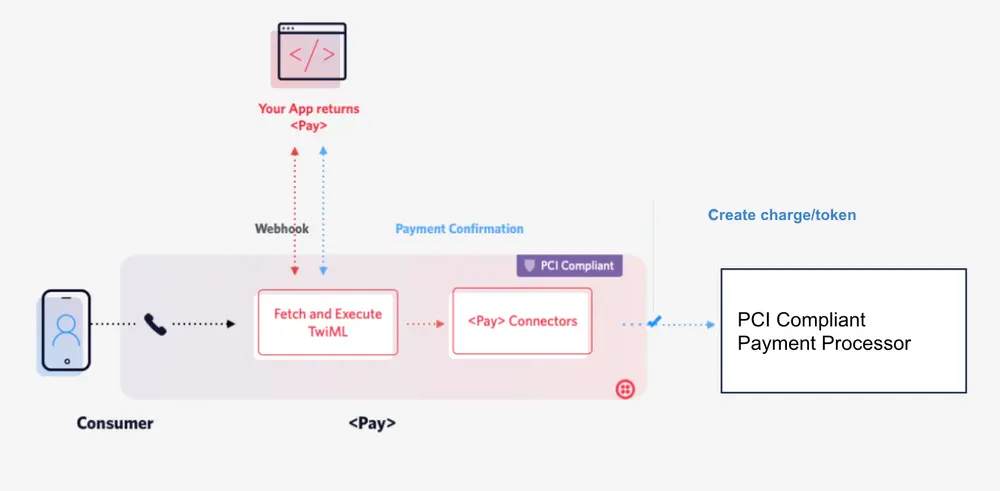
If a Generic Pay Connector is installed and configured with a payment processor, the general information flow when collecting payment information is as follows:
- A call is established with your Twilio phone number and your customer.
- Twilio executes a <Pay> verb. The customer will hear prompts to enter their credit card number, expiration date, zip code, and CVV. (Alternatively, a call center agent could collect payment details using Agent Assist.)
- Twilio passes this payment information to your Generic Pay Connector.
- The Generic Pay Connector passes the payment information to its specified payment processor using an
HTTPS POSTrequest. - The payment processor facilitates the actual payment transaction and passes the result of the transaction back to the Generic Pay Connector.
- Twilio sends this information as an HTTP request to the action URL specified in the <Pay> verb (or to the
statusCallbackURL if using the Payments API)
The Generic Pay Connector only passes information to your payment processor. The actual processing of the transaction by the payment processor is outside the scope of the Generic Pay Connector.
Note on payment processors versus payment gateways
A payment processor executes the transaction by transmitting data between you, the merchant; the issuing bank (i.e., the bank that issued your customer's credit card); and the acquiring bank (i.e., your bank).
A payment gateway is a tool that securely transmits the online payment data to the processor to continue the lifecycle of the transaction. A payment gateway also communicates the approval or decline back to the merchant or the customer.
This section describes the prerequisites for using a Generic Pay Connector, and how to install and configure a Generic Pay Connector.
Purchase a Voice-enabled Twilio phone number
If you don't already own a Twilio Voice-enabled phone number, complete the following steps:
-
In the Twilio Console, navigate to the Buy a Number page.
-
Make sure the "Voice" checkbox is checked and click the Search button.

-
You'll see a list of available phone numbers and their capabilities. Find a number that you like and click the Buy button.
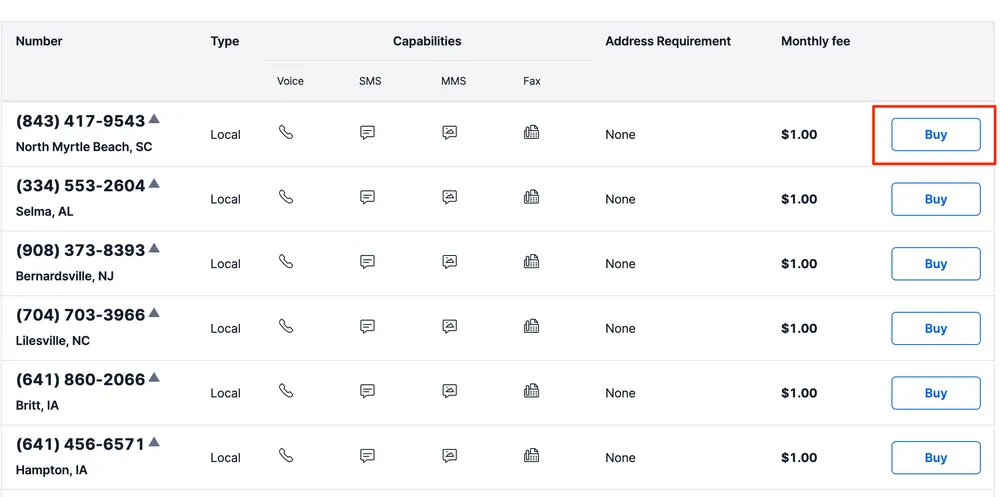
-
In the"Review Phone Number" pop-up, review the information and click on Buy (xxx) xxx-xxxx to confirm your purchase.
Enable PCI Mode
To use Twilio's Pay Connectors, you must enable PCI mode in the Twilio Console. This ensures Twilio captures payment details in a PCI-compliant manner and redacts sensitive PCI information from all call logs. Learn more about PCI workflows.
To enable PCI Mode, complete the following steps:
- Navigate to the Twilio Voice Settings in the Twilio Console. (In the left navigation pane, click on Voice > Settings > General.)
- Click on the Enable PCI Mode button.
- Click on I Agree on the pop up to accept Twilio's Terms of Service.
- Click on the Save button.
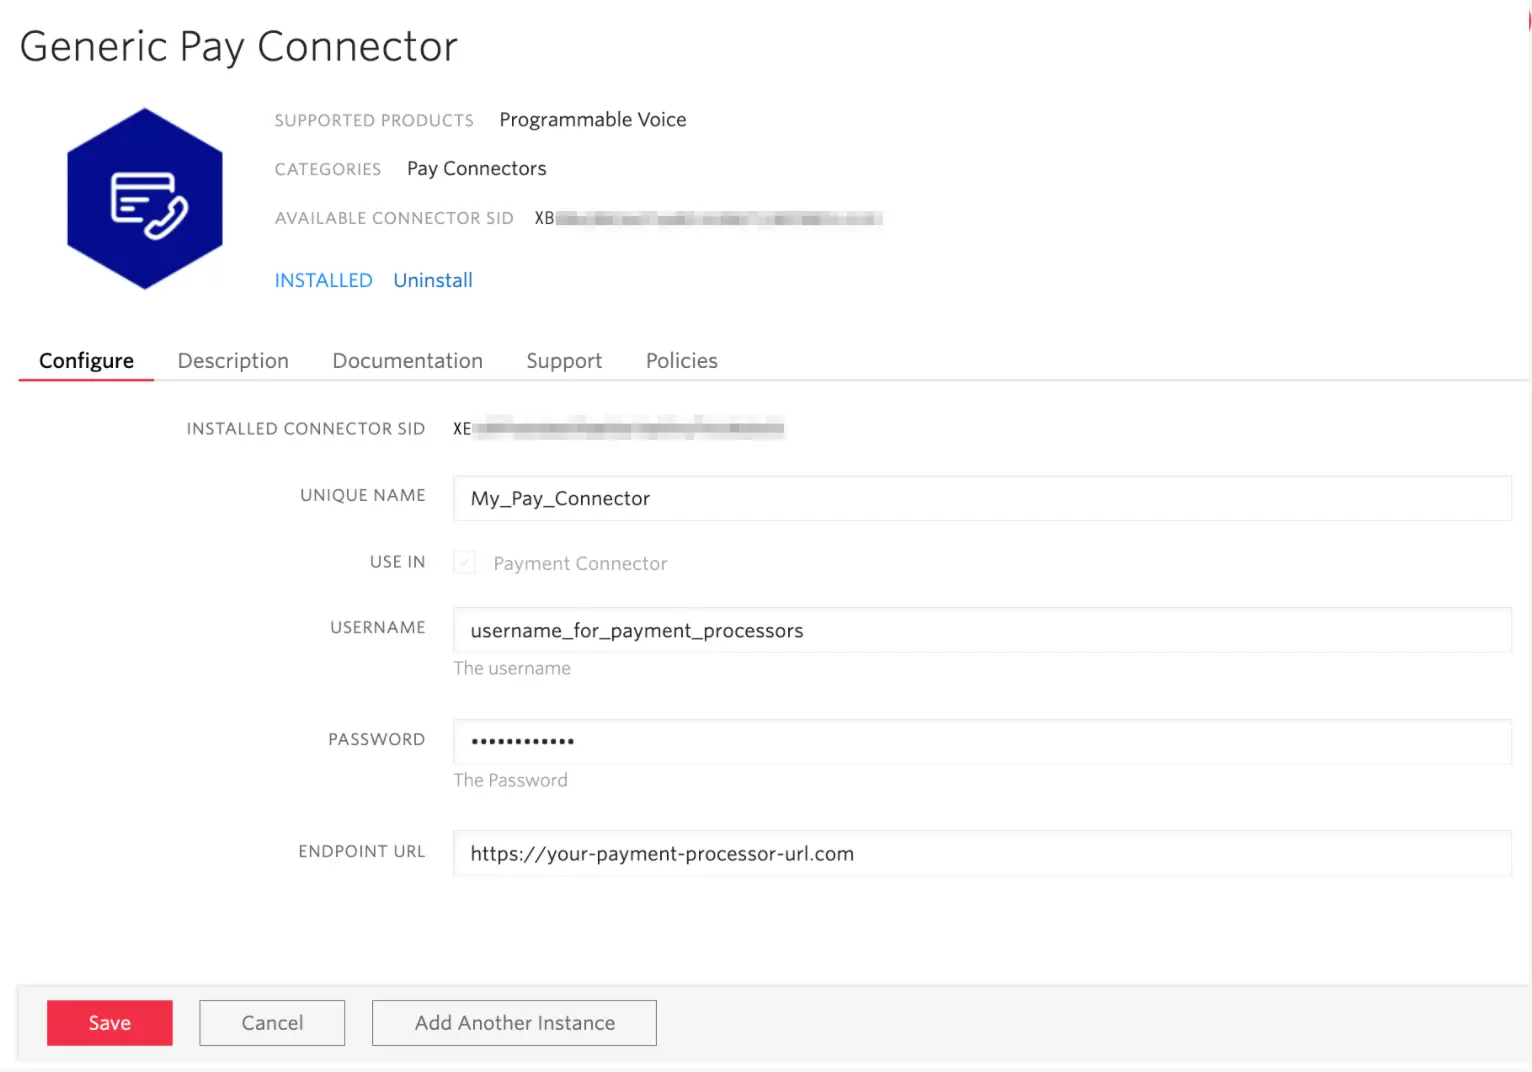
In order for Twilio to create charges and tokens on your behalf, you must install the Generic Pay Connector on your Twilio Account.
-
In the Twilio Console, navigate to the Pay Connectors page. (In the left hand navigation pane, click on Voice > Manage > Pay Connectors.)
-
Click on the Generic Pay Connector tile.\
-
Click on Install.
- Give the Generic Pay Connector a UNIQUE NAME. (You can give one Pay Connector per Twilio account the name "Default". When using <Pay>, if no
paymentConnectorattribute is specified, the default Pay Connector is used.) - Add the credentials you use for your payment processor under the USERNAME and PASSWORD field.
- Enter the ENDPOINT URL for your payment processor's infrastructure. This is where Twilio will send your customers' payment information.
- Click Save.
Warning
By default, your Generic Pay Connector will be in TEST mode and you will not be able to update it to LIVE through the Console without contacting Twilio Support. See the section Go live with your Generic Pay Connector below for more information.
Once you've installed and configured the Generic Pay Connector, you're ready to test your connection to your payment gateway (the URL you just configured) in the TEST mode with test card information. See the section Valid test credit card and bank account numbers below for more information.
You can use either the <Pay> TwiML verb or Agent Assist (using the Payments API) to test the payment flow. Using <Pay> will prompt customers using an automated voice, while Agent Assist allows a call center agent to prompt the customer to enter their payment details.
The following section contains code samples for how to collect payment information with the <Pay> verb while in TEST mode.
Twilio supports two transaction types: charge and tokenize.
A charge transaction means you want to immediately capture funds from the customer's supplied payment method (i.e. credit card, ACH-debit) in return for the goods or services you offer.
If you want to process a charge transaction using a Generic Pay Connector, you will need to include a chargeAmount attribute in your <Pay> verb or when starting a Pay session with the Payments API, and the value of the chargeAmount must be greater than 0.
1const VoiceResponse = require('twilio').twiml.VoiceResponse;23const response = new VoiceResponse();4response.pay({5chargeAmount: '10.00',6paymentConnector: 'My_Pay_Connector',7action: 'https://your-callback-function-url.com/pay',8});910console.log(response.toString());
Output
1<?xml version="1.0" encoding="UTF-8"?>2<Response>3<Pay chargeAmount="10.00" paymentConnector="My_Pay_Connector" action="https://your-callback-function-url.com/pay" />4</Response>
Once you've collected your customer's payment details, your Generic Pay Connector will send an HTTPS POST request to the configured URL of your payment processor. Below is an example of the body of the POST request that will be sent for a charge transaction. Note that there is a "method" property with a value of "charge", which indicates the type of transaction.
Below is an example request for a credit-card charge transaction
1{2"method" : "charge",3"transaction_id" : "transaction_id",4"cardnumber" : "4111111111111111",5"cvv":"123",6"amount":"10.0",7"currency_code":"USD",8"expiry_month":"08",9"expiry_year":"27",10"description":"pizza",11"postal_code":"94111",12"parameters" : {13"customer_defined_key_1" : "customer_defined_value_1",14"customer_defined_key_2" : "customer_defined_value_2"15}16}
Below is an example request for an ach-debit charge transaction
1{2"method" : "charge",3"transaction_id" : "transaction_id",4"bankaccountnumber" : "4111111111111111",5"routingnumber" : "12345678",6"amount":"10.0",7"currency_code":"USD",8"description":"pizza",9"parameters" : {10"customer_defined_key_1" : "customer_defined_value_1",11"customer_defined_key_2" : "customer_defined_value_2"12}13}
Payment processors will take the request object from above, handle the charge transaction, and return an object to Twilio that contains an ID number for the charge transaction, any applicable error code/message, and any custom parameters if necessary.
Below is an example response object that Twilio would expect from a payment processor after it handles a charge transaction. Note that there is a "charge_id" property with a value of some identification number associated with the charge transaction.
1{2"charge_id":"some_id",3"error_code":null,4"error_message":null5}
Twilio will receive and format the response from the payment processor.
If you used the <Pay> verb, Twilio will send this information in the body of a POST request to the action URL
If you used the Payment API, Twilio will send this information in the body of a POST request to the statusCallback URL you specified when you created the Payment session.
A tokenize transaction means you want to obtain a token based on the user's supplied payment information (e.g. credit card or ACH-debit information) from the payment processor instead of posting any charge. Tokens are typically stored so that you can charge the user in the future without having to ask for the payment information again. Note that tokens are provided by your payment gateway or processor.
To make a tokenize transaction, you must set the chargeAmount to "0" or omit the chargeAmount attribute from your <Pay> verb or when you start a new Pay session using the Payment API.
1const VoiceResponse = require('twilio').twiml.VoiceResponse;23const response = new VoiceResponse();4response.pay({5chargeAmount: '0',6paymentConnector: 'My_Pay_Connector',7action: 'https://your-callback-function-url.com/pay',8});910console.log(response.toString());
Output
1<?xml version="1.0" encoding="UTF-8"?>2<Response>3<Pay chargeAmount="0" paymentConnector="My_Pay_Connector" action="https://your-callback-function-url.com/pay" />4</Response>
Once you've collected your customer's payment details, your Generic Pay Connector will send a POST request to the configured URL of your payment processor. Below is an example of the body of the POST request that will be sent. Note that there is a "method" property with a value of "tokenize", which indicates the type of transaction.
Below is an example request for a credit-card tokenize transaction
1{2"method" : "tokenize",3"transaction_id" : "transaction_id",4"cardnumber" : "4111111111111111",5"cvv":"123",6"expiry_month":"08",7"expiry_year":"27",8"description":"pizza",9"postal_code":"94111",10"parameters" : {11"customer_defined_key_1" : "customer_defined_value_1",12"customer_defined_key_2" : "customer_defined_value_2"13}14}
Below is an example request for an ach-debit tokenize transaction
1{2"method" : "tokenize",3"transaction_id" : "transaction_id",4"bankaccountnumber" : "4111111111111111",5"routingnumber" : "12345678",6"description":"pizza",7"parameters" : {8"customer_defined_key_1" : "customer_defined_value_1",9"customer_defined_key_2" : "customer_defined_value_2"10}11}
Payment processors will take the request object from above, handle the tokenize transaction, and return an object to Twilio that contains an ID number for the tokenize transaction, any applicable error code/message, and any custom parameters if necessary.
Below is an example response object that Twilio would expect from a payment processor after it handles a tokenize transaction. Note that there is a "token_id" property with a value of some identification number associated with the tokenize transaction (or the token itself, depending on the payment processor).
1{2"token_id":"any_token",3"error_code":null,4"error_message":null5}
Twilio will receive and format the response from the payment processor.
If you used the <Pay> verb, Twilio will send this information in the body of a POST request to the action URL
If you used the Payment API, Twilio will send this information in the body of a POST request to the statusCallback URL you specified when you created the Payment session.
While in TEST mode, Twilio allows you to perform testing against your configured payment gateway URL with the test credit card numbers and bank account numbers listed below. Any other credit card number or bank account number will be blocked. If using <Pay>, your action URL will receive an error response.
| Card Type | Number |
|---|---|
| Visa | 4111111111111111 |
| MasterCard | 5555555555554444 |
| American Express | 378282246310005 |
| Discover | 6011111111111117 |
| Diner's Club | 3065930009020004 |
| JCB | 3566002020360505 |
| UnionPay | 6200000000000005 |
| Maestro | 6771798021000008 |
For credit card transactions, any valid expiration date, CVV, and postal code combination will work in TEST mode with the above credit card numbers.
| Card Type | Number |
|---|---|
| 8-Digit | 12345678 |
| 9-Digit | 123456789 |
Any valid bank routing number will work in TEST mode with the above bank account numbers.
Once you've completed your testing and are ready to move to LIVE mode with your Generic Pay Connector, contact Twilio Support for approval.
In order to approve your connector for LIVE mode, you must submit the following:
- the latest, non-expired Attestation of Compliance (AOC) from your payment gateway
- the URL of your payment gateway
- confirmation that you have reviewed the PCI-compliance of your downstream payment gateway
Twilio will validate this payment gateway URL against your Connector's configured URL that you set in TEST mode to ensure it points to your payment gateway, and then approve your Generic Pay Connector. Once approved, you can move your Connector to LIVE mode in the Console and your payment gateway URL will become immutable.
Warning
While in TEST mode, you can change the payment gateway URL as many times as you want.
Once you change the Connector to LIVE mode, the Connector's payment gateway URL is no longer editable.
If you need to change the payment gateway URL after switching to LIVE mode, you must open a Support ticket with the following information:
- the latest, non-expired Attestation of Compliance (AOC) from your payment gateway
- the new payment gateway URL you wish to use
- confirmation that you have reviewed the PCI-compliance of your downstream payment gateway
Twilio allows you to send custom parameters in the request to the payment processor, as well as receive custom parameters from the payment processor.
If you use the <Pay> verb, you can send custom parameters to your payment processor using the <Parameter> noun. This functionality could be used to send additional contextual information about the transaction. For example, you could inform the payment processor to waive fees, charge fees, process a refund, etc. Your specific use case and your chosen payment processor will determine what these custom parameters should be.
The <Parameter> noun is nested within the <Pay> verb's open and closing tags, and takes name and value attributes for the name and value of your custom parameter. (See "Pay charge transaction with Parameter noun" code sample below.)
The example below shows a charge transaction using the <Parameter> noun to pass custom parameters to the payment processor.
You can also pass custom parameters for tokenize transactions in the same manner.
There is no limit to the number of custom parameters you can nest within a <Pay> verb.
1const VoiceResponse = require('twilio').twiml.VoiceResponse;23const response = new VoiceResponse();4const pay = response.pay({5chargeAmount: '10.00',6paymentConnector: 'My_Generic_Pay_Connector',7action: 'https://your-callback-function-url.com/pay',8});9pay.parameter({10name: 'custom_parameter_1',11value: 'custom_value_1',12});1314console.log(response.toString());
Output
1<?xml version="1.0" encoding="UTF-8"?>2<Response>3<Pay chargeAmount="10.00" paymentConnector="My_Generic_Pay_Connector" action="https://your-callback-function-url.com/pay">4<Parameter name="custom_parameter_1" value="custom_value_1" />5</Pay>6</Response>
The body of the POST request that your Generic Pay Connector sends to the payment processor will include the custom parameters in a "parameters" property as shown below.
1{2"method" : "charge",3"transaction_id" : "transaction_id",4"cardnumber" : "4111111111111111",5"cvv":"123",6"amount":"10.0",7"currency_code":"USD",8"expiry_month":"08",9"expiry_year":"27",10"description":"pizza",11"postal_code":"94111",12"parameters" : {13"custom_parameter_1" : "custom_value_1"14}15}
Twilio also can handle receiving custom parameters from your payment processor.
After your payment processor handles your transaction, the response body it sends back can contain a parameters property as shown in the example below.
Warning
Receiving custom parameters to the payment processor is not possible with the Payments API/Agent Assist at this time.
1{2"charge_id":"any_id",3"error_code":null,4"error_message":null,5"parameters" : {6"key1_from_payment_processor" : "value1_from_payment_processor",7"key2_from_payment_processor" : "value2_from_payment_processor"8}9}
These custom parameters will then be added as properties (with their names prepended with PayConnector_) on the POST request body to your action URL. (Read more about the shape of the POST request body on the <Pay> doc's action section.)
For example, given the sample response from the payment processor above, the body of Twilio POST request to your action URL could include the following properties:
1PayConnector_key1_from_payment_processor: "value1_from_payment_processor",2PayConnector_key2_from_payment_processor: "value2_from_payment_processor"
If the payment processor fails to respond to Twilio's request within 10 seconds, Twilio will retry the request up to 5 times, passing the same transaction_id in the retried request.
It is up to the payment processor to handle the retried request properly. If the transaction is still in progress and succeeds after more than 10 seconds from the initial request, Twilio will expect the successful response to be returned to the retried request.
For example, in the case where the payment processor takes 11 seconds to process a successful transaction, the charge_id should be returned to the retry request made by Twilio.
In other words, if a duplicate transaction is attempted, either an error should be returned to Twilio stating it was a duplicate transaction, or the original charge_id / token_id (from the payment processor's first attempted response to Twilio) should be returned.
The transaction_id behaves as an idempotency token to avoid duplicate charges done by the payment processor in the case where a response is dropped in transit to Twilio.
Any non-NULL error code returned from a payment processor or customer's infrastructure will be returned to the customer in the connectorError field sent as part of the payload to the action URL specified in the <Pay> verb. (Read more about the shape of the POST request body on the <Pay> doc's action section.)
In case of an error, Twilio will expect to receive the charge_id field in the response for a charge error and the token_id field in the response for a tokenize error from the payment processor. The parameters field is optional.