SHAKEN/STIR Onboarding with the Trust Hub REST API (ISVs/Resellers using Subaccounts)
Learn to create and submit a SHAKEN/STIR Trust Product by using the Twilio Trust Hub REST API to send POST requests to various Trust Hub resource endpoints. You can use this guide to send voice notifications, create self-service automation, create an outbound call center, and create transcriptions for AI or ML.
See Related reference documentation to learn more about the Trust Hub REST API used in this guide.
This page walks ISVs/Resellers using subaccounts through creating a SHAKEN/STIR Trust Product with the Trust Hub REST API.
Not an ISV/Reseller using subaccounts? Find the appropriate onboarding instructions below:
- Direct Customer (no Subaccounts)
- Direct Customer using Subaccounts
- ISV/Reseller with single, top-level project
There are three main sections in this guide:
-
Create Primary Business Profile in the Console
-
Create Secondary Business Profile under Customer Subaccount, Add Phone Numbers
- Create Secondary Business Profile, Connect to Primary Business Profile
- Create a Supporting Document, Connect to Secondary Business Profile
- Create Business Information, Connect to Secondary Business Profile
- Create Authorized Representative, Connect to Secondary Business Profile
- Add Phone Numbers to Secondary Business Profile
- Submit Secondary Business Profile for Vetting
-
Create Trust Product, Add Phone Numbers, and Submit for Vetting
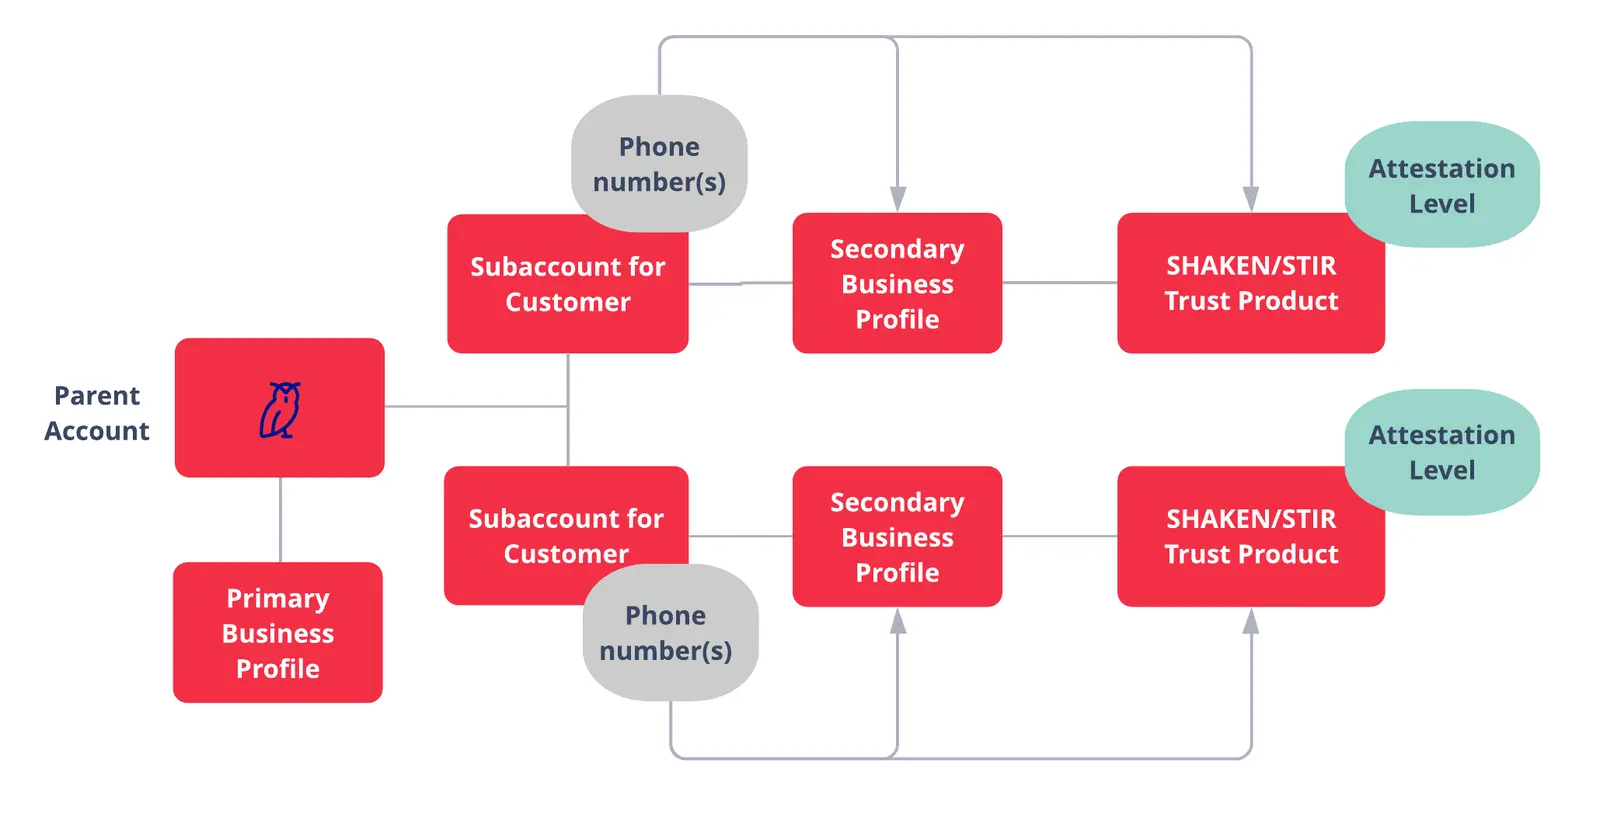
- In Twilio Console, go to Trust Hub > Customer Profiles or Customer Profiles in the legacy Console to create your profile.
- You will only need to do this one time.
- For more information on Business Profiles and vetting, go to the Trust Hub Docs.
- You will want to save the
sidfrom the response. This is your Secondary Business Profile SID, and you will need it for the next step. - Do not change the
PolicySIDin the API call below. This is a static value that will be the same across all accounts.
1// Download the helper library from https://www.twilio.com/docs/node/install2const twilio = require("twilio"); // Or, for ESM: import twilio from "twilio";34// Find your Account SID and Auth Token at twilio.com/console5// and set the environment variables. See http://twil.io/secure6const accountSid = process.env.TWILIO_ACCOUNT_SID;7const authToken = process.env.TWILIO_AUTH_TOKEN;8const client = twilio(accountSid, authToken);910async function createCustomerProfile() {11const customerProfile = await client.trusthub.v1.customerProfiles.create({12email: "EMAIL@EXAMPLE.COM",13friendlyName: "YOUR_FRIENDLY_NAME_FOR_SECONDARY_CUSTOMER_PROFILE",14policySid: "RNdfbf3fae0e1107f8aded0e7cead80bf5",15});1617console.log(customerProfile.sid);18}1920createCustomerProfile();
Response
1{2"sid": "BUaaaaaaaaaaaaaaaaaaaaaaaaaaaaaaaa",3"account_sid": "ACaaaaaaaaaaaaaaaaaaaaaaaaaaaaaaaa",4"policy_sid": "RNdfbf3fae0e1107f8aded0e7cead80bf5",5"friendly_name": "YOUR_FRIENDLY_NAME_FOR_SECONDARY_CUSTOMER_PROFILE",6"status": "draft",7"email": "EMAIL@EXAMPLE.COM",8"status_callback": "http://www.example.com",9"valid_until": null,10"date_created": "2019-07-30T22:29:24Z",11"date_updated": "2019-07-31T01:09:00Z",12"url": "https://trusthub.twilio.com/v1/CustomerProfiles/BUaaaaaaaaaaaaaaaaaaaaaaaaaaaaaaaa",13"links": {14"customer_profiles_entity_assignments": "https://trusthub.twilio.com/v1/CustomerProfiles/BUaaaaaaaaaaaaaaaaaaaaaaaaaaaaaaaa/EntityAssignments",15"customer_profiles_evaluations": "https://trusthub.twilio.com/v1/CustomerProfiles/BUaaaaaaaaaaaaaaaaaaaaaaaaaaaaaaaa/Evaluations",16"customer_profiles_channel_endpoint_assignment": "https://trusthub.twilio.com/v1/CustomerProfiles/BUaaaaaaaaaaaaaaaaaaaaaaaaaaaaaaaa/ChannelEndpointAssignments"17},18"errors": null19}
- You'll need your Secondary Business Profile's SID, which was returned in the previous step.
- You'll need your Primary Business Profile SID.
- To retrieve these SIDs through the API, see the following Additional API Calls section. You can also find them in the Trust Hub section of Twilio Console or the legacy Console.
1// Download the helper library from https://www.twilio.com/docs/node/install2const twilio = require("twilio"); // Or, for ESM: import twilio from "twilio";34// Find your Account SID and Auth Token at twilio.com/console5// and set the environment variables. See http://twil.io/secure6const accountSid = process.env.TWILIO_ACCOUNT_SID;7const authToken = process.env.TWILIO_AUTH_TOKEN;8const client = twilio(accountSid, authToken);910async function createCustomerProfileEntityAssignment() {11const customerProfilesEntityAssignment = await client.trusthub.v112.customerProfiles("YOUR_SECONDARY_BUSINESS_PROFILE_SID")13.customerProfilesEntityAssignments.create({14objectSid: "YOUR_PRIMARY_BUSINESS_PROFILE_SID",15});1617console.log(customerProfilesEntityAssignment.sid);18}1920createCustomerProfileEntityAssignment();
Response
1{2"sid": "BVaaaaaaaaaaaaaaaaaaaaaaaaaaaaaaaa",3"customer_profile_sid": "YOUR_SECONDARY_BUSINESS_PROFILE_SID",4"account_sid": "ACaaaaaaaaaaaaaaaaaaaaaaaaaaaaaaaa",5"object_sid": "YOUR_PRIMARY_BUSINESS_PROFILE_SID",6"date_created": "2019-07-31T02:34:41Z",7"url": "https://trusthub.twilio.com/v1/CustomerProfiles/BUaaaaaaaaaaaaaaaaaaaaaaaaaaaaaaaa/EntityAssignments/BVaaaaaaaaaaaaaaaaaaaaaaaaaaaaaaaa"8}
-
You will need the Address SID for the Secondary Business.
- If you already created an address for your Secondary Business, you can find it in the Trust Hub section of Twilio Console or the legacy Console.
- If you prefer to use an API to create an Address or retrieve Address SIDs, see the Additional API Calls section below. For more detailed Address API Info, go to the REST API: Addresses page.
-
This will return the SID for the Supporting Document. You will need this for the next step.
- The Supporting Document SID will start with "RD"
1// Download the helper library from https://www.twilio.com/docs/node/install2const twilio = require("twilio"); // Or, for ESM: import twilio from "twilio";34// Find your Account SID and Auth Token at twilio.com/console5// and set the environment variables. See http://twil.io/secure6const accountSid = process.env.TWILIO_ACCOUNT_SID;7const authToken = process.env.TWILIO_AUTH_TOKEN;8const client = twilio(accountSid, authToken);910async function createSupportingDocument() {11const supportingDocument =12await client.trusthub.v1.supportingDocuments.create({13attributes: {14address_sids: "YOUR_CUSTOMER_ADDRESS_SID",15},16friendlyName: "YOUR_CUSTOMER_FRIENDLY_NAME",17type: "customer_profile_address",18});1920console.log(supportingDocument.sid);21}2223createSupportingDocument();
Response
1{2"status": "DRAFT",3"date_updated": "2021-02-11T17:23:00Z",4"friendly_name": "YOUR_CUSTOMER_FRIENDLY_NAME",5"account_sid": "ACaaaaaaaaaaaaaaaaaaaaaaaaaaaaaaaa",6"url": "https://trusthub.twilio.com/v1/SupportingDocuments/RDaaaaaaaaaaaaaaaaaaaaaaaaaaaaaaaa",7"date_created": "2021-02-11T17:23:00Z",8"sid": "RDaaaaaaaaaaaaaaaaaaaaaaaaaaaaaaaa",9"attributes": {10"address_sids": "YOUR_CUSTOMER_ADDRESS_SID"11},12"type": "customer_profile_address",13"mime_type": null14}
-
You will need your Secondary Business Profile SID used earlier.
-
You will need the Supporting Document SID, which was returned in the previous step.
- If you need to retrieve the Supporting Document SID via API, see the Additional API Calls section below.
1// Download the helper library from https://www.twilio.com/docs/node/install2const twilio = require("twilio"); // Or, for ESM: import twilio from "twilio";34// Find your Account SID and Auth Token at twilio.com/console5// and set the environment variables. See http://twil.io/secure6const accountSid = process.env.TWILIO_ACCOUNT_SID;7const authToken = process.env.TWILIO_AUTH_TOKEN;8const client = twilio(accountSid, authToken);910async function createCustomerProfileEntityAssignment() {11const customerProfilesEntityAssignment = await client.trusthub.v112.customerProfiles("YOUR_SECONDARY_CUSTOMER_PROFILE_SID")13.customerProfilesEntityAssignments.create({14objectSid: "YOUR_SUPPORTING_DOCUMENT_SID",15});1617console.log(customerProfilesEntityAssignment.sid);18}1920createCustomerProfileEntityAssignment();
Response
1{2"sid": "BVaaaaaaaaaaaaaaaaaaaaaaaaaaaaaaaa",3"customer_profile_sid": "YOUR_SECONDARY_CUSTOMER_PROFILE_SID",4"account_sid": "ACaaaaaaaaaaaaaaaaaaaaaaaaaaaaaaaa",5"object_sid": "YOUR_SUPPORTING_DOCUMENT_SID",6"date_created": "2019-07-31T02:34:41Z",7"url": "https://trusthub.twilio.com/v1/CustomerProfiles/BUaaaaaaaaaaaaaaaaaaaaaaaaaaaaaaaa/EntityAssignments/BVaaaaaaaaaaaaaaaaaaaaaaaaaaaaaaaa"8}
You will need the following information about your Secondary Business:
| Parameter | Definition/Possible Values |
|---|---|
business_namerequired | Definition: Your Secondary Business' legal business name Possible Values: [any string] |
business_identityrequired | Definition: Your Secondary Business' structure. Possible Values: direct_customerisv_reseller_or_partnerunknown |
business_typerequired | Definition: Business type for your Secondary Business Possible Values: Sole ProprietorshipPartnershipLimited Liability CorporationCorporationCo-operativeLimited Liability PartnershipNon-profit |
business_industryrequired | Definition: Industry of Secondary Business Possible Values: AUTOMOTIVEAGRICULTUREBANKINGCONSUMEREDUCATIONENGINEERINGENERGYOIL_AND_GASFAST_MOVING_CONSUMER_GOODSFINANCIALFINTECHFOOD_AND_BEVERAGEGOVERNMENTHEALTHCAREHOSPITALITYINSURANCELEGALMANUFACTURINGMEDIAONLINERAW_MATERIALSREAL_ESTATERELIGIONRETAILJEWELRYTECHNOLOGYTELECOMMUNICATIONSTRANSPORTATIONTRAVELELECTRONICSNOT_FOR_PROFIT |
business_registration_identifierrequired | Definition: The official method used to register the Secondary Business' identity. Possible Values: USA: DUNS Number (Dun & Bradstreet)USA: Employer Identification Number (EIN) |
business_registration_numberrequired | Definition: The number used to identify your Secondary Business of the type chosen for your business_registration_identifierPossible Values: [numerical string for USA types] |
business_regions_of_operationrequired | Definition: Regions your Secondary BusinessAFRICAASIAEUROPELATIN_AMERICAUSA_AND_CANADA |
website_urlrequired | Definition: The URL for the Secondary Business' website Possible Values: [any valid URL string] |
social_media_profile_urlsoptional | Definition: The URL(s) for the Secondary Business' social media accounts (i.e. LinkedIn, Facebook, Twitter) Possible Values: [any valid URL string] |
Do not change the Type value. It must be customer_profile_business_information in order to create the correct resource.
- You'll need the Business Information SID returned from this API call for the next step.
Danger
Updates are coming to Twilio's Starter Brand registration based on changes from The Campaign Registry (TCR) and mobile carriers. We will provide updates on how this change may impact US A2P 10DLC registration as soon as they are available. Brands with EINs will no longer be able to use Twilio's Starter Brand registration going forward.
In the meantime, if you are registering on behalf of an organization with an EIN/Tax ID, please complete a Standard registration.
1// Download the helper library from https://www.twilio.com/docs/node/install2const twilio = require("twilio"); // Or, for ESM: import twilio from "twilio";34// Find your Account SID and Auth Token at twilio.com/console5// and set the environment variables. See http://twil.io/secure6const accountSid = process.env.TWILIO_ACCOUNT_SID;7const authToken = process.env.TWILIO_AUTH_TOKEN;8const client = twilio(accountSid, authToken);910async function createEndUser() {11const endUser = await client.trusthub.v1.endUsers.create({12attributes: {13business_name: "YOUR_SECONDARY_BUSINESS_NAME",14business_identity: "YOUR_SECONDARY_BUSINESS_IDENTITY",15business_type: "YOUR_SECONDARY_BUSINESS_TYPE",16business_industry: "YOUR_SECONDARY_BUSINESS_INDUSTRY",17business_registration_identifier: "YOUR_SECONDARY_BUSINESS_IDENTIFIER",18business_registration_number:19"YOUR_SECONDARY_BUSINESS_REGISTRATION_NUMBER",20business_regions_of_operation:21"YOUR_SECONDARY_BUSINESS_REGIONS_OF_OPERATION",22website_url: "YOUR_SECONDARY_BUSINESS_URL",23social_media_profile_urls: "",24},25friendlyName: "YOUR_CUSTOMER_FRIENDLY_NAME",26type: "customer_profile_business_information",27});2829console.log(endUser.sid);30}3132createEndUser();
Response
1{2"date_updated": "2021-02-16T20:40:57Z",3"sid": "ITaaaaaaaaaaaaaaaaaaaaaaaaaaaaaaaa",4"friendly_name": "YOUR_CUSTOMER_FRIENDLY_NAME",5"account_sid": "ACaaaaaaaaaaaaaaaaaaaaaaaaaaaaaaaa",6"url": "https://trusthub.twilio.com/v1/EndUsers/ITaaaaaaaaaaaaaaaaaaaaaaaaaaaaaaaa",7"date_created": "2021-02-16T20:40:57Z",8"attributes": {9"business_name": "YOUR_SECONDARY_BUSINESS_NAME",10"business_identity": "YOUR_SECONDARY_BUSINESS_IDENTITY",11"business_type": "YOUR_SECONDARY_BUSINESS_TYPE",12"business_industry": "YOUR_SECONDARY_BUSINESS_INDUSTRY",13"business_registration_identifier": "YOUR_SECONDARY_BUSINESS_IDENTIFIER",14"business_registration_number": "YOUR_SECONDARY_BUSINESS_REGISTRATION_NUMBER",15"business_regions_of_operation": "YOUR_SECONDARY_BUSINESS_REGIONS_OF_OPERATION",16"website_url": "YOUR_SECONDARY_BUSINESS_URL",17"social_media_profile_urls": ""18},19"type": "customer_profile_business_information"20}
- You will need the Customer Profile Business Information SID, which was returned in the last step.
- The Customer Profile Business Information SID will start with "IT".
- To find your Customer Profile Business Information SID via API, see the Read all End Users call in the Additional API Calls section.
1// Download the helper library from https://www.twilio.com/docs/node/install2const twilio = require("twilio"); // Or, for ESM: import twilio from "twilio";34// Find your Account SID and Auth Token at twilio.com/console5// and set the environment variables. See http://twil.io/secure6const accountSid = process.env.TWILIO_ACCOUNT_SID;7const authToken = process.env.TWILIO_AUTH_TOKEN;8const client = twilio(accountSid, authToken);910async function createCustomerProfileEntityAssignment() {11const customerProfilesEntityAssignment = await client.trusthub.v112.customerProfiles("YOUR_SECONDARY_BUSINESS_PROFILE_SID")13.customerProfilesEntityAssignments.create({14objectSid: "YOUR_CUSTOMER_PROFILE_BUSINESS_INFORMATION_SID",15});1617console.log(customerProfilesEntityAssignment.sid);18}1920createCustomerProfileEntityAssignment();
Response
1{2"sid": "BVaaaaaaaaaaaaaaaaaaaaaaaaaaaaaaaa",3"customer_profile_sid": "YOUR_SECONDARY_BUSINESS_PROFILE_SID",4"account_sid": "ACaaaaaaaaaaaaaaaaaaaaaaaaaaaaaaaa",5"object_sid": "YOUR_CUSTOMER_PROFILE_BUSINESS_INFORMATION_SID",6"date_created": "2019-07-31T02:34:41Z",7"url": "https://trusthub.twilio.com/v1/CustomerProfiles/BUaaaaaaaaaaaaaaaaaaaaaaaaaaaaaaaa/EntityAssignments/BVaaaaaaaaaaaaaaaaaaaaaaaaaaaaaaaa"8}
-
You will need your Secondary Business Profile SID.
-
You'll also need your Phone Number SID(s)
- To find your Phone Number SIDs in the Console, go to your Dashboard for your Customer Subaccount. In the Project Info section, click on See all phone numbers, then click on a phone number to find the SID.
- To find your Phone Number SIDs via API, see the Additional API Calls section below.
- Phone Number SIDs begin with "PN".
- In the API Call below, don't change the
ChannelEndpointType. It needs to bephone-numberto add a phone number to your Business Profile.
1// Download the helper library from https://www.twilio.com/docs/node/install2const twilio = require("twilio"); // Or, for ESM: import twilio from "twilio";34// Find your Account SID and Auth Token at twilio.com/console5// and set the environment variables. See http://twil.io/secure6const accountSid = process.env.TWILIO_ACCOUNT_SID;7const authToken = process.env.TWILIO_AUTH_TOKEN;8const client = twilio(accountSid, authToken);910async function createCustomerProfileChannelEndpointAssignment() {11const customerProfilesChannelEndpointAssignment = await client.trusthub.v112.customerProfiles("YOUR_SECONDARY_BUSINESS_PROFILE_SID")13.customerProfilesChannelEndpointAssignment.create({14channelEndpointSid: "YOUR_PHONE_NUMBER_SID",15channelEndpointType: "phone-number",16});1718console.log(customerProfilesChannelEndpointAssignment.sid);19}2021createCustomerProfileChannelEndpointAssignment();
Response
1{2"sid": "RAaaaaaaaaaaaaaaaaaaaaaaaaaaaaaaaa",3"customer_profile_sid": "YOUR_SECONDARY_BUSINESS_PROFILE_SID",4"account_sid": "ACaaaaaaaaaaaaaaaaaaaaaaaaaaaaaaaa",5"channel_endpoint_sid": "YOUR_PHONE_NUMBER_SID",6"channel_endpoint_type": "phone-number",7"date_created": "2019-07-31T02:34:41Z",8"url": "https://trusthub.twilio.com/v1/CustomerProfiles/BUaaaaaaaaaaaaaaaaaaaaaaaaaaaaaaaa/ChannelEndpointAssignments/RAaaaaaaaaaaaaaaaaaaaaaaaaaaaaaaaa"9}
- You will need your Secondary Business Profile SID.
- Do not change the value of the
Statusparameter.pending-reviewis needed to properly submit your Secondary Business Profile
1// Download the helper library from https://www.twilio.com/docs/node/install2const twilio = require("twilio"); // Or, for ESM: import twilio from "twilio";34// Find your Account SID and Auth Token at twilio.com/console5// and set the environment variables. See http://twil.io/secure6const accountSid = process.env.TWILIO_ACCOUNT_SID;7const authToken = process.env.TWILIO_AUTH_TOKEN;8const client = twilio(accountSid, authToken);910async function updateCustomerProfile() {11const customerProfile = await client.trusthub.v112.customerProfiles("YOUR_SECONDARY_BUSINESS_PROFILE_SID")13.update({ status: "pending-review" });1415console.log(customerProfile.sid);16}1718updateCustomerProfile();
Response
1{2"sid": "YOUR_SECONDARY_BUSINESS_PROFILE_SID",3"account_sid": "ACaaaaaaaaaaaaaaaaaaaaaaaaaaaaaaaa",4"policy_sid": "RNaaaaaaaaaaaaaaaaaaaaaaaaaaaaaaaa",5"friendly_name": "friendly_name",6"status": "pending-review",7"email": "notification@email.com",8"status_callback": "http://www.example.com",9"valid_until": null,10"date_created": "2019-07-30T22:29:24Z",11"date_updated": "2019-07-31T01:09:00Z",12"url": "https://trusthub.twilio.com/v1/CustomerProfiles/BUaaaaaaaaaaaaaaaaaaaaaaaaaaaaaaaa",13"links": {14"customer_profiles_entity_assignments": "https://trusthub.twilio.com/v1/CustomerProfiles/BUaaaaaaaaaaaaaaaaaaaaaaaaaaaaaaaa/EntityAssignments",15"customer_profiles_evaluations": "https://trusthub.twilio.com/v1/CustomerProfiles/BUaaaaaaaaaaaaaaaaaaaaaaaaaaaaaaaa/Evaluations",16"customer_profiles_channel_endpoint_assignment": "https://trusthub.twilio.com/v1/CustomerProfiles/BUaaaaaaaaaaaaaaaaaaaaaaaaaaaaaaaa/ChannelEndpointAssignments"17},18"errors": null19}
- Note: Do not change the policy_sid from the example below. This is a static value that will stay the same across all accounts.
- The response will contain the SID for your Trust Product. You'll need this for the next step.
1// Download the helper library from https://www.twilio.com/docs/node/install2const twilio = require("twilio"); // Or, for ESM: import twilio from "twilio";34// Find your Account SID and Auth Token at twilio.com/console5// and set the environment variables. See http://twil.io/secure6const accountSid = process.env.TWILIO_ACCOUNT_SID;7const authToken = process.env.TWILIO_AUTH_TOKEN;8const client = twilio(accountSid, authToken);910async function createTrustProduct() {11const trustProduct = await client.trusthub.v1.trustProducts.create({12email: "EMAIL@EXAMPLE.COM",13friendlyName: "FRIENDLY_NAME_FOR_YOUR_TRUST_PRODUCT",14policySid: "RN7a97559effdf62d00f4298208492a5ea",15});1617console.log(trustProduct.sid);18}1920createTrustProduct();
Response
1{2"sid": "BUaaaaaaaaaaaaaaaaaaaaaaaaaaaaaaaa",3"account_sid": "ACaaaaaaaaaaaaaaaaaaaaaaaaaaaaaaaa",4"policy_sid": "RN7a97559effdf62d00f4298208492a5ea",5"friendly_name": "FRIENDLY_NAME_FOR_YOUR_TRUST_PRODUCT",6"status": "draft",7"email": "EMAIL@EXAMPLE.COM",8"status_callback": "http://www.example.com",9"valid_until": null,10"date_created": "2019-07-30T22:29:24Z",11"date_updated": "2019-07-31T01:09:00Z",12"url": "https://trusthub.twilio.com/v1/TrustProducts/BUaaaaaaaaaaaaaaaaaaaaaaaaaaaaaaaa",13"links": {14"trust_products_entity_assignments": "https://trusthub.twilio.com/v1/TrustProducts/BUaaaaaaaaaaaaaaaaaaaaaaaaaaaaaaaa/EntityAssignments",15"trust_products_evaluations": "https://trusthub.twilio.com/v1/TrustProducts/BUaaaaaaaaaaaaaaaaaaaaaaaaaaaaaaaa/Evaluations",16"trust_products_channel_endpoint_assignment": "https://trusthub.twilio.com/v1/TrustProducts/BUaaaaaaaaaaaaaaaaaaaaaaaaaaaaaaaa/ChannelEndpointAssignments"17},18"errors": null19}
- You'll need your Trust Product's SID. This was returned by the previous API call.
- You'll need your Secondary Business Profile's SID.
- To retrieve these SIDs via the API, see the Additional API Calls section below. You can also find them in the Console under Trust Hub.
1// Download the helper library from https://www.twilio.com/docs/node/install2const twilio = require("twilio"); // Or, for ESM: import twilio from "twilio";34// Find your Account SID and Auth Token at twilio.com/console5// and set the environment variables. See http://twil.io/secure6const accountSid = process.env.TWILIO_ACCOUNT_SID;7const authToken = process.env.TWILIO_AUTH_TOKEN;8const client = twilio(accountSid, authToken);910async function createTrustProductEntityAssignment() {11const trustProductsEntityAssignment = await client.trusthub.v112.trustProducts("YOUR_TRUST_PRODUCT_SID")13.trustProductsEntityAssignments.create({14objectSid: "YOUR_SECONDARY_BUSINESS_PROFILE_SID",15});1617console.log(trustProductsEntityAssignment.sid);18}1920createTrustProductEntityAssignment();
Response
1{2"sid": "BVaaaaaaaaaaaaaaaaaaaaaaaaaaaaaaaa",3"trust_product_sid": "YOUR_TRUST_PRODUCT_SID",4"account_sid": "ACaaaaaaaaaaaaaaaaaaaaaaaaaaaaaaaa",5"object_sid": "YOUR_SECONDARY_BUSINESS_PROFILE_SID",6"date_created": "2019-07-31T02:34:41Z",7"url": "https://trusthub.twilio.com/v1/TrustProducts/BUaaaaaaaaaaaaaaaaaaaaaaaaaaaaaaaa/EntityAssignments/BVaaaaaaaaaaaaaaaaaaaaaaaaaaaaaaaa"8}
- You'll need the Phone Number SID(s) you assigned to your Business Profile earlier. (Note: Only those phone numbers already assigned to your Secondary Business Profile are eligible)
- You'll need your Trust Product SID.
- Don't change the
ChannelEndpointType - You can complete this step before or after submitting your SHAKEN/STIR Trust Product for vetting
- To check your Secondary Business Profile's phone numbers via API, see the Additional API Calls section below.
1// Download the helper library from https://www.twilio.com/docs/node/install2const twilio = require("twilio"); // Or, for ESM: import twilio from "twilio";34// Find your Account SID and Auth Token at twilio.com/console5// and set the environment variables. See http://twil.io/secure6const accountSid = process.env.TWILIO_ACCOUNT_SID;7const authToken = process.env.TWILIO_AUTH_TOKEN;8const client = twilio(accountSid, authToken);910async function createTrustProductChannelEndpointAssignment() {11const trustProductsChannelEndpointAssignment = await client.trusthub.v112.trustProducts("YOUR_TRUST_PRODUCT_SID")13.trustProductsChannelEndpointAssignment.create({14channelEndpointSid: "YOUR_PHONE_NUMBER_SID",15channelEndpointType: "phone-number",16});1718console.log(trustProductsChannelEndpointAssignment.sid);19}2021createTrustProductChannelEndpointAssignment();
Response
1{2"sid": "RAaaaaaaaaaaaaaaaaaaaaaaaaaaaaaaaa",3"trust_product_sid": "YOUR_TRUST_PRODUCT_SID",4"account_sid": "ACaaaaaaaaaaaaaaaaaaaaaaaaaaaaaaaa",5"channel_endpoint_sid": "YOUR_PHONE_NUMBER_SID",6"channel_endpoint_type": "phone-number",7"date_created": "2019-07-31T02:34:41Z",8"url": "https://trusthub.twilio.com/v1/TrustProducts/BUaaaaaaaaaaaaaaaaaaaaaaaaaaaaaaaa/ChannelEndpointAssignments/RAaaaaaaaaaaaaaaaaaaaaaaaaaaaaaaaa"9}
- Once it reaches Twilio-Approved status, you will be able to sign outbound calls with "A" level attestation.
1// Download the helper library from https://www.twilio.com/docs/node/install2const twilio = require("twilio"); // Or, for ESM: import twilio from "twilio";34// Find your Account SID and Auth Token at twilio.com/console5// and set the environment variables. See http://twil.io/secure6const accountSid = process.env.TWILIO_ACCOUNT_SID;7const authToken = process.env.TWILIO_AUTH_TOKEN;8const client = twilio(accountSid, authToken);910async function updateTrustProduct() {11const trustProduct = await client.trusthub.v112.trustProducts("YOUR_TRUST_PRODUCT_SID")13.update({14status: "pending-review",15statusCallback: "https://www.yourcallbackuri.com/webhook",16});1718console.log(trustProduct.sid);19}2021updateTrustProduct();
Response
1{2"sid": "YOUR_TRUST_PRODUCT_SID",3"account_sid": "ACaaaaaaaaaaaaaaaaaaaaaaaaaaaaaaaa",4"policy_sid": "RNaaaaaaaaaaaaaaaaaaaaaaaaaaaaaaaa",5"friendly_name": "friendly_name",6"status": "pending-review",7"email": "notification@email.com",8"status_callback": "https://www.yourcallbackuri.com/webhook",9"valid_until": null,10"date_created": "2019-07-30T22:29:24Z",11"date_updated": "2019-07-31T01:09:00Z",12"url": "https://trusthub.twilio.com/v1/TrustProducts/BUaaaaaaaaaaaaaaaaaaaaaaaaaaaaaaaa",13"links": {14"trust_products_entity_assignments": "https://trusthub.twilio.com/v1/TrustProducts/BUaaaaaaaaaaaaaaaaaaaaaaaaaaaaaaaa/EntityAssignments",15"trust_products_evaluations": "https://trusthub.twilio.com/v1/TrustProducts/BUaaaaaaaaaaaaaaaaaaaaaaaaaaaaaaaa/Evaluations",16"trust_products_channel_endpoint_assignment": "https://trusthub.twilio.com/v1/TrustProducts/BUaaaaaaaaaaaaaaaaaaaaaaaaaaaaaaaa/ChannelEndpointAssignments"17},18"errors": null19}
Including the status callback URL allows Twilio to send notifications to your webhook. The status callback URL, shown in the previous example, isn't required.
Twilio sends notifications about the approval status over email and to this webhook.
1// Download the helper library from https://www.twilio.com/docs/node/install2const twilio = require("twilio"); // Or, for ESM: import twilio from "twilio";34// Find your Account SID and Auth Token at twilio.com/console5// and set the environment variables. See http://twil.io/secure6const accountSid = process.env.TWILIO_ACCOUNT_SID;7const authToken = process.env.TWILIO_AUTH_TOKEN;8const client = twilio(accountSid, authToken);910async function listCustomerProfile() {11const customerProfiles = await client.trusthub.v1.customerProfiles.list({12limit: 20,13});1415customerProfiles.forEach((c) => console.log(c.sid));16}1718listCustomerProfile();
Response
1{2"results": [3{4"sid": "BUaaaaaaaaaaaaaaaaaaaaaaaaaaaaaaaa",5"account_sid": "ACaaaaaaaaaaaaaaaaaaaaaaaaaaaaaaaa",6"policy_sid": "RNaaaaaaaaaaaaaaaaaaaaaaaaaaaaaaaa",7"friendly_name": "friendly_name",8"status": "twilio-approved",9"email": "notification@email.com",10"status_callback": "http://www.example.com",11"valid_until": "2020-07-31T01:00:00Z",12"date_created": "2019-07-30T22:29:24Z",13"date_updated": "2019-07-31T01:09:00Z",14"url": "https://trusthub.twilio.com/v1/CustomerProfiles/BUaaaaaaaaaaaaaaaaaaaaaaaaaaaaaaaa",15"links": {16"customer_profiles_entity_assignments": "https://trusthub.twilio.com/v1/CustomerProfiles/BUaaaaaaaaaaaaaaaaaaaaaaaaaaaaaaaa/EntityAssignments",17"customer_profiles_evaluations": "https://trusthub.twilio.com/v1/CustomerProfiles/BUaaaaaaaaaaaaaaaaaaaaaaaaaaaaaaaa/Evaluations",18"customer_profiles_channel_endpoint_assignment": "https://trusthub.twilio.com/v1/CustomerProfiles/BUaaaaaaaaaaaaaaaaaaaaaaaaaaaaaaaa/ChannelEndpointAssignments"19},20"errors": [21{22"code": 1860123}24]25}26],27"meta": {28"page": 0,29"page_size": 50,30"first_page_url": "https://trusthub.twilio.com/v1/CustomerProfiles?Status=draft&FriendlyName=friendly_name&PolicySid=RNaaaaaaaaaaaaaaaaaaaaaaaaaaaaaaaa&PageSize=50&Page=0",31"previous_page_url": null,32"url": "https://trusthub.twilio.com/v1/CustomerProfiles?Status=draft&FriendlyName=friendly_name&PolicySid=RNaaaaaaaaaaaaaaaaaaaaaaaaaaaaaaaa&PageSize=50&Page=0",33"next_page_url": null,34"key": "results"35}36}
1// Download the helper library from https://www.twilio.com/docs/node/install2const twilio = require("twilio"); // Or, for ESM: import twilio from "twilio";34// Find your Account SID and Auth Token at twilio.com/console5// and set the environment variables. See http://twil.io/secure6const accountSid = process.env.TWILIO_ACCOUNT_SID;7const authToken = process.env.TWILIO_AUTH_TOKEN;8const client = twilio(accountSid, authToken);910async function createAddress() {11const address = await client.addresses.create({12city: "CUSTOMER_CITY",13customerName: "YOUR_CUSTOMER_NAME",14isoCountry: "BB",15postalCode: "CUSTOMER_POSTAL_CODE",16region: "CUSTOMER_STATE_OR_REGION",17street: "CUSTOMER_STREET",18});1920console.log(address.accountSid);21}2223createAddress();
Response
1{2"account_sid": "YOUR_PARENT_ACCOUNT_OR_SUBACCOUNT_SID",3"city": "CUSTOMER_CITY",4"customer_name": "YOUR_CUSTOMER_NAME",5"date_created": "Tue, 18 Aug 2015 17:07:30 +0000",6"date_updated": "Tue, 18 Aug 2015 17:07:30 +0000",7"emergency_enabled": false,8"friendly_name": "Main Office",9"iso_country": "BB",10"postal_code": "CUSTOMER_POSTAL_CODE",11"region": "CUSTOMER_STATE_OR_REGION",12"sid": "ADaaaaaaaaaaaaaaaaaaaaaaaaaaaaaaaa",13"street": "CUSTOMER_STREET",14"street_secondary": "Suite 300",15"validated": false,16"verified": false,17"uri": "/2010-04-01/Accounts/ACaaaaaaaaaaaaaaaaaaaaaaaaaaaaaaaa/Addresses/ADaaaaaaaaaaaaaaaaaaaaaaaaaaaaaaaa.json"18}
1// Download the helper library from https://www.twilio.com/docs/node/install2const twilio = require("twilio"); // Or, for ESM: import twilio from "twilio";34// Find your Account SID and Auth Token at twilio.com/console5// and set the environment variables. See http://twil.io/secure6const accountSid = process.env.TWILIO_ACCOUNT_SID;7const authToken = process.env.TWILIO_AUTH_TOKEN;8const client = twilio(accountSid, authToken);910async function listAddress() {11const addresses = await client.addresses.list({ limit: 20 });1213addresses.forEach((a) => console.log(a.end));14}1516listAddress();
Response
1{2"addresses": [3{4"account_sid": "ACaaaaaaaaaaaaaaaaaaaaaaaaaaaaaaaa",5"city": "SF",6"customer_name": "name",7"date_created": "Tue, 18 Aug 2015 17:07:30 +0000",8"date_updated": "Tue, 18 Aug 2015 17:07:30 +0000",9"emergency_enabled": false,10"friendly_name": "Main Office",11"iso_country": "US",12"postal_code": "94019",13"region": "CA",14"sid": "ADaaaaaaaaaaaaaaaaaaaaaaaaaaaaaaaa",15"street": "4th",16"street_secondary": null,17"validated": false,18"verified": false,19"uri": "/2010-04-01/Accounts/ACaaaaaaaaaaaaaaaaaaaaaaaaaaaaaaaa/Addresses/ADaaaaaaaaaaaaaaaaaaaaaaaaaaaaaaaa.json"20}21],22"end": 0,23"first_page_uri": "/2010-04-01/Accounts/ACaaaaaaaaaaaaaaaaaaaaaaaaaaaaaaaa/Addresses.json?FriendlyName=friendly_name&IsoCountry=US&CustomerName=customer_name&PageSize=50&Page=0",24"next_page_uri": null,25"page": 0,26"page_size": 50,27"previous_page_uri": null,28"start": 0,29"uri": "/2010-04-01/Accounts/ACaaaaaaaaaaaaaaaaaaaaaaaaaaaaaaaa/Addresses.json?FriendlyName=friendly_name&IsoCountry=US&CustomerName=customer_name&PageSize=50&Page=0"30}
1// Download the helper library from https://www.twilio.com/docs/node/install2const twilio = require("twilio"); // Or, for ESM: import twilio from "twilio";34// Find your Account SID and Auth Token at twilio.com/console5// and set the environment variables. See http://twil.io/secure6const accountSid = process.env.TWILIO_ACCOUNT_SID;7const authToken = process.env.TWILIO_AUTH_TOKEN;8const client = twilio(accountSid, authToken);910async function listSupportingDocument() {11const supportingDocuments = await client.trusthub.v1.supportingDocuments.list(12{ limit: 20 },13);1415supportingDocuments.forEach((s) => console.log(s.sid));16}1718listSupportingDocument();
Response
1{2"results": [3{4"status": "DRAFT",5"date_updated": "2021-02-11T17:23:00Z",6"friendly_name": "Business-profile-physical-address",7"account_sid": "ACaaaaaaaaaaaaaaaaaaaaaaaaaaaaaaaa",8"url": "https://trusthub.twilio.com/v1/SupportingDocuments/RDaaaaaaaaaaaaaaaaaaaaaaaaaaaaaaaa",9"date_created": "2021-02-11T17:23:00Z",10"sid": "RDaaaaaaaaaaaaaaaaaaaaaaaaaaaaaaaa",11"attributes": {12"address_sids": "ADaaaaaaaaaaaaaaaaaaaaaaaaaaaaaaaa"13},14"type": "customer_profile_address",15"mime_type": null16}17],18"meta": {19"page": 0,20"page_size": 50,21"first_page_url": "https://trusthub.twilio.com/v1/SupportingDocuments?PageSize=50&Page=0",22"previous_page_url": null,23"url": "https://trusthub.twilio.com/v1/SupportingDocuments?PageSize=50&Page=0",24"next_page_url": null,25"key": "results"26}27}
1// Download the helper library from https://www.twilio.com/docs/node/install2const twilio = require("twilio"); // Or, for ESM: import twilio from "twilio";34// Find your Account SID and Auth Token at twilio.com/console5// and set the environment variables. See http://twil.io/secure6const accountSid = process.env.TWILIO_ACCOUNT_SID;7const authToken = process.env.TWILIO_AUTH_TOKEN;8const client = twilio(accountSid, authToken);910async function listEndUser() {11const endUsers = await client.trusthub.v1.endUsers.list({ limit: 20 });1213endUsers.forEach((e) => console.log(e.sid));14}1516listEndUser();
Response
1{2"results": [3{4"date_updated": "2021-02-16T20:40:57Z",5"sid": "ITaaaaaaaaaaaaaaaaaaaaaaaaaaaaaaaa",6"friendly_name": "auth_rep_1",7"account_sid": "ACaaaaaaaaaaaaaaaaaaaaaaaaaaaaaaaa",8"url": "https://trusthub.twilio.com/v1/EndUsers/ITaaaaaaaaaaaaaaaaaaaaaaaaaaaaaaaa",9"date_created": "2021-02-16T20:40:57Z",10"attributes": {11"phone_number": "+11234567890",12"job_position": "CEO",13"first_name": "rep1",14"last_name": "test",15"business_title": "ceo",16"email": "foobar@test.com"17},18"type": "authorized_representative_1"19}20],21"meta": {22"page": 0,23"page_size": 50,24"first_page_url": "https://trusthub.twilio.com/v1/EndUsers?PageSize=50&Page=0",25"previous_page_url": null,26"url": "https://trusthub.twilio.com/v1/EndUsers?PageSize=50&Page=0",27"next_page_url": null,28"key": "results"29}30}
1// Download the helper library from https://www.twilio.com/docs/node/install2const twilio = require("twilio"); // Or, for ESM: import twilio from "twilio";34// Find your Account SID and Auth Token at twilio.com/console5// and set the environment variables. See http://twil.io/secure6const accountSid = process.env.TWILIO_ACCOUNT_SID;7const authToken = process.env.TWILIO_AUTH_TOKEN;8const client = twilio(accountSid, authToken);910async function listIncomingPhoneNumber() {11const incomingPhoneNumbers = await client.incomingPhoneNumbers.list({12limit: 20,13});1415incomingPhoneNumbers.forEach((i) => console.log(i.end));16}1718listIncomingPhoneNumber();
Response
1{2"end": 0,3"first_page_uri": "/2010-04-01/Accounts/ACaaaaaaaaaaaaaaaaaaaaaaaaaaaaaaaa/IncomingPhoneNumbers.json?FriendlyName=friendly_name&Beta=true&PhoneNumber=%2B19876543210&PageSize=50&Page=0",4"incoming_phone_numbers": [5{6"account_sid": "ACaaaaaaaaaaaaaaaaaaaaaaaaaaaaaaaa",7"address_requirements": "none",8"address_sid": "ADaaaaaaaaaaaaaaaaaaaaaaaaaaaaaaaa",9"api_version": "2010-04-01",10"beta": null,11"capabilities": {12"voice": true,13"sms": false,14"mms": true,15"fax": false16},17"date_created": "Thu, 30 Jul 2015 23:19:04 +0000",18"date_updated": "Thu, 30 Jul 2015 23:19:04 +0000",19"emergency_status": "Active",20"emergency_address_sid": "ADaaaaaaaaaaaaaaaaaaaaaaaaaaaaaaaa",21"emergency_address_status": "registered",22"friendly_name": "(808) 925-5327",23"identity_sid": "RIaaaaaaaaaaaaaaaaaaaaaaaaaaaaaaaa",24"origin": "origin",25"phone_number": "+18089255327",26"sid": "PNaaaaaaaaaaaaaaaaaaaaaaaaaaaaaaaa",27"sms_application_sid": "",28"sms_fallback_method": "POST",29"sms_fallback_url": "",30"sms_method": "POST",31"sms_url": "",32"status_callback": "",33"status_callback_method": "POST",34"trunk_sid": null,35"uri": "/2010-04-01/Accounts/ACaaaaaaaaaaaaaaaaaaaaaaaaaaaaaaaa/IncomingPhoneNumbers/PNaaaaaaaaaaaaaaaaaaaaaaaaaaaaaaaa.json",36"voice_application_sid": "",37"voice_caller_id_lookup": false,38"voice_fallback_method": "POST",39"voice_fallback_url": null,40"voice_method": "POST",41"voice_url": null,42"bundle_sid": "BUaaaaaaaaaaaaaaaaaaaaaaaaaaaaaaaa",43"voice_receive_mode": "voice",44"status": "in-use",45"type": "local"46}47],48"next_page_uri": null,49"page": 0,50"page_size": 50,51"previous_page_uri": null,52"start": 0,53"uri": "/2010-04-01/Accounts/ACaaaaaaaaaaaaaaaaaaaaaaaaaaaaaaaa/IncomingPhoneNumbers.json?FriendlyName=friendly_name&Beta=true&PhoneNumber=%2B19876543210&PageSize=50&Page=0"54}
1// Download the helper library from https://www.twilio.com/docs/node/install2const twilio = require("twilio"); // Or, for ESM: import twilio from "twilio";34// Find your Account SID and Auth Token at twilio.com/console5// and set the environment variables. See http://twil.io/secure6const accountSid = process.env.TWILIO_ACCOUNT_SID;7const authToken = process.env.TWILIO_AUTH_TOKEN;8const client = twilio(accountSid, authToken);910async function listCustomerProfileChannelEndpointAssignment() {11const customerProfilesChannelEndpointAssignments = await client.trusthub.v112.customerProfiles("YOUR_SECONDARY_BUSINESS_PROFILE_SID")13.customerProfilesChannelEndpointAssignment.list({ limit: 20 });1415customerProfilesChannelEndpointAssignments.forEach((c) =>16console.log(c.channelEndpointSid),17);18}1920listCustomerProfileChannelEndpointAssignment();
Response
1{2"results": [3{4"sid": "RAaaaaaaaaaaaaaaaaaaaaaaaaaaaaaaaa",5"customer_profile_sid": "BUaaaaaaaaaaaaaaaaaaaaaaaaaaaaaaaa",6"account_sid": "ACaaaaaaaaaaaaaaaaaaaaaaaaaaaaaaaa",7"channel_endpoint_sid": "PNaaaaaaaaaaaaaaaaaaaaaaaaaaaaaaaa",8"channel_endpoint_type": "phone-number",9"date_created": "2019-07-31T02:34:41Z",10"url": "https://trusthub.twilio.com/v1/CustomerProfiles/BUaaaaaaaaaaaaaaaaaaaaaaaaaaaaaaaa/ChannelEndpointAssignments/RAaaaaaaaaaaaaaaaaaaaaaaaaaaaaaaaa"11}12],13"meta": {14"page": 0,15"page_size": 50,16"first_page_url": "https://trusthub.twilio.com/v1/CustomerProfiles/BUaaaaaaaaaaaaaaaaaaaaaaaaaaaaaaaa/ChannelEndpointAssignments?ChannelEndpointSid=PNaaaaaaaaaaaaaaaaaaaaaaaaaaaaaaaa&PageSize=50&Page=0",17"previous_page_url": null,18"url": "https://trusthub.twilio.com/v1/CustomerProfiles/BUaaaaaaaaaaaaaaaaaaaaaaaaaaaaaaaa/ChannelEndpointAssignments?ChannelEndpointSid=PNaaaaaaaaaaaaaaaaaaaaaaaaaaaaaaaa&PageSize=50&Page=0",19"next_page_url": null,20"key": "results"21}22}
This guide teaches the basics required for the following use cases:
You can use this guide to pass cryptographic identity validation at the carrier network level, guaranteeing that your time-sensitive outbound alerts are recognized as legitimate. By leveraging SHAKEN/STIR, your urgent notifications and emergency weather closures avoid automated network blocks, ensuring they bypass "Spam Likely" labels and reach your customers immediately. To learn more advanced features that you can use with voice notifications, see Voice notifications.
You can use this guide to attach full "A-level" attestation to your outbound contact center calls, proving to terminating carriers that your business owns and has the explicit right to use its phone numbers. This protocol-level verification prevents high-volume dialer traffic from being falsely flagged as spoofed robocalls, keeping your agent connection rates high and your outreach unblocked. To learn more advanced features that you can use with outbound call centers, see Voice outbound contact center.
You can use this guide to proactively optimize your sales conversion rates by digitally signing every outbound call your representatives place. Implementing SHAKEN/STIR verifies your business's caller identity directly on the recipient's handset, giving prospects the confidence to answer your team's calls instead of dismissing them as unverified spam. To learn more advanced features that you can use with sales dialers, see Voice sales dialer.
You can use this guide to secure carrier-level authentication for your automated conversational assistants before the audio stream even begins. By utilizing SHAKEN/STIR token signing, you establish a chain of trust that differentiates your AI agents from malicious, spoofed robocallers, allowing your intelligent virtual assistants to successfully connect and interact with users in real-time. To learn more advanced features that you can use with AI agents, see Voice AI agents.
After following this guide, you can successfully onboard your ISV subaccount architecture for SHAKEN/STIR via the Twilio Trust Hub REST API. Once your SHAKEN/STIR Trust Product is verified, your end-customers' outbound calls will be signed with proper legal attestation, ensuring high verification rates across phone networks.
Explore the following guides to build on what you've learned in this guide:
- Branded Calling: Display your brand's logo and name on your customers' phones to increase answer rates and build trust.
- Voice Integrity Onboarding: Combine your verified identity with reputation monitoring tools to protect against spam tagging.