CodeIgniterとJSON Web Tokenを使用したセキュアなRESTful APIの構築方法

November 19, 2020
執筆者
Oluyemi Olususi
寄稿者
Twilio の寄稿者によって表明された意見は彼ら自身のものです
レビュー担当者
Diane Phan
Twilion

CodeIgniterとJSON Web Tokenを使用したセキュアなRESTful APIの構築方法

この記事はOluyemi Olususiこちらで公開した記事(英語)を日本語化したものです。

クラウドサービスの利用と応用が拡大する中で、Simple Object Access Protocol(SOAP)よりも効率的なアーキテクチャスタイルの必要性が増しています。REST(REpresentational State Transfer)はクライアントとApplication Programming Interface(API)との軽量でステートレスな通信を可能にします。RESTを使った通信はステートレスです。Restful APIのアクセスコントロールはトークンベースで行われ、クライアントが要求したアクションをリソースに実行する権限があるかどうかを判別する情報が伝えられます。

本稿では、CodeIgniterを使用したRESTful APIの作成方法を紹介します。CodeIgniterは強力な機能を持つPHPフレームワークで、非常に小さなリソースでフルスケールのWebアプリケーションを構築できます。

必要条件

CodeIgniterの基本的な知識があると役立ちます。CodeIgniterの知識に不安がある場合も、チュートリアルの中で説明とともに公式ドキュメントへのリンクを紹介します。不明な点があれば、リンクを参照しながらチュートリアルを進めてください。

また、以下の項目がインストールされている必要があります。

  • Composer
    CodeIgniterプロジェクトの依存関係管理に使用します。
  • ローカルデータベースインスタンス
    このチュートリアルではMySQLを使用しますが、お好きなデータベースサービスを選んで構いません。
  • Postman(または同等のアプリケーション)
    エンドポイントのテストに使用します。エンドポイントのテストにはcURLも使用できます。

作成するAPI

企業向けの顧客データベースを管理するAPIを構築し、セキュアなCodeIgniter APIの構築方法を学びます。顧客データベースにはそれぞれ次のデータが含まれます。

  • 名前
  • メール
  • サービスの維持に必要な料金(維持費)

作成するAPIは次の機能を持ちます。

  1. 新規ユーザーの登録
  2. 既存ユーザーの認証
  3. 新規顧客の追加
  4. 既存顧客情報の編集
  5. 全顧客の表示
  6. IDを指定した顧客表示
  7. IDを指定した顧客削除

3〜7の機能を実行できるのは認証されたユーザーのみです。

プロジェクトの準備

Composerを使用して新規CodeIgniterプロジェクトを作成します。以下のコマンドを実行します。

composer create-project codeigniter4/appstarter ci-secure-api

ci-secure-apiディレクトリに新しいCodeIgniterプロジェクトが作成されます。インストールが完了したら、ターミナルで新しく作成したプロジェクトのディレクトリに移動し、CodeIgniterでインストールされたローカルの開発サーバーでアプリケーションを実行します。次のコマンドを実行します。

// プロジェクトに移動
$ cd ci-secure-api
  
// アプリケーションを実行
$ php spark serve

ブラウザからhttp://localhost:8080/にアクセスすると、スタートページが表示されます。

CodeIgniterのスタート画面

環境変数の設定

CodeIgniterのインストールと実行が完了しました。次にアプリケーションで使用する環境変数を設定します。CTRL + Cでアプリケーションの実行を停止し、次のコマンドでenvファイルのコピーを.envと命名して作成します。

$ cp env .env

CodeIgniterはデフォルトで、本番環境モードで起動しますが、本稿では開発モードに変更します。次のコメントを解除して開発モードに設定します。

CI_ENVIRONMENT = development

ローカル環境にデータベースを作成し、次の変数のコメントを解除して値を更新し、データベースに正しく接続できるように設定します。

database.default.hostname = localhost
database.default.database = YOUR_DATABASE
database.default.username = YOUR_DATABASE_USERNAME
database.default.password = YOUR_DATABASE_PASSWORD
database.default.DBDriver = MySQLi # MySQL接続用のドライバ。postgresとSQLite3用のドライバもあります。

YOUR_DATABASEYOUR_DATABASE_USERNAMEYOUR_DATABASE_PASSWORDを実際の値に置き換えます。

マイグレーションとシーダー

これでデータベースが作成され、接続が設定されました。次に、userテーブルとclientテーブルのマイグレーションを作成します。マイグレーションファイルは一般的に、適切なデータベース構造を作成するのに有効です。マイグレーションファイルとシーダーの作成には、CodeIgniter CLIツールを使用します。

ターミナルで次のコマンドを実行します。

$ php spark migrate:create

CLIでマイグレーションファイルの名前を指定すると、App/Database/Migrationsディレクトリにマイグレーションファイルが作成されます。次の2つのマイグレーションファイルを作成します。

  • add_client
  • add_user

マイグレーションファイル名の先頭にYYYY-MM-DD-HHIISS形式の日付が付きます。詳しい説明はCodeIgniterドキュメントを参照してください。

次に、add_clientマイグレーションファイルの内容を次のように変更します。

<?php
use CodeIgniter\Database\Migration;

class AddClient extends Migration
{
    public function up()
    {
        $this->forge->addField([
            'id' => [
                'type' => 'INT',
                'constraint' => 5,
                'unsigned' => true,
                'auto_increment' => true,
            ],
            'name' => [
                'type' => 'VARCHAR',
                'constraint' => '100',
                'null' => false
            ],
            'email' => [
                'type' => 'VARCHAR',
                'constraint' => '100',
                'null' => false,
                'unique' => true
            ],
            'retainer_fee' => [
                'type' => 'INT',
                'constraint' => 100,
                'null' => false,
                'unique' => true
            ],
            'updated_at' => [
                'type' => 'datetime',
                'null' => true,
            ],
        'created_at datetime default current_timestamp',
        ]);
        $this->forge->addPrimaryKey('id');
        $this->forge->createTable('client');
    }

    public function down()
    {
        $this->forge->dropTable('client');
    }
}

clientテーブルのフィールドと対応するデータタイプを指定しています。

次に、add_userマイグレーションファイルを開き、次のように内容を変更します。

<?php

use CodeIgniter\Database\Migration;

class AddUser extends Migration
{
    public function up()
    {
        $this->forge->addField([
            'id' => [
                'type' => 'INT',
                'constraint' => 5,
                'unsigned' => true,
                'auto_increment' => true,
            ],
            'name' => [
                'type' => 'VARCHAR',
                'constraint' => '100',
                'null' => false
            ],
            'email' => [
                'type' => 'VARCHAR',
                'constraint' => '100',
                'null' => false,
                'unique' => true
            ],
            'password' => [
                'type' => 'VARCHAR',
                'constraint' => '255',
                'null' => false,
                'unique' => true
            ],
            'updated_at' => [
                'type' => 'datetime',
                'null' => true,
            ],
            'created_at datetime default current_timestamp',
        ]);
        $this->forge->addPrimaryKey('id');
        $this->forge->createTable('user');
    }

    public function down()
    {
        $this->forge->dropTable('user');
    }
}

このコードで、ユーザーテーブルとフィールドが作成されます。次のコマンドを使用してマイグレーションを実行します。

$ php spark migrate

開発を進めやすいように、データベースにダミーの顧客データを含めておきます。CodeIgniterスケルトンにデフォルトで含まれる依存パッケージであるfzaninotto faker bundleを使用し、データベースにランダムに顧客を追加します。マイグレーションと同じく、CodeIgniterのCLIツールを使用して顧客のシーダーを作成します。次のコマンドを実行します。

$ php spark make:seeder

CLIで名前にClientSeederを指定します。ClientSeeder.phpファイルがApp/Database/Seedsディレクトリに作成されます。このファイルを開き、以下の内容に置き換えます。

<?php

namespace App\Database\Seeds;

use CodeIgniter\Database\Seeder;
use Faker\Factory;

class ClientSeeder extends Seeder
{
    public function run()
    {
        for ($i = 0; $i < 10; $i++) { //to add 10 clients. Change limit as desired
            $this->db->table('client')->insert($this->generateClient());
        }
    }

    private function generateClient(): array
    {
        $faker = Factory::create();
        return [
            'name' => $faker->name(),
            'email' => $faker->email,
            'retainer_fee' => random_int(100000, 100000000)
        ];
    }
}

次のコマンドを使用し、データベースにダミー顧客を配置します。

$ php spark db:seed ClientSeeder

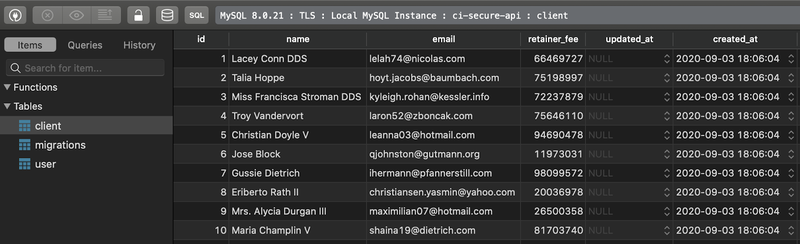
この時点でデータベースの構造は次の画面のようになります。

データベース構造

エンティティモデル

APIによるデータベース操作にはCodeIgniterモデルを使用します。これを機能させるために2つのモデルを作成します。1つはUser用、もう1つはClient用です。

App/Modelsディレクトリを開き、次のファイルを作成します。

  • UserModel.php
  • ClientModel.php

UserModel.phpに、次の内容を追加します。

<?php

namespace App\Models;

use CodeIgniter\Model;
use Exception;

class UserModel extends Model
{
    protected $table = 'user';
    protected $allowedFields = [
        'name',
        'email',
        'password',
    ];
    protected $updatedField = 'updated_at';

    protected $beforeInsert = ['beforeInsert'];
    protected $beforeUpdate = ['beforeUpdate'];

    protected function beforeInsert(array $data): array
    {
        return $this->getUpdatedDataWithHashedPassword($data);
    }

    protected function beforeUpdate(array $data): array
    {
        return $this->getUpdatedDataWithHashedPassword($data);
    }

    private function getUpdatedDataWithHashedPassword(array $data): array
    {
        if (isset($data['data']['password'])) {
            $plaintextPassword = $data['data']['password'];
            $data['data']['password'] = $this->hashPassword($plaintextPassword);
        }
        return $data;
    }

    private function hashPassword(string $plaintextPassword): string
    {
        return password_hash($plaintextPassword, PASSWORD_BCRYPT);
    }
                                      
    public function findUserByEmailAddress(string $emailAddress)
    {
        $user = $this
            ->asArray()
            ->where(['email' => $emailAddress])
            ->first();

        if (!$user) 
            throw new Exception('User does not exist for specified email address');

        return $user;
    }
}

beforeInsert関数とbeforeUpdate関数により、データベースに保存する前にUserエンティティに対する処理を実行できます。このコードでは、データベースに保存する前のユーザーパスワードをハッシュ化しています。

ClientModel.phpファイルに次のコードを追加します。

<?php

namespace App\Models;

use CodeIgniter\Model;
use Exception;

class ClientModel extends Model
{
    protected $table = 'client';
    protected $allowedFields = [
        'name',
        'email',
        'retainer_fee'
    ];
    protected $updatedField = 'updated_at';

    public function findClientById($id)
    {
        $client = $this
            ->asArray()
            ->where(['id' => $id])
            ->first();

        if (!$client) throw new Exception('Could not find client for specified ID');

        return $client;
    }
}

$tableフィールドは、どのデータベーステーブルを主として扱うかをモデルに指示します。$allowedFieldsはテーブルの更新可能な列を指示します。findClientById関数が抽象化を行い、指定のidをもとにデータベースから顧客を取得します。

モデルとデータベースの実装が完了しました。これでユーザーを追加して認証が行えます。認証されたユーザーは現行の顧客の操作も行えます。

JSON Web Tokenの実装

JSON Web Token(JWT)を使用してユーザーを認証し、無許可のユーザーによる顧客リストの閲覧を禁止します。このために、ユーザーの登録時や正常にログインしたときに、APIがトークンを発行します。このトークンが以後のリクエストのヘッダーに追加され、APIはリクエスト元のユーザーを正しく認識することができます。このチュートリアルでは、firebase/php-jwtバンドルを使用してトークンを生成します。

次のコマンドを実行し、Composerを使用してインストールします。

$ composer require firebase/php-jwt

インストールが完了したら、次の内容を.envファイルに追加します。

#JWT_SECRET_KEYキーは、アプリケーションがJWTSに署名するために使用する秘密キーです。本番用にはより強力なものを選んでください。
JWT_SECRET_KEY=kzUf4sxss4AeG5uHkNZAqT1Nyi1zVfpz 
#JWT_TIME_TO_LIVEは署名された JWT の有効期間(ミリ秒単位)を示します。
JWT_TIME_TO_LIVE=3600

次に、Servicesクラスの秘密キーを取得するヘルパー関数を作成します。App/Config/Services.phpを開いて次の内容を追加します。

public static function getSecretKey(){
    return getenv('JWT_SECRET_KEY');
} 

JWTヘルパーの作成

トークンの生成と検証のために、ヘルパーファイルを作成します。これによりアプリケーションをモジュール化できます。App/Helpersディレクトリにjwt_helper.phpを作成します。ヘルパーファイルの内容は次のように設定します。

<?php

use App\Models\UserModel;
use Config\Services;
use Firebase\JWT\JWT;

function getJWTFromRequest($authenticationHeader): string
{
    if (is_null($authenticationHeader)) { //JWT is absent
        throw new Exception('Missing or invalid JWT in request');
    }
    //JWT is sent from client in the format Bearer XXXXXXXXX
    return explode(' ', $authenticationHeader)[1];
}

function validateJWTFromRequest(string $encodedToken)
{
    $key = Services::getSecretKey();
    $decodedToken = JWT::decode($encodedToken, $key, ['HS256']);
    $userModel = new UserModel();
    $userModel->findUserByEmailAddress($decodedToken->email);
}

function getSignedJWTForUser(string $email)
{
    $issuedAtTime = time();
    $tokenTimeToLive = getenv('JWT_TIME_TO_LIVE');
    $tokenExpiration = $issuedAtTime + $tokenTimeToLive;
    $payload = [
        'email' => $email,
        'iat' => $issuedAtTime,
        'exp' => $tokenExpiration,
    ];

    $jwt = JWT::encode($payload, Services::getSecretKey());
    return $jwt;
}

getJWTFromRequest関数が受信リクエストの認証ヘッダーをチェックし、トークン値を返します。ヘッダーが欠落している場合は、例外として処理され、HTTP_UNAUTHORIZED(401)が返されます。

validateJWTFromRequest関数は、getJWTFromRequest関数により取得したトークンをデコードし、生成されたキーに対応するメールアドレスを取得します。そして、そのメールアドレスのユーザーをデータベースから検索します。ユーザーが見つからなければ、Userモデルが例外として処理し、ユーザーにHTTP_UNAUTHORIZED(401)が返されます。

getSignedJWTForUser関数を使用し、認証されたユーザーにトークンを生成します。エンコード済みのJWTには次の情報が含まれます。

  • 認証済みユーザーのメールアドレス。これを以後のリクエストに使用し、リクエスト元を検証します。
  • トークンが生成された時間(iat)。
  • トークンの有効期限が終わる時間(exp)。これを取得するために、.envファイルからJWT_TIME_TO_LIVE値を現在時刻に追加します。

認証フィルターの作成

App/FiltersディレクトリにJWTAuthenticationFilter.phpを作成します。このフィルターにより、APIはコントローラーにリクエストを渡す前にJWTをチェックします。JWTが提供されない場合や、JWTが有効期限切れの場合は、APIによりHTTP_UNAUTHORIZED(401)レスポンスとエラーメッセージが返されます。次の内容をファイルに追加します。

<?php

namespace App\Filters;

use CodeIgniter\API\ResponseTrait;
use CodeIgniter\Filters\FilterInterface;
use CodeIgniter\HTTP\RequestInterface;
use CodeIgniter\HTTP\ResponseInterface;
use Config\Services;
use Exception;

class JWTAuthenticationFilter implements FilterInterface
{
    use ResponseTrait;

    public function before(RequestInterface $request, $arguments = null)
    {
        $authenticationHeader = $request->getServer('HTTP_AUTHORIZATION');

        try {

            helper('jwt');
            $encodedToken = getJWTFromRequest($authenticationHeader);
            validateJWTFromRequest($encodedToken);
            return $request;

        } catch (Exception $e) {

            return Services::response()
                ->setJSON(
                    [
                        'error' => $e->getMessage()
                    ]
                )
                ->setStatusCode(ResponseInterface::HTTP_UNAUTHORIZED);

        }
    }

    public function after(RequestInterface $request,
                          ResponseInterface $response,
                          $arguments = null)
    {
    }
}

このように、まずJWTヘルパーが読み込まれてから、getJWTFromRequestvalidateJWTFromRequest関数を使用してリクエスト元が有効なトークンを持つ認証済みユーザーであることを確認します。 

JWTAuthenticationフィルターを登録し、保護するルートを指定します。これはApp/Config/Filters.phpファイルで行います。$aliases$filtersの配列を次のように変更します。

<?php 
namespace Config;

use App\Filters\JWTAuthenticationFilter;
use CodeIgniter\Config\BaseConfig;

class Filters extends BaseConfig
{
    public $aliases = [
        'csrf' => CSRF::class,
        'toolbar' => DebugToolbar::class,
        'honeypot' => \CodeIgniter\Filters\Honeypot::class,
        'auth' => JWTAuthenticationFilter::class // add this line
    ];

    // global filters
    // method filters
    public $filters = [
      'auth' => [
        'before' => [
            'client/*',
            'client'
      ],
    ]
  ];
}

デフォルトでデバッグツールバーがプレインストールされています。デバッグツールバーは開発途中であるため、コンフリクトが確認されています。無効にするには、$globals 配列の‘toolbar’をコメントアウトしてください。

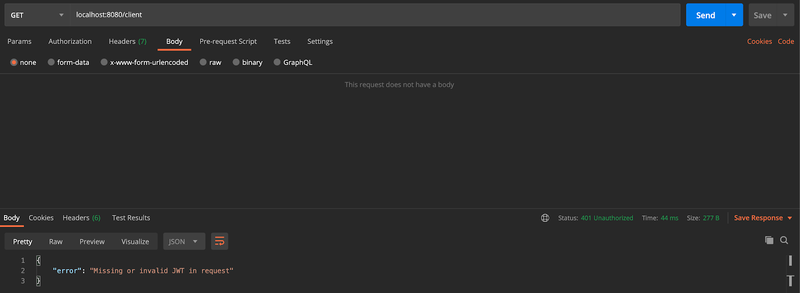
以上を追加すると、clientで始まるエンドポイント宛にリクエストが送られるたびに、JWTAuthenticationFilter.phpbefore関数が呼び出されます。これにより、リクエストヘッダーに有効なトークンが含まれる場合のみ、コントローラーはリクエストを受信して処理します。

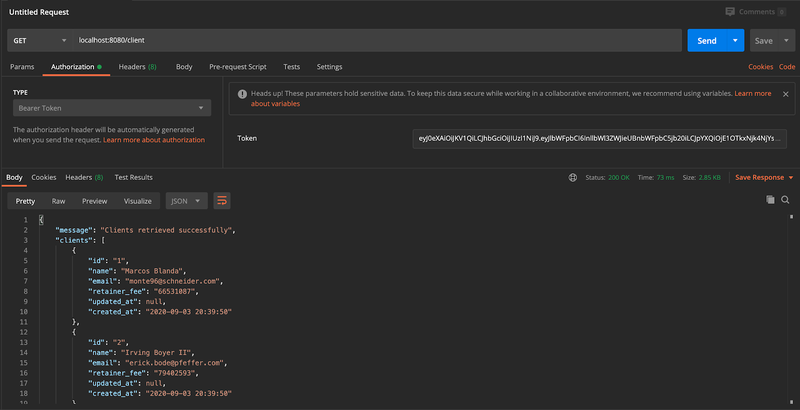
ここではコントローラーを使用していませんが、これまでに作成したアプリケーションの動作を確認することができます。Postmanを開き、http://localhost:8080/client宛にGETリクエストを実行します。次のような結果が確認できます。

POSTMANでリクエストを送信した結果

そして、App/Controllers/BaseController.phpファイルを開き、次の関数を追加します。

public function getResponse(array $responseBody,
                            int $code = ResponseInterface::HTTP_OK)
{
    return $this
        ->response
        ->setStatusCode($code)
        ->setJSON($responseBody);
}

コントローラーはこの関数を使用し、クライアントにJSONレスポンスを返します。

必ずResponseInterfaceをインポートしてください。

use CodeIgniterHTTPResponseInterface;

BaseControllerによりCodeIgniterのControllerが拡張され、受信リクエストの処理を支援するヘルパーとその他の機能が提供されます。その1つであるvalidate関数は、CodeIgniterの検証サービスを使用し、コントローラー関数に指定されたルール(必要があればエラーメッセージ)をもとにリクエストをチェックします。この関数はフォームリクエスト(Postmanを使用したフォームデータ)は適切に処理しますが、APIに送られた未処理のJSONリクエストの検証はできません。これは、フォームデータリクエストの中身がリクエストのpostフィールドに格納されるのに対し、JSONリクエストの中身がリクエストのbodyフィールドに格納されるためです。

この問題を避けるため、リクエストの両方のフィールドをチェックする関数を作成して中身を取得します。App/Controllers/BaseController.phpに以下を追加します。

public function getRequestInput(IncomingRequest $request){
    $input = $request->getPost();
    if (empty($input)) {
        //convert request body to associative array
        $input = json_decode($request->getBody(), true);
    }
    return $input;
}

必ずIncomingRequestクラスをインポートしてください。

use CodeIgniterHTTPIncomingRequest;

次に、前述した関数から取得した$inputに検証サービスを実行する関数を宣言します。この関数はビルトインされているvalidate関数とほぼ同じですが、IncomingRequestにチェックを実行する代わりに、getRequestInput関数から取得した入力にチェックを実行します。

public function validateRequest($input, array $rules, array $messages =[]){
    $this->validator = Services::Validation()->setRules($rules);
    // If you replace the $rules array with the name of the group
    if (is_string($rules)) {
        $validation = config('Validation');

        // If the rule wasn't found in the \Config\Validation, we
        // should throw an exception so the developer can find it.
        if (!isset($validation->$rules)) {
            throw ValidationException::forRuleNotFound($rules);
        }

        // If no error message is defined, use the error message in the Config\Validation file
        if (!$messages) {
            $errorName = $rules . '_errors';
            $messages = $validation->$errorName ?? [];
        }

        $rules = $validation->$rules;
    }
    return $this->validator->setRules($rules, $messages)->run($input);
}

必ず必要なクラスをインポートしてください。

use CodeIgniterValidationExceptionsValidationException;
use ConfigServices;

以上の準備ができたら、ユーザーを登録して認証を行うロジックを追加します。

認証コントローラー

次に、App/ControllersディレクトリにAuth.phpを作成します。次のようにファイルを変更します。

<?php

namespace App\Controllers;

use App\Models\UserModel;
use CodeIgniter\HTTP\Response;
use CodeIgniter\HTTP\ResponseInterface;
use Exception;
use ReflectionException;

class Auth extends BaseController
{
    /**
     * Register a new user
     * @return Response
     * @throws ReflectionException
     */
    public function register()
    {
        $rules = [
            'name' => 'required',
            'email' => 'required|min_length[6]|max_length[50]|valid_email|is_unique[user.email]',
            'password' => 'required|min_length[8]|max_length[255]'
        ];

 $input = $this->getRequestInput($this->request);
        if (!$this->validateRequest($input, $rules)) {
            return $this
                ->getResponse(
                    $this->validator->getErrors(),
                    ResponseInterface::HTTP_BAD_REQUEST
                );
        }

        $userModel = new UserModel();
       $userModel->save($input);


return $this
            ->getJWTForUser(
                $input['email'],
                ResponseInterface::HTTP_CREATED
            );

    }

    /**
     * Authenticate Existing User
     * @return Response
     */
    public function login()
    {
        $rules = [
            'email' => 'required|min_length[6]|max_length[50]|valid_email',
            'password' => 'required|min_length[8]|max_length[255]|validateUser[email, password]'
        ];

        $errors = [
            'password' => [
                'validateUser' => 'Invalid login credentials provided'
            ]
        ];

$input = $this->getRequestInput($this->request);


        if (!$this->validateRequest($input, $rules, $errors)) {
            return $this
                ->getResponse(
                    $this->validator->getErrors(),
                    ResponseInterface::HTTP_BAD_REQUEST
                );
        }
       return $this->getJWTForUser($input['email']);

       
    }

    private function getJWTForUser(
        string $emailAddress,
        int $responseCode = ResponseInterface::HTTP_OK
    )
    {
        try {
            $model = new UserModel();
            $user = $model->findUserByEmailAddress($emailAddress);
            unset($user['password']);

            helper('jwt');

            return $this
                ->getResponse(
                    [
                        'message' => 'User authenticated successfully',
                        'user' => $user,
                        'access_token' => getSignedJWTForUser($emailAddress)
                    ]
                );
        } catch (Exception $exception) {
            return $this
                ->getResponse(
                    [
                        'error' => $exception->getMessage(),
                    ],
                    $responseCode
                );
        }
    }
}

登録

新しいユーザーを正しく登録するために、次のフィールドが必要です。

  • 名前
  • メールアドレス
    8文字以上、255文字以内の有効な形式である必要があります。
  • パスワード
    8文字以上、255文字以内。

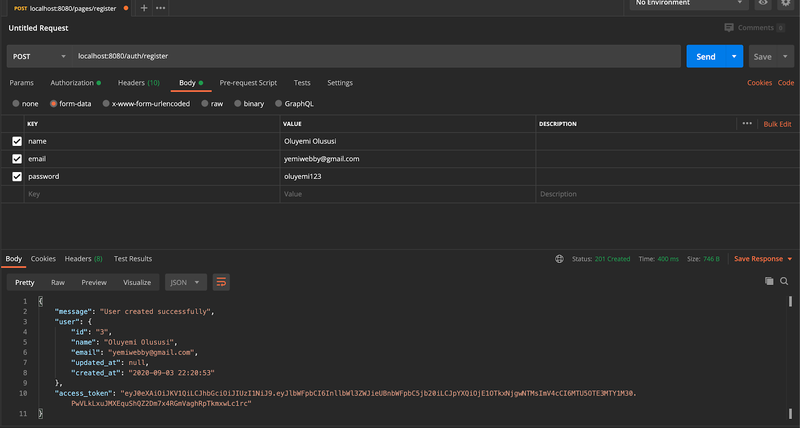
受信したリクエストは、指定されたルールに従いチェックされます。無効なリクエストは破棄され、HTTP_BAD_REQUESTコード(400)とエラーメッセージが返されます。リクエストが有効であれば、ユーザーデータが保存され、保存されたデータとともに(パスワードは除く)トークンが返されます。HTTP_CREATED(201)レスポンスによりクライアントに新しいリソースが作成されたことが通知されます。

登録エンドポイント(http://localhost:8080/auth/register)に有効なnameemail addresspasswordによるPOSTリクエストを実行すると、次のようなレスポンスが返されます。
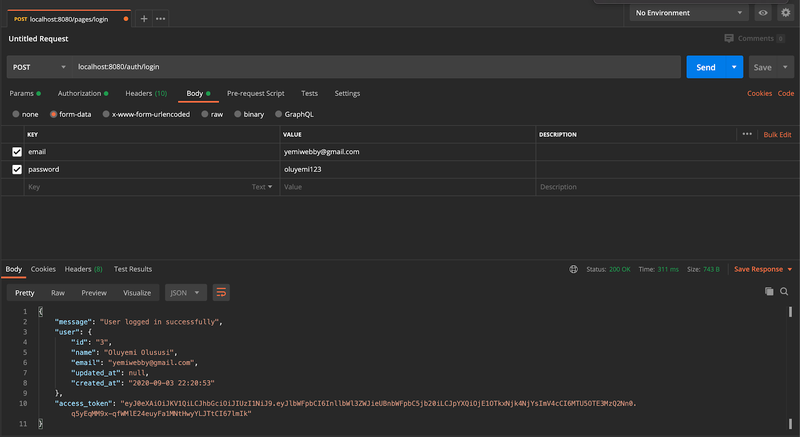
登録エンドポイントにリクエストを送信した結果

認証

正しく認証を行うために、以下の項目が必要になります。

  • メールアドレス
    8文字以上、255文字以内の有効な形式である必要があります。メールアドレスは、保存されたユーザーのものに一致しなければなりません。
  • パスワード
    8文字以上、255文字以内である必要があります。メールアドレスと同じく、送られるパスワードのハッシュは、メールアドレスに関連して保存されたパスワードのハッシュと一致しなければなりません。

しかし、同じ操作をログインエンドポイント(http://localhost:8080/auth/login)に行うと、Internal Server Error(HTTP Code 500)が発生します。これは、検証ルールに使用するvalidateUser関数がまだ作成されていないためです。

ユーザーの検証

appディレクトリに新しいディレクトリValidationを作成します。このapp/ValidationディレクトリにUserRules.phpを作成し、次のコードを追加します。

<?php

namespace App\Validation;

use App\Models\UserModel;
use Exception;

class UserRules
{
    public function validateUser(string $str, string $fields, array $data): bool
    {
        try {
            $model = new UserModel();
            $user = $model->findUserByEmailAddress($data['email']);
            return password_verify($data['password'], $user['password']);
        } catch (Exception $e) {
            return false;
        }
    }
}

次に、App/Config/Validation.phpファイルを開いて$ruleSetsの配列を変更し、使用するUserRulesを追加します。$ruleSetsは次のように設定します。

public $ruleSets = [
    \CodeIgniter\Validation\Rules::class,
    \CodeIgniter\Validation\FormatRules::class,
    \CodeIgniter\Validation\FileRules::class,
    \CodeIgniter\Validation\CreditCardRules::class,
    \App\Validation\UserRules::class,
];

カスタム検証ルールが追加され、認証リクエストが正しく機能するようになります。テストするために、POST HTTPリクエストをhttp://localhost:8080/auth/loginエンドポイントに送信します。先ほど作成したユーザーのデータを使用します。

ログインエンドポイントにリクエストを送信した結果

顧客コントローラーの作成

顧客コントローラーでは、app/Config/Routes.phpファイルにルートを指定します。ファイルを開き、次のルートを追加します。

$routes->get('client', 'Client::index');
$routes->post('client', 'Client::store');
$routes->get('client/(:num)', 'Client::show/$1');
$routes->post('client/(:num)', 'Client::update/$1');
$routes->delete('client/(:num)', 'Client::destroy/$1');

これにより、APIは同じエンドポイントで別のHTTP verbを使用してリクエストを適宜処理できます。

次に、App/ControllersディレクトリにClient.phpを作成します。ファイル内容は次のように設定します。

<?php

namespace App\Controllers;

use App\Models\ClientModel;
use CodeIgniter\HTTP\Response;
use CodeIgniter\HTTP\ResponseInterface;
use Exception;

class Client extends BaseController
{
    /**
     * Get all Clients
     * @return Response
     */
    public function index()
    {
        $model = new ClientModel();
        return $this->getResponse(
            [
                'message' => 'Clients retrieved successfully',
                'clients' => $model->findAll()
            ]
        );
    }

    /**
     * Create a new Client
     */
    public function store()
    {
        $rules = [
            'name' => 'required',
            'email' => 'required|min_length[6]|max_length[50]|valid_email|is_unique[client.email]',
            'retainer_fee' => 'required|max_length[255]'
        ];

 $input = $this->getRequestInput($this->request);

        if (!$this->validateRequest($input, $rules)) {
            return $this
                ->getResponse(
                    $this->validator->getErrors(),
                    ResponseInterface::HTTP_BAD_REQUEST
                );
        }

        $clientEmail = $input['email'];

        $model = new ClientModel();
        $model->save($input);
        

        $client = $model->where('email', $clientEmail)->first();

        return $this->getResponse(
            [
                'message' => 'Client added successfully',
                'client' => $client
            ]
        );
    }

    /**
     * Get a single client by ID
     */
    public function show($id)
    {
        try {

            $model = new ClientModel();
            $client = $model->findClientById($id);

            return $this->getResponse(
                [
                    'message' => 'Client retrieved successfully',
                    'client' => $client
                ]
            );

        } catch (Exception $e) {
            return $this->getResponse(
                [
                    'message' => 'Could not find client for specified ID'
                ],
                ResponseInterface::HTTP_NOT_FOUND
            );
        }
    }
}

indexstoreshow関数を使用し、それぞれ全顧客の表示、新規顧客の追加、単一顧客の表示のリクエストを処理します。
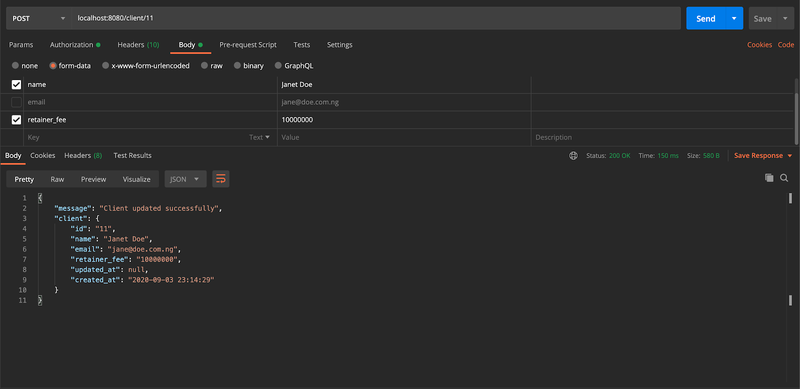
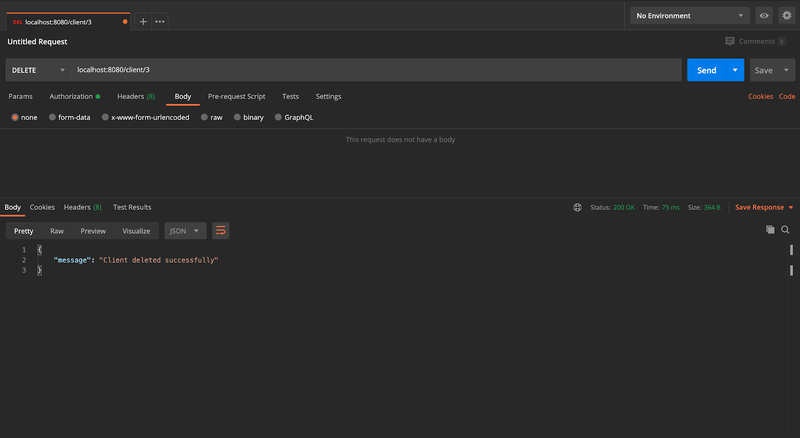
続いて、以下のようにupdatedestroyの2つの関数を作成します。update関数は顧客の編集のリクエスト処理に使用します。必須のフィールドはありません。予期される値がリクエストに含まれない場合は、値を削除してからデータベースの顧客が更新されます。destroy関数は特定の顧客を削除するリクエストを処理します。

    public function update($id)
    {
        try {

            $model = new ClientModel();
            $model->findClientById($id);

          $input = $this->getRequestInput($this->request);


            $model->update($id, $input);
            $client = $model->findClientById($id);

            return $this->getResponse(
                [
                    'message' => 'Client updated successfully',
                    'client' => $client
                ]
            );

        } catch (Exception $exception) {

            return $this->getResponse(
                [
                    'message' => $exception->getMessage()
                ],
                ResponseInterface::HTTP_NOT_FOUND
            );
        }
    }

    public function destroy($id)
    {
        try {

            $model = new ClientModel();
            $client = $model->findClientById($id);
            $model->delete($client);

            return $this
                ->getResponse(
                    [
                        'message' => 'Client deleted successfully',
                    ]
                );

        } catch (Exception $exception) {
            return $this->getResponse(
                [
                    'message' => $exception->getMessage()
                ],
                ResponseInterface::HTTP_NOT_FOUND
            );
        }
    }

以上ができたら、APIの準備は完了です。アプリケーションを以下のコマンドで再起動します。

$ php spark serve

リクエストを送信してテストします。Postman、cURL、あるいはお好きなアプリケーションを使用してテストできますが、本稿ではPostmanを使用します。
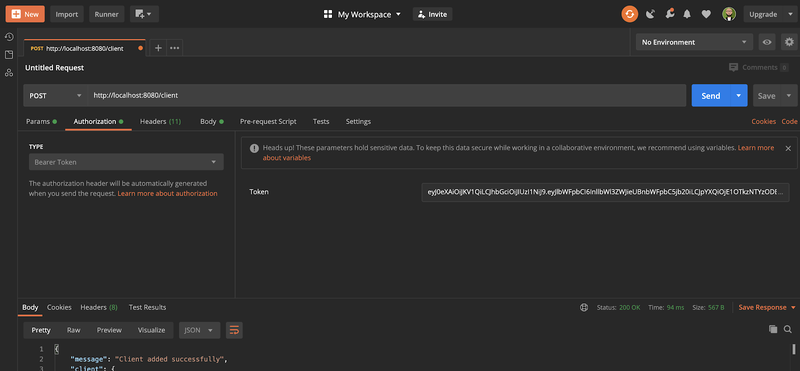
アクセストークンの追加

レスポンスのaccess_tokenの値をコピーします。[Authorization]タブをクリックし、ドロップダウンから[Bearer Token]を選択し、コピーしたaccess_tokenの値を貼り付けます。
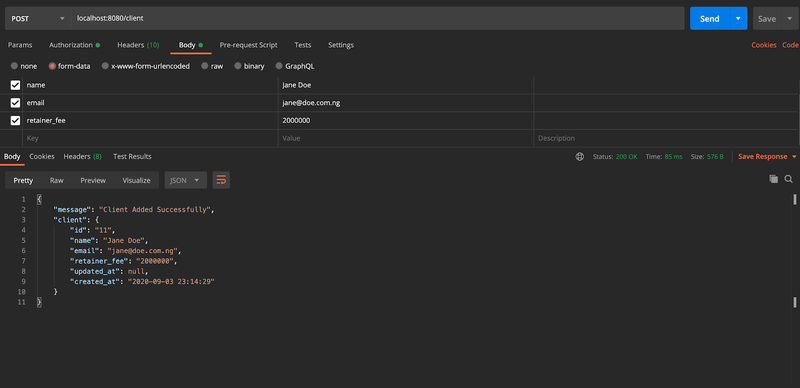
アクセストークンの追加処理結果

新規顧客の作成

新しい顧客を作成するために、POST HTTPリクエストをhttp://localhost:8080/clientに送ります。

新規顧客の作成処理結果

全顧客の表示

作成された顧客のリストを取得するために、GET HTTPリクエストをhttp://localhost:8080/clientに送ります。

全顧客の表示結果

IDを指定した顧客情報の取得

特定の顧客の情報を取得するために、GET HTTPリクエストをhttp://localhost:8080/client/1に送ります。ここでは1を使用し、データベースから取得する顧客の一意のidを指定しています。

IDを指定した顧客情報の取得結果
既存の顧客の更新結果
既存の顧客の削除結果

まとめ

本稿では、CodeIgniterを使用してPHPベースのAPIを作成しました。このAPIを使って、リソース(顧客)に基本的なCRUD(Create、Read、Update、Delete)操作を実行できます。また、リソースへのアクセスを制限するセキュリティレイヤーも追加しました。アプリケーションをモジュール化して疎結合にするプロジェクト構成の方法も学びました。

チュートリアルで使用したすべてのコードベースはGitHubで確認できます。ぜひご活用ください。一緒にコーディングを楽しみましょう!

Oluyemi氏は、電気通信工学のバックグラウンドを持つ技術愛好家です。ユーザーが直面する日々の問題を解決することに強い関心を持ち、プログラミングの道に進んで以来、Webとモバイルの両方のソフトウェア開発で問題解決能力を磨いてきました。Oluyemi氏は、知識の共有に情熱を注ぐフルスタックのソフトウェアエンジニアであり、いくつかのブログで多数の技術記事とコンテンツをインターネットに公開しています。技術にも精通しており、趣味は新しいプログラミング言語とフレームワークを試すことです。