Dive Deeper Into ARKit and Twilio Video With DataTracks API
Time to read: 9 minutes
October 26, 2017
Written by

In case you haven’t noticed, we’ve caught the AR bug here at Twilio HQ. A few weeks ago, my teammate Lizzie showed us how to bring ARKit and Twilio Programmable Video together in a Swift app. With the DataTracks API, you can take this sample further and build a shared, interactive AR experience with Video. We gave this new API a spin and made a fun app to show how Twilio Video can help you communicate in three different ways — audio, video, and data.
What’s In The App?
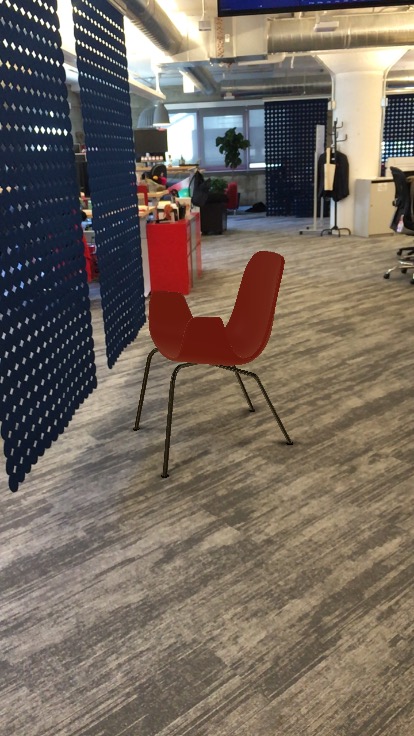
We’re ditching the spaceship and taking things to the living room. In this post, we’ll take a look at a sample app that can be used by an interior designer and their remote client, allowing the two parties to communicate about the placement of items like chairs, lamps, and vases. We’ll be using Twilio’s new DataTracks API to send information between the designer and the client with just a simple tap, and see the results as an AR experience in real-time.
What You Need to Play Along
- An Apple device with an A9 or later processor (iPhone 6s or later, iPhone SE, any iPad Pro, or the 2017 iPad)
- iOS 11 and XCode 9 (both of which you can download here.)
- A Twilio account (sign up here)
- An Apple developer account (to test AR apps, since they won’t work entirely in the iOS simulator)
- The Github repo from this sample
We’re building off the concepts from the first post in this series, so it helps if you’ve read that first and seen Lizzie’s sample code. You’ll also want to download and get familiar with the Twilio Video Quickstart — we’ve based portions of this app on both sample apps.
Initial App Setup / How To Use The App
We started with a simple Single View App in Swift called DesignConsult, which you can clone here. As with the earlier post in this series, we’re using CocoaPods to bring in the Twilio Video framework, but this time we’re going to use version 2.0.0-preview5 so we can take advantage of the new DataTracks API. Run pod install from the command line in the project directory, and open up the workspace.
Since we aren’t 3D modelers, we borrowed some furniture assets from Apple’s ARKit sample code. If you’re a 3D artist or have favorite models from TurboSquid or another model source, you can import the .scn or .dae files of your choosing into the app’s Models.scnassets.
You’ll need to generate a couple of test tokens, which you can do in the Twilio console. Make sure both have distinct identities and the same room name — we’re going to assign one to the designer and one to the client. Paste the access tokens in DesignerViewController.swift and ClientViewController.swift, respectively, where you see "TWILIO_ACCESS_TOKEN"
Run the app on your iOS device. Tap “I’m a customer” to run the app as a client (make sure to do this on a physical device in order to access the camera and take advantage of AR functionality). Build and run the app on a second physical device if you have one, or the iPhone simulator, and tap “I’m a designer” to run the app as the designer in the consultation.
Once you have both apps running, you’ll be prompted for mic and camera access. Once you’ve connected from both devices, you should see the client’s video on both devices, with a small video preview of each device’s own camera in the lower right portion of the screen if you’re not using the simulator. You’ll also be able to share audio across both devices, which is great for when you’re not in the same room.
As the client, aim your camera at the physical space around you, following the verbal direction of the designer on the other device. As the designer, direct the client to hold the camera still when you would like to place an object into the scene (this works best when you see many yellow dots, or feature points, indicating a physical plane for the object to be placed upon). Tap on the item that you would like to place, and then tap where you would like to place it. If successfully placed, the object should appear on both devices, and exist “in” the room the client is in. If you would like to move an item, simply select that type of item and place it elsewhere in the space (in this sample, only one of each type of item is allowed in the scene).
Enjoy placing furniture — then come back here to learn a little bit more about what’s running under the hood.
Publishing DataTracks — The DesignerViewController
Let’s start with our designer, who will be doing three things:
- Viewing the client’s space via a shared video feed
- Communicating with the client via audio track
- Placing furniture in the scene with taps
When we connect to the room in viewDidLoad() after the user selects the designer option, the prepareLocalMedia() function is called. In this function, three tracks are set up — local audio (your mic), local video (your camera, for the small preview view in the corner), and local data, which we’ll use to send object names and coordinates to the client. We then set a room name and connect with our preferred options. As the designer, we’re publishing all three tracks: audio, video, and data, which will be consumed on the client side.
The TVIRemoteParticipantDelegate picks up a lot of the work after we’re connected. If there’s a client in the room and they’re publishing video and audio tracks, their local tracks (remote to us) will be available to subscribe to. setupRemoteVideoView(), which is called when we successfully subscribe to the client’s video track, creates a full-screen subview that shows us their video frames. When we successfully subscribe to the client’s audio track, we’ll be able to hear their local audio (remote to us) through our device’s speakers. In this sample app, the client does not publish a data track.
Once the designer is subscribed to video and audio from the client, they’re able to get a sense of the client’s space. At this point, we’ll expect the designer to make use of the audio tracks with some verbal direction — telling the client to move to the corner, or step to the left a little bit — effectively setting up the scene so they can place objects.
The designer can place objects with two quick taps — one on the button of their choosing (chair, lamp, or vase), and one on the area corresponding to where they’d like to place the object. The tap gesture binds to handleTap(), which takes the location coordinates from the tap and concatenates them with the name of the selected object (chair, lamp, vase) and sends the string as a message via the published data track. The DataTrack API supports both strings and Data messages, so you can choose whichever best serves your use case.
If there’s another participant in the room (the client), they’ll be able to subscribe to the designer’s DataTrack, so every time the designer taps, the message will be broadcast to the client. If you tap the chair icon, and then tap the screen at x: 206.5, y: 193.5, the message “chair (206.5, 193.5)” will be published to the data track and available for consumption by the client.
Consuming Data Tracks — The ClientViewController
Now that our designer is set up to publish a data track and send messages, it’s time to look at the client experience.
The TVIRemoteParticipantDelegate appears on the client side of the application as well, and we’re able to subscribe to audio, video, and data tracks from the designer (remote participant). If the designer is successfully connected to the room and publishing a data track, we’ll be able to subscribe to it and set the data track’s delegate.
Once we’re subscribed, messages sent from the designer can come through, and it’s up to the client to handle them. Our remote data track delegate gives us a function that allows us to intercept messages and do whatever we like with them.
In this case, we know that we are expecting a string ( message) with an object name and a set of coordinates, so we’ll call placeObjectAtLocation() to handle those. This is where ARKit comes back into the mix. We take the object name substring from the message and match it to our furniture models, creating a scene and node that can be added to our sceneview. We then take the coordinate substring from message, and determine whether the location’s CGPoint maps to a real-world object or surface in the scene (a great way to help determine this is to turn on feature point debugging and look for clusters of yellow dots!). If the object can be placed, we add the node to the scene and a piece of furniture appears.
Because we’re sharing snapshots of the sceneview as video frames (just like in the first ARKit / Twilio Video sample), when the AR objects are added to our scene, they’re broadcast across the client’s video track. This means that the designer will see the furniture items on their device just as they’re placed, because their view centers on the remote video feed coming from the client, which now includes those furniture pieces.
We’ve also added a couple of convenient items to the client’s UI. The switch in the upper right corner allows the client to toggle the feature point debug option, enabling and disabling the appearance of the yellow feature point dots in the scene. The client can flip the switch on to help the designer find a surface to place furniture on, and then flip the switch off to see the room in a more natural state.
The screenshot button in the upper left corner finishes out the experience; once the client is satisfied with the placement of the items, they can persist the scene in screenshot form by tapping the button.
This keeps some of the AR magic in place and helps the client remember what the space looked like even after the video session has ended, and allows the client to share the image with others.
That’s it!
Twilio’s new DataTracks API provides an excellent complement to the audio/video tracks that you already know and love from Programmable Video. In this sample, we showcased a simple but powerful shared AR experience, allowing a designer and client to communicate even when they’re not in the same physical space. Tomorrow…we can’t wait to see what you build!
Huge thank-yous go out to Iñaqui Delgado, Chris Eagleston, Ryan Payne, and Piyush Tank of the Video team for their help with this post, and to Lizzie Siegle for inspiring us with her ARKit post. Source code for this sample can be found here—feel free to extend it however you like!
Related Resources
Twilio Docs
From APIs to SDKs to sample apps
API reference documentation, SDKs, helper libraries, quickstarts, and tutorials for your language and platform.
Resource Center
The latest ebooks, industry reports, and webinars
Learn from customer engagement experts to improve your own communication.
Ahoy
Twilio's developer community hub
Best practices, code samples, and inspiration to build communications and digital engagement experiences.