Sharing My Son’s Birth with Twilio, Dropbox, and ASP.NET
Time to read:
July 11, 2017
Written by
This post is part of Twilio’s archive and may contain outdated information. We’re always building something new, so be sure to check out our latest posts for the most up-to-date insights.

Births are Spectacular but Sharing births is difficult
On Jan 24th, 2017 my wife and I added a baby boy to our family. When he arrived, we felt overwhelming joy from bringing a new baby into the world, and were anxious to share this with our friends and family who were about three thousand miles away. Then came the challenge – how should we share this new experience with them?
This is the part where the question “ever heard of Facebook or Instagram?” comes up but that didn’t quite fit my need. See we already have a two year old daughter who didn’t stop needing us when her brother was born. Combining that with the significant drop in sleep meant less energy and desire to do much else. I wanted a solution that could automate this for me with as little intervention as possible. With this in mind, we will build an API that allows people to text a Twilio phone number and receive picture messages with photos from a cloud storage account.
Twilio makes it Easier
We’re going to build this solution by doing three things:
- Purchasing a Twilio phone number with SMS and MMS capabilities on Twilio.com
- Creating an API to send the photos from a cloud storage account using Visual Studio 2017, C#, and the latest version of the Twilio Nuget package
- Connecting our API to our Twilio number using ngrok before sharing the number and taking more pictures
Let’s get started.
Purchasing Your Twilio Number
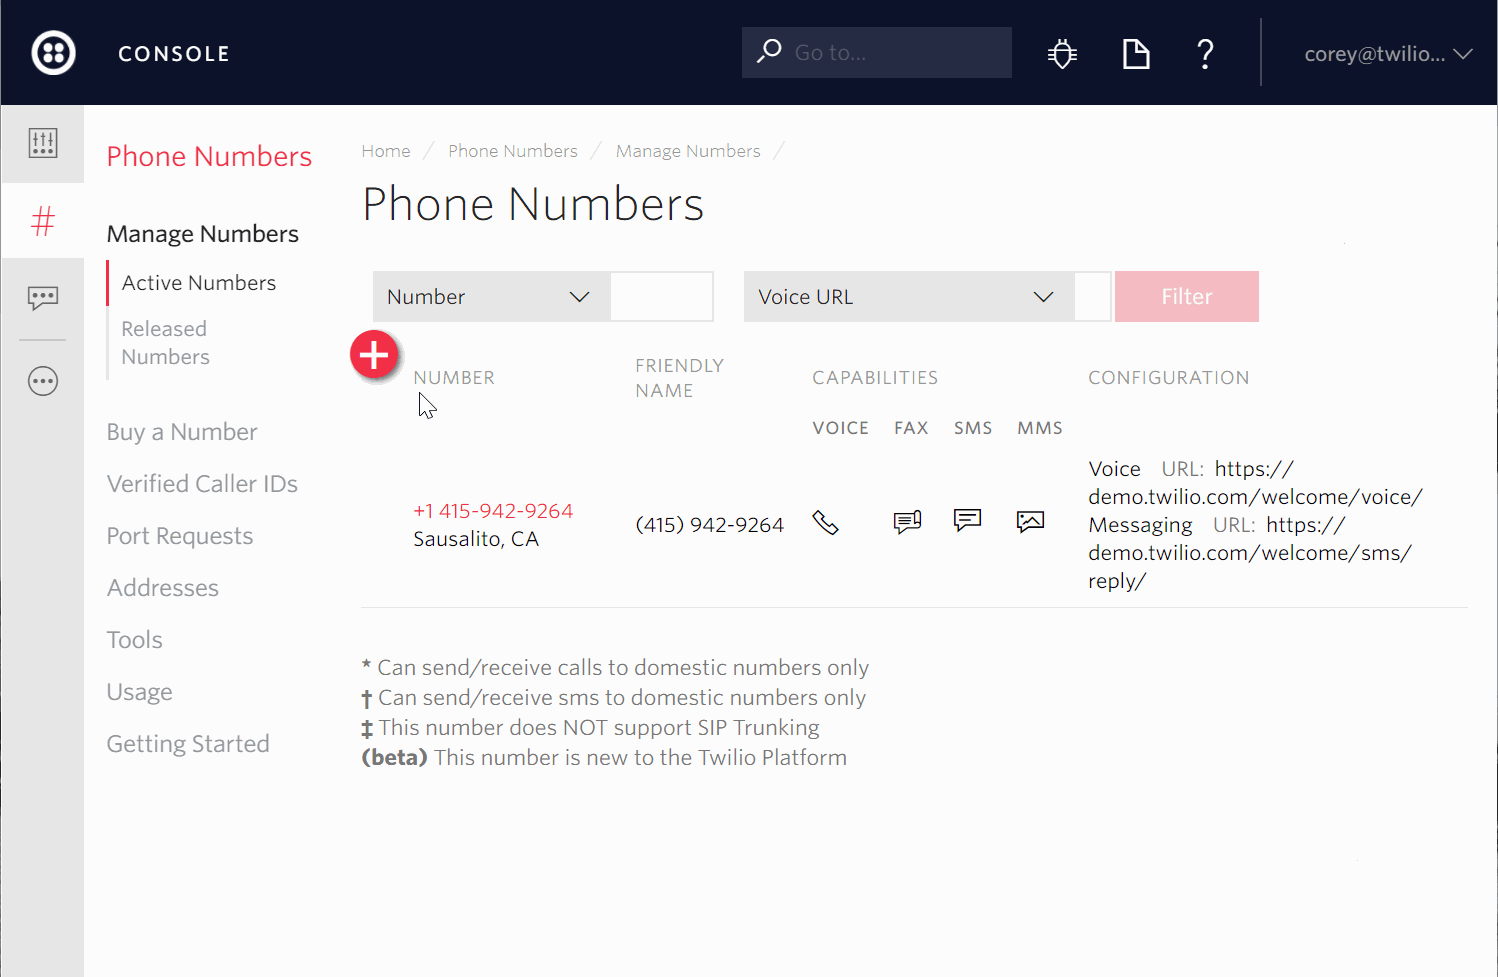
To purchase a Twilio phone number that can send MMS messages, log in to twilio.com, scroll down to the Super Network section of the console, and then click on Phone Numbers. You will next click on the Purchase a Number link (or the ‘+’ symbol if you already have other numbers already purchased), enter in an area code of your choice, select the SMS & MMS check boxes, and then click on the Search button. When eligible numbers are returned, select one of your choosing and then click on the Buy button. The same steps are shown in our animated gif below:
Keep in mind, this will only work with US based phone numbers. If you’re considering sending messages from or to non US based phone numbers, check out Twilio’s MMS Converter. This tool enables Twilio to send a URL in place of the picture message in countries where MMS support is limited. With our Twilio number purchased, Step 1 is complete!
Setting Up Your Visual Studio Web API Project
Let’s start Visual Studio and create an ASP.NET Web Application targeting the .NET Framework as shown in our animated GIF below. We will then create an empty Web API project. If you are unfamiliar with Visual Studio and would like more detailed steps, check out Create a Web API Project at docs.microsoft.com.
Next we will add the Twilio and JSON.Net Nuget packages to our project. The Twilio package contains the Twilio helper library, which provides objects to interact with Twilio’s APIs. The JSON.Net package allows us to do some JSON parsing in our code.
In the Solution Explorer window, right click on the References folder and from the context menu select Manage Nuget Packages. That should open up the Package manager window where you can search for Twilio followed by Newtonsoft.Json and then install the latest stable versions available.
Time to Write Some Code
Because this API is being built to return photos, we’re setting up our API to respond to HTTP GET requests to this url: http://localhost:xxxxx/api/photos, where xxxxx is the port number the application runs on. To do that, we need a Controller class. So in the Solution Explorer window, right-click on the Controllers folder and select Add from the menu, followed by Controller. A new dialog window should open up. In there, let’s select Web API 2 Controller – Empty and name this controller PhotosController. At this point your project should have a PhotosController.cs file. Add the statement
using Twilio.TwiML; to the file. This makes objects from the Twilio SDK available to use in our code. After doing that, your code should look like:
With that complete, it’s time to create the method that will respond to incoming SMS messages. Copy the code below into your PhotosController class so that it looks like the following:
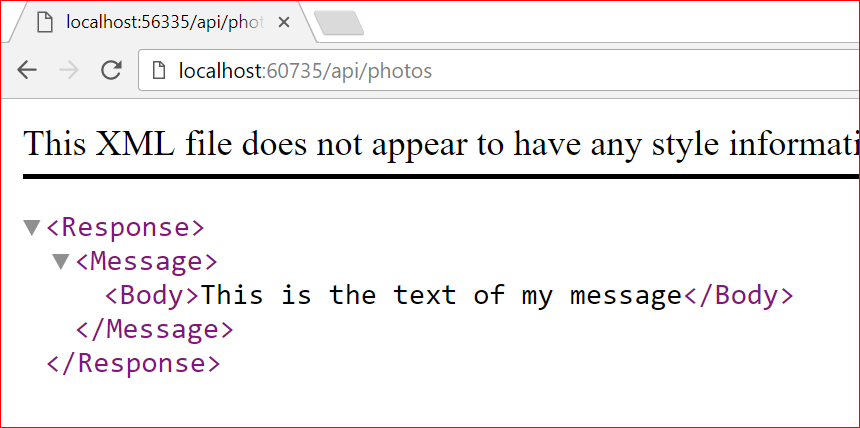
This method creates a Twilio response object MessagingResponse and uses the Body method to tell Twilio to respond to an incoming text message with this generic message. Then it converts our MessagingResponse object to an XML string that Twilio can parse by calling response.ToString(). Finally it returns the XML as the Content of the HTTP response.
Running the project will open a web browser on your computer with your app. Navigating to http://localhost:xxxxx/api/photos, (where you replace xxxxx with the port used on your machine) should give you the following:
Time to Include Photos
You are probably looking at the output and saying, “where’s my picture?” Twilio looks for a URL in the text of a Media element, which should be a child to the Message element. This is where we need to provide a URL to the photo that we want to include. With my son’s photos stored on Dropbox, I will walk through getting a URL for items stored there. You can use any repository you would like as long as the item can be downloaded via a publicly accessible URL.
To access items from Dropbox, we need to
- Sign up for a dropbox account if you don’t already have one
- Create a new app on the Dropbox Developer portal. We will create an app folder that we will store our baby photos in
- Generate an access token used for authorization purposes
- Manually upload some photos to the newly created app folder
- Select a photo from our new folder and generate a publicly accessible URL for it
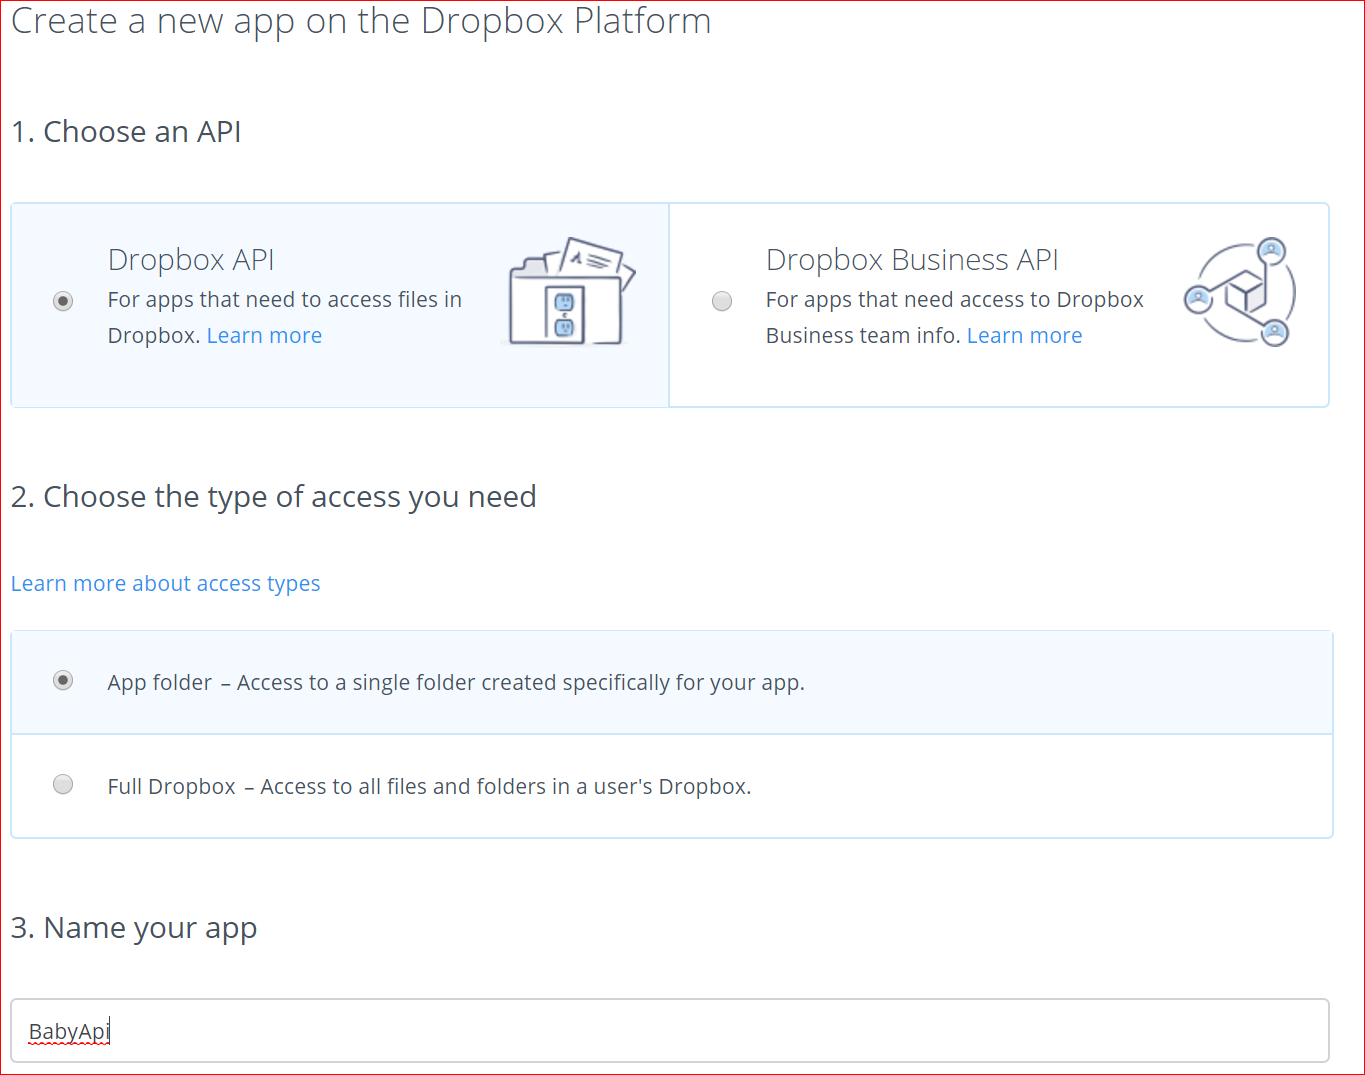
Steps 1 – 4 are pretty simple. In order to connect to Dropbox, we need to create an app on the Dropbox Developer portal. Once we navigate there and click on the Create app button in the top right corner of the page, a new page opens that allows us configure a Dropbox app. We will want to use the Dropbox API, set up an App Folder, and give our app a name as shown in the screenshot below.
After filling in those details and clicking the Create app button on the bottom of the page, we are taken to a configuration page for our Dropbox app. To create the access token we need, we will want to click on the Generate button in the OAuth2 section of the app creation page, as shown in the photo below.
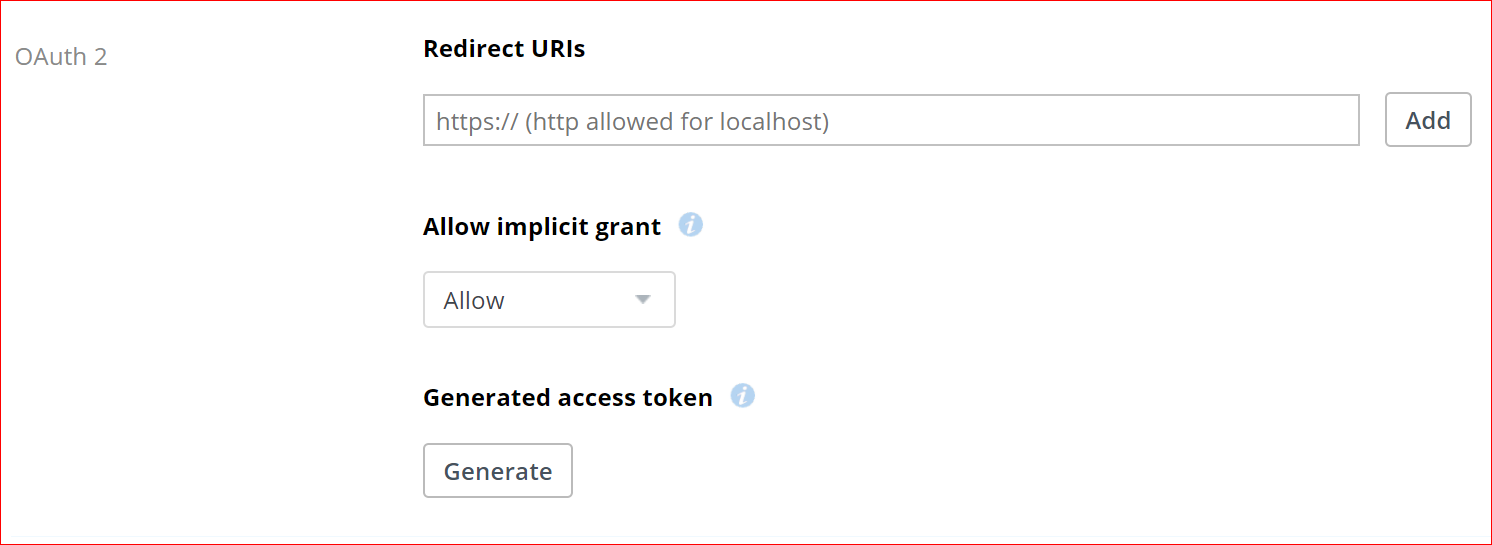
Once you click that, you should save the token somewhere as we’ll be using it again.
Before we do anything else, let’s upload some photos to our new app folder. The easiest way to do this is to navigate to this url: https://www.dropbox.com/home/Apps/UPDATE_YOUR_APP_NAME, where you replace UPDATE_YOUR_APP_NAME with your app’s name, and then upload one or two photos there.
Time to cover step 5. Back in our API project, let’s create a DropboxHelper class by right clicking on the project name in the Solution Explorer window –> Add –> Class. In the dialog box, we will name our class DropboxHelper. We can replace all of code in that file with the code below:
This code contains 2 methods: GetFilePaths returns a list of items that our app has access to; GetFileUri returns a publicly accessible link for any one of those items. Because I only have pictures stored in my folder, I will only receive URLs for those items but this solution can work with other file types as well.
To properly authenticate our requests, replace the string UPDATE_YOUR_ACCESS_TOKEN_HERE with the access token generated in step number 2 above. Once we do that, our helper class should successfully return a URL for items in the Dropbox app folder.
Time to Put It All Together
To connect our API to our DropboxHelper, let’s copy the code below into our PhotosController class. We’re going to put it underneath the Get method
GetPhotoUrl connects to Dropbox, gets all of the items, and then grabs a temporary publicly accessible URL for a randomly selected item. To finish off, we’ll update the Get method to replace the Message object creation with the below:
If we now run our app and browse to our API, we should see something similar to the below:

Step 2 complete!
Connect Our Code to Twilio
To allow Twilio to reach our API, we will use one of my favorite tools, ngrok, to expose our application running locally to the internet. If you need to download it, grab it from here. Once you have it downloaded, start up a command prompt and navigate to the directory that you saved the download to in your command prompt window. Then use the following command to start it:
Ngrok http -host-header=”localhost:xxxxx” xxxxx
where you’ll replace the xxxxx with your port number from the previous step.
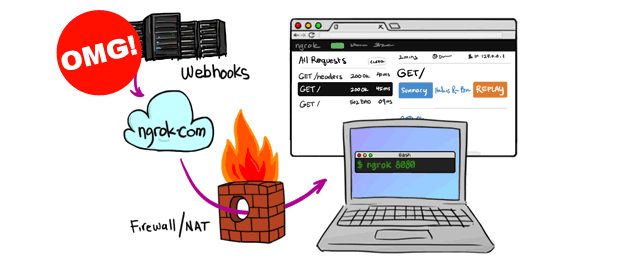
With ngrok up and running, let’s head over to twilio.com/console/phone-numbers, open up our recently purchased phone number and change the URL configuration for incoming SMS messages so that it uses an HTTP GET request pointed to http://YOUR_NGROK_URL/api/photos. When I made the change in my code and sent a message to my Twilio phone number, I received:
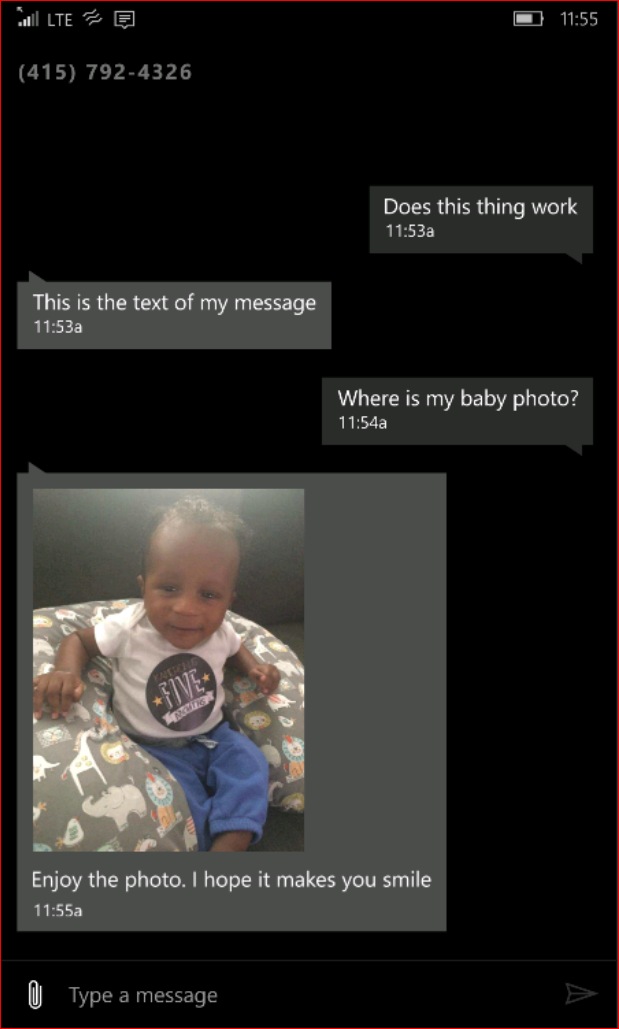
Achievement Unlocked!
Let’s recap what we’ve done. We built an API that will reply to incoming text messages on my Twilio number with updated photos from Dropbox. This API can be improved to grab data from another source, or prevent recipients from getting duplicate photos, or you could even build a website in front of this API to help manage it better. If you’d like to download the completed code, grab it from Github. Any issues with the code? Log an issue or drop a comment below.
For any other questions, message me on Twitter at @CoreyLWeathers, or email me at corey@twilio.com. I can’t wait to see what you build. For now, it’s time to go join the newly expanded family.

Related Resources
Twilio Docs
From APIs to SDKs to sample apps
API reference documentation, SDKs, helper libraries, quickstarts, and tutorials for your language and platform.
Resource Center
The latest ebooks, industry reports, and webinars
Learn from customer engagement experts to improve your own communication.
Ahoy
Twilio's developer community hub
Best practices, code samples, and inspiration to build communications and digital engagement experiences.