Building Your First Mobile App with C# .NET and Xamarin
Time to read:
June 06, 2019
Written by

Nearly everyone these days has a mobile phone, and most of these are smartphones. Everyone downloads apps, from social media to games to fitness.
As developers, a lot of you probably think about making an app for your phones. Whether it's just for a laugh, or to solve an actual problem, our curious minds get us thinking.
In this post you will get an introduction to how you can create mobile apps using C# and Visual Studio, taking advantage of the awesome Xamarin mobile tooling built into Visual Studio.
Today you will cover the following set of topics:
- What is Xamarin?
- What tools will I need?
- Getting started with the Visual Studio tools for Xamarin
- Creating a simple counter app
- Learning more
If you would like to see a full integration of Twilio APIs in a .NET Core application then checkout this free 5-part video series. It's separate from this blog post tutorial but will give you a full run down of many APIs at once.
What is Xamarin?
Xamarin is a cross-platform mobile development framework that now ships with Visual Studio 2019 for Windows and Visual Studio for Mac.
It is a thin wrapper around the native APIs and tooling, so anything you can do in Java/Kotlin for Android, or Objective-C/Swift for iOS, you can do in Xamarin using the C# goodness we know and love.
In fact, it is not just C# that can be used to write Xamarin; F# can be used too! F#, as you may well know, is the functional .NET programming language. Both use the same native Android/iOS code underneath for the components, building the application, and running it. So once you deploy it there is no way to tell how the app was made—or in what language!
There is even day 1 support so, as a new OS release or feature comes out, Xamarin will have a release available to support it. That is a huge advantage over other HTML-based mobile technologies as they often require time for someone to develop the component that compiles to the native equivalent.
Xamarin Native vs Xamarin.Forms

As you will see in the image above, there are two types of Xamarin project you can create: Xamarin Native, the traditional Xamarin approach as it is sometimes called, or Xamarin.Forms.
Both share a common code base, either in C# or F#, which means business logic can be shared across platforms. So code for things like accessing databases, talking to cloud services like Azure etc, can be written once and used regardless of whether the code is being deployed to Android, iOS, UWP, or any other platform supported by Xamarin.
Where the two types of project differ is in the UI and how it is created. Either option still compiles down into the native components, but how you write it is different.
With the Xamarin Native approach, each platform’s UI is written separately. So iOS still uses Storyboards, Android uses AXML, and UWP uses XAML. The downside to this approach is that you need to be able to develop those UI’s individually; that requires not only expertise in each of those, but also time. If you are trying to prototype a cross-platform app on a low budget quickly, this can add overhead. However, because Xamarin.Native is just a thin wrapper around the native APIs, anything you can do in the native environment you can do with the Native approach. This makes it a powerful and completely viable alternative to native development, with the benefit of shared code and using the same .NET languages you love.
With Xamarin.Forms you have the option of writing your UI declaratively in code or using XAML.
The great thing with Xamarin.Forms is that you write the UI once and it is compiled to the native language for whatever platform you are deploying to, just like Xamarin.Native. As mentioned previously, it will look identical to the non-Xamarin native apps, so you will not know how it was made, and will have the time-saving benefits of a cross-platform UI.
The main difference is that Xamarin.Forms is both shared UI and shared business logic, so not everything you can do natively is possible here—or it requires more work. The individual platforms will implement some features differently, such as taking pictures and checking for cellular connectivity. This is where plugins or libraries come in. These nifty little gems (often NuGet packages) are the result of someone kind and smart deciding to take away the hard work of implementing it for each platform. So you add the library to your project and start using it to do whatever it is you are trying to achieve by calling the library code from your project code.
A few years ago the recommendation from Xamarin, at the time an independent company, was that if you wanted to do something graphics-intensive, for example, you were better off going with Xamarin.Native. However, with the evolution of products such as SkiaSharp, these limitations are shrinking every year—maybe even every month—and Xamarin.Forms becomes a viable option for more and more project ideas.
What tools will I need?
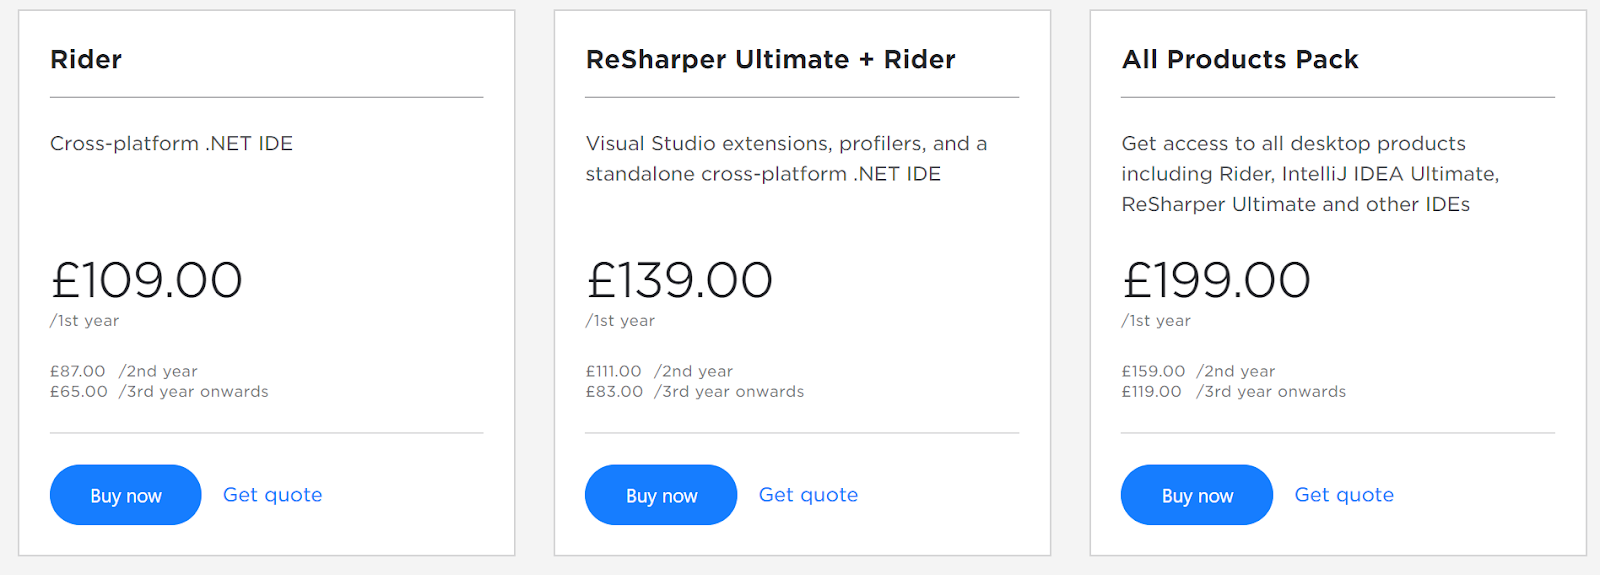
When it comes to developing Xamarin, you have 3 main IDE choices. Visual Studio 2019, Visual Studio for Mac, or Rider.
All three come with support for Xamarin out of the box. The download and installation instructions for each can be found below:
Visual Studio for both Windows and macOS supports Xamarin for free; you only require the Community edition.
Rider will require either a subscription to the whole toolbox, if you use other JetBrains products such as intelliJ, or just a subscription to the one product.
Getting started
The following steps will walk you through creating your first blank Xamarin.Forms project on both Windows and Mac and building your first Xamarin app!
These steps assume you have followed the relevant installation guide above and have all the tools required to get started.
Visual Studio 2019 for Windows
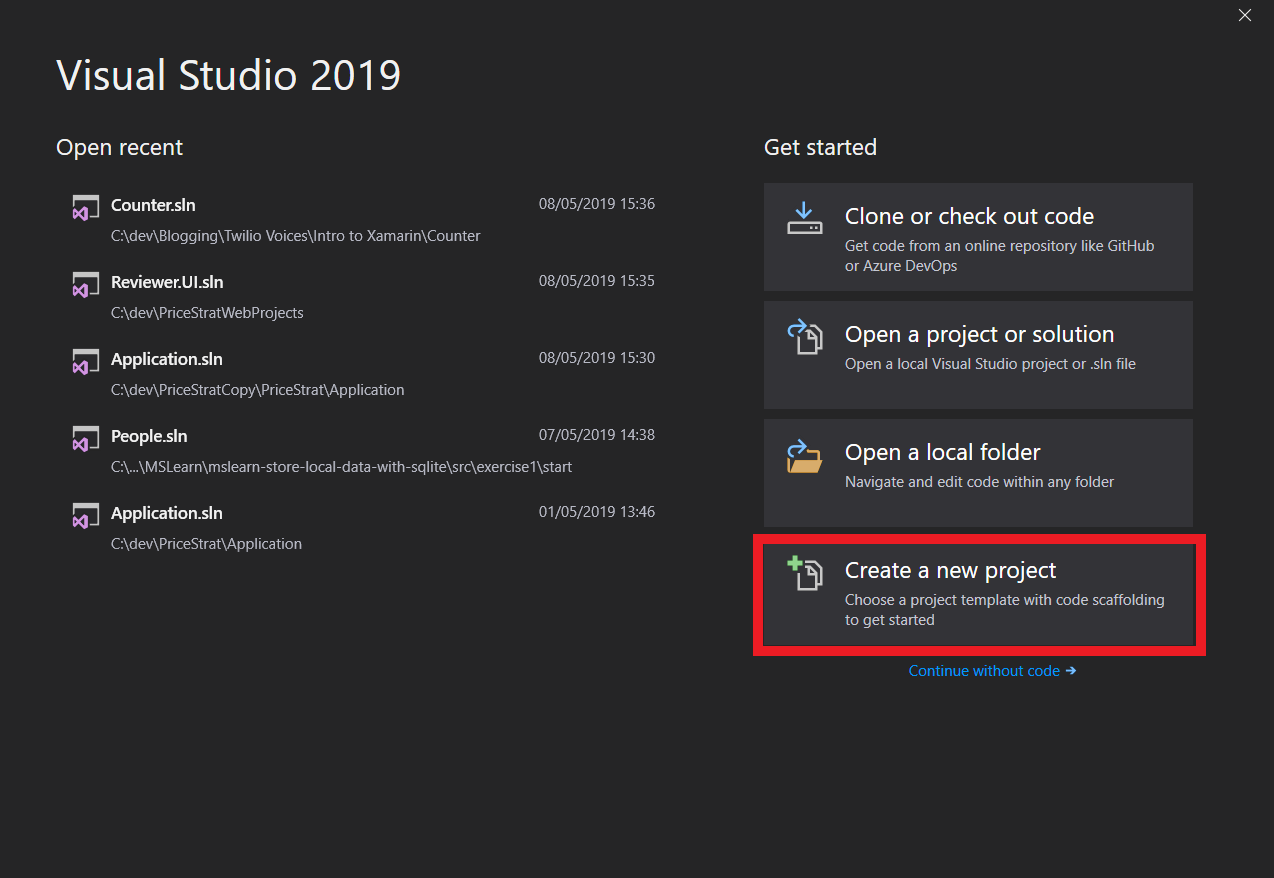
You can begin a new project by clicking Create a new project from the Welcome Window, shown below, or by selecting File > New > Project… from the menu bar.
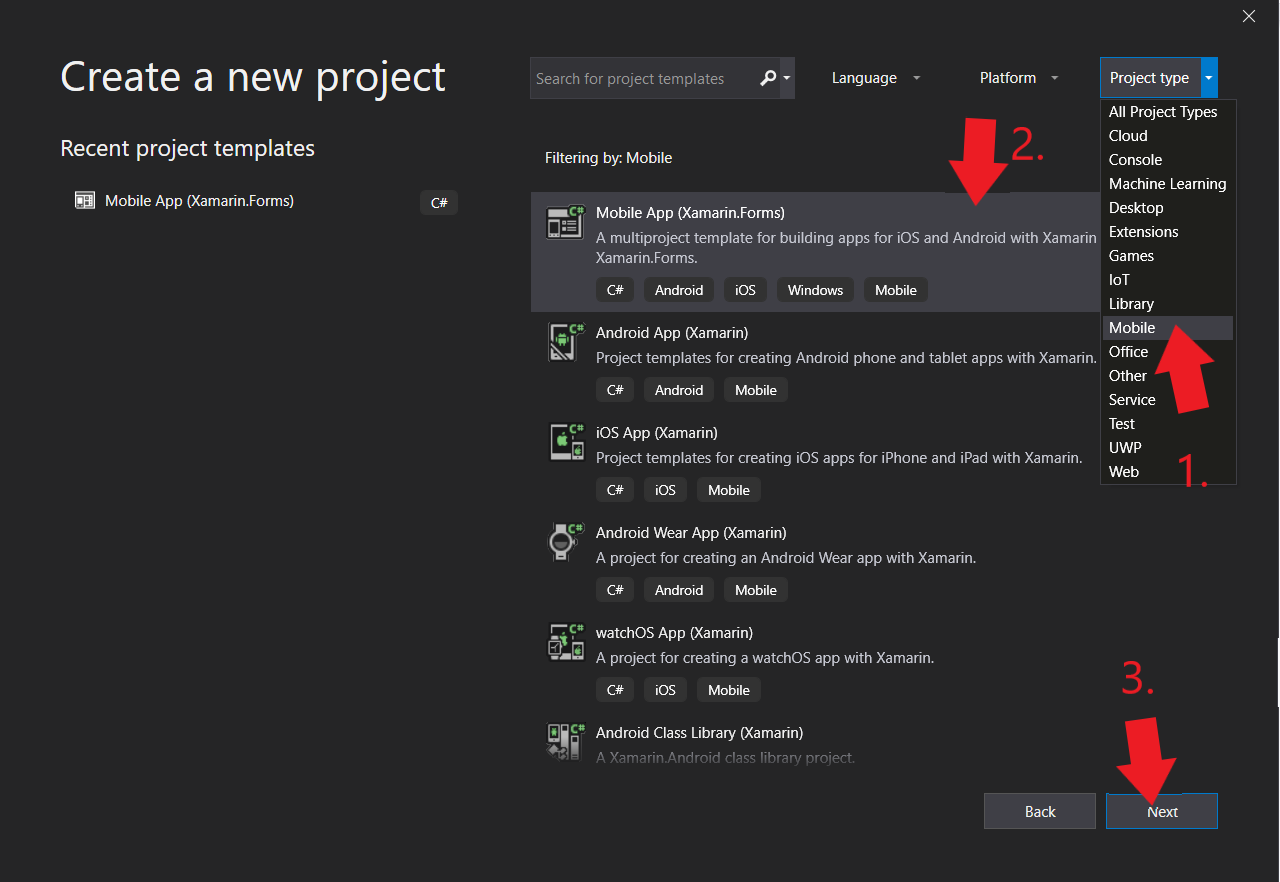
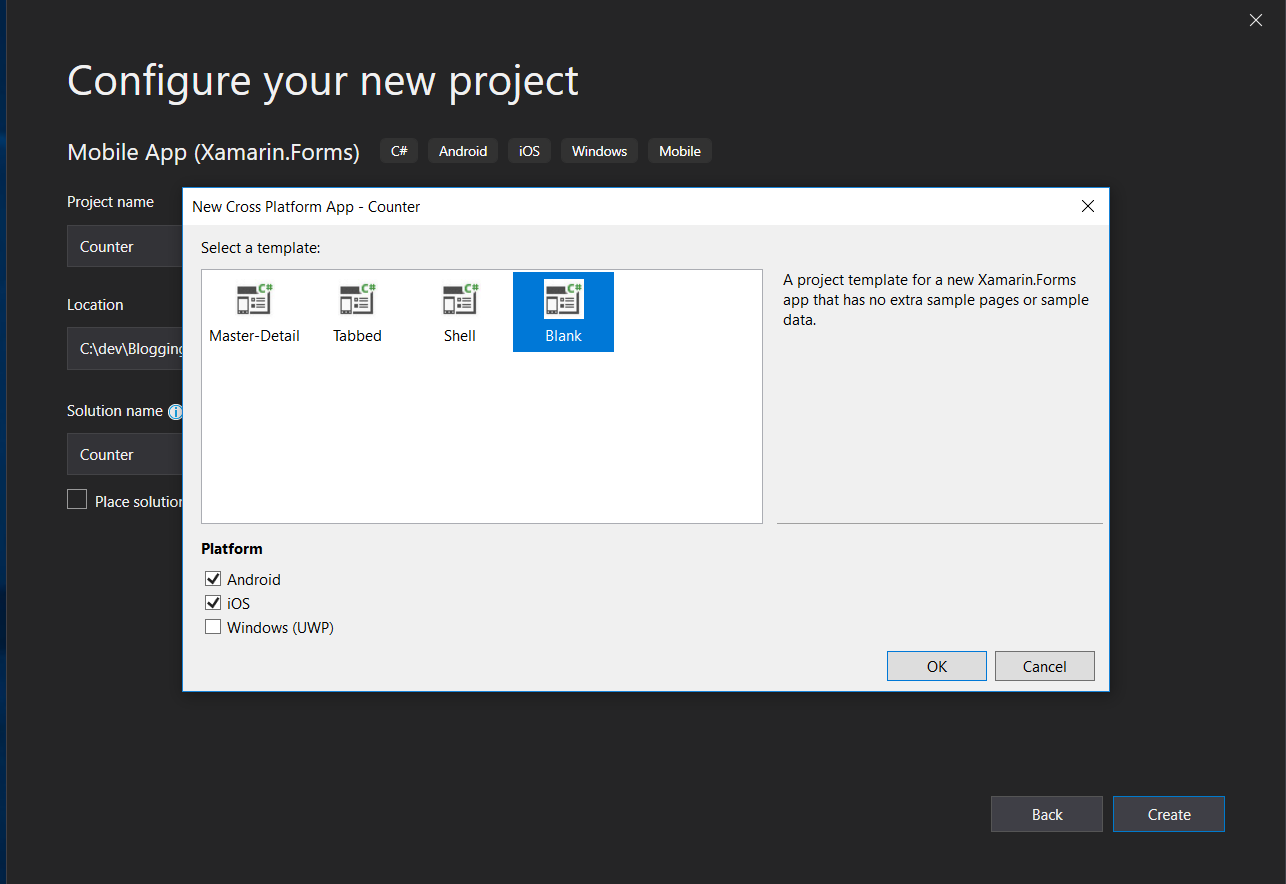
In the Create a new project window, select Mobile from the Project Type list, Then select Mobile App (Xamarin.Forms) from the Filtering by: Mobile list and click Next.
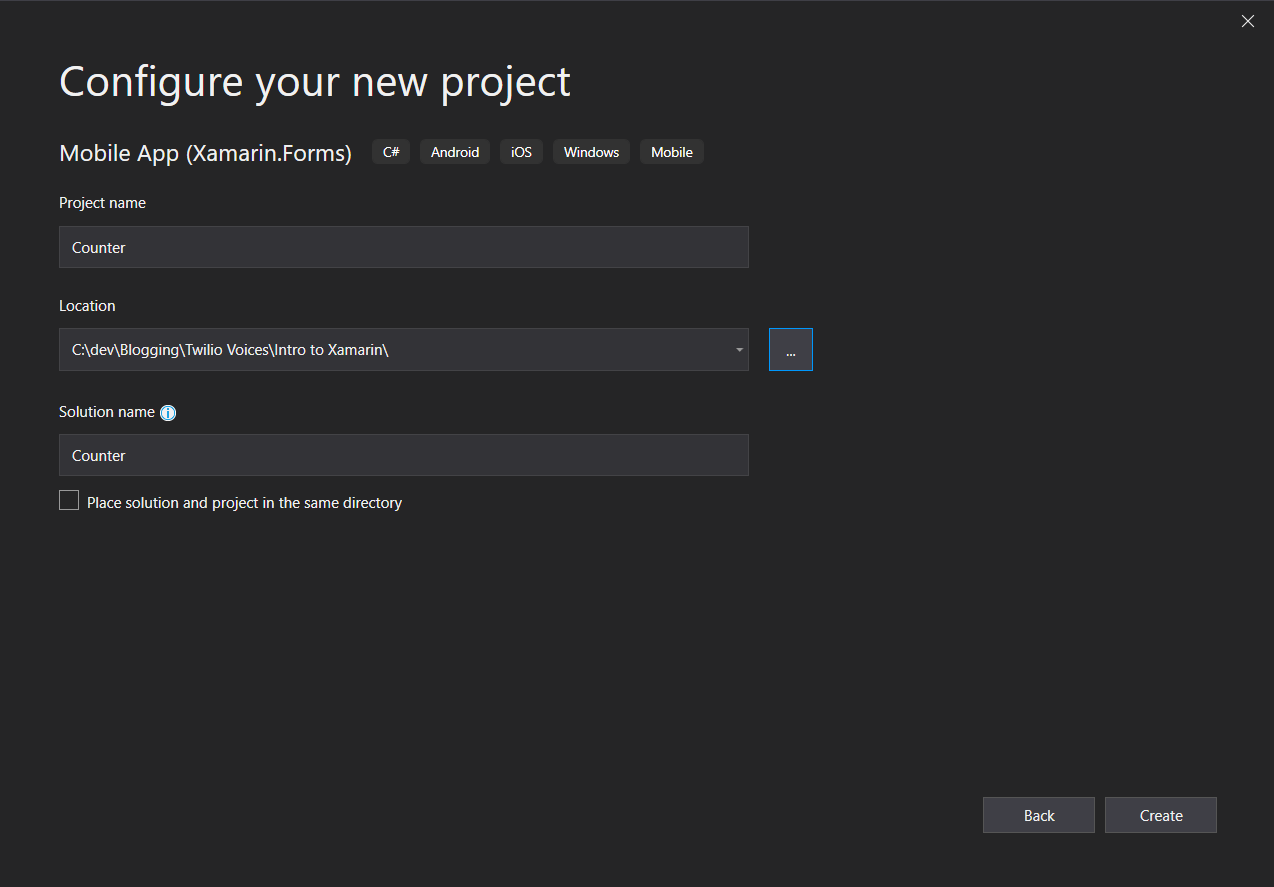
In the Configure your new project window, enter "Counter" in the Project name box, select a directory in which to save the project in the Location box, and accept the proposed value in the Solution box. Leave Place solution and project in the same directory unchecked. Click Create.
The New Cross Platform App window should open.
In the Select a template list, select Blank. Under Platform select Android and iOS. Click OK.
Visual Studio for Mac
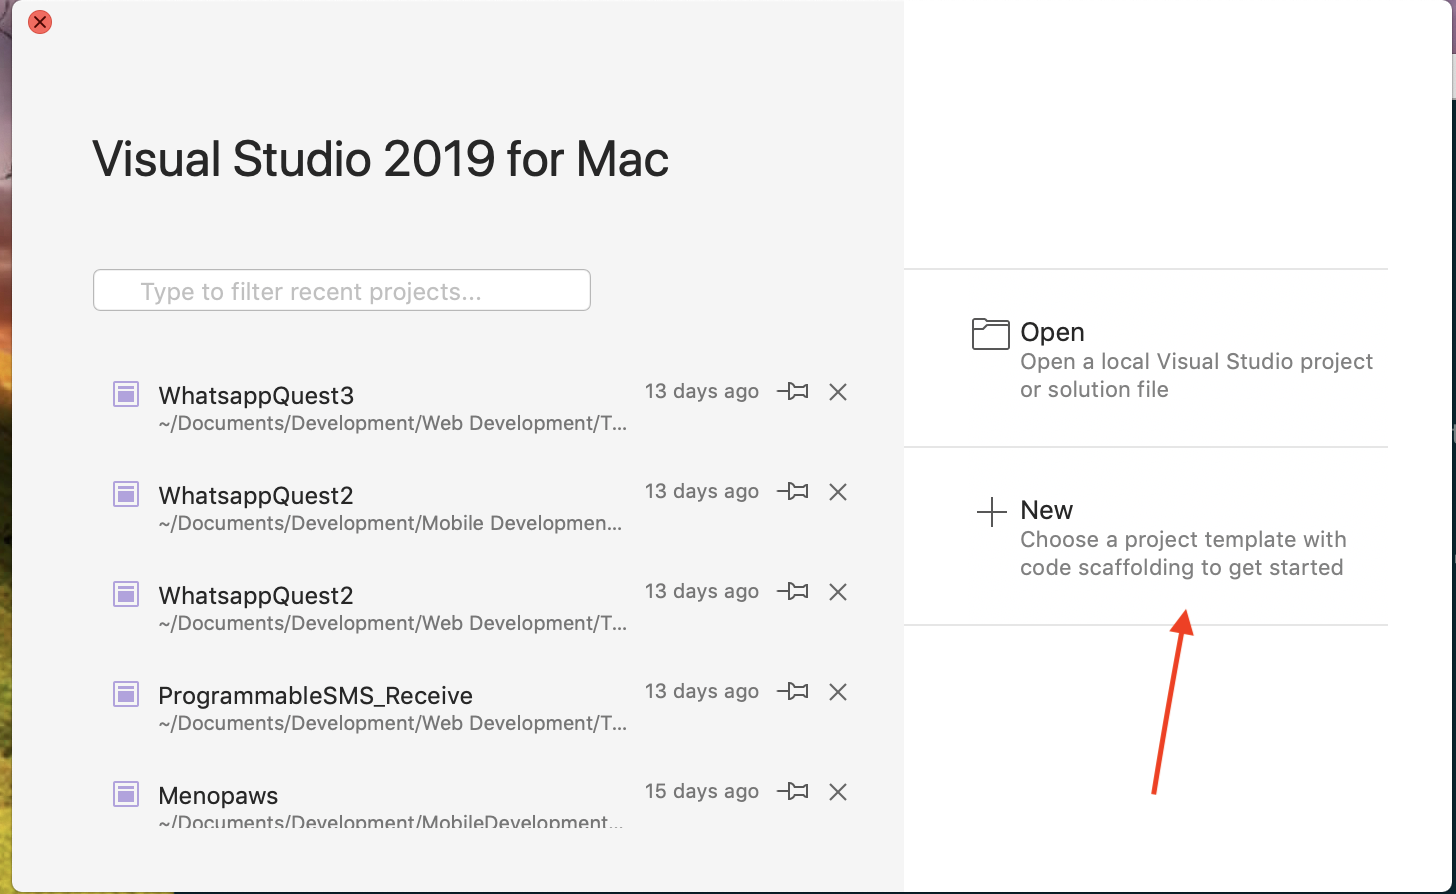
You can begin a new project by clicking New on the right-hand side of the Welcome Window, shown below, or by selecting File > New Solution… from the menu bar.
On the left-hand side of the New Project window, under the Multiplatform category, click App, select Blank Forms App, ensuring that the drop-down box next to it is set to C#. Click Next.

In the App Name box, enter “Counter”. Organization Identifier is used as an identifier in your app if published to the app store, so in this case you can leave this value as the default if you wish. Click Next.
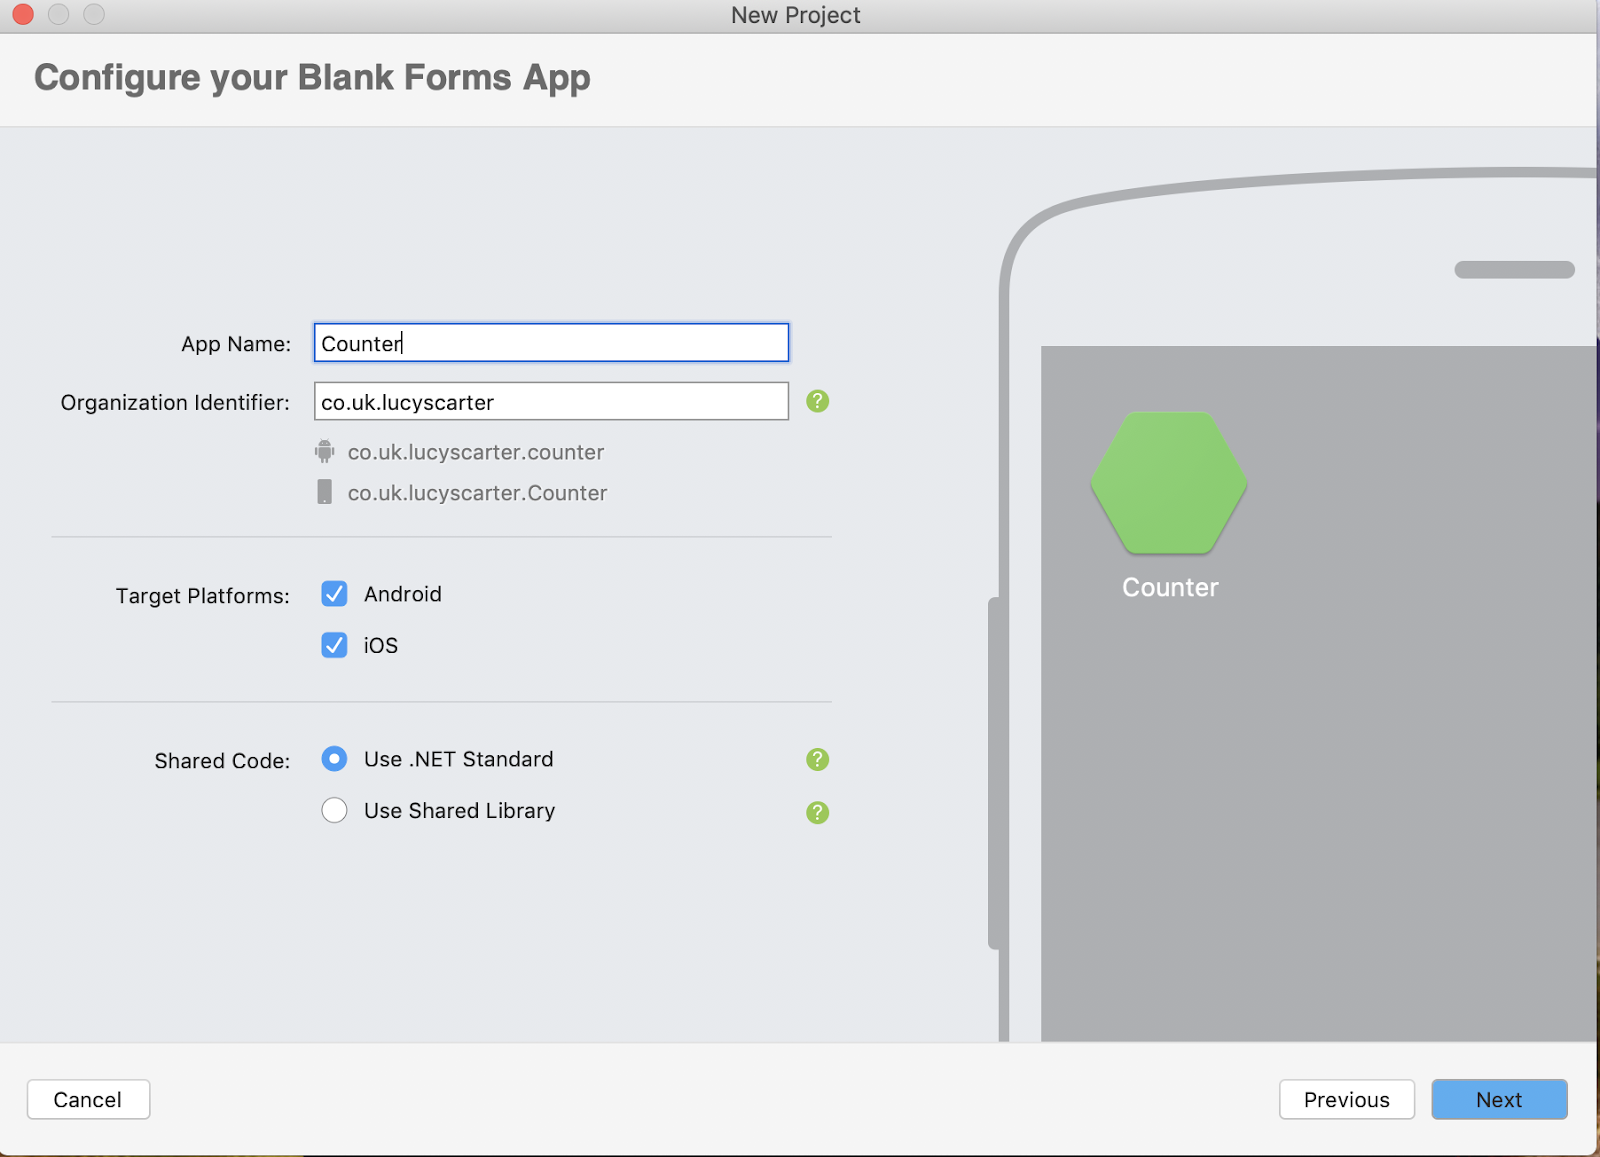
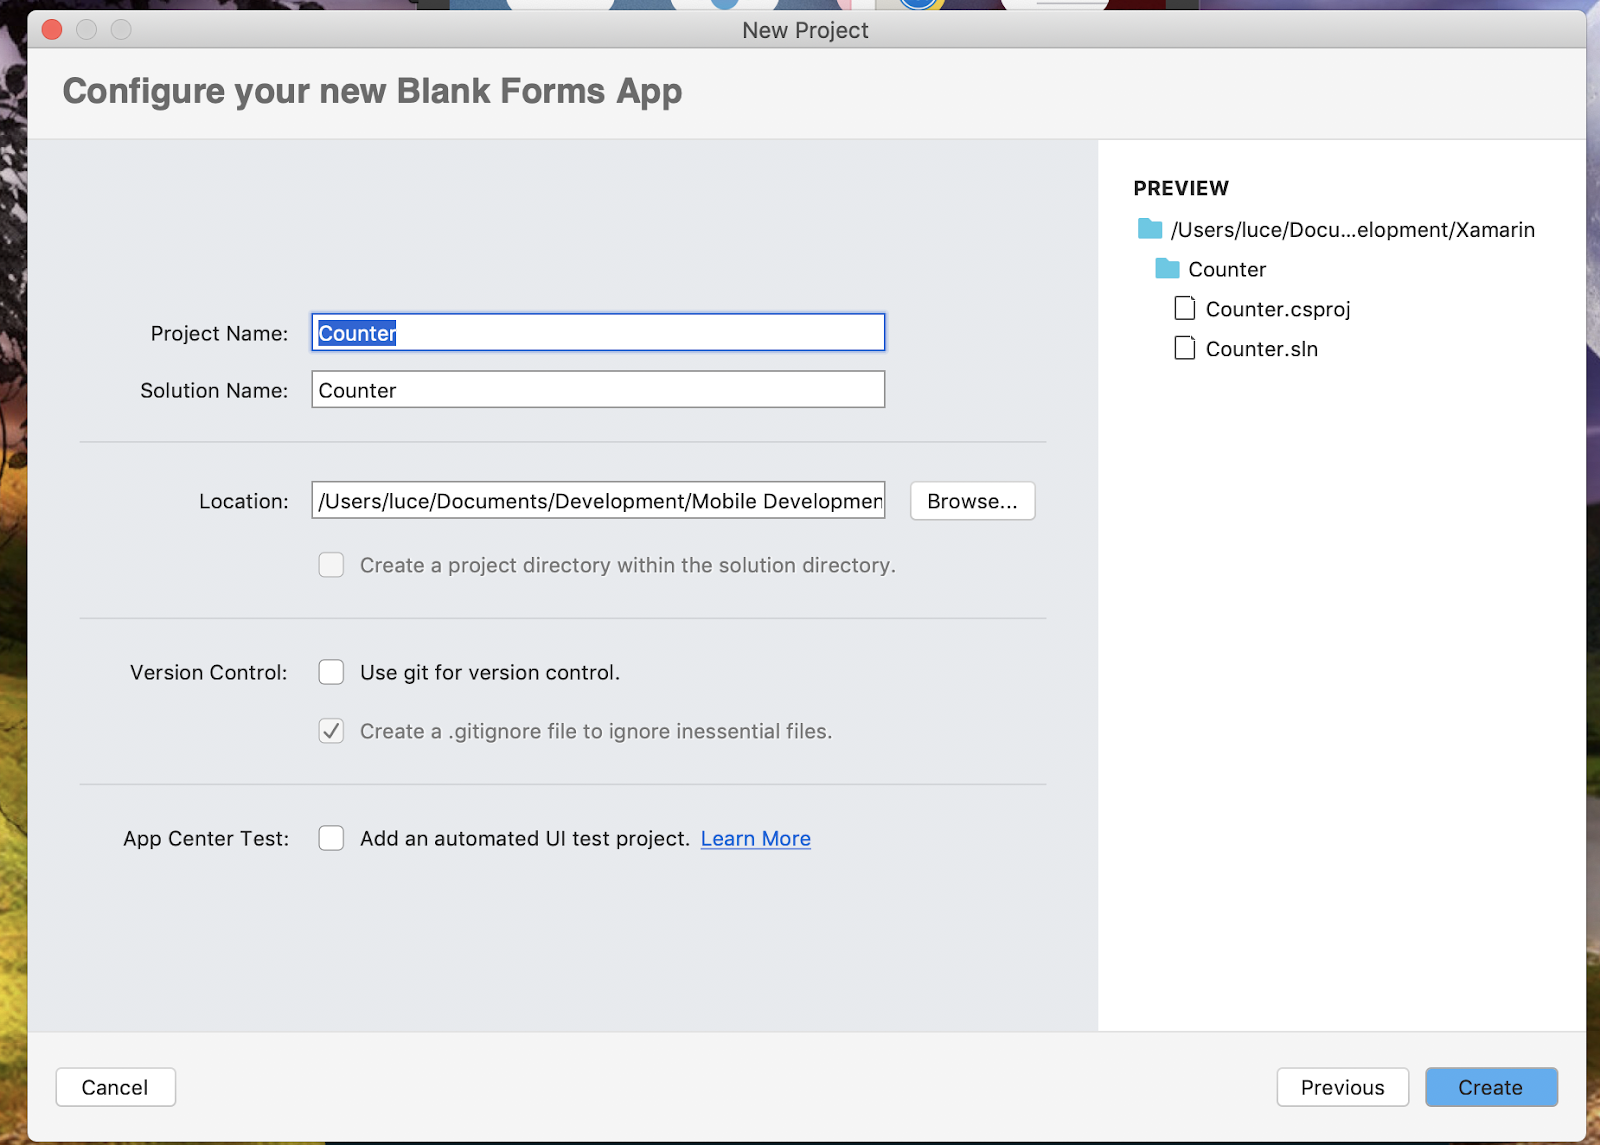
Select a Location to store the project on your hard drive. Ensure that the platforms you want to target are selected and Shared Code is set to “Use .NET Standard” then click Next.
Understanding the new solution
So the solution has loaded and your blank Xamarin.Forms project has been created, but what are all these projects you see?
Shared project
Depending on the platforms you are targeting, you will have up to 4 projects in your solution. The first is your shared project. This is where all your UI and shared code lives. You will learn more about the important files in that folder when you start writing code later in this tutorial.
Platform-specific projects
One of the projects in your solution will be called <ProjectName>.Android. As you can imagine, this is the Android project.
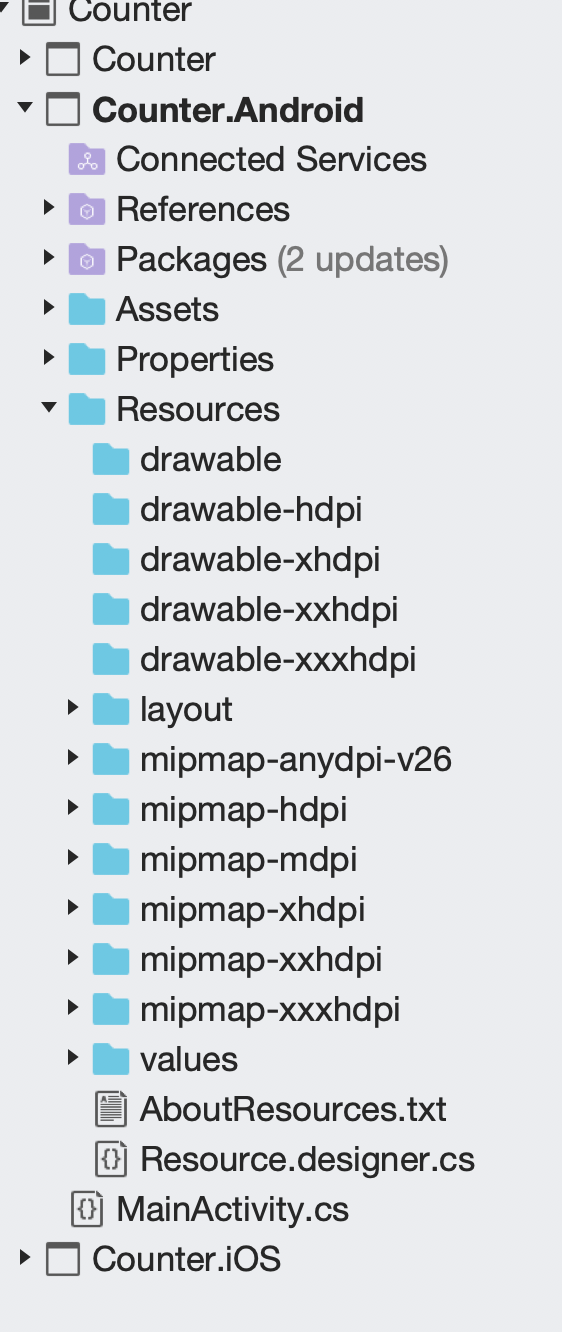
If you ever have written any native Android code in Kotlin or Java, this project will look very familiar. It has the Resources folder, which contains the drawable folders for images at different resolutions, layouts, and the MainActivity.cs file, in this case with a .cs extension for C#, a Properties folder containing your AppManifest file, which adds information about the application, and many other items.
Unlike in a Xamarin.Native project, the layout folder doesn’t contain your UI and all your MainActivity.cs class (configured for you) does is call into the shared code App.xaml.cs class to find what code to execute when the application loads.
If you selected iOS as a target operating system, you will also have a <ProjectName>.iOS project in your solution. It follows the same structure as a native iOS project written in Objective-C or Swift.
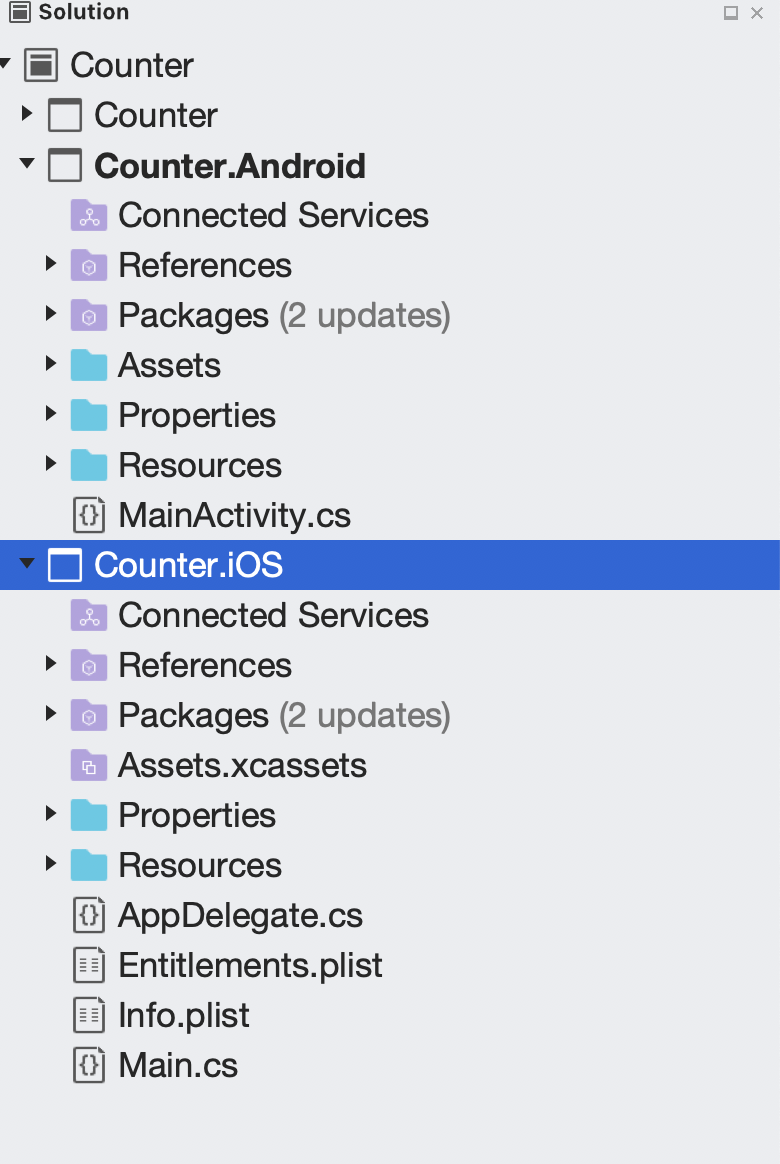
The AppDelegate.cs file initializes the Xamarin.Forms library and calls into the Counter shared project to find the application to run, including the UI.
There is also the Info.plist file, which acts as the application information file, and Entitlements.plist, which identifies the device features to which the application needs access, such as HealthKit, Apple Pay, Siri, and many others.
The UWP Project will also look as expected from native development, this post will only focus on Android and iOS.
Coding the Counter app
It is that time...first app time! Now you have your new project created and you understand the solution structure better, it is time to actually write some code!
This is a nice and simple app that is ideal to use to get started.
Begin with the user interface. You will want a way of displaying the current count and a button that makes the count increase.
Open the Main.XAML file in the Counter project folder. This is the default UI file the Visual Studio tooling creates from the New Project template. The file is templated with a stack layout containing a label centered vertically and horizontally saying “Welcome to Xamarin.Forms!” As you may guess from the name, a stack layout arranges UI components vertically. To learn more about different layout types in Xamarin.Forms, visit Layouts in Xamarin.Forms on docs.microsoft.com.
Delete the StackLayout element from the Main.XAML file and replace it with the following markup:
The two main things here to take note of are the x:Name attribute on the Label element and the Clicked attribute on the Button element. The x:Name attribute is there so you can refer to the component in code. You do this so you can update the value as the button is clicked.
As you can guess, the Clicked attribute on the button determines which method is called in code when the button is clicked. In this case it will be a method called IncrementCounterClicked. The method doesn’t exist yet, so don’t worry about warnings from your IDE; you'll create the code for the method next.
All Xamarin.Forms XAML files have an associated .cs partial class or “code behind” file which can be accessed by expanding the arrow next to the XAML file name in the Solution Explorer. Visual Studio and the Xamarin middleware use the file name, namespace, and class inheritance to automatically link any components referred to in the .xaml.cs code-behind file to the associated UI elements defined in the .xaml layout file for any pair of layout and code-behind files in the same namespace.
The Main.xaml.cs class is where you will code your app, including the method called from Clicked attribute on the Button element in the layout.
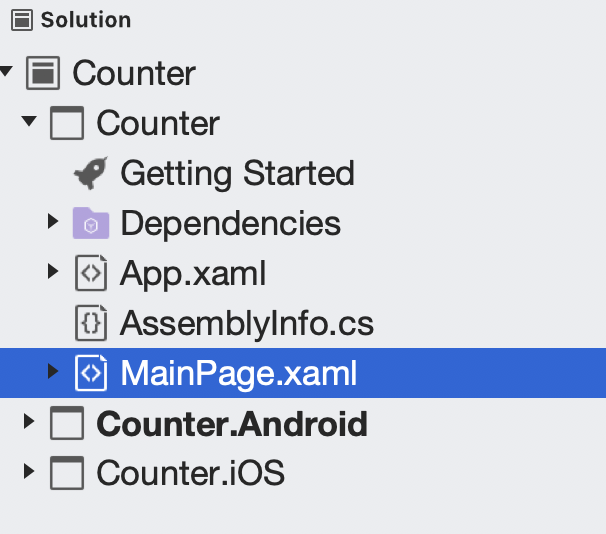
Replace the MainPage class in the MainPage.xaml.cs file with the following C# code:
This is a very short and simple class, but it teaches you how to interact with your UI.
InitializeComponent() is already written for you and is a Xamarin.Forms method for initializing all UI components for the associated XAML file.
The IncrementCounterClicked method is fairly straightforward. The sender parameter is the object that called the method, allowing it to be reused by multiple components. In this case it is only called from a Button element so the sender will be Button. EventArgs allow you to pass data to the method; in this case you don’t require any, so this parameter can be ignored.
As you can see, you reference your label using the x:Name you gave it earlier and set its text property to the string value of your current count. Boom!
Customizing the appearance of your app
You will have noticed in the code you entered earlier that you make some changes to the font and color using attributes available on the components. This is the most common and “original” way of changing the appearance of your app. However, Xamarin.Forms also supports using CSS to style your app.
In this section you will learn what the same code would look like if you used CSS instead of in-line properties on the tags themselves.
This can be achieved by placing the CSS code at the top of the XAML file but this can be messy and confusing, so this it looks like the CSS is in a separate file:
Not much has changed in the above markup, but a ContentPage.Resources tag has been added before the StackLayout element, which contains a Stylesheet tag with the Source attribute set to a styles.css file in the root of the shared project. The attributes on the components, which customize the appearance such as text color and font size, have also been removed.
The CSS file itself looks like any other CSS file, but refers to the components themselves rather than id or class selectors:
It is important to note, however, that not everything that can be done regarding appearance using XAML tag properties can be done using CSS. To learn more about the different ways to use CSS and what can be customized, visit the docs.microsoft.com page on Styling Xamarin.Forms apps using CSS.
Learning more
Like many developers, now that you have experienced Xamarin you'll want to play more and do more things! You’ll probably want to run the app you just built, so look for the next post in this series: it will show you how to run your app using device emulators and actual smartphones.
Future posts in this series will cover data binding and the Model-View-ViewModel (MVVM) design pattern.
Summary
In this post, you have learned:
- What Xamarin is
- How you can use both C# and F#
- How to create your first app
- An understanding of the solution
- How to customize the appearance of a Xamarin app with CSS
Additional Resources
The code from this blog post can be found ion a companion repository on Github, with branches for the different steps. The Master branch is the most basic, then there are additional branches to allow you to see how the app architecture evolved.
No blog post is complete without useful links where you can continue learning, so below is a list of links that are very useful to new and experienced Xamarin devs alike:
Xamarin Documentation on Microsoft Docs
Xamarin.Essentials on Microsoft Docs – Essentials is an amazing library containing abstractions for common features that would be implemented differently on each platform, saving you from having to code it yourself. Examples include Accelerometer, Connectivity to a network, Geolocation and dozens more!
Cognitive Services – Cognitive Services is Microsoft’s super easy to use, super powerful AI/ML technology that allows you to bring in the magic of AI without having to train loads of models for common tasks from speech-to-text, facial recognition and language translation, to beyond.
App Center – App Center is a powerful end-to-end service intended for mobile applications. It allows you to build, test, distribute, analyse and diagnose your applications with a small amount of configuration. Perfect for anyone who likes CI/CD and/or metrics!
Xamarin.Forms Solutions – A fantastic book giving you great samples for solving common tasks in Xamarin.Forms.
Xamarin in Action – This book is about native development in Xamarin rather than Xamarin.Forms, but for those who want to write apps using the native approach instead this is a must-have book to get you started creating your first app.
Luce Carter is a Software Developer at dunnhumby by day, Microsoft MVP and Twilio Champion by night. She is also the face behind the scenes, editing content for @JamesMontemagno, ensuring editorial quality in his blogs and episode descriptions on his podcast network, @soundbitefm. She can be found at @LuceCarter1 on Twitter, LuceCarter on Github and blogs on her own website. She writes C# in her dayjob, working mainly on an ASP.Net backend but Xamarin is her passion. When not writing apps for fun she can be found speaking around the UK or Europe on her two favourite Microsoft technologies, Xamarin and Cognitive Services.

Related Resources
Twilio Docs
From APIs to SDKs to sample apps
API reference documentation, SDKs, helper libraries, quickstarts, and tutorials for your language and platform.
Resource Center
The latest ebooks, industry reports, and webinars
Learn from customer engagement experts to improve your own communication.
Ahoy
Twilio's developer community hub
Best practices, code samples, and inspiration to build communications and digital engagement experiences.