Build Interactive Voicemail for Sports Fans with Twilio, Browserify, Angular, and Less CSS (Part Two)
Time to read: 13 minutes
August 06, 2014
Written by

With my home town still buzzing about the MLB All Star Game, it seemed high time to share part two of this series on building interactive voice mail for sports fans. In part one, we explored the high-level steps necessary to build an interactive voice mail system like the one deployed at leavejoeamessage.com. We saw how to set up a series of webhooks in our node.js backend to respond to incoming phone calls and text messages from fans, and how to store that data in a MongoDB database. If you haven’t already, you may want to check out part one of this tutorial.
But collecting all those fun messages is only half the battle. We need a front end to display and play them back to other fans, and an administrative interface to keep the trolls at bay. In this part of the tutorial, we’ll examine the front end tools and techniques we used to create the web interface for our interactive voice mail system. We won’t step through every line of code in the sample app (full source code) but we will call out some of the key concepts you’ll need to understand to see how the application works.
Let’s begin by showing how we created a public web page for viewing and playing voicemail messages and an administrative section to moderate incoming messages.
Creating Public and Admin-Only Routes
To create both public-facing and admin-only pages for this site, I didn’t feel that creating a full-blown user data model made sense. HTTP Basic authentication should provide sufficient protection for the admin operations of this simple site. If you are going to do something more advanced, it might be worth taking a look at the Passport module. But in this tutorial, we’ll use a middleware function built in to Express 3 to protect certain routes in our application with HTTP Basic auth:
Express 3’s HTTP Basic auth middleware accepts a username and password, which we have stored for our app as system environment variables. This particular method of validating a username/password may be inflexible, but you can also supply a callback that can execute custom logic to determine a valid username and password.
To secure an application route with this basic authentication middleware, we supply it as the second argument after the URL when defining a route, as in the following controller functions. Only one of the routes actually serves HTML (/admin), while the others power JSON-only API endpoints that will be used through async HTTP requests from our AngularJS app in the browser. In this instance, we are actually applying two middleware functions – the first ensures that the incoming request was made over HTTPS, and the second checks the HTTP Basic username and password:
Since this example was written, Express 4 has been released to replace Express 3. If you are using Express 4 and following along this blog post, you will quickly notice that the basic auth middleware, and nearly all built-in middleware, were removed from the main Express module. For your current and future HTTP Basic Authentication needs, I recommend the http-auth module on npm. It is a flexible and full-featured module with a middleware function you can use along with Express.
Now that we have secure routes set up for our admin section, let’s take a look at how we render HTML for our web app back to the client.
Rendering HTML with EJS
To render HTML for the user interface in both the admin and home pages, we use the EJS templating engine. There are many templating engines available for Express and Node, but as an old Ruby web app developer set in my ERB ways, EJS and its closer resemblance to plain-old HTML feels more natural to me. EJS is not the default templating engine for Express, however, so we need to configure it using the Express configuration APIs when we create our web app in app.js:
Our user-facing home page template is stored in the “views” directory, and doesn’t actually contain all that much markup:
It uses a special “include” command that pulls in markup from common “partial” files that are also used in the admin page. The markup for the admin page is even more spartan, as we don’t need the nice Joe Mauer portrait or any other window dressing in that interface:
Let’s look at the partial for the section of our pages. Here we’re going to specify the title of our page and pull in the CSS files necessary to style our page:
You’ll notice this is the first page where server-generated data is being inserted into the page using the <%= tag. The two bits of dynamic data being used are the page title, and the base name of a CSS file that will be used to style the page. Those values are provided to the rendering engine when the page is served by Express:
The partial being used to load necessary JavaScript to drive the UI looks like this:
There’s only one file being requested by the browser (though it’s a special file, as we’ll see in a bit), which uses the same base file name that’s used for the page’s CSS.
The guts of the admin and home pages are actually the same – a big, fancy list of messages that will be displayed either to an admin user or a visitor to our public page. This contains a lot of AngularJS specific markup we’ll cover in some depth later. But for now, know that it’s written in such a way that admin functions are only displayed to people logged in with HTTP Basic.
Now that we have secure pages set up, let’s see how we will write the CSS and JavaScript to power them.
JavaScript Awesome-ification with Browserify
When writing reasonably complicated front-end JavaScript code, a module loading system of some kind can be extremely useful to manage dependencies and write cleaner, more maintainable code. RequireJS is a popular module loader for the browser, which can be combined with tools like Yeoman and Bower to manage and load dependencies.
These are great tools, but when using node.js on the back end I really like to write node-style CommonJS modules for the front end as well. By doing so, I can manage my front-end dependencies with npm and package.json like I do already, without incorporating more libraries and tools into my workflow. And because my code is written and structured in the same way for both front and back-end, I find it easier to transition between client and server work. Using the same module system on the front and back-end also enables me to easily share code between client and server, when appropriate (not as often as we probably would like).
The technology which makes this possible is Browserify. Given a single CommonJS JavaScript file as an entry point, it will analyze that module’s dependencies and generate a single JavaScript file which contains your module code as well as any required dependencies. This file can then be served up to a browser and evaluated on a web page (or anywhere else JavaScript runs). Node style modules in the browser — pretty sweet IMHO. Let’s see how we’ve put Browserify to work in this application.
We begin by looking at some actual code we want to load and run in the browser. The JavaScript file that drives the main public-facing page looks like this:
The node-style module loading might feel a bit out of place for client side code at first, but check out all the awesomeness! No self-calling function boilerplate to protect the global scope. Require dependencies using relative paths in your project. Expose public interfaces for modules. All the goodness of CommonJS right in your browser.
Note that Angular (by default) wants your controller constructors to be globally visible, so we assign those to the window object. Other than that, all of our code is self-contained in modules.
To load this code in the browser, we include a single script tag with “/browser/home.js” as the source:
You astute readers might have already noticed that no such file is present in the “public” directory of our project, which contains our other static assets. The browser can’t see any of the other files in our app outside that directory, so how can that file be available in the browser?
We’re actually using Browserify to generate this file on the server with a piece of Express middleware. We generate the file as the result of a web request and then stash the resulting file in memory to serve later. This step happens here in app.js. Basically, any .js URL with the “/browser” prefix will trigger this middleware. The middleware will use Browserify to package a CommonJS module under the “browser” directory in our app project and serve it back to the client. We should note that another very common workflow is to “browserify” on the server first, then serve the resulting file as a static asset. But in our case, this middleware system should do the job.
The bulk of our JavaScript code in this application is based on AngularJS, a client-side MVC framework maintained by Google. Let’s dig into this code a bit and understand how Angular helps us display a list of voicemail and text messages, each one with it’s own individual controls and behavior.
Listing Text Messages and Voicemail with AngularJS
AngularJS is a popular choice for building rich user interfaces in the browser. Angular powers extensions to HTML markup that provide databinding, DOM manipulation, and event handling. As a developer you are then able to write controller objects that are largely decoupled from the DOM, providing a useful separation of concerns.
Angular is a big framework that is maturing and changing rapidly. Learning Angular is very much outside the scope of this post, but if you’re interested in learning more, you might check out the canonical Angular tutorial, advanced tutorials on egghead.io, and another post from my esteemed colleague Carter Rabasa in his epic tutorial series on SMS voting. In this tutorial, we will focus on how we use controllers and a hierarchy of scopes to manage data and state for the application, and the UI directives necessary to display that data to the user.
Angular Controllers, Scopes, and Event Handlers
In an AngularJS application, the data and UI state for your app will be contained in a hierarchy of scope objects. Which tab you have selected, the latest messages you got from the server, the current user’s login name – all of that data will be stored on a scope object.
Every Angular application will have at least one scope object – the root scope. This is a suitable place to store application-wide data and state, like a logged in user. Smaller pieces of your application, driven by a controller object, will also have their own scope objects and associated data.
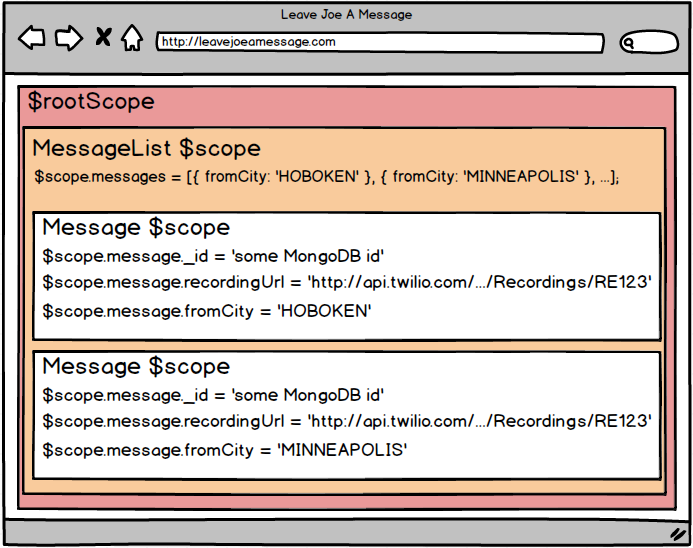
In our app, two Angular controllers do most of the heavy lifting for us. The MessageList controller is responsible for managing the list of messages displayed to the user. The Message controller is responsible for managing user interaction and display for individual messages. On the page, we will have only one MessageList controller, but many Message controllers, one for each of the messages we display. Here’s a rough diagram of the hierarchy of scopes and controllers in our application:
As we saw earlier, we made Angular controller constructor functions available in the global page context by assigning them to the window object. Before diving into our application-specific controllers, let’s look at a generic structure for a CommonJS-style Angular controller:
At a very high level, our constructor initializes our controller’s scope with any necessary data, and provides an interface to modify the current state of the scope.
The MessageList controller maintains state for the list of messages fetched from the server, and filters that list based on input from the user. The Message controller manages state for an individual message in the list, and responds to user input for deleting, favoriting, or playing a message.
One piece of the message controller I would like to call out specifically is the bits which manage playback of recorded voicemail messages. To make sure it works well across browsers, I pulled in the HTML 5 audio library buzz. Buzz allows us to create sound objects with a set of media sources that are supported across all browsers. Here we create a new sound object with media URLs returned by Twilio webhook requests for completed recordings:
By default, there is no file extension associated with the media resource URLs provided to you by Twilio. The default mime type of the file is wav audio, but you can specify other formats by appending the appropriate file extension. In this example, we use both the wav and mp3 formats to cover our bases.
Now that we have our controllers set up, let’s see how we link them with the “view” layer of Angular’s client-side MVC.
UI Directives and Linking Views to Controllers
In Angular, the “View” component in the MVC trinity is HTML, adorned with custom attributes defining data binding, visual appearance, and event handling. These custom attributes are called directives. Entire simple apps can be built using only directives, but usually you’ll need to have more complex logic defined in controllers. To associate a controller with a chunk of the DOM, you can use the “ng-controller” directive:
Doing so will allow you to access data held in that controller’s scope within your UI. It will also allow you to associate interaction events with handler functions in the controller’s scope. To display the list of messages in the MessageList scope, we use the ng-repeat directive to render a container div for each one:
In the same parent tag, you’ll see that a controller is declared for each individual row representing a message. This creates a new Angular controller, with a scope value called “message” defined, for each voicemail/text message in the list. Data for each individual message is displayed using Angular’s templating language, with raw values typically surrounded by double curly braces:
As with any AngularJS application, there’s a lot going on here – but because of Angular’s concept of nested scopes (even within repeated templates for a collection of values), we can very easily create views and controllers for smaller chunks of our application.
So we’ve talked about HTML and JavaScript at great length, but what about the site’s CSS? We won’t cover the precise styles used or much about the site’s responsive design (feel free to browse here), but I did want to call out a key component of this front-end stack – Less CSS.
Less CSS, Somewhat Ironically, Makes CSS *More* Useful
Less CSS is a CSS pre-processor that adds tons of useful features that plain-old CSS lacks. If you’re not already using Less (or Sass or something similar), it’s definitely worth a look. Never copy/cut/paste the same color hex code again!
In this application, we use Less in place of plain CSS to style our pages. Our page’s css is included in the head element:
But as you can see, it’s using the standard CSS extension. Much like our browserified JavaScript source, we have a server-side middleware set up to intercept requests to /styles/*.css and render Less-compiled stylesheets instead. But instead of rolling our own, we use a community-created Less middleware in our app.js here:
This middleware will automatically Less compile any .less files of the same name requested by the browser if they live in the /public/styles directory. Thus we can use our lovely Less stylesheets in the browser, resplendent with imports, mixins, and variables, with very little effort:
Wrapping Up
Building a front end for our web apps can be quite an ordeal, but thankfully the tools have never been better. Rendering dynamic HTML with a template engine like EJS on the server can get the job done initially, but a modern front-end stack will usually call for a little more than server-generated HTML. We saw how we can bring the modularity and dependency management of Node.js to JavaScript code running on the client with Browserify. We explored how we can create a rich front end with powerful data binding using AngularJS. We also briefly worked with Less, which buffs many rough edges off CSS.
By combining this front end with our server-side code from part one, we have a full-featured fan site that creates a personal way for those fans to communicate with their favorite star or brand. In the next part of this series, we’ll go beyond just the marketing use case to show how we can produce human-quality transcriptions of voicemail messages using the transcription APIs of Twilio partner Rev.com.
Thanks for reading, and please feel free to shoot any questions or comments my way right on this page, or on Twitter @kevinwhinnery!

Related Resources
Twilio Docs
From APIs to SDKs to sample apps
API reference documentation, SDKs, helper libraries, quickstarts, and tutorials for your language and platform.
Resource Center
The latest ebooks, industry reports, and webinars
Learn from customer engagement experts to improve your own communication.
Ahoy
Twilio's developer community hub
Best practices, code samples, and inspiration to build communications and digital engagement experiences.