Analyzing Customer Sentiment with Twilio Voice, Functions, and Deepgram AI
Time to read:
April 17, 2024
Written by
Reviewed by
Analyzing Customer Sentiment with Twilio Voice, Functions, and Deepgram AI
Understanding how customers feel about your brand is useful for gaining an edge over your competitors and expanding your business. One effective way to prioritize customer satisfaction is by using an automated sentiment analysis system to capture customer sentiments, identify pain points, and tailor your services to meet their needs effectively.
This article outlines a step-by-step guide to enable customer sentiment analysis in phone calls by integrating Twilio Programmable Voice and AI. You will build a solution that:
- Uses Twilio Programmable Voice to record customer phone calls.
- Leverages Deepgram API to transcribe the voice recordings and analyze the sentiment (positive, negative, or neutral) of call transcripts.
- Stores the call transcripts and sentiment scores in a Google Sheet for further analysis.
Prerequisites
Before you start building, you will need the following:
- A Twilio account. If you don’t have an account, you can sign up for a free account.
- A Deepgram account and an API key. You can create a Deepgram account here .
- A Google account. Create an account if you don’t have one.
Set up a Twilio service
To run this application, you will be using Twilio Functions to write your code. Twilio Functions operates in a serverless environment, eliminating the need for you to set up your own server. Twilio functions also enhance security by ensuring that only Twilio requests can execute your code.
To set up Twilio Functions, navigate to the Functions and assets section on the Twilio Console. Click on Services on the left sidebar of the console, then click on the Create Service button.

Enter a name for your service and click on the Next button. You will be directed to a page where you can edit your newly created Service.
Add Twilio function paths
In the Services page, click on the Add + button at the top of the page. From the dropdown menu that appears, select the Add Function option. This will open up a text box, type /call into the text box and click anywhere outside the box to save the path. This will create a public Twilio function that is accessible on the internet at the /call URL once deployed. Repeat this process by typing /transcribe in the text box to create another function with the path /transcribe.

Add Environment Variables
Under the Settings & More tab, click on Environment Variables and type DEEPGRAM_API_KEY inside the key input field, then paste in your Deepgram API key in the value input field.
If you don’t have a Deepgram API key, create a Deepgram account . After successfully creating an account, you will be directed to the user homepage. Click on the API keys menu on the sidebar to get an API key.

Install required packages
Under the Settings & More tab , click on Dependencies, a new tab for dependencies will open up inside the Services editor. In the module input field, enter @deepgram/sdk, and click on the Add button. Repeat the same process to add google-spreadsheet and google-auth-library as dependencies inside your project.
Set Up Google API
Since this project uses sentiment analysis, saving the output in a data analysis application like Google Sheets would be helpful. That way, further data analysis can happen in any spreadsheet of your choice. Also, the data can be easily exported as a CSV file for use in other applications.
To get started, go to the Google Developers Console and create a new project. Navigate to the API & Services section inside your project.

Click on the +Enable APIS and Services link at the top of the page. You will be directed to a page with a search input. Type “Google Sheets API” in the search input and click on the card that comes up, then click on the Enable button on the page, to enable the Google Sheets API for your project.
Create Google credentials
Go back to the API & Services page and click on the Credentials menu on the sidebar. Click on the + Create credentials link at the top of the page. From the dropdown menu that shows up, select the Service Account option.

Inside the Service account page, enter a name for your service account, and save.

Under the Service Accounts section at the bottom of the page, a new service account email will be generated for you. Click on it, then navigate to the Keys tab on the next page.
Inside the Keys tab, click on the Add Key button and select the Create new key option from the dropdown. Ensure that the JSON option is selected to create a new private key, then click on Create to generate a new JSON file with all your private credentials which will be downloaded to your computer.

Navigate to your Twilio functions page, click on the Add + button, and select the Upload file option. Upload the JSON file you just downloaded from Google. Under the visibility option, select private, then click on the Upload button.
Setting asset visibility to private in Twilio provides better security compared to public assets. Private assets are only accessible within your Twilio account, but public assets can be accessed by anyone with the asset URL.
To rename your newly uploaded asset, click on the three vertical dots icon in front of the new asset to reveal a dropdown menu. Select the Rename option and enter /twilio-sentiment.json as the new name of your asset.

Set up a Google Sheet
Create a new Google Sheet and copy the spreadsheet ID. The spreadsheet ID is the string that comes after /spreadsheet/d inside the Google Sheets URL.
Inside the environment variables in your Twilio functions, add a new variable with the key GOOGLE_SPREADSHEET_ID and enter your spreadsheet ID as the value.

Open the JSON key file you downloaded from Google, and copy the value for the client_email.
Click on the Share button within the spreadsheet and enter the client_email in the input field designated for adding people into the project, then click on Done. This process will give you read-and-write access to the Google Sheet.
Writing the Twilio Functions
The heart of this application lies in two serverless functions: /call and /transcribe.
The /call Function
The /call function serves as the entry point whenever a phone call is made. It uses Twilio's Programmable Voice API to manage the call flow.
To set this function up, navigate to the Twilio functions page and click on /call from the list of functions you previously created. Replace the existing code in the function with the code below and click the Save button.
The /call function begins with creating a new instance of Twilio.twiml.VoiceResponse. This object is essential for building the response Twilio will execute during the call. The say method is then called on the twiml object. This method instructs Twilio to read a message out to the receiver before the recording starts.
The record method then instructs Twilio to start recording the call. Importantly, the record method specifies a recordingStatusCallback URL, pointing to the /transcribe function. This setup ensures that once the recording is complete, control is automatically passed to the /transcribe function for processing.
The /transcribe Function
This function transcribes the recording returned from the /call function and passes it on to the Deepgram API. The result returned from Deepgram API is then saved inside Google Sheets. To get started, replace the code inside the /transcribe function with the code below.
The code starts by initiating Deepgram with the API key stored in the environment variable. Inside the /transcribe function handler, the recordingURL, callSID, and other relevant variables are destructured from the event returned from the /call function. The recordingURL is passed to the Deepgram API to generate a transcription of the audio recording.
Deepgram's Sentiment Analysis feature then analyzes the transcript and assigns sentiment values that range from -1 to 1. A value of -1 represents the most negative sentiment detected in the transcript, while a value of 1 indicates the most positive overall sentiment.
After receiving the transcription and sentiment data, the information is processed and saved to Google Sheets using the handleSaveToGoogleSheet function.
Saving data to Google Sheets
Copy the code below into the /transcribe file, outside the function handler.
In the code above, the fs.readFileSync function reads the JSON file synchronously, and then the parse method converts the raw data back to JSON, to easily obtain the client_email and private_key.
Within the handleSaveToGoogleSheet function, the service account credentials are authenticated using the client_email and private_key from the JSON file. Next, the Google Spreadsheet is loaded using its unique ID, and the first sheet from the document is retrieved. Lastly, the data is written to the Google sheet.
Deploying and Testing your application
To deploy the application for testing, click on the Deploy All button at the bottom of the page to spin up your application.
After a successful deployment, navigate to the Active Numbers section, under the Phone Numbers menu on your Twilio console. Click on your phone number, and scroll to the Voice Configuration section. Under the A call comes in section, change the dropdown selection from Webhook to Function. In the Service section, choose the name of the function service you previously created. For the Environment section, select UI. Then, in the Function Path section, select /call.
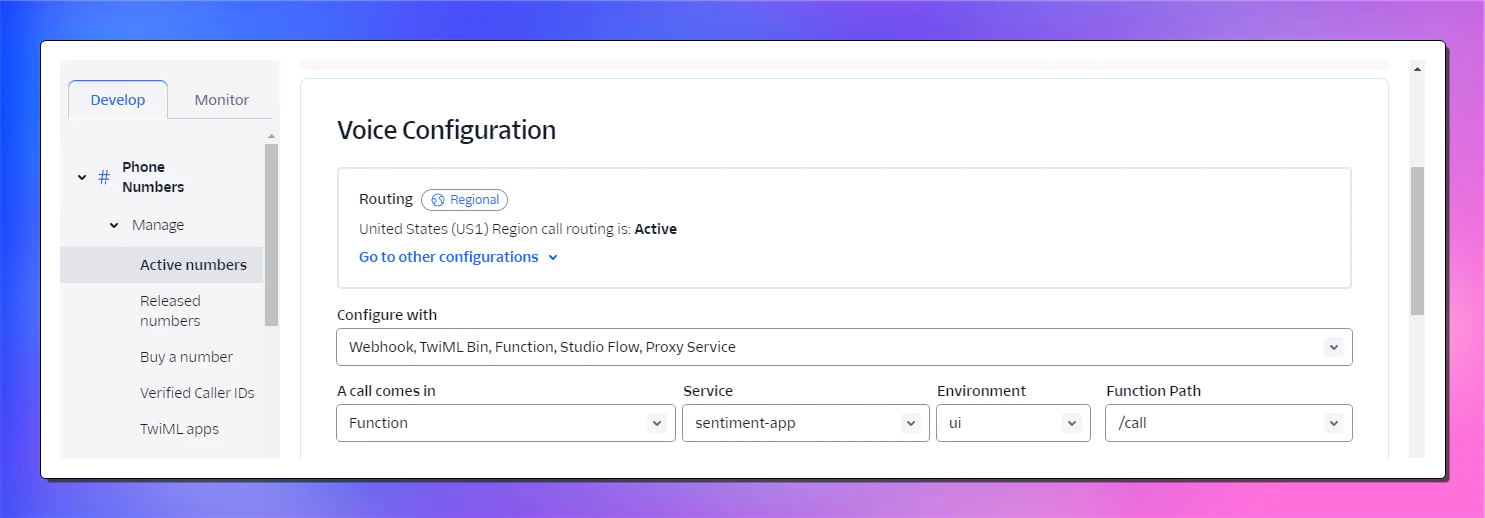
Scroll to the end of the page and click on the Save Configuration button.
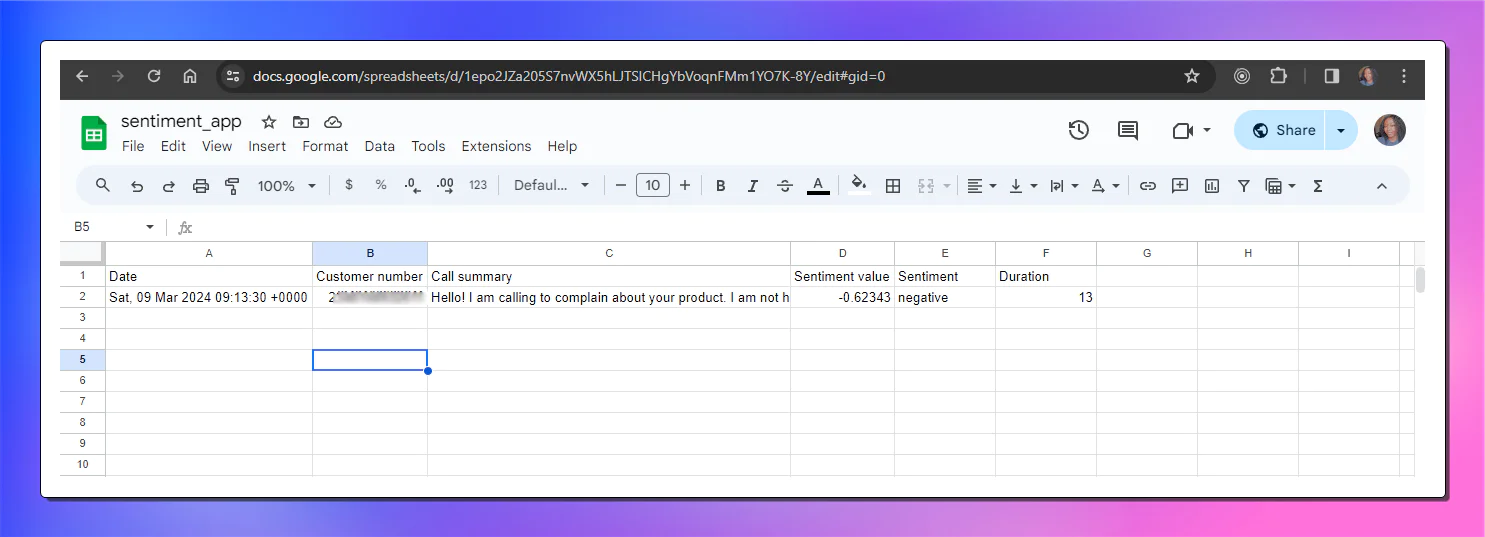
To test the application, make a call to your Twilio number, say a few words and end the call. If everything goes well, if you open up your Google Sheet, your data will show up inside the sheet.
You can extend the functionality of the application to forward your call to a second number by replacing the /call function with the code below:
In the code above, you’ll use the twiml.dial method to forward calls to a secondary phone number. This secondary number can belong to your call center agent. This allows conversations between customers and call center agents to be recorded and transcribed. Ensure to store the FORWARDING_NUMBER in your environmental variables.
Conclusion
In this article, you built an automated sentiment analysis application by integrating Twilio Programmable Voice with Deepgram's AI capabilities. You were walked through setting up Twilio functions, leveraging Deepgram for both speech recognition and sentiment analysis, and saving the output to Google Sheets for further analysis.
The sentiment data in Google Sheets can further be analyzed to identify common complaints and upsell opportunities. Additional enhancements to the application could include integrating automated surveys or adding CRM systems to associate sentiment with customer records. You could also include an alert system that notifies you when the average sentiment in your database is below or above a particular threshold using Twilio Sendgrid or Twilio programmable messaging . Happy coding!
Busayo Samuel is a full-stack MERN developer. She takes pleasure in building applications from scratch. In her leisure time, she can be found engrossed in a mystery novel or binging a sitcom.
Related Resources
Twilio Docs
From APIs to SDKs to sample apps
API reference documentation, SDKs, helper libraries, quickstarts, and tutorials for your language and platform.
Resource Center
The latest ebooks, industry reports, and webinars
Learn from customer engagement experts to improve your own communication.
Ahoy
Twilio's developer community hub
Best practices, code samples, and inspiration to build communications and digital engagement experiences.